Werbung
Verfügbare Sprachen
Verfügbare Sprachen
Quicklinks
Werbung
Kapitel
Fehlerbehebung

Verwandte Anleitungen für laerdal SimJunior


Inhaltszusammenfassung für laerdal SimJunior
- Seite 1 SimJunior Directions for Use www.laerdal.com...
-
Seite 3: Inhaltsverzeichnis
Table of Contents Introduction – Regulatory Information – General Simulator Care – SimJunior Overview Picture – SimJunior Features Simulation Software – Instructor PC – Software License – Laerdal Simulation Home – LLEAP – Voice Conference Application – Patient Monitor – Session Viewer and SimView Server –... -
Seite 4: Introduction
Laerdal in collaboration with the American Academy of Pediatrics. simulation experts so you can take advantage of their experience SimJunior can be used for the education of individuals or teams of and get the most from every learning opportunity. You will find a healthcare professionals from multiple medical disciplines. -
Seite 5: General Simulator Care
– Lubricate the oral and nasal airways with the lubricant provided This being the case, Laerdal does not guarantee that all features are prior to inserting any instrument, tube, or airway device. Also completely accurate. -
Seite 6: Storage And Transportation
The SimJunior Simulator and accessories are heavy when combined – Pressing down too hard on the defibrillation connectors during in the carrying case. Always ensure that SimJunior is firmly secured defibrillation may also cause arcing and pitting. during transportation and storage to prevent personal injury or –... -
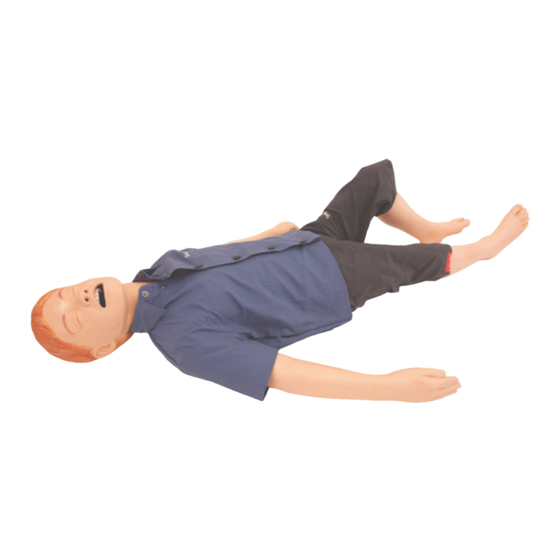
Seite 7: Simjunior Overview Picture
Introduction SimJunior Simulator Right Arm ECG Left Arm ECG Connector Connector Sternum Defib Plate Blood Pressure Apex Defib Plate IV Arm Right Leg ECG Left Leg ECG Connector Connector Power Cable External Air Connection Simulator Cable (60 pin) IO Leg... -
Seite 8: Simjunior Features
With spontaneous breathing, airway control, voice, sounds, ECG, and Prior to using airway devices, lubricate with Laerdal Airway Lubricant. other clinical features, SimJunior is a fully functional pediatric simulator. SimJunior allows observation and recognition of most vital signs, which The following equipment or methods are suitable to secure the enables the instructor to assess the student’s skills based on a realistic... - Seite 9 3-Lead ECG Studs: Sound Settings for SimJunior SimJunior supports multiple sites for auscultation and recognition of heart, lung, and bowel sounds. SimJunior also allows you to set vocal sounds. For more information on setting sounds for SimJunior, see SimPad Directions for Use or LLEAP Help Files.
-
Seite 10: Simulation Software
Laerdal programs related to patient simulation can be found and started. The help files can also be opened from here. Laerdal Simulation Home is located in the Laerdal Medical folder under the SimDesigner Windows start menu (Windows 7). -
Seite 11: Simulator Setup
Simulator Setup Preparing for Simulations After the SimJunior Simulator is prepared and all applicable interactive 2. Open the plug at the heel. devices (SimPad or Instructor PC and Patient Monitor) are configured 3. With a syringe, fill the bone with approximately 240 to 250 cc of and made ready for use, final preparations may need to be performed simulated blood. -
Seite 12: Draining Excess Iv Fluid
During Defibrillation A conventional defibrillator (not included) may be used on the SimJunior. During live defibrillation, the defibrillator and Simulator may present a shock hazard. All standard safety precautions must be taken when using the defibrillator on the Simulator. -
Seite 13: Changing The Pupils
Using an External Compressor The external compressor connects to the clear tube found in the SimJunior is delivered with normal pupils installed in the eyes. A cable bundle exiting the right side of the Simulator. When using an separate kit containing plastic pupil inserts (constricted and dilated) external compressor you can turn off the internal compressor from comes with SimJunior. -
Seite 14: Maintenance
Maintenance Maintenance after each Simulation Session The following preventive measures are required to ensure longevity of the SimJunior Simulator. – Power off the SimPad, Link Box and PCs – Charge batteries if necessary – Flush the IV-arm system and drain the IO leg (leave the plug in the bottom of the IO leg open) –... -
Seite 15: Opening The Torso
Simulator below the chest form. 4. Lift the battery out of the Simulator. Note: DO NOT disconnect the tubes and cables connecting 5. Replace the charged battery or install a new Laerdal the stomach foam to the Simulator. approved SimJunior battery. -
Seite 16: Charging The Simulator Battery
Maintenance Charging the Simulator Battery The Simulator battery charges itself as it is operated. If necessary, the Simulator battery can be charged using an optional external power adapter. 1. Power down the Simulator via the Link Box. 2. Remove the Simulator battery from the Simulator. 3. -
Seite 17: Replacing Simulator Skins
Maintenance Replacing Simulator Skins To attach the new arm: The Simulator skins may need to be replaced if they are torn, perforated, or stained. Torso Skin: To replace the Simulator torso skin, see Opening the Torso. Arm Skin: To replace the Simulator Arm Skin: 1. -
Seite 18: Troubleshooting
(Help is accessible from Laerdal Simulation Home) Problem Laerdal Patient Monitor • No chest rise on Simulator. • See Software Help Files > Laerdal Patient Monitor> Possible Solutions Troubleshooting Guide. (Help is accessible from Laerdal Simulation Home) • Check that power to Simulator is ON. - Seite 19 • If there is no change when adjusting lung compliance, contact Laerdal Technical Service. • If there is no change in lung resistance, contact Laerdal Technical Service. Mechanical Noise during Auscultation In LLEAP click <Auscultation focus>.
- Seite 20 Notes...
-
Seite 21: Overall Dimensions
Mild solution of liquid soap and water Internal battery: 7.4V, 4.4Ah, Lithium-Ion IV Fluids Only use approved SimJunior external power supply and batteries. Only use distilled or deionized water to simulate IV and IO fluids. Air Pressure Internal air tank:... - Seite 22 Notes...
-
Seite 23: Spare Parts And Accessories
Spare Parts and Accessories Spare Parts and Accessories For latest version of Spare Parts and Accessories, visit www.laerdal.com... - Seite 24 Notes...
- Seite 25 Table des matières Introduction – Informations réglementaires – Entretien du simulateur : généralités – Photographie d’ensemble de SimJunior – Caractéristiques du SimJunior Logiciel de simulation – PC du formateur – Licence du logiciel – Laerdal Simulation Home – LLEAP – Voice Conference Application –...
-
Seite 26: Introduction
Le mode d’emploi SimPad fournit des instructions relatives à l’utilisation If this equipment does cause harmful interference to radio or television de la Link Box et du système SimPad avec le simulateur SimJunior. reception, which can be determined by turning the equipment off and on, the user is encouraged to try to correct the interference by one Fichiers d’aide de LLEAP (Laerdal Learning Application) -
Seite 27: Clause De Non-Responsabilité
– S’il est utilisé à des températures supérieures à 40 °C, laissez systématiquement le simulateur refroidir entre deux sessions de La formation de personnel à l’aide de SimJunior doit s’effectuer sous formation. la responsabilité d’un intervenant médical ou technique dûment formé... -
Seite 28: Utilisation Et Entretien De La Batterie
Si les peaux sont déchirées ou ne sont pas attachées Avertissement : correctement – Une fois le simulateur SimJunior et ses accessoires placés dans la – Si les câbles, tubes ou connecteurs internes ou externes sont housse de transport, le poids de l’ensemble est conséquent. Pour endommagés... -
Seite 29: Photographie D'ensemble De Simjunior
Introduction Simulateur SimJunior Connecteur d’ECG Connecteur d’ECG du bras droit du bras gauche Plaque de défib. sternum Bras de tension artérielle Plaque de défib. Bras de perfusion apex Connecteur d’ECG de Connecteur d’ECG la jambe droite de la jambe gauche Câble d’alimentation... -
Seite 30: Caractéristiques Du Simjunior
Mouvement bilatéral de la poitrine avec respiration spontanée Vêtements du SimJunior – Mouvement unilatéral de la poitrine avec intubation bronchique SimJunior est livré avec des vêtements conçus sur mesure et munis de droite pendant les ventilations bandes auto-agrippantes permettant de les enlever plus facilement. –... - Seite 31 Pour plus d’informations sur le réglage des sons de SimJunior, consultez le mode d’emploi de SimPad ou les fichiers d’aide de LLEAP. Pouls et tension artérielle : –...
-
Seite 32: Logiciel De Simulation
à l’écran. Licence du logiciel Session Viewer et SimView Server Le PC du formateur fourni par Laerdal Medical est livré avec une Session Viewer et SimView Server sont des applications qui licence pré-activée installée pour LLEAP. -
Seite 33: Configuration Du Simulateur
Configuration du simulateur Préparation des simulations Une fois le simulateur SimJunior installé et toutes les unités interactives 2. Ouvrez le capuchon situé sur le talon. (SimPad ou PC du formateur et moniteur patient) correctement 3. À l’aide d’une seringue, remplissez l’os avec environ 240 à 250 cc raccordées et configurées, vous devrez peut-être effectuer les... -
Seite 34: Drainage De L'excédent De Liquide Intraveineux
Pendant la défibrillation Calibrage du brassard à tension artérielle dans SimPad Le simulateur SimJunior est compatible avec un défibrillateur 1. Sélectionnez <Calibrage> dans le menu. conventionnel (non fourni). Pendant la défibrillation réelle, le défibrillateur comme le simulateur peuvent présenter un risque de 2. -
Seite 35: Remplacement Des Pupilles
Des pupilles normales sont installées en usine sur le simulateur le faisceau de câbles sortant du côté droit du simulateur. Lorsque SimJunior. Un kit distinct contenant des pupilles de rechange en vous utilisez un compresseur externe, vous pouvez éteindre le plastique (contractées et dilatées) est fourni avec le SimJunior. -
Seite 36: Entretien
Entretien Entretien après chaque session de simulation Les mesures de prévention suivantes doivent impérativement être respectées afin de garantir la longévité du simulateur SimJunior. – Éteignez le système SimPad, la Link Box et les PC. – Rechargez les batteries si nécessaire. -
Seite 37: Ouverture Du Tronc
4. Retirez la batterie du simulateur. 5. Replacez la batterie chargée ou installez une nouvelle Remarque : NE débranchez PAS les tubes et les câbles qui batterie SimJunior agréée par Laerdal. relient la mousse du ventre au simulateur. 6. Raccordez la batterie au simulateur. -
Seite 38: Chargement De La Batterie Du Simulateur
Entretien Chargement de la batterie du simulateur La batterie du simulateur se charge automatiquement en cours d’utilisation. Si nécessaire, il est également possible de la charger à l’aide d’un adaptateur électrique externe (en option). 1. Mettez le simulateur hors tension via la Link Box. 2. -
Seite 39: Remplacement Des Surfaces Cutanées Du Simulateur
Entretien Remplacement des surfaces cutanées du Pour monter le nouveau bras, procédez comme suit : simulateur Les surfaces cutanées du simulateur doivent être remplacées si elles sont déchirées, perforées ou tachées. Peau du torse : Pour remplacer la peau du torse du simulateur, reportez-vous à Ouverture du tronc. -
Seite 40: Guide De Dépannage
• La poitrine du simulateur ne se soulève pas. Laerdal Patient Monitor Solutions possibles • Accédez à Fichiers d’aide du logiciel > Laerdal Patient Monitor > • Vérifiez que le simulateur est sous tension. Guide de dépannage. (L’aide est accessible à partir de Laerdal •... - Seite 41 • Vérifiez qu’aucun obstacle dans les voies respiratoires du simulateur ne bloque l’écoulement de l’air. • Si le réglage de la compliance pulmonaire ne produit aucun effet, contactez le service technique Laerdal. • Si la résistance pulmonaire ne varie pas, contactez le service technique Laerdal.
- Seite 42 Notes...
-
Seite 43: Caractéristiques Techniques
Batterie interne : 7,4 V, 4,4 Ah, lithium-ion – Solution douce d’eau et de savon liquide Liquides intraveineux Sources d’alimentation externes et batteries SimJunior agréées uniquement. Utilisez uniquement de l’eau distillée ou désionisée pour simuler les liquides intraveineux et intra-osseux. Pression d’air Réservoir d’air interne :... - Seite 44 Notes...
-
Seite 45: Accessoires Et Pièces Détachées
Accessoires et pièces détachées Accessoires et pièces detaches Pour obtenir la dernière version des accessoires et pièces detaches disponibles, consultez le site www.laerdal.com... - Seite 46 Notes...
- Seite 47 Inhaltsverzeichnis Einführung – Gesetzliche Anforderungen – Allgemeine Pflegehinweise für den Simulator – SimJunior Übersichtsbild – Merkmale des SimJunior Simulationssoftware – Ausbilder-PC – Softwarelizenz – Laerdal Simulation Home – LLEAP – Voice Conference Application – Patient Monitor – Session Viewer und SimView Server –...
-
Seite 48: Einführung Zum Simjunior™-Simulator
SimPad-Bedienungsanleitung beinhaltet Anweisungen Verwendung der Link Box und von SimPad zusammen mit SimJunior. by turning the equipment off and on, the user is encouraged to try to correct the interference by one or more of the following measures: LLEAP-Hilfedateien (Laerdal Learning Application) •... -
Seite 49: Weltweite Garantie
Halten Sie sich an die folgenden Vorsichtsmaßnahmen, um laerdal.com. Verletzungen oder Schäden am Produkt zu vermeiden: Herkunftsland – SimJunior wird in den USA hergestellt. – Füllen Sie Flüssigkeiten nur auf die in diesem Dokument beschriebene Weise in den Simulator ein. -
Seite 50: Lagerung Und Transport
Transportkoffer untergebracht sind. Stellen – Ein zu starkes Niederdrücken der Defibrillationsanschlüsse während Sie stets sicher, dass der SimJunior während des Transports und der des Defibrillationsvorgangs kann ebenfalls zu Funkensprung und Lagerung sicher verstaut ist, um Verletzungen und Beschädigungen Rostbildung führen. -
Seite 51: Simjunior Übersichtsbild
Einführung SimJunior-Simulator EKG-Anschluss EKG-Anschluss rechter Arm linker Arm Sternum-Defibrillationsplatte Blutdruckarm Apex-Defibrillati - IV-Arm onsplatte EKG-Anschluss EKG-Anschluss rechtes Bein linkes Bein Netzkabel Externe Druckluftverbindung Simulatorkabel (60-Pin) IO-Bein Einfüllöffnung für IO-Bein... -
Seite 52: Merkmale Des Simjunior
Üben von Diagnostik und Behandlung von Patienten. Machen Sie den Atemweg vor Einführen von Materialien zur Mit der spontanen Atemfunktion, Atemwegskontrolle, Stimme, Atemwegssicherung mit dem Laerdal Atemwegsgleitmittel gleitfähig. Geräuschen, EKG und sonstigen klinischen Merkmalen stellt SimJunior ein vollständig funktionsfähiges Pädiatrie-Simulatormodell dar. SimJunior folgenden Möglichkeiten bzw. -
Seite 53: Toneinstellungen Für Simjunior
Injektionsstellen. Versuchen Sie nicht, eine intramuskuläre Injektion vorzunehmen. Toneinstellungen für SimJunior 3-Kanal-EKG-Anschlüsse: SimJunior verfügt über zahlreiche Stellen für die Auskultation und Erkennung von Herz-, Lungen- und Darmgeräuschen. SimJunior ermöglicht auch die Wiedergabe von Stimmgeräuschen. Weitere Informationen über die Toneinstellungen für SimJunior finden Sie in der SimPad-Gebrauchsanleitung oder in den LLEAP-Hilfedateien. -
Seite 54: Simulationssoftware
(z. B. eine neue Festplatte oder Hauptplatine) kann Ihre Lizenz ungültig lokalen Netzwerk verfügbares Debriefing-System auszuwählen. Dies werden. Bitte wenden Sie sich an Ihren örtlichen Laerdal Kundendienst, kann später geändert werden. wenn Sie Hilfe bei der Neuaktivierung Ihrer Lizenz benötigen. -
Seite 55: Simulatoreinrichtung
Simulationssoftware Vorbereiten von Simulationen Nach der Vorbereitung des SimJunior-Simulators und der Konfiguration 2. Öffnen Sie den Stöpsel an der Ferse. und Bereitstellung sämtlicher einsetzbarer interaktiver Geräte (SimPad 3. Füllen Sie den Knochen unter Verwendung einer Injektionsspritze oder Instructor PC und Patientenmonitor) müssen eventuell noch mit ca. -
Seite 56: Ablauf Intravenös Verabreichter Flüssigkeit
Kalibrierung durchzuführen. Während der Defibrillation Kalibrieren der Blutdruckmanschette im SimPad Für SimJunior kann ein konventioneller Defibrillator (nicht mitgeliefert) 1. Wählen Sie im Menü die Option <Kalibrieren>. verwendet werden. Während einer stromführenden Defibrillation besteht das Risiko von Stromschlägen sowohl durch den Simulator als 2. -
Seite 57: Auswechseln Der Pupillen
Verwendung eines externen Kompressors Der externe Kompressor wird an den durchsichtigen Schlauch im SimJunior wird mit normalen Pupillen geliefert, die in die Augen Kabelverbund angeschlossen, der aus der rechten Seite des Simulators eingesetzt sind. Ein zusätzlicher Satz mit Pupilleneinsätzen aus Kunststoff herausragt. -
Seite 58: Wartung
Wartung Wartung nach jeder Simulationssitzung Folgende Präventivmaßnahmen sind erfoderlich, um die Langlebigkeit des SimJunior-Simulators zu gewährleisten. – Schalten Sie das SimPad, die Link Box und die PCs aus – Laden Sie gegebenenfalls die Akkus auf – Spülen Sie das IV-Armsystem und lassen Sie das IO-Bein abtropfen (lassen Sie die Stöpselöffnung am unteren Ende des... -
Seite 59: Öffnen Des Torsos
Hinweis: Trennen Sie NICHT die Schläuche und Kabel, die den 5. Setzen Sie den aufgeladenen Akku ein oder Bauchschaumstoff mit dem Simulator verbinden. installieren Sie einen neuen von Laerdal zugelassenen SimJunior-Akku. 5. Bringen Sie die Torsohaut wieder an, indem Sie die Schritte 6. -
Seite 60: Aufladen Des Simulator-Akkus
Wartung Aufladen des Simulator-Akkus Der Simulator-Akku lädt sich während des Betriebs selbst auf. Falls nötig, lässt sich der Akku des Simulators über einen optionalen externen Netzadapter aufladen. 1. Schalten Sie den Simulator über die Link Box aus. 2. Entnehmen Sie den Akku aus dem Simulator. 3. -
Seite 61: Ersetzen Der Simulatorhaut
Wartung Ersetzen der Simulatorhaut Anbringen eines neuen Arms: Die Simulatorhaut muss eventuell ersetzt werden, wenn sie eingerissen, perforiert oder verfärbt ist. Torsohaut: Zum Ersetzen der Torsohaut des Simulators siehe Öffnen des Torsos. Armhaut: Armhaut des Simulators auswechseln: 1. Ziehen Sie die alte Haut des Simulators von oben nach unten über den Arm und die Hand, oder *schneiden Sie die Haut ab. -
Seite 62: Fehlerbehebung
• Der Brustkorb des Simulators hebt sich nicht. Laerdal Patient Monitor Mögliche Lösungen • Siehe die Software-Hilfedateien > Laerdal Patient Monitor > • Überprüfen Sie, ob der Simulator eingeschaltet ist. Fehlerbehebung. (Hilfe über die Laerdal Simulation Home) • Vergewissern Sie sich über das SimPad oder LLEAP, dass –... - Seite 63 Änderung eintritt, wenden Sie sich an den technischen Kundendienst von Laerdal. • Falls keine Änderung beim Lungenwiderstand eintritt, wenden Sie sich an den technischen Kundendienst von Laerdal. Mechanisches Geräusch während der Auskultation Klicken Sie in LLEAP auf <Auskultationsfokus>. Puls (radial und brachial) Problem •...
- Seite 64 Hinweise...
-
Seite 65: Technische Daten
– Eine milde Lösung aus Flüssigseife und Wasser Interner Akku: 7,4 V, 4,4 Ah, Lithium-Ionen IV-Flüssigkeit Verwenden Sie für SimJunior ausschließlich zugelassene externe Verwenden Sie zur Simulation von IV- und IO-Flüssigkeiten ausschließlich Stromquellen und Akkus. destilliertes oder deionisiertes Wasser. Luftdruck Integrierter Lufttank: Max. - Seite 66 Hinweise...
-
Seite 67: Ersatzteile Und Zubehör
Ersatzteile und Zubehör Ersatzteile und Zubehör Eine aktuelle Liste der Ersatzteile und des Zubehörs finden Sie unter www.laerdal.com. - Seite 68 Hinweise...
- Seite 69 Índice Introducción – Información reglamentaria – Cuidado general del simulador – Imagen general de SimJunior – Características de SimJunior Software de simulación – PC del instructor – Licencia del software – Laerdal Simulation Home – LLEAP – Voice Conference Application –...
-
Seite 70: Introducción
Introducción Introducción al simulador SimJunior™ Contenido de SimCenter SimJunior es un simulador de un paciente pediátrico de tamaño real, SimCenter ofrece un acceso sencillo a contenido validado por diseñado por Laerdal en colaboración con la Academia Americana de expertos en simulación de todo el mundo para que pueda Pediatría. -
Seite 71: Exención De Responsabilidad
Exención de responsabilidad Manejo general del simulador El uso del sistema de simulación de pacientes de SimJunior para la Tome las siguientes precauciones para evitar lesiones personales o formación del personal se debe llevar a cabo bajo la supervisión de daños en el producto:... -
Seite 72: Almacenamiento Y Transporte
– La piel está desgarrada o ajustada en forma inadecuada – El simulador SimJunior y sus accesorios son pesados cuando se – Los cables, tubos o conectores externos o internos están los combina en el estuche para transporte. Asegúrese siempre dañados... -
Seite 73: Imagen General De Simjunior
Introducción Simulador SimJunior Conector de ECG para Conector de ECG el brazo derecho para el brazo izquierdo Placa para desfibrilación del esternón Brazo para medir la presión arterial Brazo para tratamiento Placa para intravenoso desfibrilación del apex Conector de ECG... -
Seite 74: Características De Simjunior
Elevación y descenso unilaterales del tórax con intubación del Ropa de SimJunior bronquio principal derecho durante las ventilaciones SimJunior viene con ropa diseñada a medida con aberturas de Velcro – Sonidos unilaterales y bilaterales del pulmón para que se pueda retirar fácilmente. Las instrucciones de lavado se encuentran en la etiqueta de la ropa. - Seite 75 Clavijas de conexión de ECG de 3 derivaciones: SimJunior admite varios sitios para auscultación y reconocimiento de los sonidos del corazón, de los pulmones y de los intestinos. SimJunior también le permite configurar sonidos vocales. Para obtener más información sobre la configuración de sonidos para SimJunior, consulte las instrucciones de uso de SimPad o los archivos de ayuda de LLEAP.
-
Seite 76: Software De Simulación
Esta opción se puede modificar disco duro o una placa madre nuevos) pueden invalidar la licencia. más adelante. Póngase en contacto con la asistencia local de Laerdal, a fin de obtener ayuda para activar nuevamente la licencia. Otras aplicaciones Existen además otros programas que se utilizan junto con las... -
Seite 77: Configuración Del Simulador
Configuración del simulador Cómo prepararse para las simulaciones Después de que el simulador SimJunior esté preparado y todos 2. Abra el tapón en el talón. los dispositivos interactivos correspondientes (SimPad o PC del 3. Con una jeringa, llene el hueso con aproximadamente 240 a instructor y monitor de paciente) estén configurados y listos para su... -
Seite 78: Drenaje Del Exceso De Fluidos Para Tratamiento Intravenoso
Se puede utilizar un desfibrilador convencional (no incluido) en el 1. Seleccione <Calibración> en el menú. SimJunior. Durante la desfibrilación real, el desfibrilador y el simulador 2. Seleccione <Calibrar la PA> en el menú desplegable. pueden presentar un riesgo de descarga. Se deben tomar todas las precauciones de seguridad estándar al utilizar el desfibrilador en el... -
Seite 79: Cambiar Las Pupilas
Uso de un compresor externo El compresor externo se conecta al tubo transparente que se SimJunior se entrega con pupilas normales instaladas en los ojos. encuentra en el grupo de cables que sale del lado derecho del SimJunior incluye un kit separado que contiene pupilas plásticas simulador. -
Seite 80: Mantenimiento
Mantenimiento Mantenimiento después de cada sesión de simulación Se requieren las siguientes medidas preventivas para asegurar la longevidad del simulador SimJunior. – Apague el SimPad, Link Box y PC – De ser necesario, cargue las baterías – Purgue el sistema del brazo para tratamiento intravenoso y drene la pierna para tratamiento intraóseo (deje abierto el tapón en la... -
Seite 81: Cómo Abrir El Torso
5. Vuelva a colocar la batería cargada o instale una nueva espuma del estómago con el simulador. batería de SimJunior aprobada por Laerdal. 6. Conecte la batería al simulador. 5. Vuelva a colocar la piel del torso realizando los pasos 1 a 4 en orden inverso. -
Seite 82: Carga De La Batería Del Simulador
Mantenimiento Carga de la batería del simulador La batería del simulador se carga a sí misma a medida que se opera. De ser necesario, la batería del simulador se puede cargar utilizando un adaptador de alimentación externa opcional. 1. Desconecte el simulador de la alimentación mediante el Link Box. 2. -
Seite 83: Cómo Reemplazar Las Pieles Del Simulador
Mantenimiento Cómo reemplazar las pieles del simulador Para unir el brazo nuevo: Es posible que se necesite reemplazar la piel del simulador si está desgarrada, perforada o manchada. Piel del torso: Para reemplazar la piel del torso del simulador, consulte Cómo abrir el torso. -
Seite 84: Resolución De Problemas
Solución posible • En caso de que se apague el sistema o todos los datos se pierdan o corrompan, comuníquese con su centro de servicio local de Laerdal. • Limpie la parte externa del simulador con toallitas para simulador. Limpie el interior de la cavidad oral con toallitas para simulador. - Seite 85 • Si no se producen cambios al ajustar la distensibilidad pulmonar, póngase en contacto con el servicio técnico de Laerdal. • Si no se producen cambios en la resistencia pulmonar, póngase en contacto con el servicio técnico de Laerdal.
- Seite 86 Notas...
-
Seite 87: Especificaciones
7,4 V, 4,4 Ah, iones de litio Líquidos para tratamiento intravenoso Únicamente utilice las baterías y la fuente de alimentación externa de Solo utilice agua destilada o desionizada para simular líquidos para SimJunior aprobadas. tratamiento intravenoso e intraóseo. Presión de aire Tanque de aire interno: Máx. - Seite 88 Notas...
-
Seite 89: Piezas De Repuesto Y Accesorios
Piezas de repuesto y accesorios Piezas de repuesto y accesorios Para obtener la última versión de las piezas de repuesto y accesorios, visite www.laerdal.com... - Seite 90 Notas...
- Seite 91 Sommario Introduzione – Informazioni normative – Cura generale del simulatore – Panoramica di SimJunior – Caratteristiche di SimJunior Software di simulazione – PC dell'istruttore – Licenza del software – Laerdal Simulation Home – LLEAP – Voice Conference Application – Patient Monitor –...
-
Seite 92: Introduzione
Attenersi a tutti i manuali per l'uso e alle etichette dei produttori harmful interference, and (2) this device must accept any interference originali. Le istruzioni per l'uso di SimJunior non sostituiscono in alcun received, including interference that may cause undesired operation. -
Seite 93: Dichiarazione Di Non Responsabilità
Dichiarazione di non responsabilità Uso generale del simulatore Per evitare infortuni alle persone o danni al prodotto, adottare le L'uso del sistema di simulazione del paziente SimJunior per il training precauzioni indicate di seguito. del personale deve essere supervisionato da personale tecnico o medico, con formazione adeguata sui principi didattici e sui protocolli –... -
Seite 94: Conservazione E Trasporto
Il simulatore SimJunior risulta pesante quando inserito insieme Rischi meccanici o elettrici agli accessori nella valigetta da trasporto. Verificare sempre che SimJunior sia saldamente fissato durante il trasporto e quando Non usare il simulatore SimJunior se: viene riposto per evitare lesioni a persone o danni al prodotto. -
Seite 95: Panoramica Di Simjunior
Introduzione Simulatore SimJunior Connettore ECG del Connettore ECG braccio destro del braccio sinistro Piastra per defibrillazione sternale Braccio per la misurazione della pressione sanguigna Piastra per Braccio per EV defibrillazione apicale Connettore ECG Connettore ECG della gamba destra della gamba sinistra... -
Seite 96: Caratteristiche Di Simjunior
Dotato di funzioni di respirazione spontanea, controllo delle vie aeree, lubrificante per vie aeree Laerdal. voce, suoni, ECG e altre funzioni cliniche, SimJunior è un simulatore pediatrico altamente funzionale. SimJunior consente di osservare e I seguenti dispositivi o metodi sono sicuri quando si gestiscono le vie... - Seite 97 Perni ECG a 3 derivazioni SimJunior supporta diverse aree per l'auscultazione e il rilevamento dei toni cardiaci, dei suoni respiratori e dei rumori intestinali. SimJunior consente anche di impostare suoni vocali. Per ulteriori informazioni sull'impostazione dei sogni di SimJunior, fare riferimento alle Istruzioni per l'uso di SimPad o ai file della guida di LLEAP.
-
Seite 98: Software Di Simulazione
Server per il debriefing. Licenza del software In genere, Session Viewer viene eseguito localmente sullo stesso Il PC dell'istruttore viene fornito da Laerdal Medical con una licenza computer utilizzato per LLEAP, mentre SimView Server viene eseguito LLEAP preattivata installata. su un server dedicato sulla rete locale. Durante il primo avvio di LLEAP, viene richiesto di selezionare un sistema di debriefing disponibile, sul Modifiche o aggiornamenti dell'hardware del computer (ad es. -
Seite 99: Preparazione Del Simulatore
Preparazione del simulatore Preparazione alle simulazioni Dopo aver preparato il simulatore SimJunior e configurato tutti i 2. Aprire il tappo situato sul tallone. dispositivi interattivi applicabili (SimPad, PC dell'istruttore o monitor 3. Con una siringa iniettare nelle ossa circa 240-250 cc di paziente) perché... -
Seite 100: Drenaggio Dei Fluidi Per Ev In Eccesso
Durante la defibrillazione 4. Per effettuare la calibrazione seguire le istruzioni visualizzate della procedura guidata Su SimJunior è possibile usare un normale defibrillatore (non incluso). Durante la defibrillazione, il defibrillatore e il simulatore possono Calibratura del bracciale per la misurazione della presentare il pericolo di scosse elettriche. -
Seite 101: Sostituzione Delle Pupille
SimJunior viene fornito con pupille normali inserite negli occhi. Con cavi che escono dal lato destro del simulatore. Quando si utilizza SimJunior viene inoltre fornito un kit separato contenente un set di un compressore esterno è possibile spegnere il compressore interno pupille di plastica (miotiche e midriatiche). -
Seite 102: Manutenzione
Manutenzione Manutenzione dopo ogni sessione di simulazione Le seguenti misure preventive sono necessarie per assicurare una lunga durata del simulatore SimJunior. – Spegnere SimPad, Link Box e PC. – Caricare le batterie, se necessario. – Sciacquare il sistema del braccio per EV e drenare la gamba per infusione intraossea (lasciando aperto il tappo in fondo alla gamba). -
Seite 103: Apertura Del Tronco
4. Rimuovere la batteria dal simulatore. 5. Sostituire con una batteria carica o installare una nuova Nota: NON scollegare tubi e cavi connessi al modulo di batteria per SimJunior approvata da Laerdal. materiale espanso dello stomaco del simulatore. 6. Collegare la batteria al simulatore. -
Seite 104: Ricarica Della Batteria Del Simulatore
Manutenzione Ricarica della batteria del simulatore La batteria del simulatore si ricarica automaticamente durante l'uso. Se necessario, può essere caricata anche usando un adattatore di corrente esterno opzionale. 1. Spegnere il simulatore mediante la Link Box. 2. Rimuovere la batteria dal simulatore. 3. -
Seite 105: Sostituzione Delle Pelli Del Simulatore
Manutenzione Sostituzione delle pelli del simulatore Per attaccare il nuovo braccio, eseguire quanto de- scritto di seguito. Potrebbe essere necessario sostituire porzioni della pelle del simulatore strappate, perforate o macchiate. Pelle del tronco Per sostituire la pelle del tronco del simulatore, consultare la sezione Apertura del tronco. -
Seite 106: Risoluzione Dei Problemi
• Il torace del simulatore non si solleva. Laerdal Patient Monitor Soluzioni possibili • Vedere File della guida per il software > Laerdal Patient Monitor > Guida alla risoluzione dei problemi (la guida è accessibile in • Verificare che il simulatore sia acceso. - Seite 107 • Controllare che non siano presenti ostruzioni nelle vie aeree del simulatore paziente che potrebbero bloccare il flusso d'aria. • Se, dopo aver regolato la complianza polmonare, non si riscontra alcun cambiamento, contattare l'assistenza tecnica Laerdal. • Se non si riscontra alcun cambiamento nella resistenza polmonare, contattare l'assistenza tecnica Laerdal.
- Seite 108 Note...
-
Seite 109: Specifiche
7,4 V, 4,4 Ah, ioni di litio Fluidi per EV Usare esclusivamente batterie e alimentatori esterni approvati per Per simulare fluidi per endovenosa e infusione intraossea, usare solo SimJunior. acqua distillata o deionizzata. Pressione dell'aria Serbatoio interno dell'aria: massimo 6 psi... - Seite 110 Note...
-
Seite 111: Parti Di Ricambio E Accessori
Parti di ricambio e accessori Parti di ricambio e accessori Per le versioni più recenti delle Parti di ricambio e accessori, visitare la pagina Web www.laerdal.com. - Seite 112 Note...
- Seite 113 Sumário Introdução – Informações regulatórias – Cuidados gerais com o simulador – Imagem de visão geral do SimJunior – Recursos do SimJunior Software de simulação – PC do instrutor – Licença de software – Laerdal Simulation Home – LLEAP – Voice Conference Application –...
-
Seite 114: Introdução
American Academy of Pediatrics (Academia Americana de Pediatria). aproveitar sua experiência e tirar o máximo de cada oportunidade O SimJunior pode ser usado para o treinamento de pessoas ou de aprendizagem. Você encontrará uma grande variedade de cenários equipes de profissionais da saúde de várias disciplinas clínicas. -
Seite 115: Isenção De Responsabilidade
Manuseio geral do simulador Isenção de responsabilidade Tome as seguintes precauções para evitar ferimentos ou danos ao O uso do sistema de simulação de paciente SimJunior para treinamento de pessoal deve ser realizado sob a supervisão de uma equipe técnica produto: ou médica adequadamente treinada, com entendimento dos princípios... -
Seite 116: Transporte E Armazenagem
Evite riscos de esmagamento: não use o simulador sem as peles externas Manutenção e uso da bateria – Sempre use baterias aprovadas para alimentar o SimJunior, o Link Box e o SimPad. – Verifique se as baterias estão instaladas corretamente. A inserção ou conexão incorreta das baterias pode causar curto-circuito. -
Seite 117: Imagem De Visão Geral Do Simjunior
Introdução Simulador SimJunior Conector de Conector de ECG para ECG para braço braço direito esquerdo Placa desfib. esterno Braço para pressão arterial Placa desfib. ápice Braço para EV Conector de ECG Conector de para perna direita ECG para perna esquerda Cabo de alimentação... -
Seite 118: Recursos Do Simjunior
Com respiração espontânea, controle das vias aéreas, voz, sons, ECG de vias aéreas da Laerdal. e outros recursos clínicos, o SimJunior é um simulador pediátrico completamente funcional. O SimJunior possibilita a observação Os seguintes equipamentos ou métodos são apropriados para uso e o reconhecimento da maioria dos sinais vitais, fazendo com que nas vias aéreas do simulador:... - Seite 119 O SimJunior também possibilita a configuração de sons vocais. Para obter mais informações sobre como configurar sons para o SimJunior, consulte as Instruções de uso do SimPad ou os arquivos de ajuda do LLEAP. Pressão e pulsos arteriais: –...
-
Seite 120: Software De Simulação
Há outros programas que são usados em conjunto com as sessões de simulação, como, por exemplo, o License Manager, para lidar com as O Laerdal Simulation Home é um aplicativo a partir do qual o LLEAP licenças de programa, e o Simulator Firmware & Network Wizard, para e outros programas da Laerdal relacionados à... -
Seite 121: Configuração Do Simulador
Configuração do simulador Preparação para simulações Após a preparação do simulador SimJunior e a configuração de todos 2. Abra a tampa no calcanhar. os dispositivos interativos aplicáveis (SimPad ou PC do instrutor e 3. Com uma seringa, preencha o osso com aproximadamente monitor do paciente), pode ser necessário fazer preparações finais... -
Seite 122: Drenagem De Excesso De Fluido Ev
Um desfibrilador convencional (não incluído) pode ser usado no calibração. SimJunior. Durante a desfibrilação, o desfibrilador e o simulador podem apresentar risco de choque. Todas as precauções de segurança padrão devem ser adotadas durante o uso do desfibrilador em um simulador. -
Seite 123: Troca De Pupilas
Uso do compressor externo O compressor externo é conectado ao tubo transparente que se O SimJunior é fornecido com pupilas normais instaladas nos olhos. encontra no conjunto de cabos que saem do lado direito do simulador. Um kit separado contendo peças plásticas de pupilas (contraídas Quando um compressor externo for usado, o compressor interno e dilatadas) é... -
Seite 124: Manutenção
Manutenção Manutenção após cada sessão de simulação As seguintes medidas preventivas são necessárias para garantir a longevidade do simulador SimJunior. – Desligue o SimPad, o Link Box e os PCs – Se necessário, carregue as baterias – Limpe o sistema de braço EV e drene a perna IO (deixe o tampão na parte inferior da perna IO aberto) –... -
Seite 125: Abertura Do Torso
4. Retire a bateria do simulador. 5. Recoloque a bateria carregada ou ponha uma nova Nota: NÃO desconecte os cabos e tubos que prendem a bateria do SimJunior aprovada pela Laerdal. espuma do estômago ao simulador. 6. Conecte a bateria ao simulador. -
Seite 126: Carregamento Da Bateria Do Simulador
Manutenção Carregamento da bateria do simulador A bateria do simulador é carregada automaticamente durante a operação. Se necessário, a bateria do simulador pode ser carregada usando-se um adaptador de alimentação externa opcional. 1. Desligue o simulador pelo Link Box. 2. Remova a bateria do simulador. 3. -
Seite 127: Substituição Das Peles Do Simulador
Manutenção Substituição das peles do simulador Para acoplar o novo braço: As peles do simulador podem precisar ser substituídas, se forem rasgadas, perfuradas ou manchadas. Pele do torso: Para substituir a pele do torso do simulador, consulte Abertura do torso. Pele do braço: Para substituir a pele do braço do simulador: 1. -
Seite 128: Solução De Problemas
• O simulador não apresenta elevação torácica. Laerdal Patient Monitor Soluções possíveis • Consulte os Arquivos de ajuda de software > Laerdal Patient Monitor > Guia de solução de problemas. (A ajuda pode ser • Verifique se o simulador está ligado. - Seite 129 • Se não houver alteração quando a complacência pulmonar for ajustada, entre em contato com o Serviço Técnico da Laerdal. • Se não houver alteração na resistência pulmonar, entre em contato com o Serviço Técnico da Laerdal.
- Seite 130 Notas...
-
Seite 131: Especificações
7,4 V, 4,4 Ah, íon-lítio Use somente água destilada ou deionizada para simular os Use somente a fonte de alimentação externa e as baterias aprovadas fluidos EV e IO. do SimJunior Pressão de ar Reservatório de ar interno: Máx. de 6 psi Conexão de ar externa:... - Seite 132 Notas...
-
Seite 133: Acessórios E Peças Sobressalentes
Acessórios e peças sobressalentes Acessórios e peças sobressalentes Para obter a versão mais recente de Peças sobressalentes e acessórios, visite www.laerdal.com. - Seite 134 Notas...
- Seite 135 Inhoudsopgave Inleiding – Informatie over regelgeving – Onderhoud van de simulator – Overzichtsfoto van de SimJunior – Eigenschappen van de SimJunior Simulatiesoftware – Pc van instructeur – Softwarelicentie – Laerdal Simulation Home – LLEAP – Voice Conference Application – Patient Monitor –...
-
Seite 136: Inleiding
De gebruiksaanwijzing voor received, including interference that may cause undesired operation. de SimJunior is niet bedoeld als vervanging van en treedt niet in de plaats van die van de oorspronkelijke fabrikant. This equipment has been tested and found to comply with the limits for a Class B digital device, pursuant to part 15 of the FCC Rules. -
Seite 137: Wereldwijde Garantie
Raadpleeg het garantieboekje van de wereldwijde garantie of ga naar ventilatie www.laerdal.com. – Gebruik de simulator niet als de interne leidingen of bekabeling Land van oorsprong - de SimJunior wordt gefabriceerd in de VS. losgekoppeld zijn – Gebruik de SimJunior simulator in geen geval onder natte Laerdal Medical omstandigheden buitenshuis. -
Seite 138: Opslag En Vervoer
(voor gebruik bij patiënten), om beschadiging aan de huid van de torso te voorkomen. – De SimJunior Simulator en accessoires zijn zwaar als ze allemaal in dezelfde draagtas worden vervoerd. Zorg altijd dat de SimJunior – Ook te hard drukken op de defibrillatieconnectoren tijdens goed is vastgezet tijdens vervoer en opslag om persoonlijk letsel of defibrillatie kan boogvorming of de vorming van putjes veroorzaken. -
Seite 139: Overzichtsfoto Van De Simjunior
Inleiding SimJunior simulator ECG-aansluiting ECG-aansluiting rechterarm linkerarm Defib. plaat sternum Bloeddrukarm Defib. plaat apex IV-arm ECG-aansluiting ECG-aansluiting rechterbeen linkerbeen Stroomkabel Aansluiting externe lucht Simulatorkabel (60-pins) IO-been Vulpoort IO-been... -
Seite 140: Eigenschappen Van De Simjunior
– Bij hoofdbronchusintubatie rechts gaat de borst asymmetrisch op Kleding SimJunior – Eenzijdige en bilaterale longgeluiden De SimJunior wordt geleverd met op maat gemaakte kleding met – Normale en abnormale ademgeluiden klittenbandsluitingen zodat deze eenvoudig verwijderd kan worden. – Variabele ademhalingssnelheid (0-60 ademhalingen per minuut) Wasinstructies zijn aangegeven op het etiket in de kleding. - Seite 141 Geluidsinstellingen voor de SimJunior De SimJunior ondersteunt meerdere plaatsen voor auscultatie en het herkennen van hart-, long, en darmgeluiden. De SimJunior stelt u ook in staat om stemgeluiden in te stellen. Zie de gebruiksaanwijzing voor de SimPad of de LLEAP Help voor meer informatie over het instellen van geluid voor SimJunior.
-
Seite 142: Simulatiesoftware
Softwarelicentie de videobestanden in Session Viewer of SimView Server. De pc van de instructeur wordt door Laerdal Medical verzonden met Session Viewer wordt gewoonlijk uitgevoerd op de computer die een geactiveerde licentie voor LLEAP erop geïnstalleerd. -
Seite 143: Simulatorinstallatie
Simulatorinstallatie Simulaties voorbereiden Nadat de SimJunior-simulator is gereed gemaakt en alle toepasselijke 2. Open de plug bij de hiel. interactieve apparaten (de SimPad of de pc van de instructeur en 3. Vul met een spuit het bot met ongeveer 240 tot 250 ml patiëntmonitor) zijn geconfigureerd en gebruiksklaar zijn, zijn er... -
Seite 144: Draineren Van Overtollige Iv-Vloeistof
1. Kies <Calibrate> (kalibreren) uit het menu. Er kan een conventionele defibrillator (niet inbegrepen) op 2. Kies <Calibrate BP> (bloeddruk kalibreren) uit de de SimJunior worden gebruikt. Tijdens defibrillatie kunnen de vervolgkeuzelijst. defibrillator en de simulator een schok veroorzaken. Alle standaard veiligheidsmaatregelen moeten worden genomen bij gebruik van een 3. -
Seite 145: Vervangen Van De Pupillen
Gebruik van een externe compressor De externe compressor wordt aangesloten op de doorzichtige slang De SimJunior wordt geleverd met normale pupillen in de ogen. Een in de kabelbundel die uit de rechterzij van de simulator komt. Bij het afzonderlijke set met plastic pupil-inzetstukken (vernauwd en verwijd) gebruik van een externe compressor kunt u de interne compressor wordt bij de SimJunior geleverd. -
Seite 146: Onderhoud
Onderhoud Onderhoud na elke simulatiesessie De volgende preventieve maatregelen zijn vereist voor een lange levensduur van de SimJunior simulator. – Schakel de SimPad, Link Box en de pc's uit – Laad zo nodig de accu’s op – Spoel het IV-armsysteem door en laat het IO-been leeglopen (laat de plug onderaan het been open) –... -
Seite 147: Openen Van De Torso
5. Vervang de accu door een opgeladen accu of installeer een Opmerking: Maak de slangen en kabels waarmee het schuim nieuwe, door Laerdal goedgekeurde SimJunior accu. van de maag aan de simulator vastzit NIET los. 6. Sluit de accu aan op de simulator. -
Seite 148: Opladen Van De Accu Van De Simulator
Onderhoud Opladen van de accu van de simulator De accu van de simulator laadt zichzelf op als hij in bedrijf is. Zo nodig kan de accu van de simulator worden opgeladen met een optionele stroomadapter. 1. Schakel de simulator via de Link Box uit. 2. -
Seite 149: Vervangen Van De Huid Van De Simulator
Onderhoud Vervangen van de huid van de simulator Nieuwe arm bevestigen: De huid van de simulator moet wellicht worden vervangen als deze gescheurd, doorboord of gevlekt is. Huid torso: Zie De torso openen om de torsohuid van de simulator te vervangen. Armhuid: Vervangen van de huid van de arm van de simulator: 1. -
Seite 150: Probleemoplossing
Mogelijke oplossing Mogelijke oplossing • Neem contact op met het plaatselijke Laerdal servicecentrum als het systeem automatisch wordt afgesloten of alle gegevens • Reinig de buitenzijde van de simulator met de speciale verloren gaan of niet meer betrouwbaar zijn. -
Seite 151: Mechanisch Geluid Tijdens Auscultatie
• Controleer of er geen obstructies in de luchtwegen van de simulator zitten die de luchtstroom kunnen blokkeren. • Neem contact op met de technische dienst van Laerdal als er geen verandering is bij het instellen van de longcompliance. • Neem contact op met de technische dienst van Laerdal als er geen verandering is in de longweerstand. - Seite 152 Opmerkingen...
-
Seite 153: Specificaties
7,4 V, 4,4 Ah, Lithium-Ion – Milde oplossing van vloeibare zeep en water IV-vloeistoffen Gebruik alleen externe stroomvoorziening en accu's die zijn goedgekeurd voor SimJunior. Gebruik uitsluitend gedestilleerd of gedeïoniseerd water voor het simuleren van IV- en IO-vloeistoffen. Luchtdruk Intern luchtreservoir:... - Seite 154 Opmerkingen...
-
Seite 155: Reserveonderdelen En Accessoires
Reserveonderdelen en accessoires Reserveonderdelen en accessoires Voor de nieuwste versie van Reserveonderdelen en accessoires, gaat u naar www.laerdal.com... - Seite 156 Opmerkingen...
- Seite 157 Spis treści Wstęp – Informacje dotyczące regulacji prawnych – Ogólne zasady konserwacji symulatora – Widok ogólny symulatora SimJunior – Funkcje symulatora SimJunior Oprogramowanie do symulacji – Komputer instruktora – Licencja oprogramowania – Laerdal Simulation Home – LLEAP – Voice Conference Application –...
-
Seite 158: Wstęp
SimJunior. Zapraszamy do odwiedzenia strony www.mysimcenter.com Symulator SimJunior jest dostarczany w postaci w pełni zmontowanej. i sprawdzenia możliwości optymalizacji szkoleń. Nie ma potrzeby montowania części symulatora. Szczegółowe informacje na temat przygotowania symulatora SimJunior do sesji szkoleniowej można znaleźć... -
Seite 159: Ogólne Zasady Konserwacji Symulatora
– nie wolno używać symulatora SimJunior na zewnątrz w wilgotnym podanymi poniżej. otoczeniu, gdyż może się to wiązać z ryzykiem porażenia prądem lub uszkodzenia symulatora, Ogólne zasady konserwacji... -
Seite 160: Przechowywanie I Transport
– Zużyty akumulator można zastąpić wyłącznie akumulatorem – Podczas defibrylacji symulator nie może stykać się z powierzchniami przeznaczonym do użytku wraz z symulatorem Laerdal SimJunior. lub przedmiotami przewodzącymi prąd. – Unikać stosowania w środowisku, w którym znajdują się substancje palne. Na przykład należy unikać defibrylacji w atmosferze bogatej Przechowywanie i transport w czysty tlen. -
Seite 161: Widok Ogólny Symulatora Simjunior
Wstęp Symulator SimJunior Złącze do EKG Złącze do EKG prawego ramienia lewego ramienia Mostkowa płytka do defibrylacji Ramię do pomiaru ciśnienia krwi Koniuszkowa płytka do Ramię z dostępem defibrylacji dożylnym Złącze do EKG Złącze do EKG prawej nogi lewej nogi Przewód zasilacza... -
Seite 162: Funkcje Symulatora Simjunior
Laerdal. Symulator SimJunior jest wyposażony w funkcje symulowania spontanicznej akcji oddechowej, umożliwia ćwiczenie procedur W celu zabezpieczenia drożności dróg oddechowych symulatora udrażniania i utrzymywania drożności dróg oddechowych, emituje można stosować... - Seite 163 Możliwość dostępu do wlewu śródkostnego: – guzowatość piszczeli (prawa noga), – kostka przyśrodkowa. Uwaga: symulator SimJunior nie został wyposażony w punkty do podawania iniekcji domięśniowych. Nie wolno podawać iniekcji domięśniowych. Ustawienia dźwięków symulatora SimJunior Symulator SimJunior można osłuchiwać w różnych miejscach w celu Piny do 3-odprowadzeniowego EKG: monitorowania i wykrywania tonów serca, szmerów płuc, odgłosów...
-
Seite 164: Oprogramowanie Do Symulacji
Session Viewer lub SimView Server Licencja oprogramowania i łączone z plikami wideo w celu przeprowadzenia podsumowania. Komputer instruktora jest wysyłany z firmy Laerdal Medical wraz ze Session Viewer zazwyczaj uruchamiany jest lokalnie na tym samym wstępnie aktywowaną licencją na zainstalowane oprogramowanie LLEAP. -
Seite 165: Konfiguracja Symulatora
Konfiguracja symulatora Przygotowanie do symulacji Po przygotowaniu symulatora SimJunior oraz skonfigurowaniu 2. Otworzyć korek w pięcie. wszystkich jednostek interaktywnych (SimPad komputer 3. Przy użyciu strzykawki napełnić kość płynem symulującym krew instruktora i monitor pacjenta) i przygotowaniu ich do użycia należy w objętości 240–250 ml. -
Seite 166: Odprowadzanie Nadmiaru Płynu Podawanego Dożylnie
3. W podmenu wybrać polecenie <Kalibruj ciśnienie krwi>. 4. Postępować zgodnie z poleceniami kreatora wyświetlanymi na ekranie w celu przeprowadzenia kalibracji. Kalibracja mankietu do pomiaru ciśnienia krwi w SimPad Podczas defibrylacji Wraz z symulatorem SimJunior można stosować standardowy 1. W menu wybrać opcję <Kalibracja>. defibrylator (niedołączony). Podczas przeprowadzania zabiegu 2. -
Seite 167: Wymiana Źrenic
Symulator SimJunior dostarczany jest z normalnymi źrenicami znajdującej się w wiązce przewodów wychodzących po prawej stronie założonymi na gałki oczne. Do zestawu SimJunior dołączono osobny symulatora. W przypadku stosowania zewnętrznej sprężarki można zestaw, w którego skład wchodzą plastikowe wkładki źrenic (zwężone wyłączyć... -
Seite 168: Czynności Konserwacyjne
Czynności konserwacyjne Czynności obsługowe po każdej sesji symulacji W celu zapewnienia jak najdłuższego czasu eksploatacji symulatora SimJunior należy stosować następujące środki obsługi zapobiegawczej: – wyłączyć urządzenia SimPad i LinkBox oraz komputery, – w razie potrzeby naładować akumulatory, – przepłukać układ ramienia dostępem... -
Seite 169: Otwieranie Korpusu
4. Wyjąć akumulator z symulatora. 5. Zainstalować naładowany akumulator lub nowy Uwaga: NIE WOLNO odłączać rurek i przewodów łączących akumulator zatwierdzony przez firmę Laerdal do piankę żołądka z symulatorem. stosowania z symulatorem SimJunior. 6. Podłączyć akumulator do symulatora. -
Seite 170: Ładowanie Akumulatora Symulatora
Czynności konserwacyjne Ładowanie akumulatora symulatora Akumulator symulatora ładuje się samoczynnie podczas pracy. Jeśli zajdzie taka potrzeba, akumulator można naładować przy pomocy dodatkowej ładowarki zewnętrznej. 1. Wyłączyć zasilanie symulatora za pomocą urządzenia Link Box. 2. Wyjąć akumulator z symulatora. 3. Podłączyć odpowiednią ładowarkę zewnętrzną (z przewodem zasilającym spełniającym lokalne wymagania) do dolnej części akumulatora. -
Seite 171: Wymiana Powłok Skórnych Symulatora
Czynności konserwacyjne Wymiana powłok skórnych symulatora Aby podłączyć nowe ramię, należy wykonać następujące czynności: W przypadku rozerwania, przedziurawienia lub poplamienia skóry symulatora należy ją wymienić. Skóra korpusu: Wymiana skóry korpusu symulatora: patrz sekcja „Otwieranie korpusu”. Skóra ramienia: Aby wymienić skórę ramienia symulatora, należy wykonać następujące czynności: 1. -
Seite 172: Rozwiązywanie Problemów
Laerdal Patient Monitor • Upewnić się, że zasilanie symulatora jest włączone. • Przy użyciu urządzenia SimPad lub aplikacji LLEAP sprawdzić, czy • Patrz Pliki pomocy oprogramowania > Laerdal Patient Monitor > – wartość parametru awRR nie jest ustawiona na zero Rozwiązywanie problemów. - Seite 173 • Sprawdzić, czy w drogach oddechowych symulatora nie ma przeszkód blokujących przepływ powietrza. • Jeśli regulacja podatności płuc nie spowoduje żadnej zmiany, należy skontaktować się z serwisem technicznym firmy Laerdal. • Jeśli opór płucny nie zmieni się, należy skontaktować się z serwisem technicznym firmy Laerdal.
- Seite 174 Uwagi...
-
Seite 175: Specyfikacje
łagodny roztwór mydła w płynie i wody. Płyny podawane dożylnie Należy używać wyłącznie akumulatorów i zewnętrznych źródeł zasilania zatwierdzonych do stosowania z symulatorem SimJunior. Należy stosować wyłącznie wodę destylowaną lub zdejonizowaną do symulowania płynów podawanych dożylnie i śródkostnie. Ciśnienie powietrza Wewnętrzny zbiornik powietrza:... - Seite 176 Uwagi...
-
Seite 177: Części Zamienne I Akcesoria
Części zamienne i akcesoria Części zamienne i akcesoria Najnowszą wersję rozdziału „Części zamienne i akcesoria” można znaleźć na stronie www.laerdal.com. - Seite 178 Uwagi...
- Seite 179 目次 はじめに – 規制情報 – シミュレータの一般的なお手入れ – SimJunior 全体写真 – SimJunior の機能 シミュレーションソフトウェア – インストラクター PC – ソフトウェアライセンス – Laerdal Simulation Home – LLEAP – Voice Conference Application – Patient Monitor – Session Viewer および SimView Server – その他のアプリケーション – SimDesigner –...
-
Seite 180: テクニカルサポート
SimPad (DFU) this equipment does cause harmful interference to radio or television SimPad 取扱説明書には、 Link Box と SimPad を SimJunior で使用す reception, which can be determined by turning the equipment off and る手順を解説しています。 on, the user is encouraged to try to correct the interference by one or more of the following measures: ヘルプファイル... -
Seite 181: シミュレータの一般的なお手入れ
はじめに グローバル保証 シミュレータの取扱いについて 怪我または製品への損傷を避けるために、以下に注意してください: レールダルグローバル保証冊子、または www.laerdal.com/jp/ をご 参照ください。 シミュレータに液体を注入する際は、必ず本書の指示に従って – ください。 原産国 - SimJunior は、米国で製造されています。 換気用の各種器具やチューブを挿入する際は、レールダル社 – Laerdal Medical 製潤滑スプレーを口腔および鼻腔気道に塗布してください。 P.O. Box 38 また、使用前に器具およびチューブにも潤滑スプレーを塗布し 226 FM 116 てください。 Gatesville, Texas 76528, USA 人工呼吸などの際に加湿は行わないでください。 – シミュレータの一般的なお手入れ – 内部チューブやケーブルが切れている場合はシミュレータを シミュレータのパフォーマンスを最適に保ち、シミュレータおよび 使用しないでください。 その部品の耐久性を保つために、以下の指示に従ってください。... - Seite 182 – スキンが破れている、あるいはファスナーが適切に閉まっ – 警告: ていない。 SimJunior シミュレータおよびアクセサリは、ある程度重量があり – 内部または外部のケーブル、チューブあるいはコネクタが – ます。輸送中に SimJunior がしっかりと固定されていることを常に 破損している。 確認し、怪我や製品への損傷を防ぐように保管してください。 シミュレータ内またはシミュレータの表面に液漏れがある。 – 空気漏れや機械損傷を示すような異常音がある。 – シミュレータの無反応や異常なにおい/煙などの電気機能 – 障害の兆候がある。 警告: 予期せぬ不具合や怪我を防ぐため、外部スキンを装着せずに – シミュレータを使用しないでください。 バッテリの使用およびメンテナンス SimJunior 、 Link Box 、 SimPad の電源用には純正のバッテリを必 – ず使用してください。 – バッテリは必ず適切に取り付けるようにしてください。バッテリ を誤って挿入したり、接続したりすると、ショートするおそれが あります。...
- Seite 183 はじめに シミュレータ SimJunior ECG コネクタ ECG コネクタ (RA) (LA) 除細動端子 (Sternum) 血圧アーム 除細動端子 IV アーム (Apex) ECG コネクタ ECG コネクタ (RL) (LL) 電源ケーブル 外部空気接続 シミュレータケーブル (60 pin) IO レッグ IO レッグ注水口...
-
Seite 184: Simjunior の機能
はじめに SimJunior シミュレータ 緊急度に応じた複数の手段でシミュレータの換気を行うことがで きます。 SimJunior によりインタラクティブな救命スキルのトレーニングが バッグマスク換気 – 容易になります。また、この製品では、患者対応や診断を効果的に トレーニングするための事前にプログラムされたシナリオを使用 経口気管挿管 – することができ、シミュレータは受講者による介入や、インストラ 経鼻気管挿管 – クターによる制御に反応します。 気道確保用のデバイスを使用する前に、レールダル純正の潤滑ス 自発呼吸、気道管理、声、音、心電図およびその他の臨床的な特徴 プレーを塗布してください。 を持つ SimJunior は、機能を網羅した小児患者シミュレータです。 SimJunior では、ほとんどのバイタルサインを観察し、認識でき、 シミュレータの気道を確保する上で適切なデバイスと方法は以下 インストラクターはリアルな臨床的状況に基づき受講者のスキルを のとおりです: 評価できます。 – ラリンゲルマスク (サイズ #2.5 ) 気管チューブ (サイズ: 4.5 カフ付き、 5.5 カフなし) SimJunior の機能... - Seite 185 前腕部の末梢静脈 除細動端子: 肘前窩および手背 – 骨内 (IO) アクセス: 以下の IO 穿刺のアクセスも可能です: 脛骨粗面 (右) – 内果 – 注: SimJunior には、筋肉注射 (IM) のできる部分はありません。 筋肉注射は実施しないでください。 の音声設定 SimJunior 3 リード ECG : SimJunior は、心音、肺音、腸音の聴診用に、複数の聴診箇所があ ります。また SimJunior では、発声も設定できます。 SimJunior の音声設定に関する詳細は、 SimPad 取扱説明書または LLEAP ヘルプファイルを参照してください。 血圧および脈拍: –...
-
Seite 186: シミュレーションソフトウェア
LLEAP は、オートモードまたはマニュア LLEAP ソフトウエアおよびその他のアプリケーションについての詳 ルモードで操作することができます。プログラム済みのシナリオに 細は、以下の手順でヘルプファイルをご参照ください。 はオートモードを使用しますが、マニュアルモードを使用すると、 1. Windows の < 開始 > < すべてのプログラム > をクリックします。 インストラクターは、シミュレーションセッションを完全に手動で コントロールすることができます。マニュアルモードでシミュレー 2. < Laerdal Simulation Home > を選択します。 ションを実行するには、通常、臨床的に良好なシミュレーションを 3. < ヘルプ > を選択します。 作成するために、ある程度の医学的専門知識が必要です。 ウェブダウンロード Voice Conference Application (VCA) 最新の取扱説明書およびソフトウェアは、 www.laerdal.com/downloads VCA ソフトウェアは、シミュレーション中に使用されるすべての... -
Seite 187: シミュレータのセットアップ
シミュレータのセットアップ シミュレーションの準備 SimJunior シミュレータの準備が整い、関連する周辺機器 (SimPad 2. かかとにあるプラグを開けます。 またはインストラクター PC および患者モニタ) の設定が終わった 3. 注射器を使って、約 240 ~ 250 cc の擬似血液で骨を満たします。 後、シミュレーション実施の前に、幾つか最後の準備を必要とする 場合があります。 4. IV リザーババッグにチューブを接続します。(必要に応じ、 クランプを使って中の圧を調整してください) 最後のシミュレーションの準備には、以下の作業が含まれます。 5. 擬似血液が吸引用に骨内に残るよう、リザーババッグにつな • IO レッグの準備 がるチューブを閉じます。 • IV の接続 6. リザーババッグが一杯になったら注入を停止し、空のバッグと 交換します。 • 余分な IV 液排出の準備... -
Seite 188: 余剰 Iv 液の排出
LLEAP での血圧計カフのキャリブレーション 1. メニューから <ツール> を選択します。 2. ツールメニューから <シミュレータのセットアップ> を選択 します。 3. サブメニューから <血圧計のキャリブレーション> を選択 します。 4. キャリブレーションを実行するには、画面ウイザードの指示 に従います。 除細動の実施時 SimPad での血圧計カフのキャリブレーション SimJunior では、臨床用の除細動器を使用できます。除細動中、除細 動器やシミュレータに触れると感電する危険性があります。シミュ 1. メニューから <キャリブレーション> を選択します。 レータで除細動器を使用する際は、すべての標準的安全措置を講 2. ドロップダウンメニューから <血圧計のキャリブレーション> じてください。 を選択します。 3. キャリブレーションを実行するには、画面ウイザードの指示 注意:除細動中、シミュレータを導電面や導電性の物と接触 に従います。 させないでください。... -
Seite 189: 瞳孔の交換
シミュレータのセットアップ 瞳孔の交換 外部コンプレッサの使用 SimJunior は正常な瞳孔が取り付けられた状態で納品されます。 外部コンプレッサは、シミュレータの右側から出ているケーブルの SimJunior には、交換用のプラスチック製の瞳孔 (散大と収縮) が入 束にある透明なチューブに接続します。外部コンプレッサを使用し った個別キットが同梱されます。 ている場合は、 SimPad または LLEAP の設定で内部コンプレッサを オフにします。 瞳孔を交換するには、以下の手順を実行します。 外部コンプレッサおよび SimJunior に対応するレギュレータの詳細 1. シミュレータのフェイススキンを破かないように注意しながら、 については、最寄のレールダル販売担当者までご連絡ください。 慎重にまぶたを大きく開きます。 2. キットに同梱の吸着カップツールを使って、または爪の先で、 SimPad の内部コンプレッサをオン/オフにする 慎重に目から瞳孔を取り外します。 3. 吸着カップツールを使うか、適正な位置をそっと押して瞳孔を 1. < マニュアルモード > を起動し、テーマを選択し、セッションを 希望のものと交換します。 開始します。... -
Seite 190: メンテナンス
メンテナンス 各シミュレーションセッション後のメンテナンス 以下は、 SimJunior シミュレータを長きにわたって使用できるよう にするために必要な予防策です。 SimPad 、 Link Box および PC の電源を切ります – 必要に応じてバッテリを充電します – IV アームを洗浄し、 IO レッグから液体を抜きます ( IO レッグ – 開口部の下部にプラグを差し込んだまま) – IV アームを使用する各セッション後に、 60% イソプロパノール アルコールまたは 70% エタノールで IV アームを洗い流します 湿った布でスキンを拭きます – 湿った布や衣服を外します – –... -
Seite 191: 上半身を開く - シミュレータのバッテリ交換
– 警告:胴体は左から右へ、スキンのホックをそっと外して開 きます。胴体のスキンは乱暴に引き上げないでください。繋が っているケーブルが損傷する可能性があります。 1. 胴体の左側および両肩にあるスキンホルダーのホックを外します。 2. バッテリ ストラップからバッテリをスライドさせて外 します 2. スキンは胴体の右側へ畳んでおきます。 3. シミュレータ内のバッテリ電源接続部を引き上げます。 3. 除細動コネクタ ケーブルを取り外します。 バッテリ電源接続部のホックを外します。 4. 除細動コネクタ ケーブルは、胸部型枠の下のシミュレータの 右側で取り外さなければなりません。 4. バッテリをシミュレータから外します。 5. 充電済みのバッテリと交換するか、正規品の新品 注:腹部のフォームとシミュレータの間に接続されている チューブやケーブルは外さないでください。 SimJunior バッテリを用意します。 6. バッテリをシミュレータに接続します。 5. ステップ 1 ~ 4 を逆の順序で行い、胴体のスキンを交換します。 7. 上半身のスキンを交換します。... -
Seite 192: シミュレータのバッテリ充電
メンテナンス シミュレータのバッテリ充電 シミュレータのバッテリは、操作中に自動的に充電されます。 シミュレータのバッテリは、必要に応じて、オプションの外部電源 アダプタを使って充電できます。 1. Link Box 経由でシミュレータの電源を切ります。 2. シミュレータからバッテリを取り外します。 3. 外部 AC アダプタをバッテリに接続します。電源コードを コンセントに接続します。 3. 呼吸バルーンに接続されている透明なチューブを外します。 4. 古いバルーンを捨てます。 5. 新しいバルーンを取り付けます。 6. チューブを新しいバルーンに再接続します。 7. 胴体を閉じて、胴体のスキンを元の位置に戻します。 肺の交換 4. バッテリの充電が終了したら、シミュレータ内のバッテリを 交換します。 漏れがある場合、シミュレータの胸腔内にある肺を交換する必要 があります。 呼吸バルーンの交換 呼吸バルーンは、肺の下の中心にある胸部プレートの下端部にあり ます。 1. 上半身スキンを開き、胸部プレートを露出させます。「 上半身 を開く 」を参照してください。 2. -
Seite 193: シミュレータスキンの交換
メンテナンス シミュレータスキンの交換 新しいアームを取り付けるには、以下の手順を実行します。 シミュレータのスキンは、裂けたり、穴があいたり、汚れたりした 際には交換が必要です。 上半身スキン: シミュレータの胴体スキンを交換するには、「 胴体を開ける 」をご 参照ください。 アームのスキン: 以下の手順でアームのスキンを交換します。 1. 古いアームスキンを引っ張って外す、或いはスキンを切ります * 。 警告: * 中のアームに穴をあけたり、切ったりしないようご 注意ください。 1. 腕の軸がスムーズに入るように、肩のねじを十分に緩めておき ます。 2. 古いスキンを廃棄します。 2. 胴体にアームを接続します。 3. 滑りを良くする為、低刺激性の液体洗剤水溶液を新しいアーム スキンの内側に塗布します。 3. 軸が取り付け金具の内部にぴったり重ね、肩の取り付け金具に 腕の軸を慎重に押し込みます。 4. 滑りを良くする為、低刺激性の石鹸水をアームに塗布します。 5. シミュレータの手をスキンの中に差し込みます。 4. 肩のネジを六角レンチで締めます。 6. 手袋をはめるように、指の部分の皮膚を正しくフィットさせます。 7. -
Seite 194: トラブルシューティング
いは破損した場合は、レールダル テクニカルセンターまでお問 ンワイプで口腔内を拭きます。肺バルーンを交換します。 「 メンテナンス - 肺バルーンの交換 」の章をご参照ください。 い合わせください。 胸部の動き LLEAP • ソフトウェアヘルプファイル > LLEAP > トラブルシューティング 問題 ガイドを参照してください (Laerdal Simulation Home からヘルプ • シミュレータの胸部が挙上しない。 にアクセス可能です)。 解決法 レールダル Patient Monitor • シミュレータの電源がオンになっていることを確認します。 • SimPad または LLEAP で以下を確認します。 • ソフトウェアヘルプファイル > レールダル Patient Monitor >... - Seite 195 トラブルシューティング 肺 シミュレータのシャットダウン 問題 問題 • 肺が正しく機能しない • シミュレータの反応がない。 解決法 解決法 • 上半身と胸部プレートを開きます。肺が自由に膨らみ、ケーブ ルが邪魔になっていないか確認します。 1. Link Box の電源をオフにします。 • 肺が適切に接続されており、チューブがねじれていないことを 2. SimPad の電源を一旦オフにする、また LLEAP を使用している 確認します。 場合は、インストラクター PC を一旦終了します。 • 肺が水平に、且つ適切な位置で装着されていることを確認します。 3. すべてを再起動します。 • 肺に割れ目や裂け目があるかどうかを確認します。 • シミュレータ気道内部で空気の流れを遮る原因が無いか確認 これでも状況が改善しない場合は、レールダルテクニカルセンター します。 までご連絡ください。 •...
- Seite 196 注...
- Seite 197 シミュレータ電源 – 70% エタノール 外部電源: 入力電圧 9 VDC 、 1.5 A 低刺激性の液体石鹸および水 – 内部バッテリ: 7.4 V 、 4.4 Ah 、リチウムイオン 用の液体 専用の SimJunior 外部電源およびバッテリのみを使用してください。 IV および IO のシミュレーションには、蒸留水または脱イオン水の みご使用ください。 空気圧 内部空気タンク: 最大 6 psi 外部空気接続: 最大 16 psi 温度制限 使用温度:...
- Seite 198 注...
-
Seite 199: 予備部品とアクセサリ
予備部品とアクセサリ 予備部品とアクセサリ 最新版の消耗品とアクセサリについては、 www.laerdal.com/jp/ をご覧ください... - Seite 200 注...
- Seite 201 目录 介绍 – 监管信息 – 模拟人常规保养 – SimJunior 概览图 – SimJunior 功能 模拟软件 – 导师个人电脑 – 软件许可证 – Laerdal Simulation Home – LLEAP – Voice Conference Application – Patient Monitor – Session Viewer 和 SimView Server – 其他应用程序 – SimDesigner –...
-
Seite 202: 监管信息
These limits are designed to provide reasonable protection against SimPad 使用说明 (DFU) harmful interference in a residential installation. This equipment SimPad 使用说明提供有关 SimJunior 与 Link Box 及 SimPad 使用 generates, uses and can radiate radio frequency energy and, if not 的说明。... -
Seite 203: 模拟人常规保养
介绍 免责声明 模拟人常规处理 采取下列预防措施,以避免造成人身伤害或产品损坏: 利用 SimJunior 病人模拟系统对人员进行的培训应在经适当培 训的技术或医疗人员的监督下进行,而且该等人员还必须了解 – 严格按照本文件中的指示为模拟人注入液体 训练原则和公认的医疗方案。所有模拟人或其他该等培训装置 在解剖特性和生理建模方面,都可能存有相似、不同和不准确 – 在插入任何器械、导管或气道装置前,用所提供的润滑剂 之处。因此,挪度不能保证所有功能都完全准确。 润滑口腔或鼻腔气道。同时,在使用前,润滑这些器械和 导管。 全球保修 – 通气过程中,切勿将潮湿空气引入系统。 请参阅挪度全球保修手册,或访问 www.laerdal.com/cn/。 – 如果模拟人的内部管道和线缆断开,切勿使用。 原产国——SimJunior 由美国制造。 – 切勿在潮湿条件下在户外使用 SimJunior 模拟人,否则可能 会带来电击危险或损坏模拟人。 Laerdal Medical – 在温度超过 35°C 时使用除颤器可能会导致过热。 P.O.Box 38 226 FM 116 警告:切勿在模拟人身上使用自动胸部按压器。... - Seite 204 四肢未附着在躯干上 – 皮肤裂开或没有适当紧固 – 内部或外部线缆、管道或连接器损坏。 – 有液体泄漏到模拟人内部或表面 – 有异常声音提示空气泄漏或机械损坏 – 有迹象表明出现电气故障,例如模拟人无反应或异常气 味或烟雾 警告: – 避免夹痛危险-无外部皮肤时,请勿使用模拟人。 电池使用和维护 – 请务必使用获准用于 SimJunior、Link Box、SimPad 电源的电池。 – 确保正确安装电池。不正确地插入和连接电池可能会造成 短路。 警告: – 根据当地法规弃置电池。 – 外部电池充电器仅可在室内使用。 – 模拟人电池仅应在 0°C 到 40°C 的温度条件下进行充电 – 切勿不当处理、拆卸或尝试修理电池。如果电池有明显 损坏、故障或外表出现渗漏,切勿使用。 – 请格外小心,以避免直接接触电气、灼热或冒烟部件。...
- Seite 205 介绍 SimJunior 模拟系统 右臂心电图连 左臂心电图连 接器 接器 胸骨除颤板 血压手臂 心尖除颤板 静脉注射臂 右腿心电图连 左腿心电图连 接器 接器 胸骨除颤板 外部空气连接 模拟人线缆(60 针) 骨内注射腿 骨内注射腿灌注口...
-
Seite 206: Simjunior 概览图
总尺寸 – 通气过程中,单侧胸部会随右主支插管起伏 长/宽(仅模拟人):120 厘米 x 42.5 厘米 重量(仅模拟人):11.36 公斤 – 单侧和双侧肺部均有肺音 – 正常和异常的呼吸音 SimJunior 衣物 – 呼吸频率可变(每分钟 0-60 次呼吸) SimJunior 配有定制的专用衣物,该衣物采用 Velcro 尼龙搭扣, 便于穿脱。清洗说明请见衣物上的标签。 – 胸前听诊部位(4 个) – 衬衫 左肺和右肺可单独或同时关闭,以形成部分或完全气道梗阻。 – 短裤 SimJunior 模拟人还可与辅助通气装置一同使用。 – 平角短裤 注意:肺部不可与呼气末正压 (PEEP) 阀门一起使用。... - Seite 207 骨内通道 (IO): 可进行骨内输注的通路位于: – 胫骨结节(右) – 内踝 注意:SimJunior 并无肌内 (IM) 注射部位。请勿尝试进行 肌内注射。 SimJunior 声音设置 SimJunior 支持对心音、肺音和肠鸣音进行多部位听诊和识别。 3 导联心电图螺柱: 您还可在 SimJunior 上设置语音。 如需了解更多有关 SimJunior 声音设定的信息,请参见 SimPad 使用 说明或 LLEAP 帮助文件。 血压和脉搏: – 血压由柯氏音听诊手动测量 – 双侧颈动脉脉搏 – 中心脉搏可设置为正常、弱和无 – 桡动脉/肱动脉脉搏可设置为正常、弱和无 – 颈动脉、肱动脉、桡动脉脉搏可与 ECG 同步...
-
Seite 208: 模拟软件
其他应用程序 Laerdal Simulation Home 还有其他与模拟训练环节同时使用的程序,例如用于处理程序 许可证的 License Manager 以及用于更新模拟人固件或排除网络 Laerdal Simulation Home 是一个应用程序,可在其中找到并开始 问题故障的 Simulator Firmware & Network Fixer。 LLEAP 和其他与病人模拟有关的挪度程序。也可以从这里打开 帮助文件。Laerdal Simulation Home 位于 Windows 开始菜单下 的挪度医疗文件夹中 (Windows 7)。 SimDesigner SimDesigner 是用于设置您自己的预编程病例的应用程序。该程 模拟训练环节中所使用的软件可分为以下几种主要应用程序: 序也可用于分析并打印出病例的图示。 – LLEAP (Laerdal Learning Application) 必须安装... -
Seite 209: 模拟人设定
模拟人设定 模拟准备工作 2. 打开脚后跟的塞子。 准备好 SimJunior 模拟人及设置好所有适用的交互式设备 (SimPad 或导师个人电脑和病人监护仪),并做好备用准 3. 使用注射器在骨内灌注约 240 至 250 cc 模拟血液。 备后,在 SimJunior 准备运行模拟之前,可能需要执行最终 4. 连接已连接至静脉储存袋的管道。(视乎需要使用辊夹打开 准备工作。 或关闭该管线,以减轻压力累积。) 最终模拟准备包括以下活动: 5. 封堵流入储存袋的管道,以使模拟血液保留在骨内供抽吸。 • 准备骨内注射腿 6. 储存袋注满后,停止输注,并用空袋子替换。 • 注射静注液体 • 排干多余的静注液体 • 清洗静脉注射臂 • 连接除颤适配器板 • 连接血压袖带... -
Seite 210: 排干多余的静注液体
冲洗静脉注射臂,以清洁静脉注射臂。 安装除颤适配器板 模拟人躯干上配有两个螺柱连接器,以供除颤器电缆使用。 在尝试除颤之前,您必须旋松并取下除颤器螺栓。 注意:模拟人的血压扬声器位于左肘前窝处(下图画圈 区域)。桡动脉和肱动脉脉搏位于矩形区域。 模拟人配备两个除颤适配器板。将带电的除颤器与除颤垫一起使 用之前,必须安装好除颤适配器板。将垫板牢固地旋紧到位。 校准 LLEAP 中的血压袖带 1. 从菜单中选择 <工具>。 2. 从工具菜单中选择 <模拟人设定>。 3. 从子菜单中选择 <校准血压>。 4. 遵照屏幕上的向导指示执行校准。 校准 SimPad 中的血压袖带 1. 从菜单中选择 <校准>。 除颤期间 2. 从下拉菜单中选择 <校准血压>。 可在 SimJunior 上应用传统除颤器(未包含在本产品中)。在现 3. 遵照屏幕上的向导指示执行校准。 场除颤过程中,除颤器和模拟人可能造成电击危险。在模拟人 上使用除颤器时,必须遵照所有标准的安全注意事项。 注意:除颤过程中,模拟人不可接触到导电表面或物体。... -
Seite 211: 更换瞳孔
模拟人设定 更换瞳孔 使用外部压缩机 外部压缩机连接至位于模拟人右边的线缆束出口处的干净管子。 SimJunior 配有已经安装在眼内的正常瞳孔。SimJunior 配有含 使用外部压缩机时,您可以从 SimPad 或 LLEAP 关闭外部压缩机。 塑料瞳孔插入物(缩小和散大)的单独套件。 如需了解有关外部压缩机和调整器面板与 SimJunior 的兼容性的 若要更换瞳孔: 更多信息,请联系您当地的挪度代表。 1. 小心地掰开眼睑,注意不要撕破模拟人的脸部皮肤。 打开或关闭 SimPad 中的内部压缩机 2. 使用与套件一起提供的吸杯工具或用您的指甲边缘,小心 地从眼内取出瞳孔。 1. 开始 <手动模式>,选择一个主题并开始训练环节。 3. 使用吸杯工具或通过轻轻按压到位,将瞳孔更换成所需的 2. 从底部菜单中选择 <其他>。 插入物。 3. 从子菜单中选择 <压缩机>。 4. 在对话框中进行所需更改并点击确定。... -
Seite 212: 每次模拟训练环节之后的维护
维护 每次模拟培训环节之后的维护 为确保 SimJunior 模拟人的使用寿命,需采取以下预防措施。 – 断开 SimPad、接线盒及个人电脑的电源 – 必要时为电池充电 – 冲洗静脉注射臂系统并让骨内注射腿变干(让骨内注射腿底 部的塞子保持打开) – 每次在使用了静脉注射臂的训练环节之后,都使用 60% 的 异丙醇或 70% 的乙醇来冲洗静脉注射臂 – 用一块湿布来擦拭皮肤 – 拿开湿布或亚麻品 – 用湿布或外用酒精擦掉胶带残留物 – 根据模拟人的使用情况,更换已损耗或损坏的模块。 – 更换有可见损坏的电缆或连接器 – 应请合格人士定期进行保养 如下情况总是需要进行维修: – 当液体溢出到模拟人内部或表面时 – 在灰尘满布的环境中使用之后 注意:有关备件的信息,请参见下列部分:备件和配件。 存放或运输之前 –... -
Seite 213: 打开躯干
– 更换模拟人电池 – 更换鼓胸气囊和肺部气囊 – 更换躯干皮肤 – 进行一般性检查 警告:从左到右打开躯干,轻轻解开皮肤。切勿用力拉扯 以扯起躯干皮肤,这样可能会损坏胸部线缆。 解开躯干左侧和双肩的躯干皮肤固定器。 2. 将电池滑出电池极片。 2. 将躯干皮肤折叠至右侧。 3. 断开除颤连接器线缆。 3. 从模拟人内部拔起电池电源连接。解开电池电源 连接。 4. 模拟人右侧胸部模型下的除颤连接器线缆必须断开。 注意:切勿断开将腹部泡沫连接至模拟人的管道和 4. 从模拟人内取出电池。 电缆。 5. 换上已充电的电池或安装一块经挪度核准的新 SimJunior 电池。 5. 按相反的顺序执行第 1 至 4 步,将躯干皮肤恢复原状。 6. 将电池连接至模拟人。 7. 更换躯干皮肤。... -
Seite 214: 模拟人电池充电
维护 模拟人电池充电 模拟人电池在运行时即自行充电。如必要,模拟人电池可使用 选配外部电源适配器进行充电。 1. 通过接线盒关闭模拟人的电源。 2. 从模拟人上取下模拟人电池。 3. 将一个经核准的外部电池充电器(带有符合当地规格的电 源线)连接至模拟人电池底部。将电池充电器的电源插头插 入壁装电源插座上。 3. 断开连接至鼓胸气囊上的透明管。 4. 丢弃旧的气囊。 5. 插入新的气囊。 6. 将管道重新连接至新气囊。 7. 关闭躯干,然后更换躯干皮肤。 4. 当电池完成充电时,请更换模拟人内的电池。 更换肺部气囊 如果出现漏气现象,则应更换肺部气囊(位于胸腔内)。 更换鼓胸气囊 鼓胸气囊位于胸板较低的一端,肺部下面的中心位置。 1. 打开躯干皮肤,露出胸板。参见 打开躯干 。 2. 断开连接至肺部气囊上的透明管,然后取下肺部气囊。 如需更多详细信息,请参见 更换肺部气囊 。 1. 打开躯干皮肤。 2. 断开连接至肺部气囊各侧下面的透明管。请参阅 更换鼓胸 气囊... -
Seite 215: 更换模拟人皮肤
维护 更换模拟人皮肤 如需安装新手臂: 如果模拟人皮肤撕裂、穿孔或弄脏,则可能需要更换。 躯干皮肤: 如需更换模拟人躯干皮肤,请参见 打开躯干 。 手臂皮肤: 如需更换模拟人手臂皮肤: 1. 通过将旧皮肤从手臂和手上扒下或*剪开皮肤,移除旧的模 拟人手臂皮肤。 警告:*请勿刺破或剪开心轴臂。 2. 丢弃旧皮肤。 1. 确保肩部螺钉足够松,以令臂轴可以轻松滑到位。 3. 用温和的洗涤剂加水,润滑新手臂皮肤的内面。 2. 将手臂连接至躯干上的相应连接点。 4. 用温和的皂液加水润滑(或涂抹)心轴。 3. 仔细将臂轴推送进肩部支架,以使臂轴与支架内部齐平。 5. 将模拟人的手部滑入皮肤中。 4. 用内六角扳手紧固肩膀螺丝。 6. 让手指覆上皮肤(像戴手套一样)。 更换骨内注射右腿 7. 将皮肤上拉,使其覆盖手臂心轴。 如需拆卸右小腿: 1. 确保腿部的所有液体均已排干。 2. 旋松将骨内注射腿固定到大腿上的螺钉,取下旧的腿骨。 3. -
Seite 216: 故障排除
• 如果系统关闭或所有数据都丢失或损坏;请联系您当地的 • 使用模拟人湿巾清洗模拟人的外面。使用模拟人湿巾清洗口 挪度服务中心。 腔内部。更换肺部气囊,请参阅下列部分: 维护——更换 肺部气囊 。 LLEAP 胸部运动 • 参见软件帮助文件 > LLEAP > 故障排除指南。(可从 Laerdal Simulation Home 中访问帮助) 问题 挪度 Patient Monitor • 模拟人的胸部不再上下起伏。 可能的解决方案 • 参见软件帮助文件 > 挪度 Patient Monitor > 故障排除指南。 (可从 Laerdal Simulation Home 中访问帮助)... - Seite 217 故障排除 • 检查肺部气囊是否有裂纹或裂缝。 • 确定模拟人的气道中没有可能阻塞气流的阻碍物。 • 如果在调整肺顺应性时无变化,请联系挪度技术服务部。 • 如果肺部阻力没有变化,请联系挪度技术服务部。 听诊过程中的机械噪音 在 LLEAP 中,点击 <听诊集中>。 脉搏(桡动脉和肱动脉脉搏) 问题 • 摸不到脉搏 可能的解决方案 • 脉搏装置上的皮肤可能过紧——重新调整皮肤,再重启。 • 确保将收缩压设置为至少 60。 • 确保已打开压缩机。 注意:如果血压设为 60 以下,则周围脉搏可能消失。 模拟人关机 问题 • 模拟人无响应。 解决方案 1. 断开 Link Box 电源。 2. 关闭 SimPad,如果您正在使用 LLEAP,则关闭导师个人电脑 的电源。...
- Seite 218 注释...
- Seite 219 – 浓度为 60% 的异丙醇酒精 模拟人电源 – 浓度为 70% 的乙醇 输入电压 9VDC、1.5A – 液体皂和水的温和溶液 外部电源: 内部电池: 7.4V、4.4Ah、锂离子 静注液体 请仅使用经核准的 SimJunior 外部电源和电池。 请仅使用蒸馏或去离子水模拟静脉注射液体和骨内注射 液体。 气压 内部气槽: 最大 6 psi 最大 16 psi 外部空气连接: 温度限制 +4ºC 到 40ºC 操作温度: -15ºC 到 50ºC 存放温度:...
- Seite 220 注释...
-
Seite 221: 备件和配件
备件和配件 备件和配件 如需获得备件和配件的最新版本,请访问 www.laerdal.com/cn/... - Seite 222 注释...
- Seite 223 목차 개요 – 규제 정보 – 일반적인 시뮬레이터 관리 – SimJunior 개관도 – SimJunior 기능 시뮬레이션 소프트웨어 – 강사 PC – 소프트웨어 라이선스 – Laerdal Simulation Home – LLEAP – Voice Conference Application – Patient Monitor – Session Viewer 및 SimView Server –...
-
Seite 224: 규제 정보
Pediatrics)와 함께 설계한 실제 크기의 사실적인 소아 환자 쉽게 액세스할 수 있으므로 그들의 경험을 활용하여 모든 학습 시뮬레이터입니다. SimJunior는 여러 의료 분야의 전문가 개인이나 기회를 최대한 활용할 수 있습니다. SimJunior를 위해 특별히 개발된 팀을 교육하기 위해 사용됩니다. 다양한 시나리오를 찾을 수 있습니다. www.mysimcenter.com을... -
Seite 225: 일반적인 시뮬레이터 관리
개요 책임의 제한 일반적인 시뮬레이터 취급 의료진 훈련을 위한 SimJunior 환자 시뮬레이션 시스템의 사용은 아래의 예방책을 준수해 신체적 상해 또는 제품 손상을 방지 하십시오: 적합한 사용자 교육을 받고, 교육적 원칙은 물론 적정한 의료 프로토콜에 대해 이해를 하고 있는 기술자 또는 의료인이... - Seite 226 – 고장의 위험을 방지하십시오. 외부 피부 없이 시뮬레이터를 사용하지 마십시오. 배터리 사용 및 유지 – SimJunior, Link Box 및 SimPad에 전원을 공급하려면 승인 받은 배터리만을 사용하십시오. – 배터리를 올바르게 설치하십시오. 배터리를 올바르지 않게 설치하면 회로가 합선될 수 있습니다. 경고 사항: –...
-
Seite 227: Simjunior 개관도
개요 SimJunior 시뮬레이터 ECG ( 우측 팔 ) ECG(좌측 팔) 커넥터 커넥터 Sternum 제세동 판 혈압 측정용 팔 Apex 제세동 판 정맥로 확보용 팔 ECG(우측 다리) ECG(좌측 다리) 커넥터 커넥터 전원 케이블 외부 공기 연결 시뮬레이터 케이블(60핀) IO 다리 IO 다리 포트... -
Seite 228: Simjunior 기능
사전 프로그래밍과 입증된 환자 시나리오를 기반으로 한 자동 – 폐 개방 또는 폐쇄 시뮬레이션 제어 호흡 기능 SimPad 또는 LLEAP(PC)의 시나리오를 이용하여 시뮬레이션을 자체적으로 실행할 수 있습니다. 환자 증상의 발현은 사전에 SimJunior는 가시적인 흉부 상승과 하강 및 다양한 호흡수와 함께 프로그래밍되어 있으며 교육생의 개입에 따라 자동으로... - Seite 229 참고: SimJunior에는 근육(IM) 주사 부위가 없습니다. IM 주사를 시도하지 마십시오. SimJunior에 대한 사운드 설정 3-lead ECG 스터드: SimJunior는 심음, 폐음, 장음의 청진 및 인지하는 데 필요한 여러 부위를 지원합니다. SimJunior는 음성 설정도 가능합니다. SimJunior 사운드 설정에 관한 자세한 내용은 SimPad 사용설명서 또는 LLEAP 도움말 파일을 참조하십시오.
-
Seite 230: 시뮬레이션 소프트웨어
예를 들어 License Manager는 프로그램 라이선스를 처리하며 Laerdal Simulation Home은 LLEAP 및 환자 시뮬레이션과 Simulator Firmware & Network Fixer는 시뮬레이터의 펌웨어를 관련된 기타 Laerdal 프로그램을 찾고 시작할 수 있는 응용 업데이트하거나 네트워크 문제를 해결합니다. 프로그램입니다. 도움말 파일도 여기에서 열 수 있습니다. Laerdal Simulation Home은... -
Seite 231: 시뮬레이터 설정
모든 인터랙티브 장치(SimPad 또는 강사 PC 및 환자 모니터)가 설치 3. 주사기를 사용해 뼈에 약 240cc 내지 250cc의 인조 혈액을 완료되어 사용 준비가 완료된 후 SimJunior가 시뮬레이션을 채웁니다. 구동하기 전 최종 준비를 수행할 필요가 있습니다. 4. IV 저장용 백에 연결된 튜브를 부착합니다. (롤러 클램프를... -
Seite 232: Iv 수액 배출
2. 드롭다운 메뉴에서 <BP 보정>을 선택합니다. 제세동 시행중 3. 스크린 마법사 지시를 따라 보정을 수행합니다. 일반적 제세동기(불포함 사항)를 SimJunior에 사용할 수 있습니다. 전류를 통한 제세동시에는 제세동기와 시뮬레이터에 감전 위험이 있을 수도 있습니다. 시뮬레이터에 제세동기를 사용할 때는 모든 표준 안전 수칙을 준수해야 합니다. -
Seite 233: 동공 교체
묶음에 있는 투명 튜브에 연결합니다. 외부 컴프레서를 사용할 때 개별 키트가 SimJunior와 함께 제공됩니다. SimPad나 LLEAP에서 내부 컴프레서를 끌 수 있습니다. SimJunior와 호환되는 외부 컴프레서 및 제어 장치 패널에 대한 동공 교체 방법: 보다 자세한 정보는 현지 Laerdal 대리점에 연락하시기 바랍니다. -
Seite 234: 유지 관리
유지 관리 각 시뮬레이션 세션 후 유지 관리 다음 예방 조치들은 SimJunior 시뮬레이터의 오랜 수명을 보장하기 위해 필요합니다. – SimPad, Link Box 및 PC의 전원을 끕니다. – 필요한 경우 배터리를 충전합니다. – IV 팔 시스템을 세척하고 IO 다리의 액체를 빼냅니다 (IO 다리... -
Seite 235: 상반신 열기
당깁니다. 배터리 전원 연결을 떼어냅니다. 4. 제세동 커넥터 케이블은 흉부 폼 아래의 시뮬레이터 오른쪽에서 분리해야 합니다. 4. 배터리를 들어 시뮬레이터에서 꺼냅니다. 5. 충전이 완료된 배터리로 교체하거나 Laerdal이 참고: 위장관 스폰지를 시뮬레이터에 연결하는 튜브와 승인한 새로운 SimJunior 배터리를 설치합니다. 케이블을 분리하지 마십시오. -
Seite 236: 시뮬레이터 배터리 충전
유지 관리 시뮬레이터 배터리 충전 시뮬레이터 배터리는 작동을 하며 자가 충전합니다. 필요한 경우, 시뮬레이터 배터리는 선택 사양인 외부 전원 어댑터를 사용해 충전할 수 있습니다. 1. Link Box를 통해 시뮬레이터의 전원을 끕니다. 2. 시뮬레이터 배터리를 시뮬레이터에서 꺼냅니다. 3. (현지 규격에 부합하는 전원 코드가 있는) 승인된 외부 배터리... -
Seite 237: 시뮬레이터 피부 교체
유지 관리 시뮬레이터 피부 교체 새로운 팔을 부착하는 방법: 시뮬레이터 피부는 찢어지거나 구멍이 나거나 얼룩이 묻으면 교체해야 할 수 있습니다. 상반신 피부: 시뮬레이터 상반신 피부를 교체하려면 상반신 열기 단원을 참조하십시오. 팔 피부: 시뮬레이터 팔 피부를 교체하는 방법: 1. 낡은 시뮬레이터 팔 피부를 팔과 손에서 분리시키거나 피부를... -
Seite 238: 문제 해결
문제 Laerdal Patient Monitor • 시뮬레이터에서 흉부가 상승되지 않습니다. 가능한 해결책 • 소프트웨어 도움말 파일 > Laerdal Patient Monitor > 문제 해결 가이드를 참조하십시오. (도움말은 Laerdal Simulation • 시뮬레이터를 연결하는 전원이 켜져 있는지 점검합니다. Home에서 액세스 가능) • SimPad 또는 LLEAP에서 다음을 확인합니다. - Seite 239 점검합니다. • 폐 주머니에 흠집이나 찢어진 부분이 있는지 점검합니다. • 시뮬레이터 기도 안에 기류를 막을 수 있는 장애물이 없는지 확인합니다. • 폐 순응도를 조절해도 변화가 없으면 Laerdal 기술 서비스에 문의하십시오. • 폐 저항에 변화가 없으면 Laerdal 기술 서비스에 문의하십시오. 청진 시 기계적 소음...
- Seite 240 참고...
- Seite 241 중성세제와 물 입력 전압 9VDC, 1.5A 외부 전원: 7.4V, 4.4Ah, 리튬 이온 내부 배터리: IV 수액 승인 받은 SimJunior 외부 전원 장치 및 배터리만을 사용하십시오. IV 및 IO 수액을 투여시에는 증류수 또는 탈염수만 사용하여 시뮬레이션하십시오. 공기압 최대 6psi 내부 공기 탱크: 최대...
- Seite 242 참고...
-
Seite 243: 예비 부품 및 부속품
예비 부품 및 부속품 예비 부품 및 부속품 예비 부품 및 부속품의 최신 버전은 다음을 방문하십시오. www.laerdal.com/kr/... - Seite 244 참고...
- Seite 248 © 2015 Laerdal Medical AS. All rights reserved. Manufacturer: Laerdal Medical Corporation P.O. Box 38, 226 FM 116, Gatesville, Texas 76528 USA T: +1 (254) 865-7221 Distributed in EU by Laerdal Medical AS P.O. Box 377, Tanke Svilandsgate 30, 4002 Stavanger, Norway...