Herunterladen Inhalt Inhalt Diese Seite drucken
Inhaltsverzeichnis

Werbung

Verfügbare Sprachen
  • DE

Verfügbare Sprachen

  • DEUTSCH, seite 43
TRI-SCALER Aqua
GACD_280514_Livret TriscalerAqua_V17Bis.indd 1
MODE D'EMPLOI
INSTRUCTION FOR USE
MANUAL DE USUARIO
INSTRUÇÕES DE UTILIZAÇÃO
BENUTZERHANDBUCH
INSTRUZIONI PER L'USO
fr
en
es
pt
de
it
31/07/2014 08:44

Werbung

Inhaltsverzeichnis
loading

Inhaltszusammenfassung für CFPM TRI-SCALER Aqua

  • Seite 1 TRI-SCALER Aqua MODE D’EMPLOI INSTRUCTION FOR USE MANUAL DE USUARIO INSTRUÇÕES DE UTILIZAÇÃO BENUTZERHANDBUCH INSTRUZIONI PER L’USO GACD_280514_Livret TriscalerAqua_V17Bis.indd 1 31/07/2014 08:44...
  • Seite 2 GACD_280514_Livret TriscalerAqua_V17Bis.indd 2 31/07/2014 08:44...
  • Seite 3: Inhaltsverzeichnis

    TRI-SCALER Aqua SOMMAIRE 1. INSTALLATION ET COMPOSANTS DE L’ÉQUIPEMENT 1. Instructions 2. Composants 3. Principales spécifications techniques 4. Installation des composants principaux 2. INSTALLATION ET MODE D’EMPLOI 1. Fonction détartrage (G) et fonction parodontie (P) 2. Fonction endodontique (E) 3. Fonction irrigation par le réservoir 3.
  • Seite 4: Installation Et Composants De L'équipement

    1. INSTALLATION ET COMPOSANTS DE L’ÉQUIPEMENT 1. Instructions TRI-SCALER Aqua est utilisé pour le détartrage des dents. C’est aussi un équipement indispensable dans la prévention et le traitement des maladies parodontales. Le nouveau détrarteur à ultrasons TRI-SCALER Aqua possède des fonctions pour le détartrage, la parodontie et l’endodontie.
  • Seite 5: Installation Des Composants Principaux

    4. Installation des composants principaux • Description avant et arrière du bloc principal Réservoir avec indicateur Indicateur de puissance niveau d’eau Fonction endodontie Fonction parodontie Fonction détartrage Indicateur du mode sec Indicateur d’eau Bouton d’augmentation par le réservoir de puissance Mode alimentation d’eau Bouton du débit d’eau Bouton choix de fonction...
  • Seite 6 • Plan d’installation du réservoir d’eau Joint du réservoir d’eau Interface du réservoir d’eau fig 4 • Plan de raccordement de la pièce à main détachable Embout Joint Pièce à main Connecteur de câble Cordon de connexion fig 5 GACD_280514_Livret TriscalerAqua_V17Bis.indd 6 31/07/2014 08:44...
  • Seite 7: Installation Et Mode D'emploi

    • Illustration de l’installation des inserts et du mandrin endodontique à l’aide des clés Visser Clé dynamométrique Insert Pièce à main Clé endodontique Mandrin Lime endodontique Visser Visser fig 6 2. INSTALLATION ET MODE D’EMPLOI 1. Fonction détartrage (G) et fonction parodontie (P) 1.1 Opération •...
  • Seite 8: Fonction Endodontique (E)

    Remarque : 1. Ne retirez pas la pièce à main quand vous appuyez sur la pédale et lorsque la machine produit des vibrations ultrasoniques. 2. Ne pas utiliser le mode à sec sauf en cas d’absolue nécessité lors du traitement. Ne pas laisser la machine fonctionner en mode à sec durant trop longtemps.
  • Seite 9: Stérilisation Et Entretien

    3. STÉRILISATION ET ENTRETIEN 1. Stérilisation de la pièce à main • Options de température et pression en autoclave : jusqu’à 135°C/2,2 bar (0,22 MPa). • Sortir la pièce à main et dévisser l’insert ou le mandrin endodontique après chaque opération. Sécher le liquide de nettoyage qui se trouve dans la pièce à...
  • Seite 10: Problèmes Rencontrés

    4. PROBLÈMES RENCONTRÉS Procéder avec précaution quand cet appareil est utilisé chez des patients cardiaques, des femmes enceintes ou des enfants. PANNE CAUSE POSSIBLE SOLUTIONS Le cordon d’alimentation n’est pas sous tension. Brancher la prise correctement. L’insert ne vibre pas et l’eau ne s’écoule pas quand vous appuyez sur La pédale de contrôle n’est pas branchée.
  • Seite 11: Précautions

    5. PRÉCAUTIONS 1. Remarques à prendre en compte lors de l’utilisation de l’appareil 1. Maintenir l’appareil propre avant et après chaque utilisation. 2. Les inserts, la pièce à main et la clé doivent impérativement être stérilisés avant chaque utilisation. 3. Ne pas visser ou dévisser les inserts lorsque l’on a le pied sur la pédale de contrôle. 4.
  • Seite 12: Légende Des Symboles

    7. LÉGENDE DES SYMBOLES Classe II Lire la notice avant utilisation Ne pas utiliser en extérieur Equipement de type BF Peut passer en autoclave Courant alternatif Bloc d’alimentation 24V AC Prise de la pédale Produit homologué FDA Réglage du débit d’eau Produit homologué...
  • Seite 13 TRI-SCALER Aqua TABLE OF CONTENTS 1. INSTALLATION AND COMPONENTS OF EQUIPMENT 1. Instructions 2. Components 3. The main technical specifications 4. Installation of the main components 2. INSTALLATION AND INSTRUCTIONS FOR USE 1. Scaling function (G) and periodontal function (P) 2.
  • Seite 14: Installation And Components Of Equipment

    1. Instructions TRI-SCALER Aqua is used for the scaling of teeth. It is also an indispensable aid for the prevention and treatment of periodontal disease. The new product TRI-SCALER Aqua has scaling, periodontal, and endodontic functions. It has a tank of solution inte- grated with the follow features: •...
  • Seite 15: Installation Of The Main Components

    4. Installation of the main components • The front and back sketch map of the main unit Water bottle Power indicator Endodontic function Periodontal function Scaling function Dry mode indicator Water indicator Increasing power switch Mode of water supply Water control knob Options switch fig 1 Decreasing power switch...
  • Seite 16 • Sketch map for water bottle installation Joint of water bottle Interface of water bottle fig 4 • Sketch map for connection of detachable handpiece Nozzle Seal Handpiece The connector of cable Cable fig 5 GACD_280514_Livret TriscalerAqua_V17Bis.indd 4 31/07/2014 08:44...
  • Seite 17: Installation And Instructions For Use

    • Sketch map for how to install tip and endochuck with wrench Screw on Torque wrench Handpiece Endochuck Endo wrench File Screw on Screw on fig 6 2. INSTALLATION AND INSTRUCTIONS FOR USE 1. Scaling function (G) and periodontal function (P) 1.1 Operation •...
  • Seite 18: Endodontic Function (E)

    Notice: 1. Don’t pull out the handpiece when the foot switch is stepped on and the machine is producing ultrasonic vibration. 2. Do not use dry mode unless absolutely necessary during treatment. Do not let the machine operate in dry mode for too long. The tooth may be damaged if the handpiece and / or insert overheat during treatment.
  • Seite 19: Sterilization And Maintenance

    Water entrance Please add water Air hole fig 7 fig 8 Water level lower limit 3. STERILIZATION AND MAINTENANCE 1. Sterilization of detachable handpiece • Temperature options and pressure in autoclave : up to 135°C/2,2 bar (0,22 MPa). • Pull out the handpiece and unscrew the scaling tip or endochuck after each operation. •...
  • Seite 20: Troubleshooting And Notes

    4. TROUBLE SHOOTING AND NOTES FAULT POSSIBLE CAUSE SOLUTIONS The power plug is loose. Insert the plug securely in the socket. The scaling tip doesn’t vibrate and there is no water flowing out when The foot switch connection is loose. Insert the foot switch to its socket tightly.
  • Seite 21: Precautions

    - The maintenance, repair and modification are made by the manufacturer or the authorized dealer. - The changed components are original of “CFPM” and are operated according to instruction manual. 16. The internal screw thread of the scaling tips produced by some manufacturers may be coarse, rusty or collapsed.
  • Seite 22: Symbol Instruction

    7. SYMBOL INSTRUCTION Class II equipment Caution, consult accompanying documents Use indoor only Type BF applied part Can be autoclaved Alternating current 24V AC power supply socket Socket for the tooth switch FDA marked product Adjustment for the water flow CE marked product Temperature limitation Atmospheric pressure...
  • Seite 23 TRI-SCALER Aqua ÍNDICE 1. INSTALACIÓN Y COMPONENTES DEL EQUIPO 1. Instrucciones 2. Componentes 3. Principales especificaciones técnicas 4. Instalación de los componentes principales 2. INSTALACIÓN Y MANUAL DE USUARIO 1. Función de eliminación de sarro (G) y función de periodoncia (P) 2.
  • Seite 24: Instalación Y Componentes Del Equipo

    1. INSTALACIÓN Y COMPONENTES DEL EQUIPO 1. Instrucciones TRI-SCALER Aqua se utiliza para la limpieza de los dientes. También es un equipo indispensable en la prevención y el tratamiento de enfermedades periodontales. El nuevo producto TRI-SCALER Aqua presenta funciones para la eliminación de sarro, la periodoncia y la endodoncia.
  • Seite 25: Instalación De Los Componentes Principales

    4. Instalación de los componentes principales • Dibujos frontal y trasero de la unidad principal Tanque de agua Indicador de potencia Función Endodoncia Función Periodoncia Función Eliminación de sarro Indicador de modo seco Irrigación de agua Botón aumento por tanque de potencia Modo de abastecimiento Botón de control...
  • Seite 26 • Diagrama para la instalación del depósito de agua Acoplamiento del depósito de agua Interface del depósito de agua fig 4 • Dibujo de la conexión de la pieza de mano separable Boquilla Sellado Pieza de mano Conector para cable Cable fig 5 GACD_280514_Livret TriscalerAqua_V17Bis.indd 4...
  • Seite 27: Instalación Y Manual De Usuario

    • Dibujo de instalación de insertos y mandril con llaves Atornillar Llave dinamométrica LLave Inserto Pieza de mano Llave para endodoncia Mandril para Lima endodoncia Atornillar Atornillar fig 6 2. INSTALACIÓN Y MANUAL DE USARIO 1. Función de eliminación de sarro (G) y función de periodoncia (P) 1.1 Operación •...
  • Seite 28: Función Endodoncia (E)

    Nota: 1. No extraer la pieza de mano cuando el pedal de control se encuentre pisado y la máquina esté produciendo vibración ultrasónica. 2. No utilizar el modo seco, a menos que sea absolutamente necesario durante el tratamiento. No deje que la máquina funcione en modo seco durante mucho tiempo.
  • Seite 29: Esterilización Y Mantenimiento

    Entrada de agua Añadir agua Orificio de aereación fig 7 fig 8 Nivel de agua inferior 3. ESTERILIZACIÓN Y MANTENIMIENTO 1. Esterilización de la pieza de mano separable • Opciones de temperatura y presión en autoclave: hasta 135°C/2,2 bar (0,22 MPa). •...
  • Seite 30 4. PROBLEMAS ENCONTRADOS FALLO POSIBLE CAUSA SOLUCIONES El cable de alimentación no está enchufado. Enchufar la toma correctamente. El inserto no vibra y no existe flujo El pedal de control no está conectado. Insertar el pedal firmemente en su conector. de agua al pisar el pedal de control.
  • Seite 31: Precauciones

    5. PRECAUCIONES 1. Tener en cuenta cuando se utilice el equipo 1. Mantener el aparato limpio antes y después de cada utilización. 2. Es imprescindible esterilizar los insertos, la llave y la pieza manual antes de cada utilización. 3. No enroscar o desenroscar los insertos cuando se tiene el pie sobre el pedal de control. 4.
  • Seite 32: Símbolos De Instrucciones

    7. SÍMBOLOS DE INSTRUCCIONES Clase II Leer el manual antes de utilizar Equipo de tipo BF No utilizar en el exterior Corriente alterna Se puede esterilizar en autoclave Enchufe del pedal 24V AC de suministro de corriente alterna de control Producto con homologación FDA Ajuste del débito de agua Producto con homologación CE...
  • Seite 33 TRI-SCALER Aqua ÍNDICE 1. INSTALAÇÃO E COMPONENTES DO APARELHO 1. Instruções 2. Componentes 3. Especificações técnicas principais 4. Instalação dos componentes principais 2. INSTALAÇÃO E INSTRUÇÕES DE UTILIZAÇÃO 1. Função de destartarização (G) e função periodontal (P) 2. Função endodôntica (E) 3.
  • Seite 34 1. INSTALAÇÃO E COMPONENTES DO APARELHO 1. Instruções TRI-SCALER Aqua é utilizado para a destartarização dos dentes. É também um equipamento indispensável na prevenção e no tratamento de doenças periodontais. O novo destartarizador piezoelétrico de ultrassons TRI-SCALER Aqua tem funções de destartarização, de tratamento periodontal e de endodontia.
  • Seite 35: Instalação Dos Componentes Principais

    4. Instalação dos componentes principais • Esquema da parte frontal e traseira da unidade principal Depósito com indicador do Indicador de potência nível de água Função endodontia Função periodontia Função destartarização Indicador de modo seco Indicador de água pelo Botão de aumento de depósito potência Modo de fornecimento de água...
  • Seite 36 • Esquema para a instalação do tanque de água Junta do depósito de água Interface do depósito de água fig 4 • Esquema para a ligação da peça de mão removível Ponta Junta Peça de mão Conector do cabo Cabo fig 5 GACD_280514_Livret TriscalerAqua_V17Bis.indd 4 31/07/2014 08:44...
  • Seite 37: Instalação E Instruções De Utilização

    • Esquema para instalação de insertos e do mandril de endodontia com chaves Aparafusar Chave dinamométrica Inserto Peça de mão Chave de Endodontia Mandril de Lima Endodontia Aparafusar Aparafusar fig 6 2. INSTALAÇÃO E INSTRUÇÕES DE UTILIZAÇÃO 1. Função de destartarização (G) e função periodontal (P) 1.1 Operação •...
  • Seite 38: Função Endodôntica (E)

    Aviso: 1. Não retirar a peça de mão enquanto estiver a carregar no pedal e o aparelho produzir vibrações de ultrassons. 2. Não usar o modo seco a menos que seja absolutamente necessário durante o tratamento. Não deixar a máquina trabalhar em modo seco muito tempo.
  • Seite 39: Esterilização E Manutenção

    Entrada de água Encher com água Orifício do ar fig 7 fig 8 Limite mínimo do nível de água 3. ESTERILIZAÇÃO E MANUTENÇÃO 1. Esterilização da peça de mão • Temperatura e pressão em autoclave: até135°C/2,2 bar (0,22 MPa). • Retirar a peça de mão e desapertar o inserto ou o mandril de endodontia depois de cada utilização. Antes da esterilização, secar o líquido que se encontra no interior da peça de mão com ar comprimido.
  • Seite 40: Resolução De Problemas

    4. RESOLUÇÃO DE PROBLEMAS PROBLEMA CAUSA POSSÍVEL SOLUÇÕES O cabo de alimentação não está ligado. Ligar a toma corretamente. O inserto não vibra e a água não flui quando se pressiona o pedal de O pedal de controlo não está ligado. Inserir firmemente o pedal no seu conector.
  • Seite 41: Precauções

    5. PRECAUÇÕES 1. Advertências relativas à utilização do equipamento 1. Manter o aparelho limpo antes e depois de cada utilização. 2. Os insertos, a chave e a peça de mão devem imperativamente ser esterilizados antes de cada utilização. 3. Não enroscar nem desenroscar os insertos enquanto estiver a pisar o pedal de controlo. 4.
  • Seite 42: Significado Dos Símbolos

    7. SIGNIFICADO DOS SÍMBOLOS Classe II Ler a nota antes de utilização Peça aplicada tipo BF Não utilizar no exterior Corrente alterna Autoclavável Tomada para o pedal 24 AC alimentação Produto com a marca FDA Regulação do caudal de água Produto com a marca CE Limitação de temperatura Pressão atmosférica para...
  • Seite 43 TRI-SCALER Aqua INHALTSVERZEICHNIS 1. INSTALLATION UND KOMPONENTEN DES GERÄTS 1.Hinweise 2. Komponenten 3. Technische Hauptdaten 4. Installation der Hauptkomponenten 2. BEDIENUNG UND EINRICHTUNG 1. Zahnsteinentfernungs-Funktion und Parodontal-Behandlung Funktion (P) 2. Endodontie-Funktion (E) 3. Funktion Automatische Wasserzufuhr 3. STERILISIERUNG UND WARTUNG 1.
  • Seite 44: Installation Und Komponenten Des Geräts

    1. INSTALLATION UND KOMPONENTEN DES GERÄTS 1. Hinweise Der neue TRI-SCALER Aqua wird hautsächlich für die Zahnreinigung genutzt und gehört zu der unverzichtbaren Ausstattung bei der Zahnvorsorge und –behandlung. Der neue TRI-SCALER Aqua verfügt über die Funktionen Scalen, Parodontal-Behandlung, Endodontologie-Behandlung und automatische Wasserzufuhr.
  • Seite 45: Installation Der Hauptkomponenten

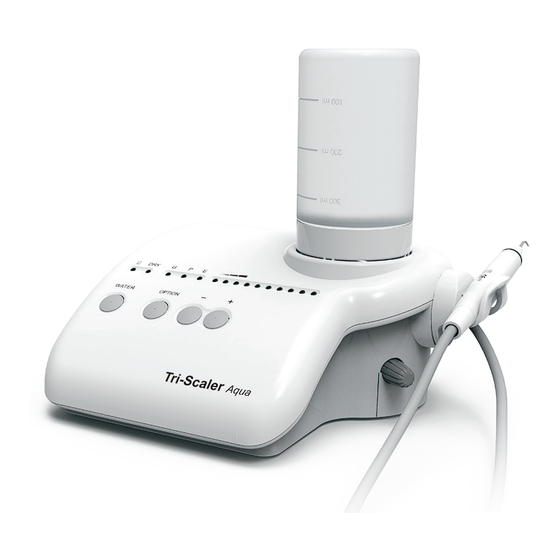
    4. Installation der Hauptkomponenten • Darstellung der Vorderseite und der Rückseite der Haupteinheit Wasserflasche Stromanzeige Endodontische Funktionen Parodontale Funktion Zahnsteinentfernungs- Funktion Anzeige des Trockenzustandes Schalter zur Funktionswahl Variation der Leistung Wasserzufuhr-Modus Wasserreglerknopf Auswahlschalter fig 1 Variation der Leistung Buchse für das Stromanschlusska bel Anschluss Fußpedal Pumpabdeckung...
  • Seite 46 • Skizze der Wasserflascheninstallation Dichtung Wasserflasche Anschluss Wasserflasche fig 4 • Darstellung der Anschlüsse des abnehmbaren Handstücks Nozzle Dichtung Handstück Kabel- Steckverbinder Kabel fig 5 GACD_280514_Livret TriscalerAqua_V17Bis.indd 4 31/07/2014 08:45...
  • Seite 47: Bedienung Und Einrichtung

    • Darstellung der Befestigung der Spitze und des Endodontie-Spannfutters mit dem Drehmomentschlüssel Anschrauben Drehmoment-Schlüssel Spitze Handstück Endodontie-Schlüssel Endodontie- Feile Spannfutter Anschrauben Anschrauben fig 6 2. BEDIENUNG UND EINRICHTUNG 1. Zahnsteinentfernungs-Funktion (G) und Parodontal-Behandlung Funktion (P) 1.1 Bedienung • Packliste vorhanden sind. •...
  • Seite 48: Anleitung Für Die Wichtigsten Komponenten Des Abnehmbaren Handstücks (Siehe Abb. 5)

    • Schrauben Sie den Aufsatz ab und nehmen Sie das Handstück heraus. Sterilisieren Sie dann die Spitze und das Handstück. Hinweis: 1. Ziehen Sie das Handstück nicht heraus, wenn das Fußpedal betätigt ist und das Gerät Ultraschall-Vibrationen erzeugt. 2. Trockenbetrieb nur bei zwingender Notwendigkeit während der Behandlung anzuwenden. Halten Sie das Gerät nicht zu lange unter dieser Bedingung in Betrieb.
  • Seite 49: Sterilisierung Und Wartung

    Wasserzulauf Fügen Sie Wasser hinzu Luftloch fig 7 fig 8 Wasserstandsuntergrenze 3. STERILISIERUNG UND WARTUNG 1. Autoklavieren bei Hochdruck und hoher Temperatur • Temperatur und Druck: bis zu 135°C/2,2 bar (0,22 MPa). • Nehmen Sie das Handstück heraus und schrauben Sie den Aufsatz und das Endodontie-Spannfutter nach jeder Behandlung ab.
  • Seite 50: Fehlerbehebung Und Hinweise

    4. FEHLERBEHEBUNG UND HINWEISE PROBLEM MÖGLICHE URSACHE BEHEBUNG Stromkabel ist nicht angeschlossen. Stecker richtig in die Steckdose stecken. Der Aufsatz vibriert nicht und bei Schließen Sie das Fußpedal fest an die Steuerpedal ist nicht angeschlossen. Betätigung des Fußpedals gibt es Anschlussbuchse.
  • Seite 51: Vorsichtshinweise

    5. VORSICHTSHINWEISE 1. Hinweise zur Benutzung des Geräts 1. Vor und nach jedem Gebrauch muss das Gerät gesäubert werden. 2. Aufsätze, Schlüssel und Handteil sind vor jedem Gebrauch zu sterilisieren. 3. Aufsätze nicht an-oder abschrauben, solange der Fuß auf dem Steuerpedal steht. 4.
  • Seite 52: Hinweise Zu Den Symbolen

    7. HINWEISE ZU DEN SYMBOLEN Klasse II Die Notiz ist vor der Benutzung zu lesen Anwendungsteil des Typs BF Achtung: Nicht im Freien benutzen Wechselstrom Darf autoklaviert werden Anschlussbuchse für das Ausgangsspannung 24 AC Fußpedal Produkt mit FDA-Kennzeichnung Anpassung des Wasserstrahls Produkt mit CE-Kennzeichnung Temperaturbegrenzung Luftdruck bei Lagerung...
  • Seite 53 TRI-SCALER Aqua INDICE 1. INSTALLAZIONE E COMPONENTI DEL DISPOSITIVO 1. Istruzioni 2. Componenti 3. Specifiche tecniche principali 4. Installazione dei componenti principali 2. INSTALLAZIONE ED ISTRUZIONI PER L’USO 1. Funzione di rimozione del tartaro (G) e funzione parodontale (P) 2. Funzione endodontica (E) 3.
  • Seite 54: Istruzioni

    TRI-SCALER Aqua viene prevalentemente utilizzato per la rimozione del tartaro ma è anche un’attrezzatura indispensabile per la prevenzione ed il trattamento delle patologie parodontali. Questo nuovo prodotto TRI-SCALER Aqua è infatti dotato di funzioni di ablazione del tartaro, parodontale ed endodontica.
  • Seite 55: Installazione Dei Componenti Principali

    4. Installazione dei componenti principali • Illustrazione fronte e retro dell’unità principale Serbatoio con indicatore Indicatore potenza livello acqua Funzione endodontica Funzione parodontale Funzione ablazione del tartaro Indicatore della modalità secca Indicatore acqua serbatoio Pulsante aumento potenza Modalità di irrigazione acqua Pomello controllo acqua Pulsante di scelta opzione (modalità...
  • Seite 56 • Grafico per l’installazione del serbatoio dell’acqua Guarnizione del serbatoio acqua Interfaccia del serbatoio acqua fig 4 • Schema di collegamento del manipolo staccabile Testina Guarnizione Manipolo Connettore per il cavo Cavo di connessione fig 5 GACD_280514_Livret TriscalerAqua_V17Bis.indd 4 31/07/2014 08:45...
  • Seite 57: Installazione Ed Istruzioni Per L'uso

    • Schema d’installazione delle punte e del mandrino endodontico per mezzo delle chiavi Avvitare Chiave dinamometrica Punta Manipolo Mandrino endodontico Chiave Lima endodontica Avvitare Avvitare fig 6 2. INSTALLAZIONE ED ISTRUZIONI PER L’USO 1. Funzione di rimozione del tartaro (G) e funzione parodontale (P) 1.1 Operazione •...
  • Seite 58: Funzione Endodontica (E)

    Nota: 1. Non togliere il manipolo mentre il pedale è azionato e la macchina produce vibrazioni ad ultrasuoni. 2. Non usare la modalità a secco durante il trattamento se non assolutamente necessario. Non lasciare la macchina in modalità a secco per troppo tempo. Il dente può essere danneggiato se il manipolo e/o l’inserto si surriscaldano durante il trattamento. 1.2 Istruzioni per i componenti principali del manipolo staccabile (vedi figura 5) : a) Le testine: la testina può...
  • Seite 59: Sterilizzazione E Manutenzione

    Ingresso acqua Aggiungere acqua Foro aria fig 7 fig 8 Limite minimo acqua 3. STERILIZZAZIONE E MANUTENZIONE 1. Sterilizzazione del manipolo • Opzioni di temperatura e pressione in autoclave: fino a 135°C/2,2 bar (0,22 MPa). • Estrarre il manipolo e svitare la punta per ablazione del tartaro o il mandrino endodontico dopo ogni operazione. Asciugare con aria compressa il liquido di pulizia nel manipolo prima della sterilizzazione.
  • Seite 60: Guida Alla Risoluzione Dei Problemi

    4. GUIDA ALLA RISOLUZIONE DEI PROBLEMI Procedere con precauzione quando questo dispositivo viene utilizzato con dei pazienti affetti da patologie cardiache, donne in stato di gravidanza o bambini. ANOMALIA CAUSA PROBABILE SOLUZIONI La spina di alimentazione non è collegata correttamente. Inserire correttamente la spina nella presa. La punta per ablazione del tártaro non vibra e l’acqua non scorre quando si Il pedale non è...
  • Seite 61: Precauzioni

    5. PRECAUZIONI 1. Avvertenze per l’uso del dispositivo 1. Mantenere l’attrezzatura per ablazione del tartaro pulita prima e dopo ogni utilizzo. 2. Il manipolo, le punte per ablazione del tartaro, il mandrino endodontico, la chiave dinamometrica e la chiave endodontica devono essere sterilizzati prima di ogni trattamento.
  • Seite 62: Spiegazione Dei Simboli

    7. SPIEGAZIONE DEI SIMBOLI Attrezzatura di classe II Attenzione, consultare il libretto d’uso Parte applicata tipo BF Utilizzare solo all’interno Corrente alternata Autoclavabile Presa per il pedale Bloco d’alimentazione 24V AC Regolazione dell’irrigazione Prodotto a marchio FDA acqua Prodotto a marchio CE Limiti di temperatura Pressione atmosferica per la conserva- Limiti di umidità...
  • Seite 63 GARANTIE Cet appareil, décrit dans le document ci-joint, a été contrôlé et correspond aux spécifications CE en vigueur. Cet appareil est garanti dans le cadre d’un usage normal contre tout défaut de fabrication (pièce et main d’œuvre) pendant une période de 12 mois à partir de la date d’achat. Les réparations effectuées sur un appareil utilisé...
  • Seite 64 WARRANTY STATEMENT This instrument described below has been fully inspected and conforms to the current products specification. This instrument is guaranteed for its designated use, against original defects in materials and workman- ship for a period of 12 months from date of purchase. Repairs necessitated by misuse or disassembling of the equipment, or by the parts not provided by the manufacturer, are not covered by this warranty.

Inhaltsverzeichnis