Herunterladen Inhalt Inhalt Diese Seite drucken

Werbung

Verfügbare Sprachen
  • DE

Verfügbare Sprachen

  • DEUTSCH, seite 1
Kristall
Eiswürfelmaschine
Ice Cube Maker
Máquina de hielo
Machine à glaçons
Fabbricatore di cubetti di ghiaccio
10031891

Werbung

Inhaltsverzeichnis
loading

Inhaltszusammenfassung für Klarstein Kristall

  • Seite 1 Kristall Eiswürfelmaschine Ice Cube Maker Máquina de hielo Machine à glaçons Fabbricatore di cubetti di ghiaccio 10031891...
  • Seite 3: Inhaltsverzeichnis

    Sehr geehrter Kunde, wir gratulieren Ihnen zum Erwerb Ihres Gerätes. Lesen Sie die folgenden Hinweise sorgfältig durch und befolgen Sie diese, um möglichen Schäden vorzubeugen. Für Schäden, die durch Missachtung der Hinweise und unsachgemäßen Gebrauch entstehen, übernehmen wir keine Haftung. INHALTSVERZEICHNIS Sicherheitshinweise 4 Geräteübersicht 6...
  • Seite 4: Sicherheitshinweise

    SICHERHEITSHINWEISE • Schließen Sie das Gerät nur an geerdete Steckdosen an, die der Spannung des Geräts entsprechen. • Wenn Sie das Gerät bewegen benutzen Sie die Griffe. • Stellen Sie das Gerät auf einen ebenen Untergrund. • Benutzen Sie das Gerät nur in Innenräumen. •...
  • Seite 5 WARNUNG Gefahr durch Feuer/brennbare Materialien. Bitte beachten Sie die örtlichen Vorschriften zur Entsorgung von Geräten mit brennbaren Kältemitteln und Gasen. • Halten Sie Lüftungsöffnungen im Gerätegehäuse frei von Hindernissen. • Beschädigen Sie nicht den Kältemittelkreislauf. • Verwenden Sie keine mechanischen Vorrichtungen oder anderen Mittel, um den Auftauprozess oder den Eisgewinnungsprozess zu beschleunigen.
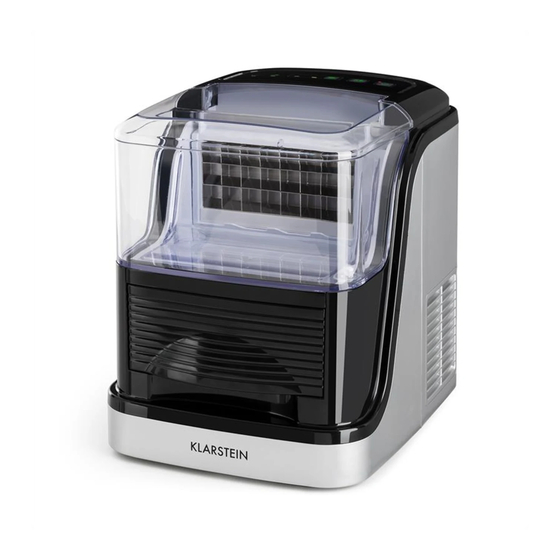
  • Seite 6: Geräteübersicht

    GERÄTEÜBERSICHT 1 Hintere Abdeckung 9 Schwimmer-Schalter 2 Kondensator 10 Wassertemperatur-Sensor 3 Obere Abdeckung 1 1 Sockelleiste 4 Wasserablauf 12 Kompressor 5 Vernebler 13 Netzkabel 6 Transparenter Wassertank 14 Transparente Wassertankabdeckung 7 Eis-Leiste 15 Bedienfeld 8 Eisbox...
  • Seite 7: Inbetriebnahme Und Bedienung

    INBETRIEBNAHME UND BEDIENUNG Aufstellung Stellen Sie das Gerät aufrecht auf einen ebenen Untergrund. Um sicherzustellen, dass das Gerät ausreichend belüftet wird, ist es wichtig dass sie um das Gerät 150 mm Platz zu allen Seiten lassen. Stellen Sie das Gerät nicht neben den Backofen, eine Heizung oder ähnliche Wärmequellen.
  • Seite 8: Bedienung

    Tastenfunktionen und Anzeigen Nachdem Sie den Stecker in die Steckdose gesteckt haben, blinkt die POWER- Taste. Drücken Sie auf die POWER-Taste und das Gerät wechselt in den Standby-Modus. Wenn sie die POWER-Taste während dem Betrieb drücken, wechselt das Gerät in den Standby-Modus. Drücken Sie die START/PAUSE-Taste, um das Gerät zu starten.
  • Seite 9: Reinigung Und Pflege

    REINIGUNG UND PFLEGE • Reinigen Sie den Innenraum, die Eisbox, den Wassertank, die Eisschaufel und den Vernebler regelmäßig. Ziehen Sie vor der Reinigung den Stecker aus der Steckdose und entfernen Sie die Eiswürfel. Verwenden Sie zur Reinigung eine verdünnte Lösung aus Wasser und etwas Essig. Reinigen Sie das Gerät nicht mit Chemikalien, Säure Benzin oder Öl.
  • Seite 10: Hinweise Zur Entsorgung

    Problem Mögliche Ursache Lösungsansatz Das Gerät läuft, Problem mit dem Wenden Sie sich zur Kontrolle produziert aber Kühlmittel. und Reparatur an einen kein Eis. Fachbetrieb. Der Kompressor ist kaputt. Der Lüftermotor ist beschädigt. Alle Leuchten Da Eis hat keinen Kontakt Ziehen Sie den Stecker und blinken gleichzeitig.
  • Seite 11 Dear Customer, Congratulations on purchasing this equipment. Please read this manual carefully and take care of the following hints to avoid damages. Any failure caused by ignoring the mentioned items and cautions mentioned in the instruction manual are not covered by our warranty and any liability.
  • Seite 12: Safety Instructions

    SAFETY INSTRUCTIONS • Check that the mains voltage corresponds to the rating of the appliance before operating. • Use handles or knobs when moving. Place on a flat stable surface for use. Do not use outdoors. • Do not use near or in the immediate vicinity of a bath or swimming pool or any source of liquid.
  • Seite 13 WARNING Danger from fi re/fl ammable materials. Please observe the local regulations for the disposal of units with fl ammable refrigerants and gases. • Keep ventilation openings in the unit housing free of obstacles. • Do not damage the refrigerant circuit. •...
  • Seite 14: Product Description

    PRODUCT DESCRIPTION 1 Rear Cover 9 Floater switch 2 Condenser 10 Water Temperature Sensor 3 Top Cover 1 1 Baseboard 4 Water Drain 12 Compressor 5 Evaporator 13 Power Cord 6 Transparent Water Box 14 Transparent Water Box Cover 7 Ice board 15 Control Panel 8 Ice Basket...
  • Seite 15: Use And Operation

    USE AND OPERATION Installation The machine should be upright to place on the horizontal plane. To ensure the machine ventilate normally, it is important to set 150mm room on top, sides and back. Do not place the machine next to the roast oven, radiate or other heat objects. Control Panel...
  • Seite 16 Buttons and Indicator Lights The indicator of POWER will flash after plugged in, press POWER and then the machine enters standby state accompanying indicator lighting. During operation, pressing this button, the machine will return to standby state. Pause and Start: After choose the menu, press this key, and start to work. This button is for selecting the size of ice.
  • Seite 17: Care And Cleaning

    CARE AND CLEANING • Clean the inner liner, ice collecting tray, water box, ice shovel and evaporator frequently. When cleaning, unplug the unit and remove the ice cubes. Use a diluted solution of water and vinegar to clean the inside and the outside surface of the Ice maker.
  • Seite 18: Hints On Disposal

    Problem Possible Cause Suggested Solution The Ice made is Water temperature is too Select small size. too large and with low. pieces sticking Ice of previous cycles left Take out the ice under the together. in the water tray. standby state. The program of No coolant in compressor.
  • Seite 19: Datos Técnicos

    Estimado cliente: Le felicitamos por la adquisición de este producto. Lea atentamente el siguiente manual y siga cuidadosamente las instrucciones de uso con el fin de evitar posibles daños. La empresa no se responsabiliza de los daños ocasionados por un uso indebido del producto o por haber desatendido las indicaciones de seguridad.
  • Seite 20: Indicaciones De Seguridad

    INDICACIONES DE SEGURIDAD • Conecte el aparato solamente a tomas de corriente con toma de tierra que se adecuen a la tensión del mismo. • Si desea desplazar el aparato, utilice las asas. • Coloque el aparato en una superficie plana y estable. •...
  • Seite 21 ADVERTENCIA Peligro por fuego/materiales infl amables. Tenga en cuenta las normas locales para la eliminación de aparatos que contengan refrigerantes y gases infl amables. • Mantenga las aberturas de ventilación de la carcasa del aparato libres de obstáculos. • No dañar el circuito de refrigeración. •...
  • Seite 22: Descripción Del Aparato

    DESCRIPCIÓN DEL APARATO 1 Cubierta trasera 9 Interruptor del flotador 2 Condensador 10 Sensor de temperatura del agua 3 Cubierta superior 1 1 Zócalo 4 Desagüe 12 Compresor 5 Nebulizador 13 Cable de alimentación 6 Depósito de agua transparente 14 Cubierta del depósito de agua transparente 7 Barra de refrigeración 15 Panel de control 8 Recipiente para el hielo...
  • Seite 23: Puesta En Marcha Y Uso

    PUESTA EN MARCHA Y USO Colocación Coloque el aparato en una superficie estable. Para garantizar que el aparato tiene suficiente ventilación, es importante que deje un espacio mínimo de 150 mm a todos los lados. No coloque el aparato cerca de hornos, radiadores ni fuentes de calor similares. Panel de control...
  • Seite 24 Funciones de los botones e indicadores Después de haber conectado el enchufe a la toma de corriente, el botón POWER parpadea. Pulse el botón POWER y el aparato entra en modo standby. Si presiona el botón POWER durante el funcionamiento, el aparato cambia a modo standby.
  • Seite 25: Limpieza Y Cuidado

    LIMPIEZA Y CUIDADO • Limpie el interior, el recipiente para el hielo, el depósito, la pala y el nebulizador con frecuencia. Desconecte el enchufe antes de limpiar el aparato y retire los cubitos de hielo. Utilice para la limpieza una solución de vinagre disuelta en agua. No limpie el aparato con productos químicos, ácidos, gasolina o aceite.
  • Seite 26: Retirada Del Aparato

    Problema Posible causa Solución propuesta El aparato funciona Problema con el Contacte con un servicio técnico pero no fabrica refrigerante. para su control y reparación. hielo. El compresor está averiado. El motor del ventilador está averiado. Todas las luces El hielo no tiene contacto Desconecte el enchufe y reinicie parpadean con el la barra de...
  • Seite 27: Fiche Technique

    Cher client, Toutes nos félicitations pour l’acquisition de ce nouvel appareil. Veuillez lire attentivement les instructions suivantes de branchement et d’utilisation afin d’éviter d’éventuels dommages. Le fabricant ne saurait être tenu pour responsable des dommages dus au non-respect des consignes de sécurité et à la mauvaise utilisation de l’appareil.
  • Seite 28: Consignes De Sécurité

    CONSIGNES DE SÉCURITÉ • Brancher uniquement l’appareil à une prise de terre dont la tension correspond à celle de l’appareil. • Utiliser les poignées pour déplacer l’appareil. • Placer l’appareil sur une surface plane. • Utiliser l’appareil uniquement en intérieur. •...
  • Seite 29 MISE EN GARDE Danger d‘incendie/de matières infl ammables. Veuillez respecter les réglementations locales concernant l‘élimination des appareils contenant des fl uides frigorigènes et des gaz infl ammables. • Veillez à ce que les ouvertures de ventilation dans le boîtier de l‘appareil soient libres d‘obstacles.
  • Seite 30: Aperçu De L'appareil

    APERÇU DE L’ APPAREIL 1 Cache arrière 9 Flotteur contacteur 2 Condensateur 10 Capteur de température de l’eau 3 Cache supérieur 1 1 Plinthe 4 Evacuation d’eau 12 Compresseur 5 Nébuliseur 13 Câble secteur 6 Réservoir d’eau transparent 14 Couvercle transparent du réservoir d’eau 7 Distributeur de glace 15 Panneau de commande 8 Seau à...
  • Seite 31: Mise En Service Et Utilisation

    MISE EN SERVICE ET UTILISATION Installation Placez l’appareil bien droit sur un support horizontal. Pour vous assurer que l’appareil est correctement ventilé, il est important de garder un espace de 150 mm sur les côtés de l’appareil. N’installez pas l’appareil près d’un four, d’un radiateur ou de sources de chaleur similaires.
  • Seite 32 Fonctions des touches et affichages Une fois que vous avez branché la fiche dans la prise, la touche POWER clignote. Appuyez sur la touche POWER pour que l’appareil passe en mode veille. Si vous appuyez sur la touche POWER pendant le fonctionnement, l’appareil passe en mode veille.
  • Seite 33: Nettoyage Et Entretien

    NETTOYAGE ET ENTRETIEN • Nettoyez régulièrement l’intérieur, le seau à glace, le réservoir d’eau, la pelle à glace et le nébuliseur. Avant le nettoyage, débranchez la fiche de la prise et retirez les glaçons. Pour le nettoyage, utilisez un de vinaire dilué dans de l’eau. ne nettoyez pas l’appareil avec des produits chimiques, des acides de l’essence ou de l’huile.
  • Seite 34: Conseils Pour Le Recyclage

    Problème Cause possible Solution L’appareil Problème de fluide Adressez-vous à un spécialiste fonctionne mais ne réfrigérant. pour vérification et réparation. fabrique pas de Le compresseur est hors glaçons. service. Le moteur du ventilateur est hors service. Tous les témoins La glace n’est pas au Débranchez la fiche et s’allument en même contact du distributeur.
  • Seite 35 Gentile cliente, La ringraziamo per aver acquistato il nostro prodotto. La preghiamo di leggere attentamente le seguenti istruzioni e di seguirle per evitare eventuali danni. Non ci assumiamo alcuna responsabilità per danni derivati da una mancata osservazione delle avvertenze di sicurezza e da un uso improprio del dispositivo. INDICE Avvertenze di sicurezza 36 Descrizione del prodotto 38...
  • Seite 36: Avvertenze Di Sicurezza

    AVVERTENZE DI SICUREZZA • Leggere attentamente tutte le istruzioni e conservare il presente libretto per consultazioni future. • Per garantire il corretto funzionamento, il dispositivo deve essere collegato ad una presa dotata di messa a terra. Consultare un elettricista se non si è sicuri che la presa a disposizione corrisponda ai requisiti richiesti.
  • Seite 37 AVVERTENZA Pericolo di incendio/materiali infi ammabili. Osservare le norme locali per lo smaltimento di apparecchi contenenti refrigeranti e gas infi ammabili. • Mantenere libere da ostacoli le aperture di ventilazione nell‘alloggiamento dell‘apparecchio. • Non danneggiare il circuito frigorifero. • Non utilizzare dispositivi meccanici o altri mezzi per accelerare lo sbrinamento o il recupero del ghiaccio.
  • Seite 38: Descrizione Del Prodotto

    DESCRIZIONE DEL PRODOTTO 1 Coperchio anteriore 9 Interruttore galleggiante 2 Condensatore 10 Sensore temperatura acqua 3 Coperchio superiore 1 1 Base 4 Scarico acqua 12 Compressore 5 Evaporatore 13 Cavo di alimentazione 6 Serbatoio trasparente 14 Coperchio serbatoio trasparente 7 Barra 15 Pannello dei comandi 8 Contenitore cubetti...
  • Seite 39: Messa In Funzione E Utilizzo

    MESSA IN FUNZIONE E UTILIZZO Collocazione Collocare il dispositivo in posizione verticale su una superficie piana. Lasciare 150 mm di spazio libero su tutti i lati per garantire una corretta ventilazione. Non collocare il dispositivo accanto ad un forno, ad una stufa o ad altre fonti di calore. Pannello dei comandi...
  • Seite 40 Funzione dei tasti e spie Dopo aver inserito la spina nella presa, il tasto POWER lampeggia. Premere il tasto POWER e il dispositivo passa in modalità standby. Se si preme il tasto POWER mentre il dispositivo è in uso, il dispositivo passa in modalità standby. Premere questo tasto per avviare il dispositivo.
  • Seite 41: Pulizia E Manutenzione

    PULIZIA E MANUTENZIONE • Pulire regolarmente la parte interna, il contenitore dei cubetti, il serbatoio dell‘acqua, la paletta e l´evaporatore. Prima di pulire il dispositivo, staccare la spina dalla presa e rimuovere i cubetti di ghiaccio. Per pulire il dispositivo utilizzare una soluzione di acqua e aceto.
  • Seite 42: Smaltimento

    Problema Causa possibile Soluzione Il dispositivo è in Problema con il Rivolgersi ad un centro assistenza funzione, ma non refrigerante. per un controllo e per la produce ghiaccio. riparazione. Il compressore è rotto. Il motore della ventola è danneggiato. Tutte le spie lam- Il ghiaccio non entra in Staccare la spina dalla presa e peggiano contem-...

Inhaltsverzeichnis