Werbung
Verfügbare Sprachen
Verfügbare Sprachen
Quicklinks
Werbung

Verwandte Anleitungen für Klarfit 10030051


Inhaltszusammenfassung für Klarfit 10030051
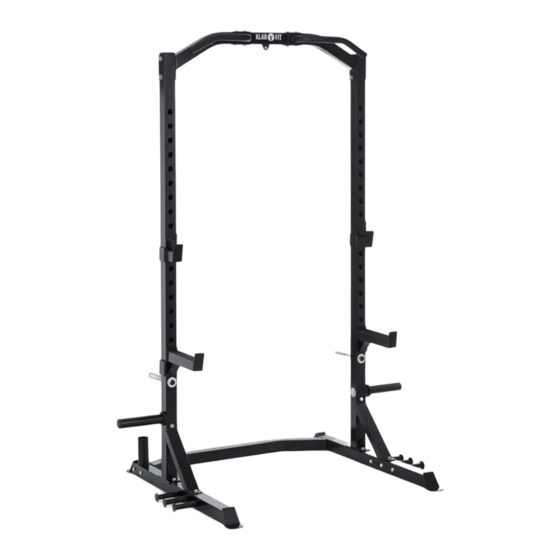
- Seite 1 Rackotar 10030051...
-
Seite 2: Wichtige Sicherheitshinweise
Sehr geehrter Kunde, Wir gratulieren Ihnen zum Erwerb Ihres Klarfit Gerätes. Lesen Sie alle Hinweise sorgfältig durch und befolgen Sie sie, um möglichen Schäden vorzubeugen. Für Schäden, die durch Missachtung der Sicher- heitshinweise und unsachgemäßen Gebrauch entstehen, übernehmen wir keine Haftung. - Seite 3 Komponenten Below Crossing Frame Left Base Frame Right Base Frame Upright Top Crossing Frame Support Frame Plate Rod Small Left Barbell Holder Small Right Barbell Hol- Big Left Barbell Holder Big Right Barbell Holder Left Handle Bar Right Handle Bar Connection Plate Plate Rod M10 x 75...
- Seite 4 Aufbau - 1 • Legen Sie die Basisteile (Left & Right Base Frame, 2 & 3) auf den Boden und montieren Sie die Säulen (Upright, 4) an diesen. Nutzen Sie die M10x70-Schlossschrauben (27), 4 passende Unterlegscheiben (M10, 21) und 4 M10 Muttern (22).
- Seite 5 Aufbau - 2 • Montieren Sie die Griffe (Left & Right Handle Bar, 12 & 13) an der Traverse (Top Crossing Bar, 5). Nutzen Sie 4 Schrauben M10x80 (18), 8 Unterlegscheiben (21) und 4 Muttern (22).
- Seite 6 Aufbau - 3 • Bringen Sie die Traverse (Top Crossing Frame, 5) an den Säulen (Upright, 4) an. Nutzen Sie die Mon- tagebleche (Connection Plate, 15) und verschrauben Sie mit 4 M12x80-Schrauben, 6 M12-Unterleg- scheiben (23) und 2 Muttern (24). •...
- Seite 7 Aufbau - 4 • Montieren Sie die Plate Rods (7) an den Säulen (M10x20-Schraube (19) und Unterlegscheiben(25)). • Schieben Sie je einen O-Ring auf die Plate Rods (7). • Bringen Sie die Rods (14) an den Basisrohren (2&3) an. Nutzen Sie M10x20-Schrauben und entspre- chende Unterlegscheiben (21).
-
Seite 8: General Safety Notice
Dear Customer, Congratulations on purchasing this product. Please read and follow these instructions, in order to avoid damaging the item. We do not cover any damages that may arise from improper use of the item or the disregard of the safety instructions. General Safety Notice •... -
Seite 9: Parts Overview
Parts Overview Below Crossing Frame Left Base Frame Right Base Frame Upright Top Crossing Frame Support Frame Plate Rod Small Left Barbell Holder Small Right Barbell Hol- Big Left Barbell Holder Big Right Barbell Holder Left Handle Bar Right Handle Bar Connection Plate Plate Rod M10 x 75... - Seite 10 Assembly - 1 • Attach two pcs Upright(4) onto the Left and Right Base Frame(2&3) using 4pcs M10*70mm Carriage Bolts(27), 4pcs M10 Washers(21) and 4pcs M10 Lock Nuts(22). • Attach two pcs Support Frames(6) to Left & Right Base Frame(2&3) using 2pcs M10*70mm Carriage Bolts(27), 2pcs M10 Washers(21) and 2pcs M10 Lock Nuts(22).
- Seite 11 Assembly - 2 • Attach Left & Right Handle Bar(12&13) onto Top Crossing Bar(5) using 4pcs M10*80mm Bolts(18), 8pcs M10 Washers(21) and 4pcs M10 Lock Nuts(22).
- Seite 12 Assembly - 3 • Attach Top Crossing Frame(5) to Each Upright(4) with Connection Plate(15) using 4pcs M12*80mm Bolts(20),6pcs M12 Washers(23) and 2pcs M12 Lock Nuts(24). • Attach the Below Crossing Frame(1) to the Left & Right Base Frame(2&3) using 4pcs M10*75mm Bolts(17),6pcs M10 Washers(21) and 2pcs M10 Lock Nuts(22)
- Seite 13 Assembly - 4 • Attach each the Plate Rod A(7) into each Upright(4) using 1pc M10*20mm Bolt(19) and 1pc Big M10Washer (25). Slide a Rubber Ring(26) onto each Plate Rod(7). • Attach each the Rod(14) into Left& Right Base Frame(2&3) using M10*20mm Bolt(19) and M10 Washer(21).
- Seite 14 Hersteller / Manufacturer / Fabricant / Fabricante / Produttore CHAL-TEC GmbH, Wallstraße 16, 10179 Berlin, Deutschland/Germany...