Vermeiren V300 XL Gebrauchsanweisung
Vorschau ausblenden
Andere Handbücher für V300 XL:
- Gebrauchsanweisung (184 Seiten) ,
- Installationsanleitung (134 Seiten) ,
- Gebrauchsanweisung (20 Seiten)
Inhaltsverzeichnis
Werbung
Verfügbare Sprachen
Verfügbare Sprachen
Quicklinks
Werbung
Kapitel
Inhaltsverzeichnis

Verwandte Anleitungen für Vermeiren V300 XL


Inhaltszusammenfassung für Vermeiren V300 XL
- Seite 1 V RM IR N V300 XL I N S T R U C T I O N M M O D E D ’ E M P L O I G E B R U I K S N W I J Z I N G...
- Seite 2 Tento návod k obsluze je součástí způsobem (tisk, kopie, mikrofilm nebo jiný způsob) bez dodávky a musí být součástí každého písemného souhlasu vydavatele, nebo zpracování, prodaného produktu. duplikace či distribuce prostřednictvím elektronických Verze: B, 2019-06 systémů je zakázáno. Multi version: C, 2019-06 © Vermeiren Group...
-
Seite 3: Inhaltsverzeichnis
V300 XL 2013-11 Contents Preface ....................2 Productdescription ..............3 Intended Use ........................ 3 Technical specifications ....................4 Drawing ........................5 Accessories ........................6 Location identification plate ..................6 Explanation of symbols ....................6 Use ..................... 6 Carrying the wheelchair ....................6 Mounting the rear wheels .................... -
Seite 4: Preface
First of all we want to thank you for putting your trust in us by selecting one of our wheelchairs. The Vermeiren wheelchairs are the result of many years of research and experience. During the development, special attention was given to the ease of use and the serviceability of the wheelchair. -
Seite 5: Productdescription
When used on mats, carpeted floors or loose floor coverings, the floor covering can get damaged. Use only Vermeiren approved accessories. The manufacturer is not liable for damage caused by the lack of or improper service or as a result of not following instructions from this manual. -
Seite 6: Technical Specifications
V300 XL 2013-11 Technical specifications Technical terms below are valid for the wheelchair in standard settings. If other footrest / armrest or other accessories are used, the tabulated values will change. Make Vermeiren Address Vermeirenplein 1/15, B-2920 Kalmthout Type Manual wheelchair... -
Seite 7: Drawing
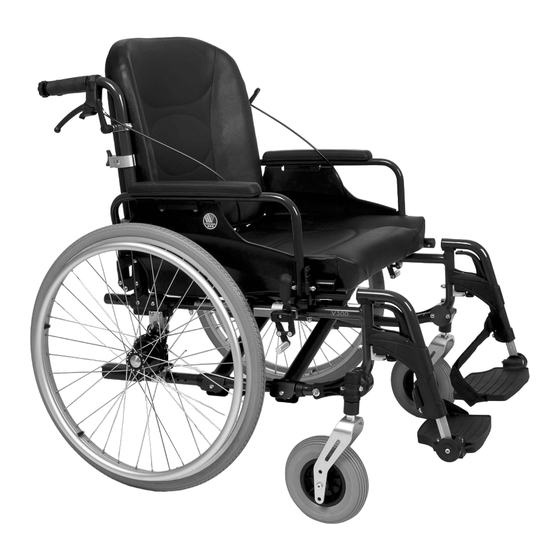
V300 XL 2013-11 The wheelchair complies to the requirements set up in: ISO 7176-8: Requirements and test methods for static, impact and fatigue strengths. ISO 7176-16: Resistance to ignition of upholstered parts Drawing 1 = Armpads 2 = Armrests 3 = Footplate... -
Seite 8: Accessories
V300 XL 2013-11 Accessories The following accessories are available for the V300 XL: • Anterior pelvic belt (B20) for mounting on the tubes of the back (see according manual) • Anti-tipping device (B78) for mounting on the bottom frame (see according manual). -
Seite 9: Mounting The Rear Wheels
V300 XL 2013-11 Mounting the rear wheels 1. Take the rear wheel and push on button 2. Keep the button pushed in and mount the rear wheels axle till it stops. 3. Release the button. 4. Check that the wheels is secured. -
Seite 10: Mounting Or Removing Of The Footrest
V300 XL 2013-11 Mounting or removing of the footrest The mounting of the footrest is done as follows: Hold the footrest sideways at the outside of the wheelchairs frame and mount the tube hood into the frame. Swing the footrest inwards till it clicks in position. -
Seite 11: Mounting Or Removing Of Armrests
V300 XL 2013-11 Mounting or removing of armrests The armrests of the wheelchair can be mounted by following instructions. L L L L CAUTION: Risk of clamping – Keep fingers, buckles and clothes away from the bottom side of the armrest. -
Seite 12: Transfer In And Out The Wheelchair
V300 XL 2013-11 To remove the armrest, press button and pull the rear of the armrest from tube hood Transfer in and out the wheelchair L L L L CAUTION: In case you cannot perform the transfer in a safe manner, ask someone to assist you. -
Seite 13: Moving On Slopes
V300 XL 2013-11 Release the brakes. Take both hand rims at their highest position. Lean forward and push the hand rims forward until straight arms. Swing your arms loosely back to the hand rims topside and repeat the movement. 2.11 Moving on slopes... - Seite 14 V300 XL 2013-11 2.12.2 Moving up steps or curbs Moving up steps or curbs with attendant as follows: Prevent the foot rests from touching the curb. Ask the attendant to tip the wheelchair backwards, just enough to move the front wheels over the curb.
-
Seite 15: Fold Up The Wheelchair
V300 XL 2013-11 2.13 Fold up the wheelchair L L L L CAUTION: Chance of pinching – Don't place fingers between the components of the wheelchair. Fold or remove the footplates (see § 2.5). Swing the push bar away from the right hand-grip (standing behind the wheelchair). -
Seite 16: Installation And Adjustment
Adjusting the seat height and seat angle The Vermeiren V300 XL is adjustable in 4 seat heights and 5 seat angles (0° -2,5° -5° -7,5° - 10° ) by changing the position of the wheels for eac h height and angle there is a different setting of the front and rear wheels. - Seite 17 V300 XL 2013-11 Front wheel Axle plate rear wheels Seat height 440 mm Seat height 470 mm Seat height 500 mm (standard) Seat height 530 mm Page 15...
- Seite 18 If you don't find the right combination you can always contact the company Vermeiren. Check that the swivel axles are perpendicular to the ground. If necessary use the procedure below to adjust the castor stem housing: Loosen the 3 bolts using a size 5 Allen key.
-
Seite 19: Adjusting The Seat Depth
V300 XL 2013-11 Adjusting the seat depth The Vermeiren V300 XL is adjustable in 3 seat depths by changing the back rest connection Seat depth Back rest connection 490 mm (Standard) Position 1 510 mm Position 2 530 mm Position 3... -
Seite 20: Adjusting Of The Footrests
V300 XL 2013-11 Adjusting of the footrests 3.6.1 Length of the footrests L L L L CAUTION: Risk of damage – Avoid that the footrests make any contact with the ground. Keep a minimum distance from 60 mm (2.36 in.) above the ground. -
Seite 21: Adjusting The Stability And The Maneuverability
Adjust the stability and maneuverability according following steps: 1. Loosen the bolts of axle plate. 2. Move the axle plate in the desired position. 3. Retighten the bolts. Maintenance For the maintenance manual of the wheelchairs refer to the Vermeiren website: www.vermeiren.be. Page 19... - Seite 22 V300 XL 2013-11 Table des matières Préface ....................2 Description du produit ............3 Utilisation prévue ......................3 Caractéristiques techniques ..................4 Schéma ........................5 Accessoires ........................5 Emplacement de la plaque d'identification ..............6 Explication des symboles .................... 6 Utilisation .................
-
Seite 23: Préface
Nous tenons tout d'abord à vous remercier de nous avoir fait confiance en choisissant l'un de nos fauteuils roulants. Les fauteuils roulants Vermeiren sont le résultat de nombreuses années de recherche et d'expérience. Au cours du développement, une attention spéciale a été portée sur la facilité... -
Seite 24: Description Du Produit
En cas d'utilisation sur des paillassons, moquettes ou revêtements de sols non fixés, le revêtement de sol peut être endommagé. Utilisez uniquement des accessoires approuvés par Vermeiren. Le fabricant n'est pas responsable des dommages causés par l'absence ou l'inadéquation de l'entretien, ou par le non-respect des instructions de ce manuel. -
Seite 25: Caractéristiques Techniques
V300 XL 2013-11 Caractéristiques techniques Les indications techniques ci-dessous sont valides pour le fauteuil roulant avec ses réglages standard. En cas d'utilisation d'autres repose-pieds / accoudoir ou autres accessoires, les valeurs indiquées sont modifiées. Marque Vermeiren Adresse Vermeirenplein 1/15, B-2920 Kalmthout... -
Seite 26: Schéma
9 = Patte d'inclinaison 10 = Traverse 11 = Poignées 12 = Barre de poussée Accessoires Les accessoires suivants sont disponibles pour le V300 XL : • Sangle pelvienne antérieure (B20) à monter sur les tubes du dossier (voir le manuel correspondant) •... -
Seite 27: Emplacement De La Plaque D'identification
V300 XL 2013-11 Emplacement de la plaque d'identification 1 = Logo Vermeiren 2 = Crash-test: NON 3 = Plaque d'identification 4 = Nom Vermeiren Explication des symboles Poids maximum Usage intérieur et extérieur Pente sécurisée maximale Conformité CE Désignation type Ne convient pas pour être utilisé... -
Seite 28: Montage Des Roues Arrière
V300 XL 2013-11 Montage des roues arrière Prenez la roue arrière et poussez sur le bouton Maintenez le bouton enfoncé et montez l'essieu arrière jusqu'à ce qu'il soit bloqué. Relâchez le bouton. Vérifiez que les roues sont bloquées. Dépliage du fauteuil roulant... -
Seite 29: Montage Ou Démontage Du Repose-Pieds
V300 XL 2013-11 Montage ou démontage du repose-pieds Le montage du repose-pieds s'effectue comme suit : Tenez le repose-pied latéralement à l'extérieur du châssis du fauteuil roulant et montez le logement de tube dans le châssis. Basculez le repose-pied vers l'intérieur jusqu'à... -
Seite 30: Montage Ou Retrait Des Accoudoirs
V300 XL 2013-11 Montage ou retrait des accoudoirs Les accoudoirs du fauteuil roulant peuvent être monté en les instructions suivant. L L L L ATTENTION : risque de pincement, laissez les doigts, boucles et vêtements à l'écart du bas de l'accoudoir. -
Seite 31: Transfert Dans Et Hors Du Fauteuil Roulant
V300 XL 2013-11 Pour retirer l'accoudoir, appuyez sur le bouton et tirez l'arrière du accoudoir hors du logement de tube . Transfert dans et hors du fauteuil roulant L L L L ATTENTION : si vous ne pouvez pas réaliser le transfert en toute sécurité, demandez à... -
Seite 32: Déplacements En Pente
V300 XL 2013-11 L L L L AVERTISSEMENT : risque de brûlures – Soyez prudents lorsque vous conduisez dans des environnements chauds ou froids (soleil, froid extrême, saunas, etc.) - Les parties métalliques peuvent subir les températures de l'environnement et devenir très chaudes ou très froides. - Seite 33 V300 XL 2013-11 Un utilisateur entraîné peut franchir seul des bordures de trottoirs plus hautes. L'idéal est de les franchir en marche arrière. Tournez le fauteuil roulant, roues arrière face à la bordure de trottoir. Penchez-vous vers l'avant pour déplacer votre centre de gravité...
-
Seite 34: Pliage Du Fauteuil Roulant
V300 XL 2013-11 2.12.3 Passage d'escaliers Le passage d'escaliers en restant sur le fauteuil roulant doit toujours se faire dans le respect des règles suivantes : L L L L AVERTISSEMENT : risque de basculement. Toujours passer des escaliers avec 2 assistants. -
Seite 35: Installation Et Réglage
Installation et réglage Les instructions de ce chapitre sont destinées au distributeur. Le Vermeiren V300 XL a été conçu pour un réglage avec un minimum de pièces de rechange. Il n'est pas nécessaire de stocker des pièces de rechange. Pour trouver un service d'entretien ou un revendeur spécialisé près de chez vous, contactez l'établissement Vermeiren le plus proche. -
Seite 36: Réglage De La Hauteur Du Siège Et De L'angle Du Siège
Réglage de la hauteur du siège et de l'angle du siège Le Vermeiren V300 XL est réglable sur 4 hauteurs de siège et 5 angles de siège (0° -2,5° -5° - 7,5° -10° ) en modifiant la position des roues pour c haque hauteur et angle, avec un réglage différent des roues avant et arrière. - Seite 37 V300 XL 2013-11 Procédez comme indiqué ci-dessous pour modifier la hauteur du siège : Retirez les roues arrière (voir § 2.14). Vissez les douilles de l'essieu arrière depuis la plaque d'essieu. Assemblez les douilles de l'essieu dans le trou approprié de la plaque d'essieu, voir le tableau 2 et la figure précédente.
-
Seite 38: Réglage De La Profondeur Du Siège
V300 XL 2013-11 Réglage de la profondeur du siège Le Vermeiren V300 XL peut être réglé sur 3 profondeurs d'assise en modifiant la liaison avec le dossier Profondeur du siège Liaison avec le dossier 490 mm (standard) Position 1 510 mm... -
Seite 39: Réglage Du Repose-Pied
V300 XL 2013-11 Réglage du repose-pied 3.6.1 Longueur du repose-pied L L L L ATTENTION : Risque de dommage - Evitez tout contact entre le repose-pieds et le sol. Conservez une distance minimale de 60 mm au-dessus du sol. Réglez comme suit la longueur du repose-pieds : 1. -
Seite 40: Réglage De La Stabilité Et De La Manœuvrabilité
1. Desserrez les boulons de la plaque d'essieu. 2. Déplacez la plaque d'essieu dans la position souhaitée. 3. Reserrez les boulons. Maintenance Le mode d'emploi des fauteuils roulants manuels se trouve sur le site Internet de Vermeiren, www.vermeiren.be. Page 19... - Seite 41 V300 XL 2013-11 Inhoudsopgave Voorwoord................... 2 Productomschrijving ............... 3 Toepassingsgebied ....................3 Technische specificaties ..................4 Tekening ........................5 Accessoires ......................5 Locatie identificatieplaat ..................6 Verklaring van de symbolen ..................6 Gebruik ..................6 Dragen van de rolstoel ..................... 6 Plaatsen van de achterwielen ...................
-
Seite 42: Voorwoord
Voorwoord We willen U danken voor het vertrouwen dat U in onze producten stelt. De rolstoelen van Vermeiren zijn het resultaat van jarenlange studies en ervaringen. Bij de ontwikkeling werd veel aandacht besteed aan een eenvoudige bediening en een gemakkelijk onderhoud. -
Seite 43: Productomschrijving
Gebruik enkel door Vermeiren goedgekeurde accessoires. Vermeiren is niet aansprakelijk voor schade door gebrekkig of onvoldoende onderhoud of als gevolg van het niet naleven van instructies van deze handleiding. Het naleven van de gebruiks- en onderhoudsinstructies vormen een essentieel onderdeel van de garantiebepalingen. -
Seite 44: Technische Specificaties
V300 XL 2013-11 Technische specificaties Onderstaande technische gegevens zijn geldig voor de rolstoel in standaard afstelling. Wanneer er andere voetsteunen/armsteunen of andere accessoires worden gebruikt, worden de opgegeven waarden gewijzigd. Merk Vermeiren Adres Vermeirenplein 1/15, B-2920 Kalmthout Type Manuele rolstoel... -
Seite 45: Tekening
9 = Trapdop 10 = Kruis 11 = Handvaten 12 = Duwstang Accessoires Volgende accessoires zijn beschikbaar voor de V300 XL: • Anterior bekkengordel (B20) om te bevestigen aan de tubes van de rug (zie volgens handleiding) • Anti-tipping apparaat (B78) om te bestiging aan het onderste frame (zie volgens... -
Seite 46: Locatie Identificatieplaat
V300 XL 2013-11 Locatie identificatieplaat 1 = Logo Vermeiren 2 = Niet gecrash test 3 = Identificatieplaat 4 = Naam Vermeiren Verklaring van de symbolen Maximum gewicht Gebruik voor binnen en buiten Maximale veilige helling CE conformiteit Type aanduiding Niet bedoeld om te gebruiken als een zit in een voertuig Gebruik Dit hoofdstuk beschrijft het normaal gebruik. -
Seite 47: Plaatsen Van De Achterwielen
V300 XL 2013-11 Plaatsen van de achterwielen 1. Neem het achterwiel en druk naafknop 2. Houdt de naafknop ingedrukt en plaats het achterwiel in de asbus tot deze niet meer verder kan. 3. Laat de naafknop los. 4. Kijk na of het wiel goed vastzit. -
Seite 48: Plaatsen Of Verwijderen Van De Voetsteun
V300 XL 2013-11 Plaatsen of verwijderen van de voetsteun Het plaatsen van de voetsteun gaat als volgt: 1. Hou de voetsteun zijdelings aan de buitenkant van de stoel en hang de steun met dop in het frame. 2. Zwenk de voetsteun naar binnen tot hij vast klikt. -
Seite 49: Plaatsen Of Verwijderen Van De Armsteunen
V300 XL 2013-11 Plaatsen of verwijderen van de armsteunen De armsteunen van de rolstoel kunnen worden gemonteerd met volgende instructies. L L L L VOORZICHTIG: Kans op klemmen – Houdt vingers, gespen en kledingsstukken weg van de onderkant van de armsteun. -
Seite 50: Transfer In En Uit De Rolstoel
V300 XL 2013-11 Als U de armsteun wilt verwijderen, druk dan op knop en trek de achterzijde van de armsteun uit dop Transfer in en uit de rolstoel L L L L VOORZICHTIG: Indien U de transfer niet veilig op eigen kracht kan doen, vraag dan hulp van iemand anders. -
Seite 51: Rijden Op Hellingen
V300 XL 2013-11 Zet de remmen los. Neem de aandrijfhoepels aan de bovenzijde vast. Leun voorwaarts en draai de hoepels naar voor tot Uw armen gestrekt zijn. Breng Uw handen terug naar de bovenzijde van de hoepels en herhaal de beweging. - Seite 52 V300 XL 2013-11 2.12.2 Oprijden van trottoirs Trottoirs oprijden kan met begeleider als volgt: Zorg er voor dat de voetsteunen het trottoir niet raken. Laat de begeleider de rolstoel lichtjes achterover kantelen tot er voldoende ruimte onder de voorwielen is om de hindernis te nemen.
-
Seite 53: Opvouwen Van De Rolstoel
V300 XL 2013-11 2.13 Opvouwen van de rolstoel L L L L VOORZICHTIG: Kans op klemmen – Houd vingers niet tussen de onderdelen van de rolstoel. Klap de voetplaten omhoog, of verwijder ze (zie § 2.5). Draai de duwstang weg van de rechtse handgreep (wanneer U achter de rolstoel staat). -
Seite 54: Montage En Afstellen
Instellen van de zithoogte en de zithoeken De Vermeiren V300 XL is instelbaar in 4 zithoogtes en 5 zithoeken (0° -2,5° -5° -7,5° -10° ) door de wielen te verstellen. Bij elke hoogte en hoek hoort een andere instelling van de voor- en achterwielen. - Seite 55 V300 XL 2013-11 Voorwiel Asplaat achterwiel Zithoogte 440 mm Zithoogte 470 mm Zithoogte 500 mm (standaard) Zithoogte 530 mm Pagina 15...
- Seite 56 V300 XL 2013-11 Om de zithoogte te wijzigen gaat U als volgt te werk: Verwijder de achterwielen (zie § 2.14). Schroef de montagebussen van de achterwielen los van de asplaat. Monteer de bussen in het juiste gat van de asplaat, zie Tabel 2 en voorgaande figuur.
-
Seite 57: Instellen Van De Zitdiepte
V300 XL 2013-11 Instellen van de zitdiepte De Vermeiren V300 XL is instelbaar in 3 zitdieptes door de rugbevestiging te verstellen. Zitdiepte rugbevestiging 490 mm (Standaard) Positie 1 510 mm Positie 2 530 mm Positie 3 Tabel 3: Zitdieptes Om de zitdiepte via de rugbevestiging wijzigen gaat U als volgt te werk: Verwijder de bouten. -
Seite 58: Afstellen Van De Voetsteun
V300 XL 2013-11 Afstellen van de voetsteun 3.6.1 Lengte van de voetsteun L L L L VOORZICHTIG: Kans op beschadiging – Zorg er voor dat de voetsteun niet over de grond sleept. Houd een minimum afstand van 60 mm tot de grond aan. -
Seite 59: Afstellen Van De Armleggers
V300 XL 2013-11 Afstellen van de armleggers De armleggers van Uw rolstoel zijn in te stellen zowel in de hoogte als in de diepte. De hoogte van de armlegger kan in 3 posities afgesteld worden: Hoogte armlegger t.o.v. Aantal blokjes onder de... -
Seite 60: Onderhoud
V300 XL 2013-11 Onderhoud Voor de onderhoudshandleiding van de manuele rolstoelen kan U de website van Vermeiren raadplegen: www.vermeiren.be. Clusteromschrijvingen De V300 XL met 24 inch achterwielen voldoen voor: Hoepelrolstoel bedoelt voor gebruik in en om Transport huis en op straat. De rolstoel is uitgevoerd met... - Seite 61 V300 XL 2013-11 Inhalt Vorwort ....................2 Produktbeschreibung .............. 3 Verwendungszweck ..................... 3 Technische Daten ......................4 Zeichnungen ........................ 5 Zubehör ........................5 Positionstypenschild ....................6 Zeichenerklärung ......................6 Verwendung ................6 Transportieren des Rollstuhls ..................6 Montage der Hinterräder ..................... 7 Auseinanderklappen des Rollstuhl ................
-
Seite 62: Vorwort
Zuerst möchten wir uns für das Vertrauen bedanken, das Sie in uns gesetzt haben, indem Sie sich für einen unserer Rollstühle entschieden haben. Die Vermeiren-Rollstühle sind das Ergebnis langjähriger Forschung und Erfahrung. In der Entwicklungsphase wurde besonderer Wert auf Bedienerfreundlichkeit und leichte Wartung des Rollstuhls gelegt. -
Seite 63: Produktbeschreibung
Wird der Rollstuhl auf Matten, Auslegeware oder Teppichböden verwendet, könnten diese Bodenbeläge beschädigt werden. Verwenden Sie ausschließlich von Vermeiren genehmigtes Zubehör. Für Schäden durch nicht oder mangelhaft durchgeführte Wartung oder durch Nichtbeachtung der folgenden Anweisungen übernimmt der Hersteller keine Haftung. -
Seite 64: Technische Daten
V300 XL 2013-11 Technische Daten Die im Folgenden aufgeführten technischen Daten gelten für einen Rollstuhl in der Standardkonfiguration. Wurden eine Fußplatte und/oder eine Armauflage oder anderes Zubehör montiert, ändern sich die in der Tabelle aufgeführten Werte. Hersteller Vermeiren Adresse Vermeirenplein 1/15, B-2920 Kalmthout (Belgien) -
Seite 65: Zeichnungen
9 = Kipphilfe 10 = Schere 11 = Handgriffe 12 = Schiebestange Zubehör Für den V300 XL ist das folgende Zubehör erhältlich: • Vorderer Beckengurt (B20) zur Befestigung an den Rohren der Rückenlehne (siehe entsprechendes Handbuch) • Anti-Kippvorrichtung (B78) zur Befestigung am unteren Rahmen (siehe... -
Seite 66: Positionstypenschild
V300 XL 2013-11 Positionstypenschild 1 = Logo Vermeiren 2 = Ohne Crash-Testung 3 = Positionstypenschild 4 = Name Vermeiren Zeichenerklärung Max. Gewicht Innen- und Außenbereich Maximale, sichere Steigung CE-Konformität Typenbezeichnung Nicht zur Verwendung als Sitz in einem Motorfahrzeug geeignet Verwendung In diesem Kapitel wird die tägliche Verwendung beschrieben. -
Seite 67: Montage Der Hinterräder
V300 XL 2013-11 Montage der Hinterräder Nehmen Sie das Hinterrad in die Hand und drücken Sie auf den Arretierstift Halten Sie den Arretierstift gedrückt und schieben Sie das Hinterrad bis zum Anschlag auf die Achse. Lassen Sie den Arretierstift los. -
Seite 68: An- Oder Abbauen Der Fußplatte
V300 XL 2013-11 An- oder Abbauen der Fußplatte Die Fußplatte wird wie folgt montiert: Halten Sie die Fußplatte seitleich an der Außenseite des Rollstuhlrahmens und stecken Sie das Rohr in die Aufnahme am Rahmen. Schwenken Sie die Fußplatte nach innen, bis sie in der Endposition einrastet. -
Seite 69: An- Oder Abbauen Der Armauflagen
V300 XL 2013-11 An- oder Abbauen der Armauflagen Die Armauflagen des Rollstuhl können durch folgende Hinweise angebaut werden. L L L L VORSICHT: Klemmgefahr – Halten Sie Ihre Finger, Schnallen oder Kleidungsstücke fern von der Unterseite der Armauflage. 1. Schieben Sie das hintere Rohr der Armauflage in die Rohraufnahme 2. -
Seite 70: Setzen In Den Rollstuhl
V300 XL 2013-11 Zum Abbauen der Armauflage drücken Sie den Knopf und ziehen den hinteren Teil der Armauflage aus der Aufnahme Setzen in den Rollstuhl L L L L VORSICHT: Falls Sie sich nicht allein sicher in den Rollstuhl setzen können, bitten Sie jemanden um Hilfe. -
Seite 71: Bewegen An Steigungen
V300 XL 2013-11 L L L L WARNUNG: Verletzungsgefahr – Achten Sie darauf, dass Sie das Gerät keinen extremen Temperaturen aussetzen (Sonnenschein, extreme Kälte, Sauna etc.), da sich die verwendeten Materialien den Umgebungstemperaturen angleichen, was bei Berührung zu Verletzungen führen kann - Umgebungstemperaturen können Oberflächen verändern. -
Seite 72: Hinauffahren Von Stufen Und Bordsteinen
V300 XL 2013-11 Ein erfahrener Fahrer kann auch höhere Bordsteine alleine überwinden. Die erfolgt dann am besten rückwärts. Drehen Sie den Rollstuhl so, dass die Hinterräder zum Bordstein stehen. Lehnen Sie sich nach vorn, um Ihren Schwerpunkt nach vorne zu verlagern. -
Seite 73: Überwinden Von Treppen
V300 XL 2013-11 2.12.3 Überwinden von Treppen Auch eine Treppe kann mit einem Rollstuhl überwunden werden, wenn die folgenden Regeln beachtet werden: L L L L WARNUNG: Kippgefahr – Treppen sollten immer mit zwei Helfern überwunden werden. 1. Bauern Sie die Fußplatten ab. -
Seite 74: Zusammenbau Und Einstellung
Zusammenbau und Einstellung Die Anweisungen in diesem Kapitel richten sich an den Fachhändler. Der Vermeiren V300 XL wurde so konzipiert, dass er optimal verstellt werden kann und nur ein Minimum an Ersatzteilen erfordert. Daher ist es nicht erforderlich, dass ein spezieller Vorrat an Ersatzteilen angelegt wird. -
Seite 75: Einstellen Der Sitzhöhe Und Des Sitzwinkels
2013-11 Einstellen der Sitzhöhe und des Sitzwinkels Der Vermeiren V300 XL ist 4-fach in der Sitzhöhe und 5-fach bei den Sitzwinkeln verstellbar (0° -2,5° -5° -7,5° -10° ). Bei jeder Sitzhöhe und für j eden Sitzwinkel wird eine andere Position der Vorder- und Hinterräder gewählt. - Seite 76 V300 XL 2013-11 So ändern Sie die Sitzhöhe: Bauen Sie die Hinterräder ab (siehe § 2.14). Schrauben Sie die Achsbuchsen der Hinterräder von der Achsplatte ab. Montieren Sie die Achsbuchsen in der richtigen Bohrung der Achsplatte, siehe Tabelle 2 und vorherige Abbildung.
-
Seite 77: Einstellen Der Sitztiefe
V300 XL 2013-11 Einstellen der Sitztiefe Die Sitztiefe des Vermeiren V300 XL kann durch Ändern der Rückenlehnenverbindung fach verstellt werden. Sitztiefe Rückenlehnenverbindung 490 mm (Standard) Position 1 510 mm Position 2 530 mm Position 3 Tabelle 3: Sitztiefe Die Sitztiefe kann durch Ändern der Rückenlehnenverbindung... -
Seite 78: Einstellen Der Fußplatte
V300 XL 2013-11 Einstellen der Fußplatte 3.6.1 Länge der Fußplatte L L L L VORSICHT: Risiko der Beschädigung – Achten Sie darauf, dass die Fußplatte den Boden nicht berührt. Achten Sie auf einen Abstand von mindestens 60 mm zwischen der Fußplatte und dem Boden. -
Seite 79: Einstellen Der Armauflage
V300 XL 2013-11 Einstellen der Armauflage Die Armauflagen Ihres Rollstuhls können in der Höhe und der Tiefe verstellt werden. Die Höhe der Armauflage kann dreifach verstellt werden. Höhe der Armauflage zum Anzahl der Blöcke Anzahl der Blöcke Sitz unter dem Rohr... -
Seite 80: Einstellen Der Stabilität Und Der Manövrierbarkeit
1. Lösen Sie die Schrauben der Achsplatte. 2. Verschieben Sie die Achsplatte in die gewünschte Position. 3. Ziehen Sie die Schrauben wieder fest. Wartung Hinweise zur Wartung der Rollstühle entnehmen Sie bitte der Website von Vermeiren: www.vermeiren.be. Seite 20... - Seite 81 V300 XL 2013-11 Indice Premessa ....................2 Descrizionedel prodotto ............3 Utilizzo previsto ......................3 Specifiche tecniche ...................... 4 Schema ........................5 Accessori ........................5 Posizione della targhetta di identificazione ..............6 Significato dei simboli ....................6 Utilizzo ..................6 Trasporto della carrozzina ...................
-
Seite 82: Premessa
Ringraziamo per la fiducia accordataci con l’acquisto di una carrozzina di nostra produzione. Le carrozzine Vermeiren sono il risultato di molti anni di ricerca ed esperienza. Durante lo sviluppo, è stata dedicata attenzione speciale alla facilità d'uso e alla praticità della carrozzina. -
Seite 83: Descrizionedel Prodotto
Quando utilizzata su pavimenti con tappeti, moquette o rivestimenti, la carrozzina può danneggiarli. Utilizzare solo gli accessori approvati Vermeiren. La casa costruttrice non può essere ritenuta responsabile per danni causati dalla mancanza di manutenzione adeguata o risultanti dal mancato rispetto delle istruzioni contenute nel presente manuale. -
Seite 84: Specifiche Tecniche
V300 XL 2013-11 Specifiche tecniche I termini tecnici riportati di seguito sono applicabili alla carrozzina con configurazione standard. Se sono utilizzati altri poggiapiedi/ poggiabraccia o accessori, i valori in tabella cambiano. Produttore Vermeiren Indirizzo Vermeirenplein 1/15, B-2920 Kalmthout Tipo Carrozzina manuale... -
Seite 85: Schema
9 = Calotta ribaltamento 10 = Crociera 11 = Impugnature 12 = Barra di spinta Accessori I seguenti accessori sono disponibili per il modello V300 XL: • Cintura pelvica anteriore (B20) per il montaggio sui tubi posteriori (vedere il manuale adatto) •... -
Seite 86: Posizione Della Targhetta Di Identificazione
V300 XL 2013-11 Posizione della targhetta di identificazione Significato dei simboli Peso massimo Utilizzo interno ed esterno Pendenza massima consentita Conformità CE Modello Non utilizzabile come sedile in un veicolo a motore Utilizzo In questo capitolo viene descritto l'utilizzo quotidiano. Le presenti istruzioni sono destinate all'utente e al rivenditore. -
Seite 87: Montaggio Delle Ruote Posteriori
V300 XL 2013-11 Montaggio delle ruote posteriori Prendere la ruota posteriore e premere sul pulsante Tenere premuto il pulsante e montare l'asse delle ruote posteriori fino a quando non si arresta. Rilasciare il pulsante. Verificare che le ruote siano fissate. -
Seite 88: Montaggio O Rimozione Del Poggiapiedi
V300 XL 2013-11 Montaggio o rimozione del poggiapiedi Montare il poggiapiedi nel modo seguente: Reggere il poggiapiedi lateralmente dalla parte esterna del telaio della carrozzina e montare il coperchio del tubo nel telaio. Ruotare il poggiapiedi verso l'interno fino a quando non scatta nella posizione corretta. -
Seite 89: Montaggio O Rimozione Dei Poggiabraccia
V300 XL 2013-11 Montaggio o rimozione dei poggiabraccia I poggiabraccia della carrozzine possono essere montato le istruzioni seguendo. L L L L ATTENZIONE: rischio di intrappolamento. Tenere le dita, le fibbie e gli indumenti lontani dalla parte laterale del poggiabraccia. -
Seite 90: Trasferire La Carrozzina All'interno E All'esterno
V300 XL 2013-11 Per rimuovere il poggiabraccia, premere il pulsante e tirare la parte posteriore del poggiabraccia dal coperchio del tubo Trasferire la carrozzina all'interno e all'esterno L L L L ATTENZIONE: nel caso in cui non si riesca a eseguire il trasferimento in modo sicuro, chiedere assistenza. -
Seite 91: Spostamento Sulle Pendenze
V300 XL 2013-11 Rilasciare i freni. Tenere entrambi i corrimano alla massima altezza. Inclinarsi in avanti e spingere in avanti i corrimano fino a stendere le mani. Far ruotare le mani lentamente all'indietro verso la parte superiore dei corrimano e ripetere il movimento. - Seite 92 V300 XL 2013-11 2.12.2 Salire su gradini e scalini Salire su gradini e scalini con un accompagnatore nel modo seguente: Fare in modo che i poggiapiedi non tocchino lo scalino. Chiedere all'accompagnatore di inclinare la carrozzina all'indietro, in modo sufficiente per consentire alle ruote anteriori di superare lo scalino.
-
Seite 93: Ripiegare La Carrozzina
V300 XL 2013-11 2.13 Ripiegare la carrozzina L L L L ATTENZIONE: possibilità di pizzicamento. Non mettere le dita tra i componenti della carrozzina. Ripiegare o rimuovere le pedane poggiapiedi (vedere § 2.5). Posizionandosi dietro alla carrozzina, ruotare e allontanare la barra di spinta dall'impugnatura. -
Seite 94: Installazione E Regolazione
Le istruzioni contenute nel presente capitolo sono destinate al rivenditore. La carrozzina Vermeiren V300 XL è stata messa a punto per essere regolata con un numero minimo di parti di ricambio. Non è necessario un altro set di parti di ricambio. - Seite 95 V300 XL 2013-11 Ruota anteriore Ruote posteriori piastra dell' asse 440 mm Altezza sedile 470 mm Altezza sedile 500 mm (Standard) Altezza sedile 530 mm Altezza sedile Pagina 15...
- Seite 96 Per altre combinazioni di inclinazione e altezza del sedile, è possibile adottare la procedura seguente per regolare la forcella anteriore e la piastra dell'asse nella combinazione giusta. Se non si trova la combinazione giusta, è sempre possibile contattare Vermeiren. Verificare che gli assi rotanti siano perpendicolari al suolo. Se necessario, adottare la procedura seguente per regolare l'alloggiamento dello stelo pressofuso: Allentare i 3 bulloni tramite una chiave a brugola da 5.
-
Seite 97: Regolazione Della Profondità Del Sedile
V300 XL 2013-11 Regolazione della profondità del sedile La profondità del sedile della carrozzina Vermeiren V300 XL è regolabile in 3 posizioni modificando connessione tra lo schienale Profondità sedile Connessione dello schienale 490 mm (standard) Posizione 1 510 mm Posizione 2... -
Seite 98: Regolazione Del Poggiapiedi
V300 XL 2013-11 Regolazione del poggiapiedi 3.6.1 Altezza del poggiapiedi L L L L ATTENZIONE: rischio di danneggiamento - Evitare che il poggiapiedi siano a contatto con il suolo. Tenere una distanza minima di 6 cm dal suolo. Regolare l'altezza del poggiapiedi nel modo seguente: 1. -
Seite 99: Regolazione Della Stabilità E Della Manovrabilità
1. Allentare i bulloni della piastra dell'asse. 2. Spostare la piastra dell'asse nella posizione desiderata. 3. Serrare nuovamente i bulloni. Manutenzione Per il manuale di manutenzione della carrozzine consultate il sito web Vermeiren: www.vermeiren.be. Pagina 19... - Seite 100 V300 XL 2013-11 Índice Introducción ..................2 Descripción del producto ............3 Uso previsto......................... 3 Especificaciones técnicas .................... 4 Esquema ........................5 Accesorios ........................5 Placa de identificación de ubicaciones ................ 6 Explicación de los símbolos ..................6 Uso ..................... 6 Transporte de la silla de ruedas ...................
-
Seite 101: Introducción
En primer lugar, nos gustaría agradecerle que haya confiado en nosotros escogiendo una de nuestras sillas de ruedas. Las sillas de ruedas Vermeiren son el resultado de muchos años de experiencia e investigación. Durante su desarrollo, hemos puesto especial atención en crear una silla de ruedas práctica y fácil de usar. -
Seite 102: Descripción Del Producto
Si la utiliza encima de alfombras, suelos enmoquetados o sobre suelos con recubrimientos que no estén fijados, pueden dañarse estos recubrimientos. Sólo use accesorios Vermeiren aprobados. El fabricante no se hace responsable de los daños causados por la falta de mantenimiento, un mantenimiento inadecuado o como resultado de no observar las instrucciones indicadas en este manual. -
Seite 103: Especificaciones Técnicas
V300 XL 2013-11 Especificaciones técnicas Las condiciones técnicas indicadas a continuación son válidas para sillas de ruedas de configuración estándar. En caso de utilizar reposapiés/reposabrazos u otros accesorios diferentes a los indicados, los valores cambian. Fabricante Vermeiren Dirección Vermeirenplein 1/15, B-2920 Kalmthout... -
Seite 104: Esquema
9 = Tapón del extremo 10 = Cruceta 11 = Empuñaduras 12 = Barra de empuje Accesorios La V300 XL cuenta con los siguientes accesorios: • Cinturón pélvico anterior (B20) para su montaje en los tubos de la parte trasera (consulte el manual) •... -
Seite 105: Placa De Identificación De Ubicaciones
V300 XL 2013-11 Placa de identificación de ubicaciones 1 = Logo Vermeiren 2 = No testado a prueba de accidentes 3 = Placa de identificación 4 = Nombre Vermeiren Explicación de los símbolos Peso máximo Uso en el interior y en el exterior Pendiente máxima segura... -
Seite 106: Montaje De Las Ruedas Traseras
V300 XL 2013-11 Montaje de las ruedas traseras Sujete la rueda trasera y presione el botón Mantenga el botón presionado y monte el eje de las ruedas traseras hasta el tope. Suelte el botón. Compruebe que las ruedas están seguras. -
Seite 107: Montaje Y Desmontaje Del Reposapiés
V300 XL 2013-11 Montaje y desmontaje del reposapiés El montaje del reposapiés se realiza del modo siguiente: Mantenga el reposapiés en posición vertical por la parte externa del chasis de la silla de ruedas e inserte el capuchón del tubo en el armazón. -
Seite 108: Montaje Y Desmontaje De Los Soportes De Brazos
V300 XL 2013-11 Montaje y desmontaje de los soportes de brazos Los reposabrazos de la silla de ruedas pueden montaje con las instrucciones siguientes. L L L L ATENCIÓN: Riesgo de que los dedos queden atrapados: mantenga los dedos, las hebillas y la ropa alejados de la parte inferior del reposabrazos. -
Seite 109: Traslado A Y Desde La Silla De Ruedas
V300 XL 2013-11 Para retirar el reposabrazos, pulse el botón y extraiga la parte posterior del reposabrazos del capuchón del tubo Traslado a y desde la silla de ruedas L L L L ATENCIÓN: En caso de no poder realizar el traslado de forma segura, pida a alguien que le ayude. -
Seite 110: Desplazamiento Por Pendientes
V300 XL 2013-11 Suelte los frenos. Sujete los dos aros de propulsión por la parte superior. Inclínese hacia delante y empuje los aros de propulsión hacia delante hasta que los brazos queden estirados. Doble los brazos hacia atrás, hacia la parte superior de los aros de propulsión y repita el movimiento. - Seite 111 V300 XL 2013-11 Los usuarios experimentados pueden franquear bordillos altos sin ayuda. Esta acción se realiza mejor de espaldas. Gire la silla de ruedas de forma que las ruedas traseras queden orientadas al bordillo. Inclínese hacia delante para desplazar su centro de gravedad hacia delante.
-
Seite 112: Plegado De La Silla De Ruedas
V300 XL 2013-11 2.12.3 Desplazamientos por escaleras Para desplazarse por las escaleras mientras está en una silla de ruedas, siga las instrucciones siguientes: L L L L ADVERTENCIA: Riesgo de vuelco: el desplazamiento por escaleras deberá realizarse siempre con 2 acompañantes. -
Seite 113: Instalación Y Ajuste
Instalación y ajuste Este capítulo contiene instrucciones destinadas a los distribuidores especializados. La silla Vermeiren V300 XL está diseñada para ser regulada mediante un mínimo de piezas de repuesto. No es necesario disponer de un stock extra de piezas de repuesto. -
Seite 114: Ajuste De La Altura Del Asiento Y Del Ángulo Del Asiento
Ajuste de la altura del asiento y del ángulo del asiento El asiento de la silla Vermeiren V300 XL dispone de 4 alturas y 5 ángulos (0° -2,5° -5° -7,5° - 10° ) regulables mediante la modificación de la posición de las ruedas para cada altura y ángulo con ajustes diferentes en las ruedas delanteras y traseras. - Seite 115 Para las demás combinaciones de ángulo y altura del asiento, siga el procedimiento anterior para ajustar la horquilla y la placa eje en la combinación adecuada. En caso de no encontrar la combinación correcta, contacte con la empresa Vermeiren. Verifique que los ejes pivotantes se encuentran en posición perpendicular con respecto al suelo.
-
Seite 116: Ajuste De La Profundidad Del Asiento
V300 XL 2013-11 Ajuste de la profundidad del asiento El asiento de la silla Vermeiren V300 XL dispone de 3 posiciones de profundidad regulables mediante la modificación de la pieza de unión del respaldo Profundidad del asiento Unión del respaldo 490 mm (estándar) -
Seite 117: Ajuste Del Reposapiés
V300 XL 2013-11 Ajuste del reposapiés 3.6.1 Longitud del reposapiés L L L L PRECAUCIÓN: Riesgo de desperfectos: evite que el reposapiés entre en contacto con el suelo. Mantenga una distancia mínima de 60 mm por encima del suelo. Regule la longitud del reposapiés como se indica a continuación:... -
Seite 118: Ajuste Del Reposabrazos
V300 XL 2013-11 Ajuste del reposabrazos El reposabrazos de su silla de ruedas puede ajustarse en altura y profundidad. La altura del reposabrazos puede regularse en 3 posiciones. Altura del reposabrazos al Número de bloques Número de bloques entre asiento... -
Seite 119: Ajuste De La Estabilidad Y La Maniobrabilidad
V300 XL 2013-11 Ajuste de la estabilidad y la maniobrabilidad La estabilidad y la maniobrabilidad pueden ajustarse moviendo la placa eje de las ruedas traseras Ajuste la estabilidad y la maniobrabilidad de acuerdo con los pasos siguientes: 1. Afloje los tornillos de la placa eje. - Seite 120 V300 XL 2013-11 Spis treści Wstęp ....................2 Opis produktu ................3 Przeznaczenie ......................3 Parametry techniczne ....................4 Rysunek ........................5 Akcesoria ........................5 Płytka określająca położenie ..................6 Objaśnienie symboli ....................6 Sposób użycia ................6 Przenoszenie wózka inwalidzkiego ................6 Montaż...
-
Seite 121: Wstęp
Wstęp Przede wszystkim pragniemy Państwu podziękować za zaufanie, jakim nas Państwo obdarzyli, dokonując wyboru jednego z naszych wózków inwalidzkich. Wózki inwalidzkie Vermeiren są konstruowane na podstawie wieloletnich badań i doświadczenia. W procesie projektowania szczególną uwagę poświęcono łatwości użycia i solidności. -
Seite 122: Opis Produktu
Podczas użytkowania na matach, dywanach lub luźnych przykryciach podłogowych może dojść do uszkodzenia powierzchni wykładzinowej. Należy korzystać wyłącznie z akcesoriów zatwierdzonych przez firmę Vermeiren. Producent nie ponosi odpowiedzialności za uszkodzenia spowodowane brakiem lub nieodpowiednim serwisowaniem bądź będące skutkiem nieprzestrzegania zaleceń... -
Seite 123: Parametry Techniczne
V300 XL 2013-11 Parametry techniczne Parametry techniczne podane poniżej opisują wózek inwalidzki w konfiguracji standardowej. Jeśli użytkownik korzysta z innych podnóżków/podłokietników lub innych akcesoriów, wartości będą się różnić. Producent Vermeiren Adres Vermeirenplein 1/15, B-2920 Kalmthout Ręczny wózek inwalidzki Model V300 XL Maksymalna waga użytkownika... -
Seite 124: Rysunek
9 = Zaślepka 10 = Krzyżak 11 = Uchwyty 12 = Uchwyty poprzeczny Akcesoria Dla modelu V300 XL dostępne są następujące akcesoria: • Pas stabilizujący miednicę od przodu (B20) do zamocowania na rurach z tyłu wózka (patrz instrukcja) • Urządzenie zapobiegające przewróceniu wózka (B78) do zamocowania na dolnej ramie wózka (patrz instrukcja) -
Seite 125: Płytka Określająca Położenie
V300 XL 2013-11 Płytka określająca położenie 1 = Logo Vermeiren 2 = Bez Crash testu 3 = Płytka określająca 4 = Imię i nazwisko Vermeiren Objaśnienie symboli Waga maksymalna Użycie wewnątrz i na zewnątrz budynków Maks. bezpieczne nachylenie CE deklaracja Oznaczenie typu Nie nadaje się... -
Seite 126: Montaż Kół Tylnich
V300 XL 2013-11 Montaż kół tylnich 1. Chwyć tylne koło i naciśnij przycisk 2. Przytrzymując wciśnięty przycisk, nałóż oś tylnego koła aż do zablokowania. 3. Zwolnij przycisk. 4. Sprawdź, czy koło jest bezpiecznie zamocowane. Rozkładanie wózka inwalidzkiego L L L L PRZESTROGA: Ryzyko przytrzaśnięcia –... -
Seite 127: Montaż I Demontaż Podnóżka
V300 XL 2013-11 Montaż i demontaż podnóżka Aby zamontować podnóżek: Przytrzymaj podnóżek w poprzek po zewnętrznej stronie ramy wózka inwalidzkiego i przymocuj element ramy. Obróć podnóżek do wewnątrz, aż wskoczy na swoje miejsce. Obróć płytę podnóżka w dół, aż zaciski zablokują... -
Seite 128: Montaż I Demontaż Podłokietników
V300 XL 2013-11 Montaż i demontaż podłokietników Podłokietniki wózka inwalidzkiego można montaż zgodnie z instrukcją. L L L L PRZESTROGA: Ryzyko przytrzaśnięcia – trzymaj palce, zapięcia i odzież z dala od spodniej części podłokietnika. 1. Zamontuj tylną rurkę podłokietnika w ramie 2. -
Seite 129: Wsiadanie I Zsiadanie Z Wózka Inwalidzkiego
V300 XL 2013-11 Aby wymontować podłokietnik, naciśnij przycisk i wyciągnij tył podłokietnika z ramy Wsiadanie i zsiadanie z wózka inwalidzkiego L L L L PRZESTROGA: Jeśli nie można samemu bezpiecznie wsiąść lub zsiąść z wózka inwalidzkiego, należy poprosić kogoś o pomoc. -
Seite 130: Poruszanie Się Po Powierzchniach Pochyłych
V300 XL 2013-11 Zwolnij hamulce. Uchwyć obie obręcze w najwyższych punktach. Pochyl się w przód i popchnij obręcze do przodu aż do wyprostowania rąk. Luźno odchyl ręce do tyłu aż do górnych krawędzi obręczy i powtórz ruch. 2.11 Poruszanie się po powierzchniach pochyłych L L L L OSTRZEŻENIE:... - Seite 131 V300 XL 2013-11 Doświadczony użytkownik może samodzielnie pokonywać wyższe krawężniki. Najłatwiej tego dokonać, poruszając się do tyłu. Obróć wózek inwalidzki, zwracając go tylnymi kołami w stronę krawężnika. Pochyl się w przód, aby przesunąć środek ciężkości do przodu. Zbliż wózek do krawędzi krawężnika.
-
Seite 132: Składanie Wózka Inwalidzkiego
V300 XL 2013-11 2.12.3 Pokonywanie schodów Schody można pokonywać na wózku inwalidzkim, przestrzegając następujących zasad: L L L L OSTRZEŻENIE: Ryzyko wywrócenia – zawsze pokonuj schody z pomocą 2 opiekunów. Wymontuj podnóżki. Jeden z opiekunów musi nieznacznie odchylić wózek w tył. -
Seite 133: Montaż I Regulacja
Instrukcje zawarte w niniejszym rozdziale są przeznaczone dla wyspecjalizowanego sprzedawcy. Wózek Vermeiren V300 XL zaprojektowano w taki sposób, aby jego regulacja wymagała minimum części zamiennych. Nie jest wymagany zapas dodatkowych części zamiennych. Informacje na temat najbliższych punktów usługowych lub przedstawicieli otrzymać można w najbliższym biurze Vermeiren. -
Seite 134: Regulacja Wysokości I Kąta Nachylenia Siedziska
2013-11 Regulacja wysokości i kąta nachylenia siedziska W wózku Vermeiren V300 XL można ustawić 4 różne wysokości i 5 kątów nachylenia siedziska (0° -2,5° -5° -7,5° -10° ), zmieniaj ąc pozycję kół. Dla każdej wysokości i kąta nachylenia wymagana jest inna konfiguracja przednich i tylnich kół. - Seite 135 Jeśli występują trudności ze znalezieniem odpowiedniej kombinacji, zawsze można skontaktować się z firmą Vermeiren. Sprawdź, czy ośki skrętne są ustawione prostopadle do podłoża. W razie potrzeby skorzystaj z poniższej procedury, aby wyregulować obudowę nóżki kółka: Poluzuj 3 śruby, używając klucza imbusowego 5 mm.
-
Seite 136: Regulacja Głębokości Siedziska
V300 XL 2013-11 Regulacja głębokości siedziska W wózku Vermeiren V300 XL można ustawić 3 różne głębokości siedziska, zmieniając pozycję złącza oparcia Głębokość siedziska Złącze oparcia 490 mm (Standard) Pozycja 1 510 mm Pozycja 2 530 mm Pozycja 3 Tabela 3: Głębokość siedziska Aby zmienić... -
Seite 137: Regulacja Podnóżka
V300 XL 2013-11 Regulacja podnóżka 3.6.1 Długość podnóżka L L L L UWAGA: Ryzyko uszkodzenia — należy unikać kontaktu podnóżka z podłożem. Zachowaj minimalny odstęp 60 mm od podłoża. Aby wyregulować długość podnóżka: 1. Wykręć śrubę (na tyle podnóżka). 2. Ustaw wygodną długość podnóżka. -
Seite 138: Regulacja Stabilności I Manewrowości
V300 XL 2013-11 Głębokość podłokietników można ustawić w 3 pozycjach. Głębokość podłokietnika Wykorzystane otwory Pozycja przednia Tylny i środkowy Pozycja środkowa (Standard) Otwory 2 i 4 Pozycja tylna Przedni i środkowy Tabela 5: Głębokość podłokietnika Aby wyregulować wysokość i głębokość podłokietników: Wykręć... - Seite 139 V300 XL 2019-06 Obsah Úvodní slovo ................2 Popis produktu ............... 3 1.1 Určení produktu ..................... 3 1.2 Technické údaje .................... 4 1.3 Nákres ......................5 1.4 Příslušenství ....................6 1.5 Umístění identifikačního štítku ..............6 1.6 Vysvětlivky symbolů ..................6 Použití...
- Seite 140 Dodržování uživatelských instrukcí a pokynů k údržbě je nezbytnou součástí záručních podmínek. Tento návod obsahuje nejnovější verzi produktu. Společnost Vermeiren si vyhrazuje právo na změny bez povinnosti přizpůsobit či vyměnit předchozí dodané modely. Pokud máte jakékoliv otázky, obraťte se prosím na Vašeho specializovaného prodejce.
-
Seite 141: Popis Produktu
Invalidní vozík by se neměl používat jako žebřík, ani pro přepravu těžkých či horkých předmětů. Při používání na rohožích, kobercích či volné podlahové krytině hrozí poškození této krytiny. Používejte pouze schválená příslušenství od společnosti Vermeiren. Výrobce není odpovědný za škodu způsobenou nedostatečným nebo nesprávným servisem nebo nedodržováním pokynů uvedených v tomto manuálu. -
Seite 142: Technické Údaje
V300 XL 2019-06 Technické údaje Technické údaje níže jsou platné pro invalidní vozík ve standardním nastavení. Pokud se používají podnožky/loketní opěrky nebo další příslušenství, tabulkové hodnoty se změní. Značka Vermeiren Adresa Vermeirenplein 1/15, B-2920 Kalmthout Manuální invalidní vozík Model V300 XL Maximální... -
Seite 143: Nákres
V300 XL 2019-06 Invalidní vozík vyhovuje požadavkům uvedených v normách: ISO 7176-8: Požadavky a zkušební metody na statickou únosnost, rázovou pevnost a únavovou pevnost. ISO 7176-16: Odolnost čalouněných dílů vůči vznícení. Nákres 1 = Područky 2 = Loketní opěrky 3 = Stupačky 4 = Brzdy 5 = Řídicí... -
Seite 144: Příslušenství
V300 XL 2019-06 Příslušenství Pro V300 XL jsou dostupná následující příslušenství: Bezpečnostní pás (B20) Zařízení proti překlopení (B78) pro montáž na spodní zadní část rámu Umístění identifikačního štítku 1 = Logo Vermeiren 2 = Crash testy neprovedeny 3 = Identifikační štítek 4 = Název Vermeiren... -
Seite 145: Použití
V300 XL 2019-06 Použití Tato kapitola popisuje každodenní použití. Tyto pokyny jsou určeny pro uživatele a specializovaného prodejce. Invalidní vozík je od Vašeho specializovaného prodejce dodáván kompletně sestavený. Pokyny pro specializovaného prodejce k sestavení invalidního vozíku jsou uvedeny v kapitole Přenášení... -
Seite 146: Montáž A Demontáž Podnožek
V300 XL 2019-06 Montáž a demontáž podnožek Postup montáže podnožek: Podržte stupačky příčně z vnější strany rámu invalidního vozíku a vložte čepičku trubice do rámu. Otočte podnožky směrem dovnitř, dokud nezacvaknou. Sklopte stupačky směrem dolů až do (3) uzamknutí spony přes pero (4) Postup demontáže podnožek:... -
Seite 147: Montáž A Demontáž Loketních Opěrek
V300 XL 2019-06 Montáž a demontáž loketních opěrek Loketní opěrky invalidního vozíku připevněte podle následujících pokynů. VÝSTRAHA: Nebezpečí sevření – udržujte prsty, přezky a oděvy mimo spodní stranu loketní opěrky. 1. Vsuňte zadní trubici loketní opěrky do rámu vozíku 2. Ujistěte se, že loketní opěrka zacvakne do uzamykacího mechanizmu. -
Seite 148: Přesun Pacienta Do A Z Invalidního Vozíku
V300 XL 2019-06 Pro sejmutí loketní opěrky stiskněte tlačítko (3) a vytáhněte zadní část loketní opěrky z rámu vozíku (4). Přesun pacienta do a z invalidního vozíku VÝSTRAHA: Pokud nemůžete vykonat bezpečný přesun sami, požádejte někoho o pomoc. VÝSTRAHA: Nebezpečí překlopení invalidního vozíku – nestoupejte na stupačky. -
Seite 149: Pohyb Ve Svahu
V300 XL 2019-06 Uvolněte brzdy. Uchopte obě poháněcí obruče v jejich nejvyšší poloze. Nakloňte se vpřed a zatlačte poháněcími obručemi směrem vpřed až do natažených paží. Houpejte pažemi dozadu směrem k horní straně poháněcích obručí a pohyb opakujte. 2.11 Pohyb ve svahu VAROVÁNÍ: Kontrolujte svoji rychlost –... - Seite 150 V300 XL 2019-06 2.12.2 Jízda do schodu nebo na obrubník. Postup jízdy do schodu nebo na obrubník s pomocí asistenta: Ujistěte se, aby se stupačky nedotkly obrubníku. Požádejte asistenta, aby naklonil invalidní vozík směrem vzad, tak akorát, aby přední kola mohla najet na obrubník.
-
Seite 151: Skládání Invalidního Vozíku
V300 XL 2019-06 2.13 Skládání invalidního vozíku VÝSTRAHA: Nebezpečí sevření – neumisťujte prsty mezi komponenty invalidního vozíku. Složte nebo sundejte stupačky (viz kapitola 2.5). Odklopte tlačnou tyč od pravého madla (zezadu invalidního vozíku). Uchopte sedadlo za přední a zadní část a vytáhněte jej. -
Seite 152: Instalace A Nastavení
Příslušenství Nastavení výšky a náklonu sedadla Sedadlo invalidního vozíku Vermeiren V300 XL je nastavitelné výškově ve 4 polohách a úhlově v 5 polohách (0°-2,5°-5°-7,5°- 10°) změnou polohy kol. Každé výšce a úhlu (náklonu) odpovídá různé nastavení předních a zadních kol. - Seite 153 V300 XL 2019-06 Přední kolo Destička osy zadních kol Výška sedadla 440 mm Výška sedadla 470 mm Výška sedadla 500 mm (standardní) Výška sedadla 530 mm Strana...
- Seite 154 U dalších kombinací úhlu a výšky sedadla použijte výše uvedený postup pro nastavení přední vidlice a destičky osy do správné kombinace poloh. Pokud nenajdete tu správnou kombinaci, můžete vždy kontaktovat společnost Vermeiren. Zkontrolujte, zda jsou otočné osy kolmé vůči zemi. Pokud je to nezbytné, podle postupu níže nastavte kryt dříku kolečka:...
-
Seite 155: Nastavení Hloubky Sedadla
V300 XL 2019-06 Nastavení hloubky sedadla Hloubka sedadla invalidního vozíku Vermeiren V300 XL má tři polohy prostřednictvím změny uchycení zádové opěrky (1). Hloubka sedadla Uchycení zádové opěrky 490 mm (standardní) Poloha 1 510 mm Poloha 2 530 mm Poloha 3 Tabulka 3: Hloubka sedadla Hloubku sedadle je možné... -
Seite 156: Nastavení Podnožek
V300 XL 2019-06 Nastavení podnožek 3.6.1 Délka podnožek VÝSTRAHA: Nebezpečí poškození – zajistěte, aby se podnožky nedotýkaly země. Udržujte minimální vzdálenost 60 mm nad zemí. Postup nastavení délky podnožek: 1. Povolte šroub (1) (na zadní straně podnožek). 2. Nastavte požadovanou délku podnožek. -
Seite 157: Nastavení Stability A Ovladatelnosti
V300 XL 2019-06 Výška područek Počet bloků Počet bloků mezi nad sedadlem pod trubicí trubicí a područkami 220 mm (standardní) 230 mm 240 mm Tabulka 4: Výška područky Hloubka područky lze nastavit ve 3 polohách. Hloubka područky Použité otvory Střední poloha Zadní... - Seite 159 Service registration form Service registration form This product (name): …………………………………….. was inspected (I), serviced (S), repaired (R) or disinfected (D): By (stamp): By (stamp): By (stamp): Kind of work: I / S / R / D Kind of work: I / S / R / D Kind of work: I / S / R / D Date: Date:...
- Seite 160 Vermeiren GROUP Vermeirenplein 1 / 15 B-2920 Kalmthout website: www.vermeiren.com © Vermeiren Group 2019...