Herunterladen Inhalt Inhalt Diese Seite drucken
Ten-Haaft Oyster Bedienungsanleitung
Vorschau ausblenden Andere Handbücher für Oyster:
Inhaltsverzeichnis

Werbung

Verfügbare Sprachen

Verfügbare Sprachen

Soundbar
BEDIENUNGSANLEITUNG
OPERATING MANUAL
INSTRUCTIONS D'UTILISATION
www.ten-haaft.com

Werbung

Inhaltsverzeichnis
loading

Inhaltszusammenfassung für Ten-Haaft Oyster

  • Seite 1 Soundbar BEDIENUNGSANLEITUNG OPERATING MANUAL INSTRUCTIONS D’UTILISATION www.ten-haaft.com...
  • Seite 2: Inhaltsverzeichnis

    6.1 Hinweise 6.2 HDMI-Anschluss 6.3 USB-Anschluss 6.4 Digitaleingang 6.5 Analogeingang 7. Allgemeiner Betrieb 7.1 Allgemeiner Betrieb Oyster® Soundbar 8. Fehlerbehebung 8.1 Fehlerbeschreibung Oyster® Soundbar 9. Technische Daten 9.1 Technische Daten Oyster® Soundbar 10. Pflege und Wartung 10.1 Hinweise zu Pflege und Wartung...
  • Seite 3: Allgemeine Informationen

    1. ALLGEMEINE INFORMATIONEN 1.1 Wichtige Hinweise zur sicheren Benutzung Ihres Geräts Dieses Gerät wurde in Übereinstimmung mit internationalen Sicherheitsstandards konstruiert und hergestellt. Wie bei allen anderen elektrischen Geräte auch, müssen Sie bei diesem Gerät einige Hinweise beachten, um eine optimale und sichere Funktion zu gewährleisten. Lesen Sie vor der ersten Benutzung des Geräts die Bedienungsanleitung durch.
  • Seite 4: Sicherheitshinweise

    1. ALLGEMEINE INFORMATIONEN Benutzen Sie Ihr Gerät nicht weiter, wenn Sie Zweifel an dessen korrekter Funktion haben oder wenn es in irgendeiner Weise beschädigt ist. Schalten Sie das Gerät aus, ziehen Sie den Netzstecker und wenden Sie sich an Ihren Händler. VOR ALLEM: Seien Sie beim Umgang mit elektrischen Geräten stets umsichtig! Sicherheit geht immer vor! 1.2 Sicherheitshinweise...
  • Seite 5 1. ALLGEMEINE INFORMATIONEN Feuchtigkeit • Zur Vermeidung von Brandgefahr, elektrischem Schlag oder Produktschäden darf die Einheit niemals Regen oder Feuchtigkeit ausgesetzt werden und muss vor tropfenden und spritzenden Flüssigkeiten geschützt wer- den. Auf der Einheit dürfen keine mit Flüssigkeit gefüllten Gefäße, wie z.B. Vasen, abgestellt werden. •...
  • Seite 6 1. ALLGEMEINE INFORMATIONEN Überwachung • Verhindern Sie unbedingt, dass insbesondere Kinder Gegenstände in die Öffnungen der Anlage stecken. Das Blitzsymbol im Dreieck weist auf gefährliche elektrische Spannung im Inneren des Gehäuses und die Gefahr eines elektrischen Schlags hin. Ein Ausrufezeichen in einem Dreieck weist auf wichtige Hinweise zu Betrieb, Pflege und Wartung im zur Ein- heit gehörenden Handbuch hin.
  • Seite 7: Produktübersicht

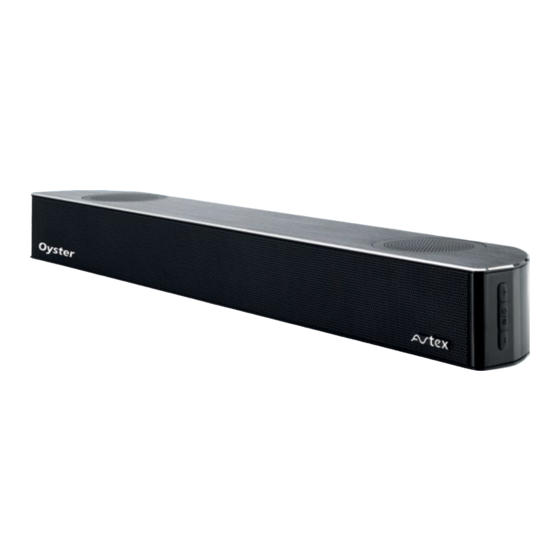
    2. PRODUKTÜBERSICHT 2.1 Produktübersicht Oyster® Soundbar Vorderansicht Rückansicht Nummer Beschreibung Stromanzeige (Standby + Ein) Sensor der Fernbedienung LED-Anzeige • Zum Ein-/Ausschalten gedrückt halten. • Zum Umschalten der Quelle drücken. VOL + / VOL - • Zum Einstellen der Lautstärke drücken.
  • Seite 8: Fernbedienung

    3. FERNBEDIENUNG 3.1 Fernbedienung Nummer Beschreibung Zum Umschalten der Einheit zwischen Ein und Standby Zum Wählen eines voreingestellten Klangeffekts drücken. Die EQ-Standardeinstellung ist MU- SIC, durch mehrfaches Drücken wird zwischen NEWS, NORMAL und MUSIC umgeschaltet. Zum Stummschalten bzw. Fortsetzen der Wiedergabe drücken. VOL + / VOL - •...
  • Seite 9 3. FERNBEDIENUNG...
  • Seite 10: Batterie Einsetzen

    3. FERNBEDIENUNG 3.2 Batterie einsetzen 1. Zum Öffnen des Batteriefachs den Deckel auf der Rückseite der Fernbedienung ausrasten und entfernen. 2. Zwei Batterien der Größe AAA einsetzen. Sicherstellen, dass die Batterien polrichtig entsprechend den Markie- rungen ( + ) und ( - ) an den Batterien und im Batteriefach ( + ) und ( - ) eingesetzt werden. 3.
  • Seite 11: Standardzubehör

    4. STANDARDZUBEHÖR 4.1 Standardzubehör Nummer Standardzubehör x 1 Stück Fernbedienung x 2 Stück AAA-Batterien x 1 Stück Bedienungsanleitung x 1 Stück Netzteil x 1 Stück Kfz-Adapter x 1 Stück Netzkabel x 1 Stück AUX-Kabel x 1 Stück HDMI-Kabel x 1 Stück Koaxialkabel x 1 Stück Halter...
  • Seite 12: Standardinstallation

    5. STANDARDINSTALLATION 5.1 Teile Schrauben A x 2 Halter x 1 Mini-Soundbar x 1 TV x 1 5.2 Installation 1. Gerätefuß vom Fernsehgerät abbauen. 2. Mini-Soundbar mit dem Halter an das TV-Gerät anbauen. SCHRITT 1: Vorhandene Schrauben am Gerätefuß SCHRITT 2: Halter x 1 Vorhandene Schrauben Schrauben A x 2...
  • Seite 13: Stromanschluss

    6. STROMANSCHLUSS 6.1 Hinweise Achtung: • Gefahr von Produktschäden! Stellen Sie sicher, dass die Netzspannung Ihres Stromversorgers mit der Betriebs- spannung übereinstimmt, die auf dem Aufkleber auf der Unterseite oder Rückseite der Einheit angegebenen ist. • Vor dem Anschließen des Netzkabels zuerst alle anderen Verbindungen herstellen. •...
  • Seite 14: Hdmi-Anschluss

    6. STROMANSCHLUSS 6.2 HDMI-Anschluss TV-Geräte mit HDMI-CEC- und ARC-Funktion Wenn Sie Ihre Soundbar an ein TV-Gerät mit HDMI-CEC- oder ARC-Funktion (Audio Return Channel) anschlie- ßen, wird der Fernsehton ohne zusätzliches Audiokabel über die Soundbar wiedergegeben. • Verwenden Sie dazu ein ARC-kompatibles Hochgeschwindigkeits-HDMI-Kabel, und verbinden Sie die HD- MI-ARC-Buchse Ihrer Soundbar mit der HDIMI-ARC-Buchse Ihres TV-Geräts.
  • Seite 15 6. STROMANSCHLUSS Bild und Ton erleben. Sie können über die Soundbar sowohl Bild als auch Ton von externen Geräten wiedergeben. • Stecken Sie dazu ein HDMI-Kabel (nicht im Lieferumfang enthalten) in die Buchse HDMI 1 oder HDMI 2 des TV-Geräts ein und das andere Ende in die Buchse HDMI OUT des externen Geräts ein (z.B. DVD-Spieler, Blu- Ray-Spieler, Spielekonsole).
  • Seite 16: Usb-Anschluss

    6. STROMANSCHLUSS 6.3 USB-Anschluss Über den USB-Anschluss können Sie Musik von USB-Speichermedien (z.B. USB-Stick, USB-Flash-Player oder Speicherkarten) über die leistungsfähigen Lautsprecher der Soundbar wiedergeben. 1. Stecken Sie dazu das USB-Gerät in die Buchse auf der Rückseite der Soundbar. 2. Wählen Sie die USB-Funktion, indem Sie Sie mehrmals / auf der Seite der Soundbar oder USB auf der Fernbedienung drücken.
  • Seite 17: Analogeingang

    6. STROMANSCHLUSS 6.5 Analogeingang Anschluss eines DVD-Spielers bzw. TV-Geräts an den Analogeingang der Soundbar • Verbinden Sie mit einem Inline-Audiokabel mit 3,5-mm-Stereo-Klinkenstecker und 2 Cinch-Steckern den Ausgang des DVD-Spielers bzw. TV-Geräts mit dem AUX-Eingang der Soundbar. • Schließen Sie den Ausgang des DVD-Spielers bzw. TV-Geräts an den Analogeingang der Soundbar an. •...
  • Seite 18: Allgemeiner Betrieb

    7. ALLGEMEINER BETRIEB 7.1 Allgemeiner Betrieb Oyster® Soundbar Standby/Ein Wenn Sie Ihre Einheit zum ersten Mal an die Stromversorgung anschließen, schaltet sie sich automatisch ein. • Um die Einheit auf STANDBY zu schalten, drücken Sie auf der Fernbedienung auf oder halten Sie an der Einheit / gedrückt, bis die POWER-Anzeige rot leuchtet.
  • Seite 19 7. ALLGEMEINER BETRIEB Bluetooth-fähige Geräte koppeln Bevor Sie Ihre Bluetooth-fähigen Geräte zum ersten Mal an die Soundbar anschließen, müssen Sie diese mit der Soundbar koppeln. Hinweis: • Der Empfangsbereich zwischen Soundbar und Bluetooth-Gerät beträgt maximal ca. 8 Meter (sofern sich keine Gegenstände zwischen Bluetooth-Gerät und der Soundbar befinden).
  • Seite 20: Fehlerbehebung

    8. FEHLERBEHEBUNG 8.1 Fehlerbeschreibung Oyster® Soundbar Fehlerbehebung Führen Sie niemals Reparaturversuche an der Soundbar durch, dies führt zum Verlust Ihrer Garantieansprüche. Falls beim Betrieb dieser Einheit Probleme auftreten, prüfen Sie bitte die folgenden Punkte, bevor Sie sich an den Kundendienst wenden.
  • Seite 21: Technische Daten

    9. TECHNISCHE DATEN 9.1 Technische Daten Oyster® Soundbar Stromversorgung: 100 - 240 V Wechselstrom, 50/60 Hz Netzteil:12 Volt (0,75 A) / 24 V (0,42 A) Stromaufnahme: 10 Watt Stromaufnahme (Standby): < 0,5 Watt Eingangsempfindlichkeit: 700 mVrms Impedanz Hochtöner: 8 Ohm Impedanz Tief-/Mitteltöner: 4 Ohm...
  • Seite 22: Pflege Und Wartung

    10. PFLEGE UND WARTUNG 10.1 Hinweise zu Pflege und Wartung Entsorgung Das Symbol auf dem Produkt oder dessen Verpackung weist darauf hin, dass dieses Produkt nicht über den Hausmüll entsorgt werden darf. Das Produkt muss über eine entsprechend ausgewiesene Rückgabestelle dem Recycling von elektrischen und elektronischen Geräten zugeführt werden.
  • Seite 23 NOTIZEN...
  • Seite 24 CONTENTS 1. General information 1.1 Some Dos and Don‘ts On The Safe Use Of Equipment 1.2 Safety Warnings 2. Product Overview 2.1 Product overview Oyster® Soundbar 3. Remote Control 3.1 Remote Control 3.2 Battery Installation 3.3 Remote Control Operation Range 4.
  • Seite 25: General Information

    1. GENERAL INFORMATION 1.1 Some Dos and Don‘ts On The Safe Use Of Equipment This equipment has been designed and manufactured to meet international safety standards but, like any electrical equipment, care must be taken if you are to obtain the best results and safety is to be assured. DO read the operating instructions before you attempt to use the equipment.
  • Seite 26: Safety Warnings

    1. GENERAL INFORMATION 1.2 Safety Warnings • Read all the instructions carefully before using the unit and keep them for future reference. • Retain the manual. If you pass the unit onto a third party make sure to include this manual. Check that the voltage marked on the rating label matches your mains voltage.
  • Seite 27 1. GENERAL INFORMATION Safety • Always disconnect the unit from the mains supply before connecting/disconnecting other devices or moving the unit. • Unplug the unit from the mains socket before a lightning storm. Mains Cable • Make sure the unit or the unit stand is not resting on top of the mains cable, as the weight of the unit may damage the cable and create a safety hazard.
  • Seite 28 1. GENERAL INFORMATION Service • To reduce the risk of electric shock, do not remove screws. The unit does not contain any user-serviceable parts. Please leave all maintenance work to qualified personnel. • Do not open any fixed covers as this may expose dangerous voltages. Maintenance •...
  • Seite 29: Product Overview

    2. PRODUCT OVERVIEW 2.1 Product overview Oyster® Soundbar Front view Back view Number Power indicator (Standby & on) Remote Control sensor LED Display • Press and hold for power on/off. • Press to change source. VOL + / VOL - •...
  • Seite 30: Remote Control

    3. REMOTE CONTROL 3.1 Remote Control Number To switch the unit between ON and STANDBY mode Press to select a preset sound effect. Default EQ is MUSIC, press to switch to NEWS, NORMAL and MUSIC as recycle. Press to mute or resume the sound VOL + / VOL - •...
  • Seite 31 3. REMOTE CONTROL...
  • Seite 32: Battery Installation

    3. REMOTE CONTROL 3.2 Battery Installation 1. Unclip and remove back cover to open battery compartment of the remote control 2. Insert two AAA size batteries. Make sure the ( + ) and ( - ) ends of the batteries match the ( + ) and ( - ) ends indicated in the battery compartment.
  • Seite 33: Standard Accessories

    4. STANDARD ACCESSORIES 4.1 Standard Accessories Number Standard Accessories x 1 pc Remote Control x 2 pcs AAA batteries x 1 pc Instruction Manual x 1 pc Power adaptor x 1 pc Car adaptor x 1 pc AC cord x 1 pc AUX cable x 1 pc HDMI cable...
  • Seite 34: Normal Installation

    5. NORMAL INSTALLATION 5.1 Parts Screws A x 2 Bracket x 1 Mini soundbar x 1 TV x 1 5.2 Installation 1. Disassemble the TV stand from the TV 2. Using the bracket to assembly the mini soundbar with TV. STEP 1: Existing TV stand screws STEP 2:...
  • Seite 35: Power Connection

    6. POWER CONNECTION 6.1 Hints Caution: • Risk of product damage! Ensure that the power supply voltage corresponds to the voltage printed on the rating label on the back or on the underside of the unit. • Before connecting the power cable, ensure that you have completed all the other connections. •...
  • Seite 36: Hdmi Connection

    6. POWER CONNECTION 6.2 HDMI Connection With compatible TVs HDMI-CEC and ARC If you connect your sound bar to a compatible TV HDMI-CEC and ARC (Audio Return Channel), you can play the sound from your TV through your sound bar without using additional audio cable. •...
  • Seite 37 6. POWER CONNECTION To enjoy the sound and image. You can enjoy both sound and image for a device connected to your sound bar. • To do so, plug HDMI cable (not supplied) to the HDMI 1 or HDMI 2 jack on the back of the TV and the other end into the HDMI OUT jack on your audio device, such as DVD player, Blu-Ray player, games console.
  • Seite 38: Usb Connection

    6. POWER CONNECTION 6.3 USB Connection Connecting a USB mass storage device (including USB flash memory, USB flash players or memory cards) to this unit to enjoy the device’s stored music through the powerful speakers of this unit. 1. Insert the USB device into the port at the rear of the unit.
  • Seite 39: Analogue Input Connection

    6. POWER CONNECTION 6.5 Analogue input connection Connecting DVD player/TV outpus to analogue input from the soundbar. • Use a 3.5mm line in to RCA audio cable to connect the DVD player/TV output with the AUX input socket from the soundbar. •...
  • Seite 40: General Operation

    7. GENERAL OPERATION 7.1 General Operation Oyster® Soundbar Standby/ON When you connect the unit for the first time to the power supply, the unit will automatically switch on. button on the remote control or press and hold the / • Press the on the unit to switch the main unit to STANDBY mode, the POWER indicator will illuminate red.
  • Seite 41 7. GENERAL OPERATION Note: • The operational range between this unit and a Bluetooth device is approximately 8 metres (without any object between the Bluetooth device and the unit). • Before you connect a Bluetooth device to this unit, ensure that you know the device’s capabilities. •...
  • Seite 42: Trouble Shooting

    8. TROUBLE SHOOTING 8.1 Trouble Shooting Oyster® Soundbar Trouble shooting To keep the warranty valid, never try to repair the system by yourself. If you encounter problems when using this unit, check the following points before requesting service. No power •...
  • Seite 43: Specification

    9. SPECIFICATION 9.1 Specification Oyster® Soundbar Power Supply: AC100-240V~50/60Hz Power Adapter:12V (0.75A)/24V (0.42A) Power Consumption: 10 Watt Power Consumption(standby mode): < 0.5 Watt Input Sensitivity: 700mVrms High Frequence Speaker Impedance: 8 Ohm Main Speaker Impedance: 4 Ohm S/N(A Weight): 80dB Power Output: 10W x 2 THD(1kHz, 1W): 0.5%...
  • Seite 44: Care And Maintenance

    10. CARE AND MAINTENANCE 10.1 Notes on care and maintenance This symbol on the product or on its packaging indicates that this product may not be treated as household waste. Instead it shall be handed over to the applicable collection point for the recycling of electrical and electronic equipment.
  • Seite 45 NOTES...
  • Seite 46 1.1 Choses à faire et à ne pas faire pour une utilisation sans risque de l‘appareil 1.2 Avertissements concernant la sécurité 2. Vue d’ensemble du produit 2.1 Vue d’ensemble du produit Oyster® Soundbar 3. Télécommande 3.1 Télécommande 3.2 Mise en place des piles 3.3 Portée de la télécommande...
  • Seite 47: Informations Générales

    1. INFORMATIONS GÉNÉRALES 1.1 Choses à faire et à ne pas faire pour une utilisation sans risque de l‘appareil Cet appareil a été conçu et fabriqué pour répondre aux normes de sécurité internationales mais, comme pour tout dispositif électrique, il convient de respecter certaines consignes pour en tirer les meilleurs résultats et en assurer la sécurité...
  • Seite 48: Avertissements Concernant La Sécurité

    1. INFORMATIONS GÉNÉRALES SURTOUT, NE MANIPULEZ JAMAIS au hasard et ne prenez jamais aucun risque avec tout appareil électrique quel qu’il soit. Jouez la sécurité ! 1.2 Avertissements concernant la sécurité • Lisez attentivement la totalité des instructions avant d‘utiliser l’appareil et conservez-les de façon à pouvoir vous y référer ultérieurement.
  • Seite 49 1. INFORMATIONS GÉNÉRALES Aération • Pour prévenir le risque de choc électrique ou d’incendie dû à une surchauffe, assurez-vous que les orifices d‘aération ne sont pas obstrués par des rideaux ou d’autres objets. • N’installez pas l’appareil dans une bibliothèque, un placard ou un autre espace confiné. Assurez-vous que l’appareil est bien ventilé.
  • Seite 50 1. INFORMATIONS GÉNÉRALES Surveillance • Surveillez les enfants afin d‘éviter qu‘ils ne jouent avec l‘appareil et la télécommande. L’éclair terminé par une flèche à l’intérieur d’un triangle avertit l‘utilisateur de la présence d‘une tension dangereuse non isolée à l‘intérieur de l‘appareil, suffisamment élevée en tout cas pour créer un risque de choc électrique.
  • Seite 51: Vue D'ensemble Du Produit

    2. VUE D’ENSEMBLE DU PRODUIT 2.1 Vue d’ensemble du produit Oyster® Soundbar Vue avant Vue avant Numéro Témoin d'alimentation (modes veille et marche) Capteur de télécommande Affichage LED • Appuyer sur ce bouton et le maintenir enfoncé pour allumer ou éteindre l’appareil.
  • Seite 52: Télécommande

    3. TÉLÉCOMMANDE 3.1 Télécommande Nummer Beschreibung Zum Umschalten der Einheit zwischen Ein und Standby Zum Wählen eines voreingestellten Klangeffekts drücken. Die EQ-Standardeinstellung ist MU- SIC, durch mehrfaches Drücken wird zwischen NEWS, NORMAL und MUSIC umgeschaltet. Zum Stummschalten bzw. Fortsetzen der Wiedergabe drücken. VOL + / VOL - •...
  • Seite 53 3. TÉLÉCOMMANDE...
  • Seite 54: Mise En Place Des Piles

    3. TÉLÉCOMMANDE 3.2 Mise en place des piles 1. Déclipser et retirer le cache arrière pour ouvrir le compartiment des piles de la télécommande. 2. Insérer deux piles AAA. Assurez-vous que les extrémités ( + ) et ( - ) des piles correspondent aux extrémités ( + ) et ( - ) indiquées dans le compartiment des piles.
  • Seite 55: Accessoires Standard

    4. ACCESSOIRES STANDARD 4.1 Accessoires standard Nombre Accessoires standard Télécommande Piles AAA Manuel d’utilisation Adaptateur d'alimentation Adaptateur voiture Cordon d’alimentation Câble AUX Câble HDMI Câble coaxial Support Vis A...
  • Seite 56: Installation Normale

    5. INSTALLATION NORMALE 5.1 Pièces Vis A x 2 Support x 1 Mini barre de son x 1 Téléviseur x 1 5.2 Installation 1. Détacher le socle du téléviseur. 2. Utiliser le support pour monter le téléviseur sur la mini barre de son ÉTAPE 1 : ÉTAPE 2 : Vis du socle de téléviseur existant.
  • Seite 57: Branchement Électrique

    6. BRANCHEMENT ÉLECTRIQUE 6.1 Notes Attention : • Risque d’endommager le produit ! Assurez-vous que la tension d’alimentation correspond à la tension indiquée sur la plaque signalétique apposée au dos ou sur le dessous de l‘appareil. • Avant de brancher le cordon d‘alimentation, réalisez tous les autres branchements nécessaires. •...
  • Seite 58: Établissement De La Connexion Hdmi

    6. BRANCHEMENT ÉLECTRIQUE 6.2 Établissement de la connexion HDMI Téléviseurs compatibles HDMI-CEC et ARC En connectant votre barre de son à un téléviseur compatible HDMI-CEC et ARC (Audio Return Channel), vous pouvez profiter du son du téléviseur à travers la barre de son sans câble audio supplémentaire. •...
  • Seite 59 6. BRANCHEMENT ÉLECTRIQUE Pour profiter du son et de l‘image. Vous pouvez profiter à la fois de l‘image et du son d‘un appareil connecté à la barre de son. • Insérez le câble HDMI (non fourni) dans la prise HDMI 1 ou HDMI 2 à l‘arrière du téléviseur et l‘autre extrémité du câble dans la prise HDMI OUT de votre appareil audio (lecteur DVD, lecteur Blu-ray, console de jeu, etc.).
  • Seite 60: Connexion Usb

    6. BRANCHEMENT ÉLECTRIQUE 6.3 Connexion USB Branchez un périphérique de stockage USB (y compris une clé USB, un lecteur flash USB ou une carte mémoi- re) sur la barre de son pour profiter de la musique enregistrée sur votre périphérique à travers les puissants haut-parleurs de la barre de son.
  • Seite 61: Connexion À Une Entrée Analogique

    6. BRANCHEMENT ÉLECTRIQUE 6.5 Connexion à une entrée analogique Branchement d’une sortie lecteur DVD / téléviseur sur l’entrée analogique de la barre de son • Utilisez un câble audio Line-In à RCA de 3,5 mm pour connecter la sortie du lecteur DVD / téléviseur à la prise d’entrée AUX de la barre de son.
  • Seite 62: Utilisation Générale

    7. UTILISATION GÉNÉRALE 7.1 Utilisation Générale Oyster® Soundbar Veille / marche La première fois que vous branchez le câble d‘alimentation de la barre de son sur une prise secteur, la barre de son s‘allume automatiquement. de la télécommande ou appuyez sur le bouton / •...
  • Seite 63 7. UTILISATION GÉNÉRALE Couplage de périphériques Bluetooth Vous devez coupler votre périphérique Bluetooth à la barre de son avant de le connecter pour la première fois. Remarque : • La distance maximale entre la barre de son et votre périphérique Bluetooth est d’environ 8 mètres (en l‘absence d‘obstacle entre le périphérique Bluetooth et la barre de son).
  • Seite 64: Dépannage

    8. DÉPANNAGE 8.1 Dépannage Oyster® Soundbar Dépannage Pour ne pas perdre le bénéfice de la garantie, n’essayez jamais de réparer le système par vous-même. En cas de problème, vérifiez les points suivants avant de faire appel à un technicien. Pas de courant •...
  • Seite 65: Caractéristiques Techniques

    9. CARACTÉRISTIQUES TECHNIQUES 9.1 Caractéristiques Techniques® Soundbar Alimentation : 100-240 V CA~50/60 Hz Adaptateur d’alimentation :12 V (0,75 A)/24 V (0,42 A) Consommation électrique : 10 watts Consommation électrique (en mode veille) : < 0,5 watt Sensibilité d’entrée : 700 mV eff. Impédance à...
  • Seite 66: Entretien

    10. ENTRETIEN 10.1 Notes sur l‘entretien Mise au rebut La présence du symbole sur le produit ou son emballage indique que le produit ne doit pas être éliminé avec les ordures ménagères. Il doit être remis à un point de collecte pour le recyclage des équipements électriques et électroniques.
  • Seite 67 NOTES...
  • Seite 68 Haaft GmbH Öffnungszeiten Neureutstraße 9 Montag – Freitag 08:00 Uhr – 12:00 Uhr 75210 Keltern und von 12:30 Uhr – 16:30 Uhr Germany Office hours: Tel.: +49 (0) 7231 / 58588-0 Fax: +49 (0) 7231 / 58588-119 Monday – Friday 08:00 a.m.

Inhaltsverzeichnis