
Verwandte Anleitungen für KLEIBER Pyroskop 840


Inhaltszusammenfassung für KLEIBER Pyroskop 840
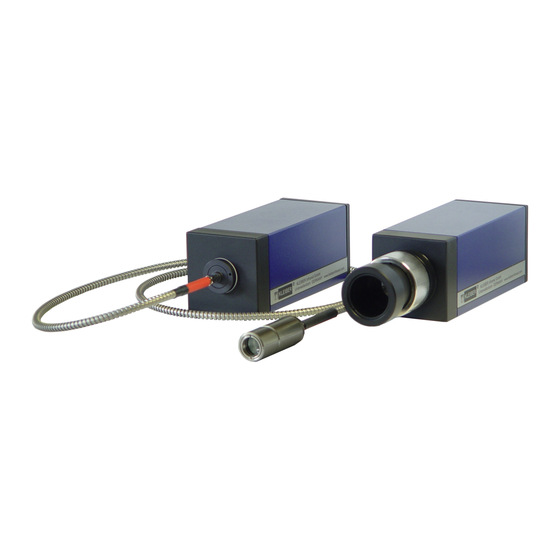
- Seite 1 Pyroskop 840 KLEIBER-Pyrometer Operation Manual Betriebsanleitung Fast measurement, fast controlling, fast switching...
- Seite 2 © 2010 - 2018 KLEIBER Infrared GmbH Any reproduction of this user manual or part thereof, its storage on electronic media and translation of the manual into foreign languages without written approval of the company KLEIBER Infrared GmbH is strictly forbidden.
-
Seite 3: Inhaltsverzeichnis
6.1.1 Climatic conditions ........18 Pyroskop 840... - Seite 4 13.2 Disposal ..........31 14 Licenses of used software Pyroskop 840...
-
Seite 5: Basic Information
The KLEIBER Pyroskop 840 also enables you to solve high speed applications in laser areas by using laser rejection filters and challenging temperature measurement on silicon or tungsten. -
Seite 6: Warranty And Liability
Data (section 4) at page 8 1.5 Warranty and Liability KLEIBER Infrared GmbH offers a 2 year warranty for the device starting from the date of invoice. The warranty covers manufacturing defects. Then the device will be repaired free of charge, however freight charges are the responsibility of the respective sender. -
Seite 7: Safety
Important instructions for protecting the environment. 2.2 General Safety Notes The KLEIBER Pyroskop 840 pyrometer has been built in accordance with the currently valid standards of the technology and the recognized safety regulations and ensures the highest safety level. The fundamental safety and occupational safety requirements of applicable laws, standards, and guidelines have been taken into account in the pyrometer design. -
Seite 8: Scope Of Delivery / Accessories
3 Scope of Delivery / Accessories 3.1 Scope of Delivery The scope of delivery of the pyrometer includes: • High speed infrared pyrometer KLEIBER Pyroskop 840 • Retaining bolt 14.9 mm, length 100 mm, thread M12 • Water cooling connection (only for Pyrometer with direct optics) •... -
Seite 9: Accessories
3.3.2 Direct optics Accessories for optics Art.-No. Description 30002-20010 Vario optic 30002-20030 Vario optic with air purge unit 30002-20980 Air purge unit for vario optic 30002-20020 Macro optic 30002-20040 Vario optic with protective glass 30003-03410 Laser rejection filter 1064 nm Pyroskop 840... -
Seite 10: Fiber Optics
Air purge unit Accessories for LVO 35 Art.-No. Description 30006-33122 Laser rejection filter 920 . . . 1100 nm 30006-32010 90° mirror 30006-32160 Mounting with retaining pin 10 mm 30006-32130 Ball and socket mounting 30006-32230 Air purge unit Pyroskop 840... - Seite 11 Please send your orders for accessories to the following address. When ordering, please quote the type, the name of the accessory part, and the quantity. Service address KLEIBER Infrared GmbH Phone: +49 (0)3671 / 527 20 - 0 Am Gewände 3...
-
Seite 12: Technical Data
2014/35/EU electrical equipment designed for use within certain voltage limits Length Direct optics: 180 mm + length optics, overall maximum 330 mm Fiber optics: 199.5 mm (pyrometer) Height 70 mm Depth 70 mm Weight Direct optics: about 1,200 g Fiber optics: about 910 g Pyroskop 840... -
Seite 13: Measurement Ranges
200 . . . 1,000 °C 300 . . . 2,300 °C Legend: Standard combination 400 . . . 1,300 °C Combination possible with 400 . . . 3,000 °C higher effort / noise 350 . . . 3,500 °C Combination not possible Pyroskop 840... -
Seite 14: Drawing Pyrometer
4 buttons Figure 1: Drawing pyrometer with direct optics 19.5 M 12 for retaining pin Display 12-pin 4-pin Connection optical fiber plug connection plug connection 4 buttons Figure 2: Drawing pyrometer with fiber optics Pyroskop 840... -
Seite 15: Technical Description
The operating elements as well as the connections / interfaces are located at the back of the pyrometer (see Operating elements and cable connections (section 5.4) at page 16). On the bottom of the pyrometer is a threaded hole for mounting the pyrometer and for pyrometers with direct optics aslo coolant connections. Pyroskop 840... -
Seite 16: Direct Optics
Distance from optics front edge Fix length tube extraction Measuring field diameter IMPORTANT: The macro tube cannot be adjusted. The distances mentioned must be respected absolutely in order to ensure the small measuring field. Pyroskop 840... -
Seite 17: Setting The Vario Optics
The vario optic is thus adjusted to the required measuring distance. Tube Ring nut Figure 7: Setting vario optics in mm 1,000 1,200 1,400 1,600 1,800 2,000 2,500 3,000 in mm 10.5 11.5 13.0 14.0 15.0 20.0 28.0 Distance from optics front edge Measuring field diameter Pyroskop 840... -
Seite 18: Fiber Optics
Ring nut Housing Optical fiber Length L Measuring distance Figure 9: Fixed optics IMPORTANT: The fixed optic cannot be adjusted. The distances mentioned must be respected absolutely in order to ensure the small measuring field. Pyroskop 840... -
Seite 19: Setting The Vario Fiber Optics
Length L Maximum measuring distance Figure 10: Setting the fiber optics Example (LVO 25) in mm in mm in mm 63.2 60.0 58.1 56.2 55.4 54.6 54.0 53.6 53.1 52.7 52.4 52.1 Measuring distance Measuring field diameter Length Pyroskop 840... -
Seite 20: Operating Elements And Cable Connections
Digital input 2 0 . . . 24 V Digital output 0 . . . 24 V Black RS 485 - A Grey / pink RS 485 - B Red / blue RS 485 - GND Orange Figure 13: Connection 12-pole Violet not used cable Pyroskop 840... -
Seite 21: Cooling Connection (For Pyrometers With Direct Optics)
Please pay attention if you take over table values of emissivity to give the value of emissivity factor at a certain wave length. Adjusting emissivity following table values is not as exactly as adjusting following a comparing measurement. Pyroskop 840... -
Seite 22: Starting Up
• Do not set the pyrometer near strong electromagnetic fields or near electromagnetic interference sources. • Make sure that the pilot light falls unhindered on the object being measured and that there is nothing in the path of the rays. Pyroskop 840... -
Seite 23: Installation
• The minimum bend radius of the optical fiber (200 mm type red, 400 mm type blue) must not be exceeded. 6. Double check stable set up of the pyrometer. The pyrometer is ready for use and can be switched on. Pyroskop 840... -
Seite 24: Align Pyrometer
(section 5.3.3) at page 15). Align the optics according to the measuring distance on the measuring object, using the pilot light. Make sure that there are no objects in the path of rays. The pyrometer is thus aligned and ready for temperature measurement. Pyroskop 840... -
Seite 25: Communication
The connection is made at 3,000,000 baud, even parity, eight data bits and one stop bit. In this RS 485 system, exactly one pyrometer Pyroskop 840 may be present. Line A and B are terminated with 120 . The maximum possible cable length is approx. -
Seite 26: Display
• Current output • Chart information minimum and maximum from a selected point of time (adjustable with buttons • Actual device temperature • Serial number • Device state (see Device state (section 8.1.3) at page 23) Pyroskop 840... -
Seite 27: Chart
. Once the device has an IP address, the symbol changes to If the setting is not successful via DHCP, the device assigns itself a private IP address (changing to takes significantly longer). Communication is indicated by changing symbols Pyroskop 840... -
Seite 28: Configuration Menu
In addition, the current measurement temperature is displayed when setting the emissivity. Submenu for setting the switch contact mode. In addition to the se- lectable values, the symbols used in the display are also shown. Pyroskop 840... -
Seite 29: Parameter
9 Parameter 9 Parameter The parameters of the Pyroskop 840 can be splitted into three categories: • Temperature measurement • Display settings • Communication settings Most of the parameters can be set at the pyrometer and via digital communications respectively software. -
Seite 30: Display Settings
Adjustable within the limits of 10 . . . 3,600 s. • Decimal mark ( Adjustable are comma and point for format temperature values. • Orientation ( The orientation of the display can be rotated by 180 °. Pyroskop 840... -
Seite 31: Communication Settings
RSA key on the pyrometer is optional, but without, a encrypted communication is not possible. • Allowed communication via Ethernet ( Defines if an RSA key is stored in the pyrometer for the encrypted communication, whether the commu- nication must be encrypted or not. Pyroskop 840... -
Seite 32: Troubleshooting
Do not undertake any interventions into the pyrometer. If problems arise which do not relate to the causes mentioned above, inform the service staff of the KLEIBER Infrared GmbH.(for contact data see (section 3.3.3) at page 7) -
Seite 33: Transport And Storage
The following climatic conditions are required in the storage room of the pyrometer: • Temperature range -20 °C . . . +70 °C • Maximum air humidity to 70 % • Atmosphere free of dust and corrosive vapors Pyroskop 840... -
Seite 34: Maintenance And Care
Check the cables and the housing at regular intervals for damage and a firm seating. 12.2 Cleaning the Optics Clean the lens with a soft cloth or cotton pad and with white spirits. The optics is thus cleaned and the pyrometer is again ready for use. Pyroskop 840... -
Seite 35: Taking Out Of Service, Disposal
The pyrometer is thus out of operation. 13.2 Disposal For disposal, you can return the pyrometer to KLEIBER Infrared GmbH (for address see (section 3.3.3) at page 7, WEEE-Reg.-Nr. DE 23400844). For this you should pack the pyrometer appropriately in the original packaging or use a cardboard carton with shock absorbing PE material. -
Seite 36: Licenses Of Used Software
This product includes software developed by the OpenSSL Project for use in the OpenSSL Toolkit. (http://www.openssl.org/) This product includes cryptographic software written by Eric Young (eay@cryptsoft.com) • lwIP (BSD License) All license texts can be found in the supplied documentation. Pyroskop 840... - Seite 37 6.1.1 Klimatische Bedingungen ........18 Pyroskop 840...
- Seite 38 13.2 Entsorgung ..........31 14 Lizenzen genutzter Software Pyroskop 840...
-
Seite 39: Grundlegende Informationen
Piktogramme und Signalwörter sind im Sicherheit (Abschnitt 2) auf Seite 3 erläutert. 1.3 Verwendungszweck Die Pyrometer der Serie KLEIBER Pyroskop 840 wurden speziell für den Einsatz in Forschungs- und Ent- wicklungsabteilungen konzipiert. Die Pyrometer werden in verschiedenen Spektralbereichen angeboten und können somit für vielfältige Spezialaufgaben eingesetzt werden. -
Seite 40: Gewährleistung Und Haftung
Betriebs- und Umgebungsbedingungen 1.5 Gewährleistung und Haftung Die KLEIBER Infrared GmbH gibt auf das Gerät eine Gewährleistung von 2 Jahren ab Datum der Rechnungs- legung. Die Gewährleistung bezieht sich auf Fabrikationsfehler. Das Gerät wird dann kostenlos repariert. Die Frachtkosten trägt der jeweilige Absender. -
Seite 41: Sicherheit
Wichtige Hinweise zum Umweltschutz. 2.2 Allgemeine Sicherheitshinweise Das Pyrometer der Serie KLEIBER Pyroskop 840 wurde nach den derzeit gültigen Regeln der Technik und den anerkannten sicherheitstechnischen Regeln gebaut und gewährleistet ein Höchstmaß an Sicherheit. Bei der Konstruktion des Pyrometers wurden die grundlegenden Sicherheits- und Gesundheitsanforderungen der zutreffenden Gesetze, Normen und Richtlinien angewandt. -
Seite 42: Lieferumfang / Zubehör
3 Lieferumfang / Zubehör 3 Lieferumfang / Zubehör 3.1 Lieferumfang Im Lieferumfang des Pyrometers enthalten ist: • High Speed Infrarot-Pyrometer KLEIBER Pyroskop 840 • Haltebolzen 14,9 mm, Länge 100 mm, Gewinde M12 • Verschraubung Wasserkühlung (nur für Pyrometer mit Direktoptik) •... -
Seite 43: Zubehör
Kugelgelenkhalterung, Schraubbefestigung mit Haltebolzen M 12 30002-10020 Kugelgelenkhalterung, Klemmbefestigung mit Haltebolzen M 12 3.3.2 Direktoptiken Optikzubehör Artikel-Nr. Bezeichnung 30002-20010 Variooptik 30002-20030 Variooptik mit Luftblasvorsatz 30002-20980 Luftblasvorsatz für Variooptik 30002-20020 Makrooptik 30002-20040 Variooptik mit Schutzglas 30003-03410 Lasersperrfilter 1064 nm Pyroskop 840... -
Seite 44: Lichtwellenleitervorsatzoptiken
Halterung mit Kugelgelenk 30006-32170 Montage- und Ausrichthalterung, justierbar 30006-32220 Luftblasvorsatz Zubehör für LVO 35 Artikel-Nr. Bezeichnung 30006-33122 Lasersperrfilter 920 . . . 1100 nm 30006-32010 90° Umlenkaufsatz 30006-32160 Halterung mit Haltebolzen 10 mm 30006-32130 Halterung mit Kugelgelenk 30006-32230 Luftblasvorsatz Pyroskop 840... - Seite 45 Bestellungen für Zubehörteile senden Sie bitte an nachfolgende Serviceadresse. Geben Sie bei der Bestellung bitte den Typ, die Bezeichnung des Zubehörteils sowie die gewünschte Stückzahl an. Serviceadresse KLEIBER Infrared GmbH Tel: +49 (0)3671 / 527 20 - 0 Am Gewände 3...
-
Seite 46: Technische Daten
CE-Kennzeichnung Gemäß EU-Richtlinien Normenverweis 2014/30/EU EMV-Richtlinie 2014/35/EU Niederspannungsrichtlinie Länge Direktoptik: 180 mm + Länge Optik, insgesamt maximal 330 mm Lichtwellenleitervorsatzoptik: 199,5 mm (Pyrometer) Höhe 70 mm Tiefe 70 mm Gewicht Direktoptik: ca. 1.200 g Lichtwellenleitervorsatzoptik: ca. 910 g Pyroskop 840... -
Seite 47: Messbereiche
200 . . . 1.000 °C 300 . . . 2.300 °C Legende: Standardkombination 400 . . . 1.300 °C Kombination mit höheren Auf- 400 . . . 3.000 °C wand / Rauschen möglich 350 . . . 3.500 °C Kombination nicht möglich Pyroskop 840... -
Seite 48: Zeichnung Pyrometer
12-poliges für 4-poliges Anschlusskabel Anschlusskabel 4 Taster Abbildung 1: Zeichnung Pyrometer mit Direktoptik 19.5 M 12 für Haltebolzen Anzeige Anschluss Anschluss Anschluss Lichtwellenleiter für 12-poliges für 4-poliges Anschlusskabel Anschlusskabel 4 Taster Abbildung 2: Zeichnung Pyrometer mit Lichtwellenleiteroptik Pyroskop 840... -
Seite 49: Technische Beschreibung
Die Bedienelemente sowie die Anschlüsse / Schnittstellen befinden sich an der Rückseite des Pyrometers (vgl. Bedienelemente und Kabelanschlüsse (Abschnitt 5.4) auf Seite 16). An der Pyrometerunterseite befindet sich eine Gewindebohrung zur Befestigung des Pyrometers und bei Py- rometern mit Direktoptik zusätzlich Kühlmittelanschlüsse. Pyroskop 840... -
Seite 50: Direktoptik
1.58 . . . 2.20 m, 2.00 . . . 2.20 m in mm in mm in mm Messdistanz von Vorderkante Optik Feste Länge Tubusauszug Messfelddurchmesser WICHTIG: Der Makrotubus kann nicht verstellt werden. Die genannten Abstände sind unbedingt einzuhalten, um das kleine Messfeld sicherzustellen. Pyroskop 840... -
Seite 51: Einstellen Der Variooptik
Die Variooptik ist damit auf den benötigten Messabstand eingestellt. Tubus Ringmutter Abbildung 7: Variooptik einstellen in mm 1.000 1.200 1.400 1.600 1.800 2.000 2.500 3.000 in mm 10,5 11,5 13,0 14,0 15,0 20,0 28,0 Messentfernung von Vorderkante Optik Messfelddurchmesser Pyroskop 840... -
Seite 52: Lichtwellenleitervorsatzoptik
Die Festoptik ist eine Festoptik für sehr kleine Messfelder, d. h. bei einer bestimmten Messentfernung ist ein bestimmter Messfelddurchmesser gegeben. Lichtwellenleiter Ringmutter Gehäuse Länge L Messentfernung Abbildung 9: Lichtwellenleitervorsatzoptik (Festoptik) WICHTIG: Die Festoptik kann nicht verstellt werden. Die genannten Abstände sind unbedingt einzuhalten, um das kleine Messfeld sicherzustellen. Pyroskop 840... -
Seite 53: Einstellen Der Variolichtwellenleitervorsatzoptik
Lichtwellenleiter Ringmutter Gehäuse Minimale Messentfernung Länge L Maximale Messentfernung Abbildung 10: Einstellen der Lichtwellenleitervorsatzoptik Beispiel (LVO 25) in mm in mm in mm 63,2 60,0 58,1 56,2 55,4 54,6 54,0 53,6 53,1 52,7 52,4 52,1 Messentfernung Messfelddurchmesser Länge Pyroskop 840... -
Seite 54: Bedienelemente Und Kabelanschlüsse
Digitaler Ausgang 0 . . . 24 V Schwarz RS 485 - A Grau / Rosa RS 485 - B Rot / Blau RS 485 - GND Orange Erde Abbildung 13: Anschluss 12- Violett nicht belegt poliges Kabel Pyroskop 840... -
Seite 55: Kühlwasseranschluss (Für Pyrometer Mit Direktoptik)
Beachten Sie bei der Übernahme von Tabellenwerten für den Emissionsgrad, dass der Wert des Emis- sionsgrades für eine bestimmte Wellenlänge angegeben wird. Die Einstellung des Emissionsgrades nach Tabellen bietet daher nicht die gleiche Genauigkeit wie die Einstellung nach einer Vergleichsmes- sung. Pyroskop 840... -
Seite 56: Inbetriebnahme
• Setzen Sie das Pyrometer nicht in der Nähe von starken elektromagnetischen Feldern bzw. in der Nähe elektromagnetischer Störquellen ein. • Achten Sie darauf, dass das Pilotlicht ungehindert auf das Messobjekt fällt und dass sich keine Gegen- stände im Strahlengang befinden. Pyroskop 840... -
Seite 57: Installation
• Die Lichtwellenleitervorsatzoptik kann mit verschiedenen Halterungen, die als Zubehör verfügbar sind, befestigt werden. • Der minimale Biegeradius (200 mm Typ rot, 400 mm Typ blau) des Lichtwellenleiters darf nicht unterschritten werden. 6. Prüfen Sie die stabile Aufstellung des Pyrometers. Das Pyrometer ist betriebsbereit und kann eingeschaltet werden. Pyroskop 840... -
Seite 58: Pyrometer Ausrichten
Variolichtwellenleitervorsatzoptik (Abschnitt 5.3.3) auf Seite 15). 4. Richten Sie die Optik entsprechend des Messabstandes, mit Hilfe des Pilotlichtes auf das Messobjekt aus. Achten Sie darauf, dass sich keine Gegenstände im Strahlengang befinden. Das Pyrometer ist damit ausgerichtet und zur Temperaturmessung bereit. Pyroskop 840... -
Seite 59: Kommunikation
Die Verbindung erfolgt bei 3.000.000 Baud, gerader Parität, acht Datenbits und einen Stoppbit. In diesem RS 485 System darf sich genau ein Pyrometer Pyroskop 840 befinden. Die Leitungen A und B sind mit 120 abgeschlossen. Die maximal mögliche Kabellänge beträgt ca. 30 m. -
Seite 60: Anzeige
• Messrate Digital • Chartinformation Min- und Maxtemperaturwert aus dem kompletten Chart • Stromausgang • Chartinformation Min- und Maxtemperaturwert zu • Aktuelle Geräteinnentemperatur einen auswählten Zeitpunkt (einstellbar mit Tasten • Seriennummer • Gerätestatus (vgl. Gerätestatus (Abschnitt 8.1.3) auf Seite 23) Pyroskop 840... -
Seite 61: Chart
. Die IP-Adresse kann manuell eingestellt werden oder via DHCP angefordert werden. Ist die Festlegung via DHCP nicht erfolgreich, vergibt sich das Gerät selber einer private IP-Adresse (Wechsel auf dauert deutlich länger). Die Kommunikation wird mit einen Wechsel zwischen dargestellt. Pyroskop 840... -
Seite 62: Konfigurationsmenü
Menüebene gewech- selt. Zusätzlich wird bei der Einstellung des Emissionsgrades die aktuell gemessene Temperatur angezeigt. Untermenü zur Einstellung des Modus des Schaltausganges. Neben den auswählbaren Werten, werden außerdem die Symbole, die in der Anzeige verwendet werden, dargestellt. Pyroskop 840... -
Seite 63: Parameter
9 Parameter 9 Parameter Die Parameter des Pyroskop 840 lassen sich in drei Kategorien einteilen: • Temperaturmessung • Anzeigeeinstellungen • Kommunikationseinstellungen Ein Großteil der Parameter sind am Pyrometer sowie über die digitale Kommunikation bzw. Software einstell- bar. Einige Parameter sind nur über das Pyrometer oder die digitale Kommunikation einstellbar. Dies wird durch... -
Seite 64: Anzeigeeinstellungen
– Zeit Einstellbar innerhalb der Grenzen von 10 . . . 3.600 s. • Temperaturformat ( Einstellbar sind Komma und Punkt zur Formatierung von Temperaturwerten. • Ausrichtung ( Die Ausrichtung der Anzeige kann um 180 ° gedreht werden. Pyroskop 840... -
Seite 65: Kommunikationseinstellungen
Das Speichern eines privaten RSA Schlüssels auf dem Pyrometer ist optional, jedoch ist ohne keine verschlüsselte Kommunikation möglich. • Erlaubte Kommunikation via Ethernet ( Legt fest wenn ein RSA Schlüssel im Pyrometer für die verschlüsselte Kommunikation hinterlegt ist, ob die Kommunikation verschlüsselt erfolgen muss oder nicht. Pyroskop 840... -
Seite 66: Beseitigung Von Störungen
Wasserkühlung oder Verschmutzung der Linse zurückzuführen sind. Nehmen Sie keine Eingriffe in das Pyrometer selbst vor. Treten Störungen auf, die sich nicht auf die oben ge- nannten Ursachen zurückführen lassen, verständigen Sie das Servicepersonal der KLEIBER Infrared GmbH. (Kontaktdaten vgl. (Abschnitt 3.3.3) auf Seite 7) Störung... -
Seite 67: Transport Und Lagerung
Pyrometer durch geeignete Maßnahmen vor Staubablagerungen. An die klimatischen Bedingungen im Lagerraum des Pyrometers werden folgende Anforderungen gestellt: • Temperaturbereich: -20 °C . . . +70 °C • Maximale Luftfeuchte bis 70 % • Atmosphäre staubarm, frei von ätzenden Dämpfen Pyroskop 840... -
Seite 68: Wartung Und Pflege
Überprüfen Sie in regelmäßigen Abständen die Kabel und das Gehäuse auf Beschädigungen und festen Sitz. 12.2 Reinigen der Optik Reinigen Sie die Linse mit einem weichen Tuch oder Wattestäbchen und mit Spiritus. Die Optik ist damit gereinigt und das Pyrometer wieder betriebsbereit. Pyroskop 840... -
Seite 69: Außerbetriebnahme, Entsorgung
Das Pyrometer ist damit außer Betrieb. 13.2 Entsorgung Zur Entsorgung können Sie das Pyrometer an die KLEIBER Infrared GmbH zurück- schicken (Adresse vgl. (Abschnitt 3.3.3) auf Seite 7, WEEE-Reg.-Nr. DE 23400844). Verpacken Sie hierzu das Pyrometer zweckmäßigerweise in der Originalverpackung oder verwenden Sie einen mit stoßdämpfendem PE-Material ausgelegten Karton. -
Seite 70: Lizenzen Genutzter Software
This product includes software developed by the OpenSSL Project for use in the OpenSSL Toolkit. (http://www.openssl.org/) This product includes cryptographic software written by Eric Young (eay@cryptsoft.com) • lwIP (BSD License) Alle Lizenztexte befinden sich in der mitgelieferten Dokumentation. Pyroskop 840...