Zanussi ZOP37912XC Benutzerinformation
Vorschau ausblenden
Andere Handbücher für ZOP37912XC:
- Benutzerinformation (61 Seiten) ,
- Benutzerinformation (60 Seiten)

Verwandte Anleitungen für Zanussi ZOP37912XC


Inhaltszusammenfassung für Zanussi ZOP37912XC
- Seite 1 User Manual GETTING STARTED? EASY. ZOP37912XC ZOP37902XK EN User Manual Oven DE Benutzerinformation Backofen...
- Seite 1 User Manual GETTING STARTED? EASY. ZOP37912XC ZOP37902XK EN User Manual Oven DE Benutzerinformation Backofen...
-
Seite 2: Safety Information
SAFETY INFORMATION Before the installation and use of the appliance, carefully read the supplied instructions. The manufacturer is not responsible for any injuries or damages that are the result of incorrect installation or usage. Always keep the instructions in a safe and accessible location for future reference. -
Seite 3: Safety Instructions
Before carrying out any maintenance, disconnect the appliance • from the power supply. Ensure that the appliance is switched off before replacing the • lamp to avoid the possibility of electric shock. Do not use a steam cleaner to clean the appliance. •... -
Seite 3: Safety Instructions
Before carrying out any maintenance, disconnect the appliance • from the power supply. Ensure that the appliance is switched off before replacing the • lamp to avoid the possibility of electric shock. Do not use a steam cleaner to clean the appliance. •... - Seite 4 • The electrical installation must have an isolation • Discoloration of the enamel or stainless steel device which lets you disconnect the appliance has no effect on the performance of the from the mains at all poles. The isolation device appliance.
- Seite 4 • The electrical installation must have an isolation • Discoloration of the enamel or stainless steel device which lets you disconnect the appliance has no effect on the performance of the from the mains at all poles. The isolation device appliance.
-
Seite 5: Internal Lighting
particularly any non-stick pots, pans, trays, • Fumes released from all Pyrolytic Ovens / utensils etc. Cooking Residues as described are not harmful • Read carefully all the instructions for Pyrolytic to humans, including infants or persons with cleaning. medical conditions. •... -
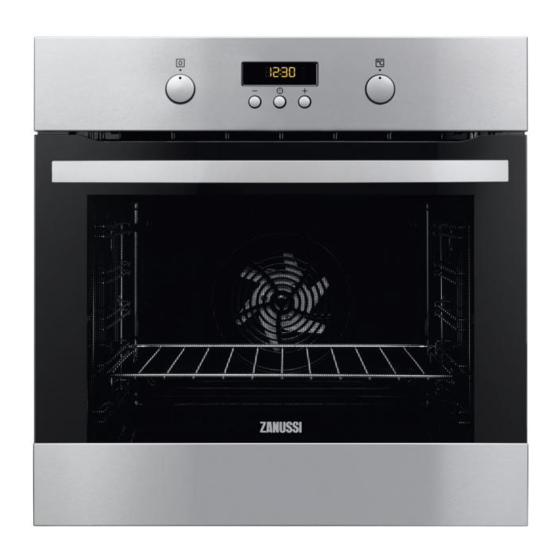
Seite 6: Product Description
PRODUCT DESCRIPTION GENERAL OVERVIEW Control panel Knob for the heating functions Display Control knob (for the temperature) Heating element Lamp Shelf support, removable Shelf positions ACCESSORIES For cakes and biscuits. • Grill- / Roasting pan • Wire shelf To bake and roast or as pan to collect fat. For cookware, cake tins, roasts. -
Seite 7: Before First Use
BEFORE FIRST USE Put the accessories and the removable shelf WARNING! Refer to Safety chapters. supports back to their initial position. PREHEATING To set the Time of day refer to "Clock Preheat the empty oven before first use. functions" chapter. 1. -
Seite 7: Before First Use
BEFORE FIRST USE Put the accessories and the removable shelf WARNING! Refer to Safety chapters. supports back to their initial position. PREHEATING To set the Time of day refer to "Clock Preheat the empty oven before first use. functions" chapter. 1. -
Seite 8: Clock Functions
Oven function Application Oven function Application To grill flat food in large To turn on the pyrolytic quantities and to toast cleaning of the oven. This bread. function burns off residual Fast Grilling Pyrolysis dirt in the oven. To roast larger meat joints or poultry with bones on SETTING A HEATING FUNCTION one shelf position. -
Seite 9: Using The Accessories
SETTING AND CHANGING THE TIME SETTING THE TIME DELAY FUNCTION After the first connection to the mains, wait until the 1. Set a heating function. display shows and "12:00". "12" flashes. 2. Press again and again until starts to flash. 1. -
Seite 9: Using The Accessories
SETTING AND CHANGING THE TIME SETTING THE TIME DELAY FUNCTION After the first connection to the mains, wait until the 1. Set a heating function. display shows and "12:00". "12" flashes. 2. Press again and again until starts to flash. 1. -
Seite 10: Additional Functions
Wire shelf and baking tray / deep pan together: Push the baking tray / deep pan between the guide bars of the shelf support and the wire shelf on the guide bars above. Baking tray/ Deep pan: Push the baking tray / deep pan between the guide bars of the shelf support. -
Seite 11: Hints And Tips
If you turn off the oven, the cooling fan can continue prevent this, the oven has a safety thermostat which to operate until the oven cools down. interrupts the power supply. The oven turns on again automatically when the temperature drops. SAFETY THERMOSTAT Incorrect operation of the oven or defective components can cause dangerous overheating. -
Seite 11: Hints And Tips
If you turn off the oven, the cooling fan can continue prevent this, the oven has a safety thermostat which to operate until the oven cools down. interrupts the power supply. The oven turns on again automatically when the temperature drops. SAFETY THERMOSTAT Incorrect operation of the oven or defective components can cause dangerous overheating. - Seite 12 Top / Bottom Heat True Fan Cooking Food Time (min) Comments Temperature Shelf posi- Temperature Shelf posi- (°C) tion (°C) tion Buttermilk 80 - 100 In a 26 cm cheese- cake cake mould Apple 2 (left and 80 - 100 In two 20 cake (Ap- right)
- Seite 12 Top / Bottom Heat True Fan Cooking Food Time (min) Comments Temperature Shelf posi- Temperature Shelf posi- (°C) tion (°C) tion Buttermilk 80 - 100 In a 26 cm cheese- cake cake mould Apple 2 (left and 80 - 100 In two 20 cake (Ap- right)
- Seite 13 Top / Bottom Heat True Fan Cooking Food Time (min) Comments Temperature Shelf posi- Temperature Shelf posi- (°C) tion (°C) tion Biscuits / 140 - 150 2 and 4 35 - 40 In a baking pastry tray stripes - two levels Biscuits / 140 - 150 1, 3 and 5...
- Seite 13 Top / Bottom Heat True Fan Cooking Food Time (min) Comments Temperature Shelf posi- Temperature Shelf posi- (°C) tion (°C) tion Biscuits / 140 - 150 2 and 4 35 - 40 In a baking pastry tray stripes - two levels Biscuits / 140 - 150 1, 3 and 5...
- Seite 14 Bread and pizza Top / Bottom Heat True Fan Cooking Food Time (min) Comments Temperature Shelf posi- Temperature Shelf posi- (°C) tion (°C) tion White 60 - 70 1 - 2 pieces, bread 500 gr per piece Rye bread 30 - 45 In a bread Bread 2 (2 and...
- Seite 14 Bread and pizza Top / Bottom Heat True Fan Cooking Food Time (min) Comments Temperature Shelf posi- Temperature Shelf posi- (°C) tion (°C) tion White 60 - 70 1 - 2 pieces, bread 500 gr per piece Rye bread 30 - 45 In a bread Bread 2 (2 and...
- Seite 15 Meat Top / Bottom Heat True Fan Cooking Food Time (min) Comments Temperature Shelf posi- Temperature Shelf posi- (°C) tion (°C) tion Beef 50 - 70 On a wire shelf Pork 90 - 120 On a wire shelf Veal 90 - 120 On a wire shelf English...
- Seite 15 Meat Top / Bottom Heat True Fan Cooking Food Time (min) Comments Temperature Shelf posi- Temperature Shelf posi- (°C) tion (°C) tion Beef 50 - 70 On a wire shelf Pork 90 - 120 On a wire shelf Veal 90 - 120 On a wire shelf English...
- Seite 16 Fish Top / Bottom Heat True Fan Cooking Food Time (min) Comments Temperature Shelf posi- Temperature Shelf posi- (°C) tion (°C) tion Trout / 40 - 55 3 - 4 fish Sea bream Tuna fish / 35 - 60 4 - 6 fillets Salmon GRILLING Set the maximum temperature.
- Seite 16 Fish Top / Bottom Heat True Fan Cooking Food Time (min) Comments Temperature Shelf posi- Temperature Shelf posi- (°C) tion (°C) tion Trout / 40 - 55 3 - 4 fish Sea bream Tuna fish / 35 - 60 4 - 6 fillets Salmon GRILLING Set the maximum temperature.
- Seite 17 Temperature Temperature Food Time (min) Food Time (min) (°C) (°C) Roast beef or 180 - 190 6 - 8 Saddle of 160 - 180 40 - 60 fillet, medium lamb, 1 - 1.5 Roast beef or 170 - 180 8 - 10 fillet, well Poultry done...
- Seite 17 Temperature Temperature Food Time (min) Food Time (min) (°C) (°C) Roast beef or 180 - 190 6 - 8 Saddle of 160 - 180 40 - 60 fillet, medium lamb, 1 - 1.5 Roast beef or 170 - 180 8 - 10 fillet, well Poultry done...
- Seite 18 Temperature Shelf posi- Food Accessories Time (min) (°C) tion Sweet rolls, 12 baking tray or dripping pan 20 - 30 pieces Rolls, 9 pieces baking tray or dripping pan 30 - 40 Pizza, frozen, wire shelf 10 - 15 0.35 kg Swiss roll baking tray or dripping pan 25 - 35...
- Seite 18 Temperature Shelf posi- Food Accessories Time (min) (°C) tion Sweet rolls, 12 baking tray or dripping pan 20 - 30 pieces Rolls, 9 pieces baking tray or dripping pan 30 - 40 Pizza, frozen, wire shelf 10 - 15 0.35 kg Swiss roll baking tray or dripping pan 25 - 35...
- Seite 19 Temperature Shelf posi- Food Accessories Time (min) (°C) tion Vegetables, baking tray or dripping pan 25 - 30 mediterrean 0.7 DEFROST Quantity Defrosting time Further defrosting Food Comments (kg) (min) time (min) Chicken 100 - 140 20 - 30 Place the chicken on an upturned saucer placed on a large plate.
- Seite 19 Temperature Shelf posi- Food Accessories Time (min) (°C) tion Vegetables, baking tray or dripping pan 25 - 30 mediterrean 0.7 DEFROST Quantity Defrosting time Further defrosting Food Comments (kg) (min) time (min) Chicken 100 - 140 20 - 30 Place the chicken on an upturned saucer placed on a large plate.
- Seite 20 Fruit Shelf position Food Temperature (°C) Time (h) 1 position 2 positions Plums 60 - 70 8 - 10 1 / 4 Apricots 60 - 70 8 - 10 1 / 4 Apple slices 60 - 70 6 - 8 1 / 4 Pears 60 - 70...
- Seite 20 Fruit Shelf position Food Temperature (°C) Time (h) 1 position 2 positions Plums 60 - 70 8 - 10 1 / 4 Apricots 60 - 70 8 - 10 1 / 4 Apple slices 60 - 70 6 - 8 1 / 4 Pears 60 - 70...
-
Seite 21: Care And Cleaning
Temper- Accesso- Shelf Food Function ature Time (min) Comments ries position (°C) Fatless- True Fan Wire 40 - 60 Use a cake mould ponge Cooking / shelf (26 cm diameter). cake Fan Cook- Diagonally shifted. Preheat the oven for 10 minutes. Short True Fan Baking... -
Seite 21: Care And Cleaning
Temper- Accesso- Shelf Food Function ature Time (min) Comments ries position (°C) Fatless- True Fan Wire 40 - 60 Use a cake mould ponge Cooking / shelf (26 cm diameter). cake Fan Cook- Diagonally shifted. Preheat the oven for 10 minutes. Short True Fan Baking... -
Seite 22: Cleaning Reminder
STAINLESS STEEL OR ALUMINIUM OVENS 2. Clean the inner side of the door with hot water, so that the residues do not burn from the hot Clean the oven door with a damp cloth or sponge air. only. Dry it with a soft cloth. 3. -
Seite 22: Cleaning Reminder
STAINLESS STEEL OR ALUMINIUM OVENS 2. Clean the inner side of the door with hot water, so that the residues do not burn from the hot Clean the oven door with a damp cloth or sponge air. only. Dry it with a soft cloth. 3. - Seite 23 The oven door may close if you try to remove the glass panels before you remove the oven door. CAUTION! Do not use the oven without the glass panels. 1. Open the door fully and hold both hinges. 4. Put the door on a soft cloth on a stable surface. 5.
- Seite 23 The oven door may close if you try to remove the glass panels before you remove the oven door. CAUTION! Do not use the oven without the glass panels. 1. Open the door fully and hold both hinges. 4. Put the door on a soft cloth on a stable surface. 5.
-
Seite 24: Replacing The Lamp
REPLACING THE LAMP WARNING! Risk of electric shock. The lamp can be hot. 1. Turn off the oven. Wait until the oven is cooled down. 2. Disconnect the oven from the mains. 3. Put a cloth on the bottom of the cavity. CAUTION! Always hold the halogen lamp with a cloth to prevent grease residue from burning on the lamp. -
Seite 24: Replacing The Lamp
REPLACING THE LAMP WARNING! Risk of electric shock. The lamp can be hot. 1. Turn off the oven. Wait until the oven is cooled down. 2. Disconnect the oven from the mains. 3. Put a cloth on the bottom of the cavity. CAUTION! Always hold the halogen lamp with a cloth to prevent grease residue from burning on the lamp. - Seite 25 Problem Possible cause Remedy The oven does not heat up. The fuse is blown. Make sure that the fuse is the cause of the malfunction. If the fuse is blown again and again, contact a qualified electrician. The lamp does not operate. The lamp is defective.
- Seite 25 Problem Possible cause Remedy The oven does not heat up. The fuse is blown. Make sure that the fuse is the cause of the malfunction. If the fuse is blown again and again, contact a qualified electrician. The lamp does not operate. The lamp is defective.
-
Seite 26: Service Data
Problem Possible cause Remedy The appliance is activated and The demo mode is activated. 1. Deactivate the oven. does not heat up. The fan does 2. Press and hold the button not operate. The display shows "Demo". 3. The first digit on the dis- play and Demo indicator start to blink. -
Seite 27: Electrical Installation
BUILDING IN min. 550 min. 560 min. 550 min. 560 SECURING THE APPLIANCE TO THE ELECTRICAL INSTALLATION CABINET The manufacturer is not responsible if you do not follow the safety precautions from the Safety chapters. This appliance is supplied only with a main cable. CABLE Cable types applicable for installation or replacement:... -
Seite 28: Energy Efficiency
3 x 1.5 ENERGY EFFICIENCY PRODUCT FICHE AND INFORMATION ACCORDING TO EU 65-66/2014 Supplier's name Zanussi ZOP37902XK Model identification ZOP37912XC Energy Efficiency Index 81.2 Energy efficiency class Energy consumption with a standard load, conventional 0.93 kWh/cycle mode Energy consumption with a standard load, fan-forced mode 0.69 kWh/cycle... -
Seite 29: Environmental Concerns
Keep food warm Moist Fan Baking Choose the lowest possible temperature setting to Function designed to save energy during cooking. use residual heat and keep a meal warm. The When you use this function the lamp automatically residual heat indicator or temperature appears on turns off after 30 seconds. -
Seite 30: Sicherheitshinweise
SICHERHEITSHINWEISE Lesen Sie vor der Montage und dem Gebrauch des Geräts zuerst die Gebrauchsanleitung. Bei Verletzungen oder Schäden infolge nicht ordnungsgemäßer Montage oder Verwendung des Geräts übernimmt der Hersteller keine Haftung. Bewahren Sie die Anleitung immer an einem sicheren und zugänglichen Ort zum späteren Nachschlagen auf. -
Seite 31: Allgemeine Sicherheit
ALLGEMEINE SICHERHEIT Die Montage des Geräts und der Austausch des Kabels muss • von einer Fachkraft vorgenommen werden. WARNUNG: Das Gerät und die zugänglichen Geräteteile • werden während des Betriebs heiß. Seien Sie vorsichtig und berühren Sie niemals die Heizelemente. Verwenden Sie zum Anfassen des Zubehörs und der Töpfe •... -
Seite 31: Allgemeine Sicherheit
ALLGEMEINE SICHERHEIT Die Montage des Geräts und der Austausch des Kabels muss • von einer Fachkraft vorgenommen werden. WARNUNG: Das Gerät und die zugänglichen Geräteteile • werden während des Betriebs heiß. Seien Sie vorsichtig und berühren Sie niemals die Heizelemente. Verwenden Sie zum Anfassen des Zubehörs und der Töpfe •... - Seite 32 • Montieren Sie das Gerät an einem sicheren und VERWENDUNG geeigneten Ort, der den Montageanforderungen WARNUNG! Verletzungs-, entspricht. Verbrennungs-, Stromschlag- oder • Das Gerät ist mit einem elektrischen Kühlsystem Explosionsgefahr. ausgestattet. Es muss an die Stromversorgung angeschlossen werden. • Dieses Gerät ist ausschließlich zur Verwendung im Haushalt bestimmt.
- Seite 32 • Montieren Sie das Gerät an einem sicheren und VERWENDUNG geeigneten Ort, der den Montageanforderungen WARNUNG! Verletzungs-, entspricht. Verbrennungs-, Stromschlag- oder • Das Gerät ist mit einem elektrischen Kühlsystem Explosionsgefahr. ausgestattet. Es muss an die Stromversorgung angeschlossen werden. • Dieses Gerät ist ausschließlich zur Verwendung im Haushalt bestimmt.
-
Seite 33: Reinigung Und Pflege
• Verwenden Sie für feuchte Kuchen das tiefe • Entfernen Sie vor der pyrolytischen Blech. Fruchtsäfte können bleibende Flecken Selbstreinigung und vor der Erstinbetriebnahme verursachen. Folgendes aus dem Ofeninnenraum: • Dieses Gerät ist nur zum Kochen bestimmt. – Alle größeren Lebensmittelrückstände, Öl- Jeder andere Gebrauch ist als und Fettablagerungen. -
Seite 34: Gerätebeschreibung
geeignet. Benutzen Sie diese nicht für die ENTSORGUNG Raumbeleuchtung. WARNUNG! Verletzungs- und • Trennen Sie das Gerät von der Erstickungsgefahr. Stromversorgung, bevor Sie die Lampe austauschen. • Trennen Sie das Gerät von der • Verwenden Sie dazu eine Lampe mit der Stromversorgung. -
Seite 35: Täglicher Gebrauch
Sensorfeld/Taste Funktion Beschreibung PLUS Einstellen der Zeit. DISPLAY A. Timer/Temperatur/ B. Aufheiz- und Restwärmeanzeige C. KT Sensor (nur ausgewählte Modelle) D. Türverriegelung (nur ausgewählte Modelle) E. Stunden/Minuten F. Demo-Betrieb (nur ausgewählte Modelle) G. Uhrfunktionen VOR DER ERSTEN INBETRIEBNAHME VORHEIZEN WARNUNG! Siehe Kapitel Heizen Sie den leeren Backofen vor der ersten Sicherheitshinweise. -
Seite 36: Einstellen Einer Ofenfunktion
Ofenfunktion Anwendung Ofenfunktion Anwendung Zum Backen auf bis zu 3 Zum Braten größerer Einschubebenen gleichzei- Fleischstücke oder von Ge- tig und zum Dörren. flügel mit Knochen auf einer Heißluft Heißluftgrillen Stellen Sie eine 20 - 40 °C Einschubebene. Zum Grati- niedrigere Temperatur als nieren und Überbacken. -
Seite 36: Einstellen Einer Ofenfunktion
Ofenfunktion Anwendung Ofenfunktion Anwendung Zum Backen auf bis zu 3 Zum Braten größerer Einschubebenen gleichzei- Fleischstücke oder von Ge- tig und zum Dörren. flügel mit Knochen auf einer Heißluft Heißluftgrillen Stellen Sie eine 20 - 40 °C Einschubebene. Zum Grati- niedrigere Temperatur als nieren und Überbacken. - Seite 37 UHRFUNKTIONEN TABELLE DER UHRFUNKTIONEN 1. Drücken Sie zum Einstellen der Stunden oder Uhrfunktion Anwendung 2. Drücken Sie zur Bestätigung und stellen Sie die Minuten ein. Anzeigen oder Ändern der Im Display wird und die eingestellte Stunde Tageszeit. Sie können die TAGESZEIT angezeigt.
- Seite 37 UHRFUNKTIONEN TABELLE DER UHRFUNKTIONEN 1. Drücken Sie zum Einstellen der Stunden oder Uhrfunktion Anwendung 2. Drücken Sie zur Bestätigung und stellen Sie die Minuten ein. Anzeigen oder Ändern der Im Display wird und die eingestellte Stunde Tageszeit. Sie können die TAGESZEIT angezeigt.
-
Seite 38: Einstellen Der Zeitvorwahl-Funktion
5. Drehen Sie den Knopf in die Position Aus. 6. Drehen Sie den Knopf in die Position Aus. EINSTELLEN DER ZEITVORWAHL-FUNKTION EINSTELLUNG DES KURZZEIT-WECKERS 1. Stellen Sie eine Backofenfunktion ein. Der Kurzzeit-Wecker kann sowohl bei ein- als auch ausgeschaltetem Backofen verwendet werden. 2. -
Seite 39: Abschaltautomatik
Die kleine Einkerbung auf der Oberseite erhöht die Sicherheit. Diese Einkerbungen dienen auch als Kippsicherung. Durch den umlaufend erhöhten Rand des Rosts ist das Kochgeschirr gegen Abrutschen vom Rost gesichert. ZUSATZFUNKTIONEN VERWENDUNG DER KINDERSICHERUNG Wenn die Kindersicherung eingeschaltet ist, kann Temperatur (°C) Abschaltzeit (Std.) der Ofen nicht versehentlich bedient werden. -
Seite 40: Tipps Und Hinweise
TIPPS UND HINWEISE Backen von Kuchen WARNUNG! Siehe Kapitel Öffnen Sie die Backofentür nicht vor Ablauf von Sicherheitshinweise. 3/4 der Backzeit. Wenn Sie zwei Backbleche gleichzeitig nutzen, Die Temperaturen und Backzeiten in lassen Sie eine Ebene dazwischen frei. den Tabellen sind nur Richtwerte. Sie Garen von Fleisch und Fisch sind abhängig von den Rezepten, der Setzen Sie bei Speisen mit hohem Fettgehalt eine... - Seite 41 Ober-/Unterhitze Heißluft Bemerkun- Speise Dauer (Min.) Temperatur Einschub- Temperatur Einschub- (°C) ebene (°C) ebene Apfelku- 2 (links 80 - 100 In 2 Ku- chenfor- chen rechts) men (20 cm) auf dem Kom- birost Strudel/ 60 - 80 Auf dem Stollen Backblech Marmela- 2 (links...
- Seite 42 Ober-/Unterhitze Heißluft Bemerkun- Speise Dauer (Min.) Temperatur Einschub- Temperatur Einschub- (°C) ebene (°C) ebene Plätzchen/ 140 - 150 2 und 4 35 - 40 Auf dem Feinge- Backblech bäck - zwei Ebe- Plätzchen/ 140 - 150 1, 3 und 5 35 - 45 Auf dem Feinge-...
- Seite 43 Brot und Pizza Ober-/Unterhitze Heißluft Bemerkun- Speise Dauer (Min.) Temperatur Einschub- Temperatur Einschub- (°C) ebene (°C) ebene 60 - 70 1 - 2 Weißbrot Stück, 500 g pro Stück Roggen- 30 - 45 In einer brot Brotform 2 (2 und 25 - 40 6 - 8 Bröt- Brötchen...
- Seite 44 Ober-/Unterhitze Heißluft Bemerkun- Speise Dauer (Min.) Temperatur Einschub- Temperatur Einschub- (°C) ebene (°C) ebene Cannello- 180 - 190 180 - 190 25 - 40 In einer Auflauf- form 1) Backofen 10 Minuten vorheizen. Fleisch Ober-/Unterhitze Heißluft Bemerkun- Speise Dauer (Min.) Temperatur Einschub- Temperatur...
- Seite 45 Ober-/Unterhitze Heißluft Bemerkun- Speise Dauer (Min.) Temperatur Einschub- Temperatur Einschub- (°C) ebene (°C) ebene Hasenbra- 60 - 80 Zerlegter Hase 150 - 200 Zerlegter Fasan 90 - 120 Ganzer Fisch Ober-/Unterhitze Heißluft Bemerkun- Speise Dauer (Min.) Temperatur Einschub- Temperatur Einschub- (°C) ebene (°C)
- Seite 46 Menge Dauer (Min.) Speise Stück Menge (kg) 1. Seite 2. Seite Fischfilet 12 - 14 10 - 12 Belegte Toastbrote 4 - 6 5 - 7 Toast 4 - 6 2 - 4 2 - 3 HEISSLUFTGRILLEN Kalb Nutzen Sie die erste oder zweite Einschubebene. Rind Temperatur Speise...
-
Seite 47: Feuchte Heissluft
Fisch, gedämpft Temperatur Speise Dauer (Min.) (°C) Temperatur Speise Dauer (Min.) (°C) Ente, 1,5 - 2 180 - 200 80 - 100 Ganzer 210 - 220 40 - 60 Fisch, 1 - 1,5 Gans, 3,5 - 5 160 - 180 120 - 180 Pute, 2,5 - 160 - 180... - Seite 48 Einschubebe- Speise Zubehör Temperatur (°C) Dauer (Min.) Makronen, 20 Backblech oder tiefes 25 - 35 Stück Blech Muffins, 12 Backblech oder tiefes 30 - 40 Stück Blech Gebäck, pikant, Backblech oder tiefes 25 - 30 16 Stück Blech Mürbeteigge- Backblech oder tiefes 25 - 35 bäck, 20 Stück Blech...
-
Seite 49: Informationen Für Prüfinstitute
DÖRREN - HEISSLUFT Sie erzielen ein besseres Ergebnis, wenn Sie nach halber Dörrzeit den Backofen ausschalten, öffnen Verwenden Sie mit Butterbrot- oder Backpapier und am besten über Nacht auskühlen lassen. belegte Bleche. Gemüse Nutzen Sie für ein Blech die dritte Einschubebene. Nutzen Sie für 2 Bleche die erste und vierte Einschubebene. - Seite 50 Ein- Tempe- Speise Funktion Zubehör schub- Dauer (Min.) Bemerkungen ratur (°C) ebene Apfelku- Ober-/ Kombi- 70 - 90 2 Formen (20 cm chen Unterhitze rost Durchmesser) dia- gonal versetzt ver- wenden. Apfelku- Heißluft / Kombi- 70 - 90 2 Formen (20 cm chen Umluft rost...
-
Seite 51: Hinweise Zur Reinigung
Ein- Tempe- Speise Funktion Zubehör schub- Dauer (Min.) Bemerkungen ratur (°C) ebene Hambur- Grillstufe Kombi- Max. 20 - 30 Kombirost in die ger aus rost und vierte und Fett- Rind- Fettpfan- pfanne in die dritte fleisch Einschubebene 6 Stück, des Backofens 0,6 kg einschieben. -
Seite 52: Erinnerungsfunktion Reinigen
Drücken Sie oder drehen Sie den Temperaturwahlknopf, um die Pyrolyse zu starten. Sie können den Beginn der Reinigung mit der Funktion ENDE verzögern. Während der Pyrolyse ist die Lampe ausgeschaltet. 5. Sobald der Backofen die voreingestellte Temperatur erreicht hat, wird die Tür verriegelt. Das Display zeigt und die Balken der Führen Sie zum Einsetzen der entfernten... - Seite 53 4. Legen Sie die Backofentür auf ein weiches Tuch auf einer stabilen Fläche. 5. Fassen Sie die Türabdeckung (B) an der Oberkante der Tür an beiden Seiten an. Drücken Sie sie nach innen, um den Klippverschluss zu lösen. 6. Ziehen Sie die Türabdeckung nach vorne, um 2.
-
Seite 54: Austauschen Der Lampe
AUSTAUSCHEN DER LAMPE WARNUNG! Stromschlaggefahr. Die Lampe kann heiß sein. 1. Schalten Sie den Backofen aus. Warten Sie, bis der Backofen abgekühlt ist. 2. Trennen Sie den Ofen von der Netzversorgung. 3. Breiten Sie ein Tuch auf dem Garraumboden aus. VORSICHT! Halogenlampen immer mit einem Tuch anfassen, um ein Einbrennen von Fett (Fingerabdrücke) - Seite 55 Störung Mögliche Ursache Abhilfe Der Backofen heizt nicht. Die Kindersicherung ist einge- Siehe „Verwenden der Kinder- schaltet. sicherung“. Der Backofen heizt nicht. Die Sicherung ist durchge- Vergewissern Sie sich, dass brannt. die Sicherung der Grund für die Störung ist. Brennt die Si- cherung wiederholt durch, wenden Sie sich an eine zuge- lassene Elektrofachkraft.
-
Seite 56: Montage
Störung Mögliche Ursache Abhilfe Das Gerät ist eingeschaltet, Der Demo-Modus ist einge- 1. Schalten Sie den Back- heizt aber nicht auf. Der Venti- schaltet. ofen aus. lator funktioniert nicht. Im Dis- 2. Halten Sie die Taste play erscheint "Demo". gedrückt. 3. -
Seite 57: Einbau
EINBAU min. 550 min. 560 min. 550 min. 560 BEFESTIGUNG DES GERÄTS IM MÖBEL ELEKTRISCHER ANSCHLUSS Der Hersteller haftet nicht für Schäden, die aufgrund der Nichtbeachtung der in den Sicherheitshinweisen beschriebenen Sicherheitsvorkehrungen entstehen. Das Gerät wird nur mit einem Netzkabel geliefert. KABEL Einsetzbare Kabeltypen für Montage oder Austausch:... - Seite 58 (blaues und braunes Kabel). maximal 2300 3 x 1 ENERGIEEFFIZIENZ PRODUKTDATENBLATT UND INFORMATIONEN GEMÄSS EU 65-66/2014 Herstellername Zanussi ZOP37902XK Modellidentifikation ZOP37912XC Energieeffizienzindex 81.2 Energieeffizienzklasse Energieverbrauch bei Standardbeladung, Ober-/Unterhitze 0.93 kWh/Programm Energieverbrauch bei Standardbeladung, Umluft 0.69 kWh/Programm Anzahl der Garräume Wärmequelle Strom Fassungsvermögen...
- Seite 59 Warmhalten von Speisen Halten Sie die Unterbrechungen beim Backen so kurz wie möglich, wenn Sie mehrere Backwaren Wählen Sie die niedrigste Temperatureinstellung, gleichzeitig zubereiten. wenn Sie die Restwärme zum Warmhalten von Garen mit Heißluft Speisen nutzen möchten. Die Restwärmeanzeige oder Temperatur werden auf dem Display Nutzen Sie, wenn möglich, die Garfunktionen mit angezeigt.
- Seite 60 WWW.ZANUSSI.COM/SHOP...