Herunterladen Inhalt Inhalt Diese Seite drucken

Werbung

Verfügbare Sprachen
  • DE

Verfügbare Sprachen

  • DEUTSCH, seite 29
Copyright Notice:
Copyright Notice:
Copyright Notice:
Copyright Notice:
Copyright Notice:
No part of this installation guide may be reproduced, transcribed, transmitted, or
translated in any language, in any form or by any means, except duplication of
documentation by the purchaser for backup purpose, without written consent of
ASRock Inc.
Products and corporate names appearing in this guide may or may not be registered
trademarks or copyrights of their respective companies, and are used only for
identification or explanation and to the owners' benefit, without intent to infringe.
Disclaimer:
Disclaimer:
Disclaimer:
Disclaimer:
Disclaimer:
Specifications and information contained in this guide are furnished for informational
use only and subject to change without notice, and should not be constructed as a
commitment by ASRock. ASRock assumes no responsibility for any errors or
omissions that may appear in this guide.
With respect to the contents of this guide, ASRock does not provide warranty of any
kind, either expressed or implied, including but not limited to the implied warranties or
conditions of merchantability or fitness for a particular purpose.
In no event shall ASRock, its directors, officers, employees, or agents be liable for
any indirect, special, incidental, or consequential damages (including damages for
loss of profits, loss of business, loss of data, interruption of business and the like),
even if ASRock has been advised of the possibility of such damages arising from any
defect or error in the guide or product.
This device complies with Part 15 of the FCC Rules. Operation is subject to the
following two conditions:
(1) this device may not cause harmful interference, and
(2) this device must accept any interference received, including interference that
may cause undesired operation.
ASRock Website: http://www.asrock.com
Published March 2005
Copyright©2005 ASRock INC. All rights reserved.
1 1 1 1 1
ASRock K7NF2-RAID Motherboard

Werbung

Inhaltsverzeichnis
loading

Inhaltszusammenfassung für ASROCK K7NF2-RAID

  • Seite 1 ASRock. ASRock assumes no responsibility for any errors or omissions that may appear in this guide. With respect to the contents of this guide, ASRock does not provide warranty of any kind, either expressed or implied, including but not limited to the implied warranties or conditions of merchantability or fitness for a particular purpose.
  • Seite 2 Secondary IDE Connector (IDE2, Black) ATX Power Connector (ATXPWR1) Chassis Fan Connector (CHA_FAN1) Shared USB 2.0 Header (USB45E, Blue) System Panel Connector (PANEL1) FSB Select Jumper (FSB_SEL1) Chassis Speaker Connector (SPEAKER 1) FSB Select Jumper (FSB_SEL0) 2 2 2 2 2 ASRock K7NF2-RAID Motherboard...
  • Seite 3 USB 2.0 Ports (USB01) RJ-45 Port USB 2.0 Ports (USB23) Line In (Light Blue) Serial Port: COM1 Line Out (Lime) PS/2 Keyboard Port (Purple) Microphone (Pink) PS/2 Mouse Port (Green) USB 2.0 Ports (USB45) 3 3 3 3 3 ASRock K7NF2-RAID Motherboard...
  • Seite 4: Package Contents

    In case any modifications of this manual occur, the updated version will be available on ASRock website without further notice. You may find the latest memory and CPU support lists on ASRock website as well. ASRock website http://www.asrock.com...
  • Seite 5: Specifications

    Speed: 802.3u (10/100 Ethernet), supports Wake-On-LAN Hardware Monitor: CPU temperature sensing; Chassis temperature sensing; CPU overheat shutdown to protect CPU life (ASRock U-COP)(see CAUTION 1); CPU fan tachometer; Chassis fan tachometer; Voltage monitoring: +12V, +5V, +3.3V, Vcore PCI slots: 5 slots with PCI Specification 2.3 AGP slot: 1 AGP slot, supports 1.5V, AGP 8X card (see CAUTION 2)
  • Seite 6 CPU and the heatsink when you install the PC system. Do NOT insert a 3.3V AGP card into the AGP slot of K7NF2-RAID motherboard! It may cause permanent damage! Power Management for USB 2.0 works fine under Microsoft ®...
  • Seite 7: Cpu Installation

    STEP 5: Install CPU fan and heatsink. For proper installation, please kindly refer to the instruction manuals of your CPU fan and heatsink vendors. 7 7 7 7 7 ASRock K7NF2-RAID Motherboard...
  • Seite 8: Installing A Dimm

    Installation of Memory Modules (DIMM) Installation of Memory Modules (DIMM) K7NF2-RAID motherboard provides three 184-pin DDR (Double Data Rate) DIMM slots, and supports Dual Channel Memory Technology. To enable Dual-Channel mode, you need to install 2 DIMMs into DDR1 and DDR3 slots. Although this chipset can work on...
  • Seite 9: Installing An Expansion Card

    The ASRock AGP slot has a special locking mechanism which can securely fasten the graphics card inserted. Please do NOT use a 3.3V AGP card on the AGP slot of K7NF2-RAID motherboard! It may cause permanent damage! For the voltage information of your VGA card, please check with the VGA card vendors.
  • Seite 10 (FID0, FID1, FID2, FID3, FID4) (see p.2 item 2) Note: The set of FID jumpers are designed to adjust the multiplier of CPU. For detailed information, please refer to page 15 of user Manual in the Support CD. ASRock K7NF2-RAID Motherboard...
  • Seite 11 1.5 Gb/s SATA1 data transfer rate. Serial ATA (SATA) Either end of the SATA data cable Data Cable can be connected to the SATA hard disk or the SATA connector on the motherboard. ASRock K7NF2-RAID Motherboard...
  • Seite 12 (AUX1: see p.2 item 25) AUX1 card, or MPEG card. Front Panel Audio Connector This is an interface for front panel audio cable that allows (9-pin AUDIO1) convenient connection and (see p.2 item 21) control of audio devices. ASRock K7NF2-RAID Motherboard...
  • Seite 13 (see p.2 item 27) Game Connector Connect a Game cable to this connector if the Game port (15-pin GAME1) bracket is installed. (see p.2 item 19) Game cable with the Game port bracket (Optional) connect to the Game connector ASRock K7NF2-RAID Motherboard...
  • Seite 14 STEP 1: Make a SATA Driver Diskette. Insert the ASRock Support CD into your optical drive to boot your system. During POST at the beginning of system boot-up, press <F11> key, and then a window for boot devices selection appears. Please select CD- ROM as the boot device.
  • Seite 15 CD, which is located in the folder at the following patch: .. \ Nvidia SATA patch for Win98/ME Then the SATA HDD can be used in SATA 1 or SATA 2 port. Windows 98 SE / Windows ME does not support RAID function. ASRock K7NF2-RAID Motherboard...
  • Seite 16 To begin using the Support CD, insert the CD into your CD-ROM drive. It will display the Main Menu automatically if “AUTORUN” is enabled in your computer. If the Main Menu does not appear automatically, locate and double-click on the file “ASSETUP.EXE” from the BIN folder in the Support CD to display the menus. ASRock K7NF2-RAID Motherboard...
  • Seite 17 ASRock K7NF2-RAID Motherboard...
  • Seite 18 ASRock K7NF2-RAID Motherboard...
  • Seite 19 ® ® ” ” ASRock K7NF2-RAID Motherboard...
  • Seite 20 ASRock K7NF2-RAID Motherboard...
  • Seite 21 ASRock K7NF2-RAID Motherboard...
  • Seite 22 ” ” ASRock K7NF2-RAID Motherboard...
  • Seite 23 “ ” SATA2 SATA1 ASRock K7NF2-RAID Motherboard...
  • Seite 24 AUX1 ASRock K7NF2-RAID Motherboard...
  • Seite 25 ASRock K7NF2-RAID Motherboard...
  • Seite 26 ASRock K7NF2-RAID Motherboard...
  • Seite 27 .. \ RAID BIOS Setting Utility .. \ RAID Utility for Windows ASRock K7NF2-RAID Motherboard...
  • Seite 28 ® ® ASRock K7NF2-RAID Motherboard...
  • Seite 29 1. Einführung 1. Einführung 1. Einführung Wir danken Ihnen für den Kauf des ASRock K7NF2-RAID Motherboard, ein zuverlässiges Produkt, welches unter den ständigen, strengen Qualitätskontrollen von ASRock gefertigt wurde. Es bietet Ihnen exzellente Leistung und robustes Design, gemäß der Verpflichtung von ASRock zu Qualität und Halbarkeit. Dieses Schnellstarthandbuch beinhaltet eine Einführung in das Motherboard, sowie eine...
  • Seite 30: Spezifikationen

    Wake-On-LAN Hardware Monitor: CPU Temperaturmessung (ASRock U-COP); Messung der häuseinnentemperatur; CPU Shutdown bei Überhitzung, schützt die CPU vor dem Hitzetod (ASRock U-COP)(siehe VORSICHT 1); Rotationskontrolle für CPU-Lüfter; Rotationskontrolle für Gehäuse-Lüfter; Spannungsüberwachung: +12V, +5V, +3.3V, Vcore PCI-Slots: 5 Slots nach PCI-Spezifikation 2.3 AGP-Slot : 1x AGP-Slot, unterstützt 1.5V, 8X AGP-Karten...
  • Seite 31 ® 98/ME könnte es dagegen zu Störungen kommen. . Obwohl das K7NF2-RAID eine stufenlose Einstellung der Taktfrequenz ermöglicht, ist es nicht empfehlenswert, das System zu übertakten. Frequenzen, die über den für den jeweiligen Prozessor vorgesehenen liegen, können das System instabil werden lassen oder die CPU beschädigen.
  • Seite 32: Sicherheitshinweise Vor Der Montage

    Hebel nach unten drücken, bis er hörbar einrastet. Schritt 5: Installieren Sie einen aktiven CPU-Kühler, der die gesamte Fläche der CPU abdeckt und eine ausreichende Wärmeableitung für den von Ihnen verwendeten CPU-Typ bietet. Weitere Hinweise finden Sie der Installationsanleitung für Ihren CPU-Kühler. ASRock K7NF2-RAID Motherboard...
  • Seite 33: Installation Der Speichermodule (Dimm)

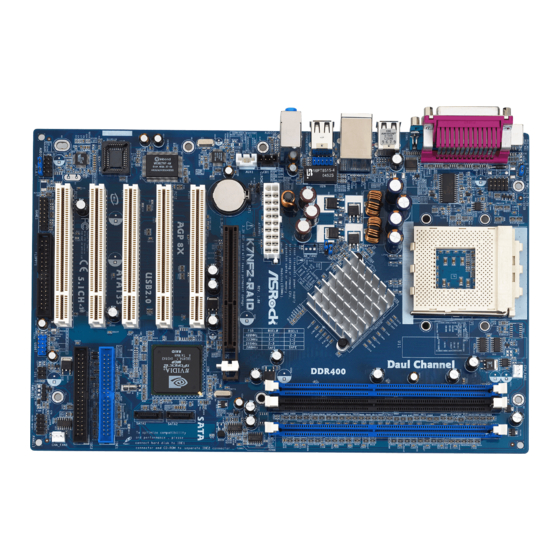
    2.2 Installation der Speichermodule (DIMM) 2.2 Installation der Speichermodule (DIMM) 2.2 Installation der Speichermodule (DIMM) Das K7NF2-RAID Motherboard bietet drei 184-polige DDR (Double Data Rate) DIMM- Steckplätze und unterstützt die Doppelkanal-Speichertechnologie. Um den Doppelkanalmodus zu aktivieren, müssen Sie zwei DIMMs in den Steckplätzen DDR1 und DDR3 installieren.
  • Seite 34: Erweiterungssteckplätze (Pci Und Agp-Slots)

    2.3 Erweiterungssteckplätze (PCI und AGP-Slots): Es stehen 5 PCI- und 1 AGP-Slot auf dem K7NF2-RAID - Motherboard zur Verfügung. PCI-Slots: PCI-Slots werden zur Installation von Erweiterungskarten mit dem 32bit PCI-Interface genutzt. AGP-Slot: Der AGP-Slot wird zur Installation einer Gfrafikkarte genutzt.
  • Seite 35: Einstellung Der Jumper

    Hinweis: Um +5VSB nutzen zu können, wird ein Netzteil benötigt, welches auf dieser Leitung 2A liefern kann. (siehe S.2 - Punkt 20) (siehe S.2 - Punkt 20) Hinweis: Sind die Jumper JL1 und JR1 gesetzt funktionieren beide Audioanschlüsse, Front- und Rückseite. ASRock K7NF2-RAID Motherboard...
  • Seite 36 Sie den CMOS-Inhalt löschen. FID Jumpers (FID0, FID1, FID2, FID3, FID4) (siehe S.2, Punkt 2) Hinweis: Das Set mit FID-Jumpern dient zum Einstellen der Multiplier der CPU. Details sind im Handbuch auf Seite 15 auf der Support-CD angegeben. ASRock K7NF2-RAID Motherboard...
  • Seite 37 Seriell-ATA-Anschlüsse Diese beiden Serial ATA- (SATA-) Verbínder unterstützten SATA- (SATA1: siehe S.2 - Punkt 9) SATA2 Datenkabel für interne (SATA2: siehe S.2 - Punkt 8) Massenspeichergeräte. Die aktuelle SATA-Schnittstelle SATA1 ermöglicht eine Datenübertragungsrate bis 1,5 Gb/s. ASRock K7NF2-RAID Motherboard...
  • Seite 38 Ende des SATA- Netzteil Stromversorgungskabels mit dem Stromanschluss des Netzteils. USB 2.0-Anschluss ASRock I/O Plus™ verfügt über 6 Standard-USB 2.0-Anschlüsse (9-pin USB67) auf der Rückseite. Wenn die (siehe S.2 - Punkt 17) hinteren USB-Anschlüsse nicht ausreichen, steht dieser USB 2.
  • Seite 39 (3-pin CHA_FAN1) Anschlussbuchse mit dem (siehe S.2 - Punkt 13) schwarzen Lüfterkabel übereinstimmt. Anschluss für CPU-Lüfter Verbinden Sie das Lüfterkabel so, dass der Massepin der (3-pin CPU_FAN1) Anschlussbuchse mit dem (siehe S.2 - Punkt 5) schwarzen Lüfterkabel übereinstimmt. ASRock K7NF2-RAID Motherboard...
  • Seite 40: Sata-Festplatten Installieren

    Verbinden Sie das andere Ende des SATA-Datenkabels mit der primären SATA-Festplatte. SCHRITT 4: Verbinden Sie ein Ende des zweiten SATA-Datenkabels mit dem sekundären SATA-Anschluss (SATA2) des Mainboards. SCHRITT 5: Verbinden Sie das andere Ende des SATA-Datenkabels mit der sekundären SATA-Festplatte. ASRock K7NF2-RAID Motherboard...
  • Seite 41 Bitte gehen Sie wie folgt vor, wenn Sie Windows 2000 oder Windows XP auf Ihren SATA-Festplatten mit RAID-Funktionen installieren möchten. SCHRITT 1: Erstellen Sie eine SATA-Treiberdiskette. Legen Sie die ASRock Support-CD in Ihr optisches Laufwerk, um Ihr System hochzufahren. (Legen Sie zu diesem Zeitpunkt KEINE Diskette in das Diskettenlaufwerk ein!) Während des Selbsttests zu Beginn des Systemstarts drücken Sie die <F11>-...
  • Seite 42: Installation Von Windows 98 Se / Windows Me

    98 / Windows ME, die sich auf der mitgelieferten Support-CD im folgenden Verzeichnis befindet: ..\ Nvidia SATA patch for Win98/ME Danach kann die SATA-Festplatte mit SATA 1 oder SATA 2 verwendet werden. Windows 98 SE / Windows ME unterstützt keine “RAID” -Funktionen. ASRock K7NF2-RAID Motherboard...
  • Seite 43 EXE im BIN-Verzeichnis der Support-CD, um die Menüs aufzurufen. Das Setup-Programm soll es Ihnen so leicht wie möglich machen. Es ist menügesteuert, d.h. Sie können in den verschiedenen Untermenüs Ihre Auswahl treffen und die Programme werden dann automatisch installiert. ionen. ASRock K7NF2-RAID Motherboard...
  • Seite 44: Contenu Du Paquet

    1. Introduction 1. Introduction 1. Introduction Merci pour votre achat d’une carte mère ASRock K7NF2-RAID, une carte mère très fiable produite selon les critères de qualité rigoureux de ASRock. Elle offre des performances excellentes et une conception robuste conformément à l’engagement d’ASRock sur la qualité...
  • Seite 45: Spécifications

    5.1 canaux audio AC’97; LAN: Vitesse: 802.3u (Ethernet 10/100), support du Wake-On-LAN Surveillance Système: Mesure de la température CPU (ASRock U-COP); Mesure de la température du châssis; Coupure auto du CPU en cas de surchauffe pour protéger le CPU (ASRock U-COP)(voir ATTENTION 1);...
  • Seite 46 Microsoft Windows 98/ME. Bien que les cartes K7NF2-RAID offrent le contrôle Stepless, il n’est pas recommandé d’effectuer un overclocking. Les fréquences différentes de celles recommandées pour le bus CPU peuvent entraîner une instabilité du système ou endommager le CPU. La fréquence hôte du CPU de cette carte mère est déterminée par le réglage des cavaliers.
  • Seite 47 CPU. Le verrouillage du levier dans son encoche latérale est annoncé par un clic. Etape 5. Installez le ventilateur et le radiateur du CPU. Pour une installation correcte, reportez-vous aux manuels du fabricant du ventilateur et du radiateur de CPU. ASRock K7NF2-RAID Motherboard...
  • Seite 48 2.2 Installation des modules mémoire (DIMM) 2.2 Installation des modules mémoire (DIMM) La carte mère K7NF2-RAID comprend trois slots DIMM pour de la DDR (Double Data Rate) à 184 broches, et prend en charge la technologie mémoire double voie. Pour activer le mode Double Voie, il vous faut installer 2 DIMM dans les slots DDR1 et DDR3.
  • Seite 49 2.3 Slot d’extension (Slots PCI et Slot AGP) 2.3 Slot d’extension (Slots PCI et Slot AGP) Il y a 5 slots PCI et 1 slot AGP sur les cartes mères K7NF2-RAID. Slots PCI: Les slots PCI sont utilisés pour installer des cartes d’extension dotées d’une interface PCI 32 bits.
  • Seite 50 Note: Pour sélectionner +5VSB, il faut obligatoirement 2 Amp et un courant standby supérieur fourni par l’alimentation. (voir p.2 fig. 20) (voir p.2 fig. 20) Note: Si les cavaliers JL1 et JR1 sont reliés, les connecteurs audio du panneau avant et du panneau arrière peuvent fonctionner. ASRock K7NF2-RAID Motherboard...
  • Seite 51 (voir p.2 fig. 2) Note: L’ensemble de cavaliers FID est conçu pour régler le coefficient multiplicateur du processeur. Pour obtenir des informations détaillées, veuillez vous référer à la page 15 du Manuel Utilisateur sur le CD de Support. ASRock K7NF2-RAID Motherboard...
  • Seite 52 ATA (SATA) prennent en (SATA1: voir p.2 fig. 9) charge les câbles SATA pour SATA2 (SATA2: voir p.2 fig. 8) les périphériques de stockage internes. L’interface SATA SATA1 actuelle permet des taux transferts de données pouvant aller jusqu’à 1,5 Go/s. ASRock K7NF2-RAID Motherboard...
  • Seite 53 électrique SATA sur le connecteur d’alimentation de l’unité d’alimentation électrique. Connecteur USB 2.0 L’ASRock I/O Plus™ vous fournit 6 ports USB 2.0 par défaut situés (USB67 br.9) sur le panneau arrière. Si les (voir p.2 fig. 17) ports USB arrières ne sont pas suffisants, ce connecteur USB 2.0 (USB67) est capable de...
  • Seite 54 Reliez le câble du au connecteur en faisant correspondre le fil noir à la broche de masse. (CPU_FAN1 br. 3) (voir p.2 fig. 5) Connecteur d’alimentation ATX Reliez-le à une alimentation ATX. (ATXPWR1 br. 20) (voir p.2 fig. 27) ASRock K7NF2-RAID Motherboard...
  • Seite 55 ETAPE 4 : Connectez l’une des extrémités du second câble de données SATA sur le connecteur SATA secondaire (SATA2) de la carte mère. ETAPE 5 :Connectez l’autre extrémité du câble de données SATA sur le disque dur SATA secondaire. ASRock K7NF2-RAID Motherboard...
  • Seite 56 SATA avec fonctions RAID, veuillez suivre la procédure ci-dessous. ETAP 1: Créez une disquette pilotes SATA. A. Insérez le CD de soutien ASRock dans votre lecteur de disque optique pour démarrer votre système. (N’insérez AUCUNE disquette dans le lecteur de disquette pour l’instant!)
  • Seite 57 .. \ Nvidia SATA patch for Win98/ME Le disque dur SATA peut être utilisé sur le port SATA 1 ou SATA 2. Windows 98 SE / Windows ME ne supporte pas les fonctions “RAID”. ASRock K7NF2-RAID Motherboard...
  • Seite 58 Pour utiliser le CD technique, insérez-le dans le lecteur de CD-ROM. Le Menu principal s’affiche automatiquement si “AUTORUN” est activé dans votre ordinateur. Si le Menu principal n’apparaît pas automatiquement, localisez dans le CD technique le fichier “ASSETUP. EXE” dans le dossier BIN et double-cliquez dessus pour afficher les menus. ASRock K7NF2-RAID Motherboard...
  • Seite 59: Contenuto Della Confezione

    Grazie per aver scelto una scheda madre ASRock K7NF2-RAID, una scheda madre affidabile prodotta secondo i severi criteri di qualità ASRock. Le prestazioni eccellenti e il design robusto si conformano all’impegno di ASRock nella ricerca della qualità e della resistenza. Questa guida d’installazione rapida comprende la descrizione della scheda madre e una guida d’installazione passo a passo per i costruttori di nuovi...
  • Seite 60 AC’97 Audio a 5.1 canali; LAN: Velocità: 802.3u (10/100 Ethernet), supporta Wake-On-LAN Monitoraggio Hardware: Sensore per la temperatura del processore (ASRock U-COP); Sensore per la temperatura dello Chassis; Chiusura automatica del processore in caso di surriscaldamento per proteggere la CPU (ASRock U-COP)(vedi ATTENZIONE 1);...
  • Seite 61 Windows ® 98/ME. Sebbene K7NF2-RAID offrano controllo passo a passo, non è consigliabile eseguire l’overclocking. Frequenze del bus del processore diverse da quelle raccomandate possono causare instabilità al sistema o danni al processore e alla scheda madre. La frequenza Host della CPU di questa scheda madre è...
  • Seite 62: Installazione

    Quando la leva fa clic sulla linguetta laterale significa che è bloccata. Step 5. Installare la ventola del processore e l’heatsink. Per una corretta installazione, per favore fare riferimento ai manuali di istruzione dei produttori della ventola e dell’heatsink del processore. ASRock K7NF2-RAID Motherboard...
  • Seite 63 2.2 Installazione dei moduli di memoria (DIMM) 2.2 Installazione dei moduli di memoria (DIMM) La scheda madre K7NF2-RAID ha tre slot DDR (Double Data Rate) DIMM a 184 pin e supporta la tecnologia di memoria a doppio canale. Per abilitare la modalità a doppio canale, è...
  • Seite 64 2.3 Slot di espansione (PCI e slot AGP) 2.3 Slot di espansione (PCI e slot AGP) Esistono 5 slot PCI e 1 slot AGP su entrambe le schede madri K7NF2-RAID. Slot PCI: Sono utilizzati per installare schede di espansione con Interfaccia PCI a 32-bit.
  • Seite 65 Nota: Per selezionare +5VSB, sono necessari 2 Ampere e il consumo di corrente in standby aumenta. (vedi p.2 item 20) (vedi p.2 item 20) Nota: Se i jumper JL1 e JR1 sono chiusi, funzionano sia i connettori audio frontali che posteriori. ASRock K7NF2-RAID Motherboard...
  • Seite 66 (FID0, FID1, FID2, FID3, FID4) (vedi p.2 item 2) Nota: Il set di jumper FID sono disegnati per regolare il moltiplicatore del processore. Per informazioni più dettagliate, fare riferimento alla pagina 15 del manuale dell’utente nel CD di supporto. ASRock K7NF2-RAID Motherboard...
  • Seite 67 (SATA1: vedi p.2 item 9) SATA2 SATA per dispositivi di (SATA2: vedi p.2 item 8) immagazzinamento interni. ATA (SATA) supportano cavi SATA1 SATA per dispositivi di memoria interni. L’interfaccia SATA attuale permette velocità di trasferimento dati fino a 1.5 Gb/s. ASRock K7NF2-RAID Motherboard...
  • Seite 68 Plus™. Se si utilizzano le porte (vedi p.2 item 28) USB del pannello frontale allacciando il cavo USB del pannello frontale a questo connettore (USB45), le porte 4, 5 USB del dispositivo ASRock I/ O Plus™ non potranno funzionare. Connettore modulo Questo connettore supporta infrarossi...
  • Seite 69 Connettore della ventola Collega il cavo della ventola al del processore connettore verificando che il colore nero corrisponda alla (3-pin CPU_FAN1) massa. (vedi p.2 item 5) Connettore ATX Connette a un alimentatore. (20-pin ATXPWR1) (vedi p.2 item 27) ASRock K7NF2-RAID Motherboard...
  • Seite 70 Collegare l’altra estremità del cavo dati SATA all’hard disk SATA primario. 4° PASSO: Connettere una estremità del secondo cavo dati SATA al connettore SATA secondario (SATA2) della scheda madre. 5° PASSO: Connettere l’altra estremità del cavo dati SATA all’hard disk SATA secondario. ASRock K7NF2-RAID Motherboard...
  • Seite 71 RAID, seguire le istruzioni in basso. 1° PASSO: Creare un dischetto driver SATA. Inserire il CD di supporto ASRock nel lettore ottico prima di accendere il sistema. (NON inserire nessun dischetto floppy nel drive in questo momento!) Durante la fase di POST, all’inzio del boot-up del sistema, premere il tasto <F11>.
  • Seite 72 .. \ Nvidia SATA patch for Win98/ME A questo punto il disco rigido SATA può essere usato nella porta SATA 1 o SATA 2. Windows 98 SE / Windows ME non supporta le funzioni “RAID”. ASRock K7NF2-RAID Motherboard...
  • Seite 73 Inserire il CD di supporto nel lettore CD-ROM. Se la funzione “AUTORUN” è attivata nel computer, apparirà automaticamente il Menù principale. Se il Menù principale non appare automaticamente, posizionarsi sul file “ASSETUP.EXE” nel CESTINO del CD di supporto e cliccare due volte per visualizzare i menù. D”. ASRock K7NF2-RAID Motherboard...
  • Seite 74: Contenido De La Caja

    1. Introducción 1. Introducción Gracias por su compra de ASRock K7NF2-RAID placa madre, una placa de confianza producida bajo el control de calidad estricto y persistente. La placa madre provee realización excelente con un diseño robusto conforme al compromiso de calidad y resistencia de ASRock.
  • Seite 75 AC’97 Audio, 5.1 canales LAN: Velocidad: 802.3u (10/100 Ethernet), soporta Wake-On-LAN Monitor Hardware: Sensor para la temperature del procesador (ASRock U-COP); Sensor para la temperatura del chasis; Corte automático en caso de temperatura sobre-elevada de CPU (ASRock U-COP)(ver ATENCIÓN 1);...
  • Seite 76 Windows ® 98/ME. Aunque K7NF2-RAID ofrezan stepless control, no recomendamos overclocking. Frecuencias aprate de las frecuencias de CPU bus recomendadas podrían causar la inestabilidad del sistema o dañar el procesador y la placa madre. La frecuencia host de la CPU de esta placa base se determina mediante el parámetro del puente.
  • Seite 77: Instalación

    CPU, examine su orientación o examine si los pins están ya encorvados. Paso 4. Encierre el zócalo bajando la palanca. Paso 5. Instale el disipador de calor con ventilador del CPU (consulte la documentación del disipador de calor). ASRock K7NF2-RAID Motherboard...
  • Seite 78 2.2 Instalación de Memoria 2.2 Instalación de Memoria La placa base K7NF2-RAID proporciona tres ranuras DIMM DDR de 184 pin (Double Data Rate, es decir, Tasa doble de datos) y es compatible con la Tecnología de memoria de canal dual. Para habilitar el modo de canal dual, debe instalar 2 módulos DIMM en las ranuras DDR1 y DDR3.
  • Seite 79 2.3 Ranuras de Expansion (Ranuras PCI y AGP) 2.3 Ranuras de Expansion (Ranuras PCI y AGP) Hay 5 ranuras PCI y 1 ranura AGP sobre las placas mardres K7NF2-RAID. Slot PCI: Para instalar tarjetas de expansión que tienen 32-bit Interface PCI.
  • Seite 80 Para elegir +5VSB, se necesita corriente más que 2 Amp. (ver p.2, No. 20) (ver p.2, No. 20) Atención: Si los puentes JL1 y JR1 son cortos, tanto el conector de audio del panel frontal como del panel posterior pueden funcionar. ASRock K7NF2-RAID Motherboard...
  • Seite 81 (FID0, FID1, FID2, FID3, FID4) (vea p.2, No. 2) Nota: El conjunto de puentes FID está diseñado para ajustarse al multiplicador de CPU. Para obtener información detallada, consulte la página 15 del Manual de usuario en el CD de soporte. ASRock K7NF2-RAID Motherboard...
  • Seite 82 Estas dos conexiones de serie ATA (SATA) admiten cables (SATA1: ver p.2, No. 9) SATA2 SATA para dispositivos de (SATA2: ver p.2, No. 8) almacenamiento internos. La interfaz SATA actual permite SATA1 una velocidad de transferencia de 1.5 Gb/s. ASRock K7NF2-RAID Motherboard...
  • Seite 83 2 puertos USB 2.0 adicionales. Conector USB 2.0 Este conector USB45 está compartido compartido con los puertos USB 2.0 4,5 en ASRock I/O (9-pin USB45) Plus™. Cuando utilice los (ver p.2, No. 28) puertos USB del panel frontal adjuntando el cable USB del...
  • Seite 84 (3-pin CHA_FAN1) (ver p.2, No. 13) Conector de ventilador de CPU Conector para ventilador de CPU. (3-pin CPU_FAN1) (ver p.2, No. 5) Conector de ATX power Conector para ATX power supply. (20-pin ATXPWR1) (ver p.2, No. 27) ASRock K7NF2-RAID Motherboard...
  • Seite 85 PASO 4: Conecte un extremo del segundo cable de datos SATA a la conexión SATA secundaria de la placa base (SATA2). PASO 5: Conecte el otro extremo del cable de datos SATA al disco duro SATA secundario. ASRock K7NF2-RAID Motherboard...
  • Seite 86 RAID, por favor siga los pasos siguientes. PASO 1: Haga un Disquete de Controlador SATA. Inserte el CD de soporte de ASRock en la unidad óptica de la unidad para iniciar el sistema. (NO inserte ningún disquete en la unidad de disco en este momento) Durante la comprobación inicial (POST) del sistema, pulse la tecla <F11>...
  • Seite 87 .. \ Nvidia SATA patch for Win98/ME A continuación, podrá utilizar el disco duro SATA en el puerto SATA 1 o SATA 2. Windows 98 SE / Windows ME no soporta las funciones “RAID”. ASRock K7NF2-RAID Motherboard...
  • Seite 88 Para iniciar la instalación, ponga el CD en el lector de CD y se desplegará el Menú Principal automáticamente si «AUTORUN» está habilitado en su computadora. Si el Menú Principal no aparece automáticamente, localice y doble-pulse en el archivo “ASSETUP. EXE” para iniciar la instalación. ASRock K7NF2-RAID Motherboard...

Inhaltsverzeichnis