ASROCK K7S41GX2 Installationsanleitung
Copyright Notice:
Copyright Notice:
Copyright Notice:
Copyright Notice:
Copyright Notice:
No part of this installation guide may be reproduced, transcribed, transmitted, or trans-
lated in any language, in any form or by any means, except duplication of documen-
tation by the purchaser for backup purpose, without written consent of ASRock Inc.
Products and corporate names appearing in this guide may or may not be registered
trademarks or copyrights of their respective companies, and are used only for identifica-
tion or explanation and to the owners' benefit, without intent to infringe.
Disclaimer:
Disclaimer:
Disclaimer:
Disclaimer:
Disclaimer:
Specifications and information contained in this guide are furnished for informational
use only and subject to change without notice, and should not be constructed as a
commitment by ASRock. ASRock assumes no responsibility for any errors or omissions
that may appear in this guide.
With respect to the contents of this guide, ASRock does not provide warranty of any kind,
either expressed or implied, including but not limited to the implied warranties or
conditions of merchantability or fitness for a particular purpose. In no event shall
ASRock, its directors, officers, employees, or agents be liable for any indirect, special,
incidental, or consequential damages (including damages for loss of profits, loss of
business, loss of data, interruption of business and the like), even if ASRock has been
advised of the possibility of such damages arising from any defect or error in the guide
or product.
This device complies with Part 15 of the FCC Rules. Operation is subject to the
following two conditions:
(1) this device may not cause harmful interference, and
(2) this device must accept any interference received, including interference that
may cause undesired operation.
CALIFORNIA, USA ONLY
The Lithium battery adopted on this motherboard contains Perchlorate, a toxic
substance controlled in Perchlorate Best Management Practices (BMP) regulations
passed by the California Legislature. When you discard the Lithium battery in
California, USA, please follow the related regulations in advance.
"Perchlorate Material-special handling may apply, see
www.dtsc.ca.gov/hazardouswaste/perchlorate"
ASRock Website: http://www.asrock.com
Copyright©2010 ASRock INC. All rights reserved.
ASRock K7S41GX2 Motherboard
Published June 2010
1 1 1 1 1
Inhaltsverzeichnis

Verwandte Anleitungen für ASROCK K7S41GX2


Inhaltszusammenfassung für ASROCK K7S41GX2
- Seite 1 ASRock. ASRock assumes no responsibility for any errors or omissions that may appear in this guide. With respect to the contents of this guide, ASRock does not provide warranty of any kind, either expressed or implied, including but not limited to the implied warranties or conditions of merchantability or fitness for a particular purpose.
-
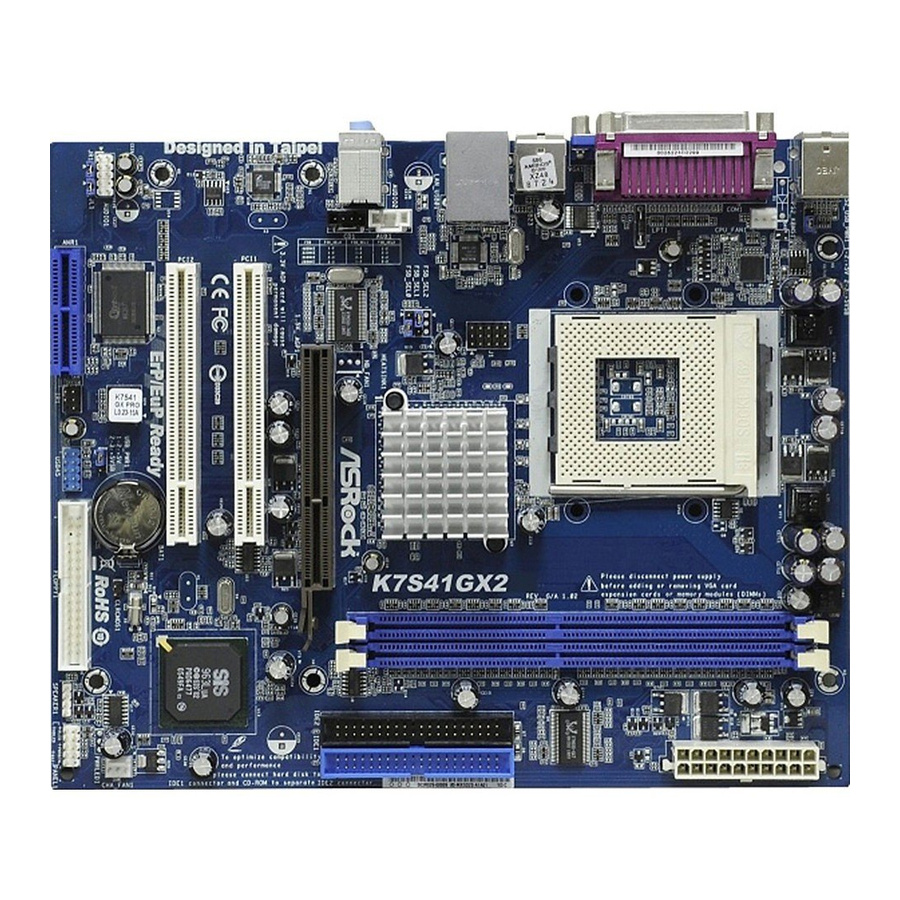
Seite 2: Motherboard-Layout
Clear CMOS (CLRCMOS1) FSB Select Jumpers (FSB_SEL0/FSB_SEL1) Chassis Fan Connector (CHA_FAN1) Internal Audio Connector: CD1 (Black) System Panel Connector (PANEL1) Internal Audio Connector: AUX1 (White) Chassis Speaker Connector (SPEAKER 1) J1 Jumpers 2 2 2 2 2 ASRock K7S41GX2 Motherboard... - Seite 3 PS/2 Keyboard Port (Purple) Microphone (Pink) LAN Port LED Indications ACT/LINK SPEED Activity/Link LED SPEED LED Status Description Status Description No Activity Green 10Mbps connection Blinking Data Activity Green 100Mbps connection LAN Port 3 3 3 3 3 ASRock K7S41GX2 Motherboard...
-
Seite 4: Package Contents
In case any modifications of this manual occur, the updated version will be available on ASRock website without further notice. You may find the latest VGA cards and CPU support lists on ASRock website as well. ASRock website http://www.asrock.com If you require technical support related to this motherboard, please visit our website for specific information about the model you are using. -
Seite 5: Specifications
- 1 x Floppy connector - 1 x IR header - CPU/Chassis FAN connector - 20 pin ATX power connector - CD in header - AUX in header - Front panel audio header 5 5 5 5 5 ASRock K7S41GX2 Motherboard... - Seite 6 - FCC, CE, WHQL - ErP/EuP Ready (ErP/EuP ready power supply is required) (see CAUTION 8) * For detailed product information, please visit our website: http://www.asrock.com WARNING Please realize that there is a certain risk involved with overclocking, including adjusting the setting in the BIOS, applying Untied Overclocking Technology, or using the third- party overclocking tools.
- Seite 7 Intelligent Energy Saver is a revolutionary technology that delivers unparalleled power savings. ASRock Instant Flash is a BIOS flash utility embedded in Flash ROM. This convenient BIOS update tool allows you to update system BIOS without entering operating systems first like MS-DOS or Windows ®...
- Seite 8 5v standby power efficiency is higher than 50% under 100 mA current consumption. For EuP ready power supply selection, we recommend you checking with the power supply manu- facturer for more details. 8 8 8 8 8 ASRock K7S41GX2 Motherboard...
-
Seite 9: Installation
2. Installation 2. Installation K7S41GX2 is a Micro ATX form factor (9.6-in x 7.8-in, 24.4 cm x 19.8 cm) motherboard. Before you install the motherboard, please study the configura- tion of your chassis to ensure that the motherboard fits into it. -
Seite 10: Cpu Installation
Then connect the CPU fan to the CPU_FAN connector (CPU_FAN1, see page 2, No. 2). For proper installation, please kindly refer to the instruction manuals of the CPU fan and the heatsink. ASRock K7S41GX2 Motherboard... - Seite 11 2.3 Installation of Memory Modules (DIMM) 2.3 Installation of Memory Modules (DIMM) 2.3 Installation of Memory Modules (DIMM) K7S41GX2 motherboard provides two 184-pin DDR (Double Data Rate) DIMM slots. Please make sure to disconnect power supply before adding or removing DIMMs or the system components.
- Seite 12 AMR slot: The AMR slot is used to insert an ASRock MR card (optional) with v.92 Modem functionality. AGP slot: The AGP slot is used to install a graphics card. The ASRock AGP slot has a special design of clasp that can securely fasten the inserted graphics card.
- Seite 13 Note: To select +5VSB, it requires 2 Amp and higher standby current provided by power supply. (see p.2 No. 22) (see p.2 No. 21) Note: If the jumpers JL1 and JR1 are short (see the figure above), both front panel and rear panel audio connectors can work. ASRock K7S41GX2 Motherboard...
- Seite 14 CPU. However, the system will work well without the adjustment of multiplier. You do not have to adjust the multiplier for normal usage. Multiplier 5.5x 6.5x 7.5x 8.5x 9.5x 10.5x 11.5x 12.5x 13.5x 16.5x ASRock K7S41GX2 Motherboard...
- Seite 15 For example, “Athlon XP 2000+” is an 1666MHz CPU: 12.5 (Multiplier) X 133MHz (External frequency) = 1666MHz FID jumpers setting: The jumper caps are not provided by ASRock. Please understand that ASRock does not guarantee and support the adjustment of multiplier. These jumpers setting may not apply to all multiplier-locked or even some unlocked AMD CPU.
- Seite 16 (4-pin SPEAKER 1) (see p.2 No. 14) Chassis Fan Connector Please connect a chassis fan cable to this connector and (3-pin CHA_FAN1) match the black wire to the (see p.2 No. 12) ground pin. ASRock K7S41GX2 Motherboard...
- Seite 17 Then, the drivers compatible to your system can be auto-detected and listed on the support CD driver page. Please follow the order from up to bottom side to install those required drivers. Therefore, the drivers you install can work properly. ASRock K7S41GX2 Motherboard...
- Seite 18 CD, insert the CD into your CD-ROM drive. It will display the Main Menu automatically if “AUTORUN” is enabled in your computer. If the Main Menu does not appear automatically, locate and double-click on the file “ASSETUP.EXE” from the “BIN” folder in the Support CD to display the menus. ASRock K7S41GX2 Motherboard...
- Seite 19 1. Einführung 1. Einführung 1. Einführung Wir danken Ihnen für den Kauf des ASRock K7S41GX2 Motherboard, ein zuverlässiges Produkt, welches unter den ständigen, strengen Qualitätskontrollen von ASRock gefertigt wurde. Es bietet Ihnen exzellente Leistung und robustes Design, gemäß der Verpflichtung von ASRock zu Qualität und Halbarkeit.
-
Seite 20: Spezifikationen
- 1 x Serieller port: COM 1 - 1 x VGA port - 4 x Standard-USB 2.0-Anschlüsse - 1 x RJ-45 LAN Port mit LED (ACT/LINK LED und SPEED LED) - Audiobuchse: Audioeingang / Lautsprecher vorne / Mikrofon ASRock K7S41GX2 Motherboard... - Seite 21 Einzigartige - Intelligent Energy Saver (Intelligente Energiesparfunktion) Eigenschaft (siehe VORSICHT 4) - Sofortstart - ASRock Instant Flash (siehe VORSICHT 5) - Hybrid Booster: - Schrittloser CPU-Frequenz-Kontrolle (siehe VORSICHT 6) - ASRock U-COP (siehe VORSICHT 7) - Boot Failure Guard (B.F.G. – Systemstartfehlerschutz)
- Seite 22 Mit einer eigenen, modernen Hardware und speziellem Softwaredesign, bietet der Intelligent Energy Saver eine revolutionäre Technologie zur bisher unerreichten Energieeinsparung. ASRock Instant Flash ist ein im Flash-ROM eingebettetes BIOS-Flash- Programm. Mithilfe dieses praktischen BIOS-Aktualisierungswerkzeugs können Sie das System-BIOS aktualisieren, ohne dafür zuerst Betriebssysteme wie MS-DOS oder Windows ®...
- Seite 23 Gemäß einer Empfehlung von Intel muss eine EuP-fähige Stromversorgung dem Standard entsprechen, was bedeutet, dass bei einem Stromverbrauch von 100 mA die 5-Volt-Standby-Energieeffizienz höher als 50% sein sollte. Für die Wahl einer EuP-fähigen Stromversorgung empfehlen wir Ihnen, weitere Details beim Hersteller der Stromversorgung abzufragen. ASRock K7S41GX2 Motherboard...
-
Seite 24: Einstellung Der Jumper
Audioanschlüsse auf der Vorderseite und der Rückseite. CMOS löschen (CLRCMOS1, 2-Pin jumper) 2-pin Jumper (siehe S.2 - No. 11) Hinweis: CLRCMOS1 erlaubt Ihnen das Löschen der CMOS-Daten. Diese beinhalten das System-Passwort, Datum, Zeit und die verschiedenen BIOS-Parameter. Um die ASRock K7S41GX2 Motherboard... - Seite 25 IDE-Gerät als “Master” ein. Details entnehmen Sie bitte den Anweisungen Ihres IDE-Gerätehändlers. Zur Optimierung der Kompatibilität und Leistung verbinden Sie die Festplatte mit dem primären IDE-Anschluss (IDE1, blau) und das CD-ROM mit dem sekundären IDE-Anschluss (IDE2, schwarz). ASRock K7S41GX2 Motherboard...
- Seite 26 Verbinden Sie den Gehäuselautsprecher Gehäuselautsprecher mit diesem Anschluss. (4-pin SPEAKER1) (siehe S.2, Punkt 14) Anschluss für Gehäuselüfter Verbinden Sie das Gehäuselüfterkabel mit diesem (3-pin CHA_FAN1) Anschluss und den schwarzen (siehe S.2, Punkt 12) Draht mit dem Erdungsstift. ASRock K7S41GX2 Motherboard...
- Seite 27 Verbinden Sie ein CPU- Lüfterkabel mit diesem (3-pin CPU_FAN1) Anschluss und den schwarzen (siehe S.2, Punkt 2) Draht mit dem Erdungsstift. Anschluss für ATX-Netzteil Verbinden Sie eine ATX- Stromversorgung mit diesem (20-pin ATXPWR1) Anschluss. (siehe S.2, Punkt 6) ASRock K7S41GX2 Motherboard...
- Seite 28 “ASSETUP.EXE” im BIN-Verzeichnis der Support-CD, um die Menüs aufzurufen. Das Setup-Programm soll es Ihnen so leicht wie möglich machen. Es ist menügesteuert, d.h. Sie können in den verschiedenen Untermenüs Ihre Auswahl treffen und die Programme werden dann automatisch installiert. ASRock K7S41GX2 Motherboard...
-
Seite 29: Contenu Du Paquet
1. Introduction 1. Introduction 1. Introduction Merci pour votre achat d’une carte mère ASRock K7S41GX2, une carte mère très fiable produite selon les critères de qualité rigoureux de ASRock. Elle offre des performances excellentes et une conception robuste conformément à l’engagement d’ASRock sur la qualité... - Seite 30 - Prise Audio: Entrée Ligne / Haut-parleur frontal / Microphone Connecteurs - 2 x ATA133 IDE connecteurs (prend en charge jusqu’à 4 périphériques IDE) - 1 x Port Disquette - 1 x En-tête du module infrarouge - Connecteur pour ventilateur de CPU/Châssis ASRock K7S41GX2 Motherboard...
- Seite 31 - Pilotes, utilitaires, logiciel anti-virus (Version d’essai) Caractéristique - Économiseur d’énergie intelligent (voir ATTENTION 4) unique - l'Instant Boot - ASRock Instant Flash (voir ATTENTION 5) - L’accélérateur hybride: - Contrôle direct de la fréquence CPU (voir ATTENTION 6) - ASRock U-COP (voir ATTENTION 7) Surveillance - Détection de la température de l’UC...
- Seite 32 Energy Saver (L’économiseur d’énergie intelligent) est une technologie révolutionnaire qui apporte des économies d’énergie sans précédent. O ASRock Instant Flash é um utilitário de flash do BIOS incorporado na memória Flash ROM. Esta prática ferramenta de actualização do BIOS permite-lhe actualizar o BIOS do sistema sem necessitar de entrar nos ®...
- Seite 33 5v en mode de veille doit être supérieure à 50% pour 100 mA de consommation de courant. Pour choisir une alimentation électrique conforme à la norme EuP, nous vous recommandons de consulter votre fournisseur de courant pour plus de détails. ASRock K7S41GX2 Motherboard...
- Seite 34 Effacer la CMOS (CLRCMOS1, le cavalier à 2 broches) cavalier 2 broches (voir p.2 No. 11) Note: CLRCMOS1 vous permet d’effacer les données de la CMOS. Ces données incluent les ASRock K7S41GX2 Motherboard...
- Seite 35 IDE périphérique pour les détails. En outre, pour optimiser la compatibilité et les performances, veuillez connecter votre unité de disque dur sur le connecteur IDE principal (IDE1, bleu) et votre CD- ROM sur le connecteur IDE secondaire (IDE2, noir). ASRock K7S41GX2 Motherboard...
- Seite 36 Ce connecteur offre plusieurs fonctions système en façade. (PANEL1 br. 9) (voir p.2 fig. 13) Connecteur du haut-parleur Veuillez connecter le haut- du châssis parleur de châssis sur ce connecteur. (SPEAKER1 br. 4) (voir p.2 fig. 14) ASRock K7S41GX2 Motherboard...
- Seite 37 (CPU_FAN1 br. 3) sur la broche de terre. (voir p.2 fig. 2) Connecteur d’alimentation ATX Veuillez connecter une unité d’alimentation ATX sur ce (ATXPWR1 br. 20) connecteur. (voir p.2 fig. 6) ASRock K7S41GX2 Motherboard...
- Seite 38 Pour utiliser le CD technique, insérez-le dans le lecteur de CD-ROM. Le Menu principal s’affiche automatiquement si “AUTORUN” est activé dans votre ordinateur. Si le Menu principal n’apparaît pas automatiquement, localisez dans le CD technique le fichier ASSETUP.EXE dans le dossier BIN et double-cliquez dessus pour afficher les menus. ASRock K7S41GX2 Motherboard...
- Seite 39 Grazie per aver scelto una scheda madre ASRock K7S41GX2, una scheda madre affidabile prodotta secondo i severi criteri di qualità ASRock. Le prestazioni eccellenti e il design robusto si conformano all’impegno di ASRock nella ricerca della qualità e della resistenza. Questa Guida Rapida all’Installazione contiene l’introduzione alla motherboard e la guida passo-passo all’installazione.
- Seite 40 - 1 x Collettore modulo infrarossi - Connettore CPU/Chassis ventola - 20-pin collettore alimentazione ATX - Connettori audio interni - Connettore audio sul pannello frontale - 1 x Collettore USB 2.0 (supporta 2 porte USB 2.0) (vedi ATTENZIONE 3) ASRock K7S41GX2 Motherboard...
- Seite 41 - Predisposto ErP/EuP (è necessaria l’alimentazione predisposta per il sistema ErP/EuP) (vedi ATTENZIONE 8) * Per ulteriori informazioni, prego visitare il nostro sito internet: http://www.asrock.com AVVISO Si prega di prendere atto che la procedura di overclocking implica dei rischi, come anche la regolazione delle impostazioni del BIOS, l’applicazione della tecnologia Untied Overclocking...
- Seite 42 è una tecnologia rivoluzionaria che consente di realizzare risparmi energetici senza pari. ASRock Instant Flash è una utilità Flash BIOS integrata nella Flash ROM. Questo comodo strumento d’aggiornamento del BIOS permette di aggiornare il sistema BIOS senza accedere a sistemi operativi come MS- ®...
- Seite 43 5 v è più alta del 50% con un consumo di corrente di 100 mA. Per la scelta di un’alimentatore predisposto EuP consigliamo di verificare ulteriori dettagli con il produttore. ASRock K7S41GX2 Motherboard...
- Seite 44 (vedi p.2, No. 22) (vedi p.2, No. 21) Nota: Se i jumper JL1 e JR1 sono in corto (vedere la figura più sopra) i connettori audio del pannello anteriore e del pannello posteriore possono funzionare. ASRock K7S41GX2 Motherboard...
- Seite 45 Descrizione dei connettori Connettore del Floppy disk (33-pin FLOPPY1) (vedi p.2, No. 15) Lato del Pin1 con la striscia rossa Nota: Assicurarsi che il lato del cavo con la striscia rossa sia inserito nel lato Pin1 del connettore. ASRock K7S41GX2 Motherboard...
- Seite 46 ROM,TV tuner, o schede (AUX1: vedi p.2, No. 27) MPEG. Connettore audio sul È un’interfaccia per il cavo del pannello frontale pannello audio. Che consente connessione facile e controllo (9-pin AUDIO1) dei dispositivi audio. (vedi p.2, No. 23) ASRock K7S41GX2 Motherboard...
- Seite 47 Collegare il cavo della ventola processore della CPU a questo connettore e fare corrispondere il cavo (3-pin CPU_FAN1) nero al pin di terra. (vedi p.2, No. 2) Connettore ATX Collegare un alimentatore ATX a questo connettore. (20-pin ATXPWR1) p.2, No. ASRock K7S41GX2 Motherboard...
- Seite 48 Inserire il CD di supporto nel lettore CD-ROM. Se la funzione “AUTORUN” è attivata nel computer, apparirà automaticamente il Menù principale. Se il Menù principale non appare automaticamente, posizionarsi sul file ASSETUP. EXE nel CESTINO del CD di supporto e cliccare due volte per visualizzare i menù. ASRock K7S41GX2 Motherboard...
- Seite 49 1. Introducción 1. Introducción Gracias por su compra de ASRock K7S41GX2 placa madre, una placa de confianza producida bajo el control de calidad estricto y persistente. La placa madre provee realización excelente con un diseño robusto conforme al compromiso de calidad y resistencia de ASRock.
- Seite 50 - 2 x ATA133 conexiones IDE (admite hasta 4 dispositivos IDE) - 1 x puerto Floppy - 1 x Cabezal de Módulo Infrarrojos - Conector de ventilador de CPU / chasis - 20-pin cabezal de alimentación ATX ASRock K7S41GX2 Motherboard...
- Seite 51 Característica - Administrador de energía inteligente (vea ATENCIÓN 4) Única - Instant Boot - ASRock Instant Flash (vea ATENCIÓN 5) - Amplificador Híbrido: - Stepless control de frecuencia de CPU (vea ATENCIÓN 6) - ASRock U-COP (vea ATENCIÓN 7) - Protección de Falla de Inicio (B.F.G..)
- Seite 52 . Gracias a esta utilidad, sólo necesitará pulsar <F6> durante la fase POST o pulsar <F2> para acceder al menú de configuración del BIOS y a la utilidad ASRock Instant Flash. Ejecute esta herramienta y guarde el archivo correspondiente al sistema BIOS nuevo en su unidad flash USB, unidad de disco flexible o disco duro para poder actualizar el BIOS con sólo...
- Seite 53 50% con un consumo de corriente de 100mA. Para seleccionar una fuente de alimentación que cumpla la directiva EuP, le recomendamos que consulte con el fabricante de la fuente de alimentación para obtener más detalles. ASRock K7S41GX2 Motherboard...
- Seite 54 Atención: Para elegir +5VSB, se necesita corriente mas que 2 Amp proveida por la fuente de electricidad. (vea p.2, No. 22) (vea p.2, No. 21) Atención: Si los puentes JL1 y JR1 son cortos (véase la figura anterior), se pueden utilizar las conexiones de sonido frontal o trasera. ASRock K7S41GX2 Motherboard...
- Seite 55 (vea p.2, No.15) la banda roja debe quedar en el mismo lado que el contacto 1 Atención: Asegúrese que la banda roja del cable queda situado en el mismo lado que el contacto 1 de la conexión. ASRock K7S41GX2 Motherboard...
- Seite 56 MPEG. (AUX1: vea p.2, No.27) Conector de audio de panel Este es una interface para frontal cable de audio de panel frontal que permite conexión y control (9-pin AUDIO1) conveniente de apparatos de (vea p.2, No.23) Audio. ASRock K7S41GX2 Motherboard...
- Seite 57 CPU en esta conexión haciendo coincidir el cable negro (3-pin CPU_FAN1) con el contacto de tierra. (vea p.2, No.2) Conector de ATX power Conecte la fuente de alimentación ATX en esta conexión. (20-pin ATXPWR1) (vea p.2, No.6) ASRock K7S41GX2 Motherboard...
- Seite 58 Para iniciar la instalación, ponga el CD en el lector de CD y se desplegará el Menú Principal automáticamente si «AUTORUN» está habilitado en su computadora. Si el Menú Principal no aparece automáticamente, localice y doble-pulse en el archivo ASSETUP.EXE para iniciar la instalación. ASRock K7S41GX2 Motherboard...
- Seite 59 ASRock K7S41GX2 Motherboard...
- Seite 60 9,6 x 7,8 / 24,4 x 19,8 ASRock K7S41GX2 Motherboard...
- Seite 61 ASRock K7S41GX2 Motherboard...
- Seite 62 ASRock K7S41GX2 Motherboard...
- Seite 63 ASRock K7S41GX2 Motherboard...
- Seite 64 Short Open ASRock K7S41GX2 Motherboard...
- Seite 65 1 ASRock K7S41GX2 Motherboard...
- Seite 66 Master IDE (IDE CD-ROM IR1) AUX1 ASRock K7S41GX2 Motherboard...
- Seite 67 PANEL1) ATX. ASRock K7S41GX2 Motherboard...
- Seite 68 BIOS Setup Power-On-Self-Test – POST POST BIOS Setup POST Ctrl> + <Alt> + <Delete BIOS Setup ASRock K7S41GX2 Motherboard...
- Seite 69 Gratos por comprar nossa placa–mãe K7S41GX2, um produto confiável feito com ASRock um estrito controle de qualidade consistente. Com um excelente desempenho, essa placa é dotada de um projeto robusto que atende a ASRock de compromisso com a qualidade e durabilidade.
- Seite 70 - Áudio Jack: Entrada de linha / Altifalante frontal / Microfone Conectores - 2 x conectores ATA133 IDE (suporta até 4 dispositivos IDE) - 1 x porta para disquete - 1 x Conector do módulo de infravermelho ASRock K7S41GX2 Motherboard...
- Seite 71 Funcionalidade - Intelligent Energy Saver (veja o AVISO 4) Única - Instant Boot - ASRock Instant Flash (veja o AVISO 5) - Booster híbrido: - Frequência da CPU com controle contínuo (veja o AVISO 6) - ASRock U-COP (veja o AVISO 7) - B.F.G.
- Seite 72 Com uma concepção de hardware e de software avançada, a Poupanla de Energia Inteligente é uma das opções no Sintonizador ASRock OC. ASRock Instant Flash est un utilitaire de flash du BIOS flash intégré dans la ROM Flash. Cet outil pratique de mise à jour du BIOS vous permet de mettre à...
- Seite 73 50% com um consumo de corrente de 100 mA. Para selecção da fonte de alimentação em conformidade com a norma EuP, recomendamos que confirme com o fabricante da fonte de alimentação para mais detalhes. ASRock K7S41GX2 Motherboard...
- Seite 74 Nota: Para escolher +5VSB, é preciso uma corrente de stand by de 2 A ou mais. (veja a folha 2, No. 22) (veja a folha 2/ No. 21) Nota: Se os jumpers JL1 e JR1 estiverem conectados, tanto os conectores do painel frontal quanto do traseiro funcionarão. ASRock K7S41GX2 Motherboard...
- Seite 75 (FLOPPY 1, 33 pinos) (veja a folha 2, No. 15) o lado com listras vermelhas para o Pino 1 Nota: Certifique-se de que o lado com listras vermelhas no cabo seja conectado ao lado Pino 1 do conector. ASRock K7S41GX2 Motherboard...
- Seite 76 Conector Áudio do painel Esta é uma interface para o frontal cabo de áudio no painel frontal, que permite uma conexão e (AUDIO1 de 9 pinos) controle convenientes dos (veja a folha 2, No. 23) dispositivos de áudio. ASRock K7S41GX2 Motherboard...
- Seite 77 CPU, coincidindo o fio preto com o pino de aterramento. (CPU_FAN1 de 3 pinos) (veja a f2, No. 2) Conector de força do ATX Ligue a fonte de alimentação ATX neste conector. (ATXPWR1 de 20 pinos) (veja a folha 2, No. 6) ASRock K7S41GX2 Motherboard...
- Seite 78 CD na leitora de CD-ROM do computador. Automaticamente iniciará o menu principal, casa o “AUTORUN” esteja ativado. Se o menu principal não aparecer automaticamente, explore o CD e execute o “ASSETUP.EXE” localizado na pasta “BIN”. ASRock K7S41GX2 Motherboard...
- Seite 79 ASRock K7S41GX2 Motherboard...
- Seite 80 ASRock K7S41GX2 Motherboard...
- Seite 81 ASRock K7S41GX2 Motherboard...
- Seite 82 ASRock K7S41GX2 Motherboard...
- Seite 83 Short Open ASRock K7S41GX2 Motherboard...
- Seite 84 ASRock K7S41GX2 Motherboard...
- Seite 85 ASRock K7S41GX2 Motherboard...
- Seite 86 AUX1 C D 1 ASRock K7S41GX2 Motherboard...
- Seite 87 ASRock K7S41GX2 Motherboard...