Bresser MA Bedienungsanleitung
Vorschau ausblenden
Andere Handbücher für MA:
- Bedienungsanleitung (52 Seiten) ,
- Bedienungsanleitung (60 Seiten)

Verwandte Anleitungen für Bresser MA


Inhaltszusammenfassung für Bresser MA
- Seite 1 Wetterstation · Weather Station · Station météo · Hygrometer MA Bedienungsanleitung Instruction manual Mode d’emploi...
-
Seite 2: Inhaltsverzeichnis
Inhaltsverzeichnis Impressum ................ 4 Eigenschaften ............... 4 Zu dieser Anleitung .............. 5 Teileübersicht und Lieferumfang........ 6 Display-Anzeigen.............. 7 Stromversorgung herstellen .......... 8 Automatische Messwertanzeige ......... 8 Schimmelalarm .............. 9 Luftfeuchtigkeitsalarm ............ 9 10 Wechsel der Messwertanzeigen ........ 10 11 Entsorgung ................. 10 12 EG-Konformitätserklärung .......... -
Seite 3: Impressum
Hersteller-Anschrift gerichtete Anfra- gen oder Einsendungen nicht bearbeitet werden können. Irrtümer und technische Änderungen vorbehalten. © 2018 Bresser GmbH Alle Rechte vorbehalten. Die Reproduktion dieser Dokumentation – auch auszugs- weise – in irgendeiner Form (z.B. Fotokopie, Druck, etc.) so- wie die Verwendung und Verbreitung mittels elektronischer Systeme (z.B. -
Seite 4: Zu Dieser Anleitung
• 24-Stunden-Historie für Luftfeuchtigkeit und Tempera- • Info für ein gesundes und sicheres Raumklima • Innentemperaturanzeige (0-50 °C) • Taupunkttemperaturmesser (0-50 °C) • Luftfeuchtigkeitsanzeige (20% - 95%) • Wahl der Temperatureinheit (°C/°F) • Touch-Bedienfeld 3 Zu dieser Anleitung HINWEIS Diese Bedienungsanleitung ist als Teil des Gerätes zu betrachten! Lesen Sie vor der Benutzung des Geräts aufmerksam die Sicherheitshinweise und die Bedienungsanleitung. -
Seite 5: Teileübersicht Und Lieferumfang
4 Teileübersicht und Lieferumfang Abb. 1: Teileübersicht für das Hygrometer Display SET/DEW POINT Touch-Schaltfläche (An- zeigenwechsel oder Alarmeinstellung) ON/OFF Touch-Schalt- Lichtsignal bei Alarmak- fläche (Alarm ein-/aus- tivierung schalten) C/F Touch-Schaltfläche MAX.MIN Touch-Schalt- (Wechsel zwischen °C/ fläche (Wechsel zwi- °F, Werteinstellung ab- schen Maximal-/Minimal- wärts oder Alarmeinstel- wertanzeige oder Lö-... -
Seite 6: Display-Anzeigen
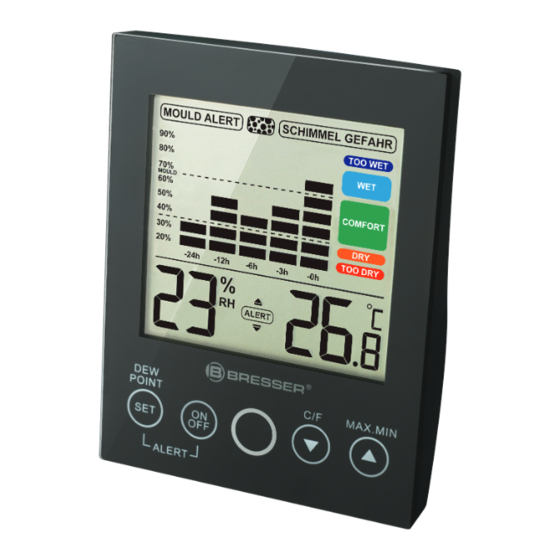
Thermo-/Hygrometer (A), Standclip (B) Erforderliche Batterien (nicht im Lieferumfang enthal- ten): 2 Stck. Micro-Batterien (1.5V, Typ AAA) 5 Display-Anzeigen Abb. 2: Display-Anzeigen für das Hygrometer Schimmelalarm-Symbol Balkenanzeige Luft- (Anzeige bei Überschrei- feuchtigkeitswert ten des oberen Grenz- werts) Werteachse für Luft- Oberer Grenzwert / feuchtigkeit Grenzlinie Unterer Grenzwert /... -
Seite 7: Stromversorgung Herstellen
Luftfeuchtigkeitswert (in Taupunkt-Symbol (An- %) (Anzeige wählbar) zeige bei Erreichen des Taupunkt-Schwellwerts) MIN-Symbol (Anzeige 10 ALERT-Symbol (Anzei- bei Tiefstwertanzeige) ge bei Alarmeinstellung) 11 MAX-Symbol (Anzeige 12 Temperaturwert (Anzei- bei Höchstwertanzeige) ge wählbar) 13 Temperatureinheit (°C 14 Raumklimaindikator oder °F wählbar) (Luftfeuchtigkeitswert in Abhängigkeit zu den Grenzwerten) -
Seite 8: Schimmelalarm
8 Schimmelalarm Im normalen Anzeigemodus die C/F Touch-Schaltflä- che etwa 3 Sekunden lang berühren, um in den Einstel- lungsmodus für den Schimmelalarm zu gelangen. MOULD ALERRT und die Anzeige für die Luftfeuchtig- keit blinken. Die C.F/UP oder MAX.MIN/DOWN Touch-Schaltflä- chen berühren, um den gewünschten Wert einzustel- len. -
Seite 9: Wechsel Der Messwertanzeigen
SET/DEW POINT Touch-Schaltfläche abschließend be- rühren, um den Einstellungsmodus zu verlassen. ON/OFF Touch-Schaltfläche berühren, um den Luft- feuchtigkeitsalarm zu aktivieren. Im Display wird ALERT angezeigt. ON/OFF Touch-Schaltfläche erneut berühren, um den Luftfeuchtigkeitsalarm zu deaktivieren. ALERT wird nicht mehr angezeigt. 10 Wechsel der Messwertanzeigen •... -
Seite 10: Eg-Konformitätserklärung
Quecksilber und "Pb" steht für Blei. 12 EG-Konformitätserklärung Eine „Konformitätserklärung“ in Übereinstimmung mit den anwendbaren Richtlinien und entsprechenden Normen ist von der Bresser GmbH erstellt worden. Diese kann auf Anfrage jederzeit eingesehen werden. http://www.bresser.de • info@bresser.de 13 Garantie Die reguläre Garantiezeit beträgt 2 Jahre und beginnt am Tag des Kaufs. - Seite 11 Die vollständigen Garantiebedingungen sowie Informatio- nen zu Garantiezeitverlängerung und Serviceleistungen können Sie unter www.bresser.de/garantiebedingungen einsehen. 12 / 32...
- Seite 30 Teléfono*: +34 91 67972 69 Telephone*: +44 1342 837 098 BRESSER Iberia SLU BRESSER UK Ltd c/Valdemorillo,1 Nave B Unit 1 starborough Farm, P.I. Ventorro del cano Starborough Road, Nr Marsh Green, 28925 Alcorcón Madrid Edenbridge, Kent TN8 5RB España...