Herunterladen Inhalt Inhalt Diese Seite drucken

Werbung

Verfügbare Sprachen

Verfügbare Sprachen

PARANTAJA
DE
Aufbau- und Bedienungsanleitung
GB
Assembly instructions and user guide
FR
Instructions de montage et mode d'emploi
Art.Nr. SF-2170

Werbung

Inhaltsverzeichnis
loading

Inhaltszusammenfassung für Skandika PARANTAJA

  • Seite 1 PARANTAJA Aufbau- und Bedienungsanleitung Assembly instructions and user guide Instructions de montage et mode d‘emploi Art.Nr. SF-2170...
  • Seite 2: Inhaltsverzeichnis

    Teileliste ..........................5 Aufbauanleitung ......................... 6 Generelle Hinweise ......................9 Auf- und abwärmen ......................10 Übungsanleitung ....................... 11 Wartung ..........................13 Garantiebedingungen ...................... 14 Besuchen Sie auch unsere Webseite Scannen Sie den QR-Code für weitere Informationen mit Ihrem Smartphone www.skandika.com...
  • Seite 3: Wichtige Sicherheitshinweise

    WARNUNG Um die Verletzungsgefahr zu reduzieren, muss diese Anleitung vor dem Gebrauch vollständig gelesen und verstanden werden! Dieses Gerät ist ausschließlich für den Heimgebrauch in Übereinstimmung mit den Anweisungen in dieser Anleitung vorgesehen. Lesen Sie die Gebrauchsanleitung sorgfältig durch, bevor Sie das Gerät einsetzen und bewahren Sie die Gebrauchsanleitung für die weitere Nutzung auf. Wichtige Sicherheitshinweise •...
  • Seite 4 Wichtige Sicherheitshinweise • Stellen Sie das Gerät an einem trockenen, ebenen Ort auf und schützen Sie es vor Feuchtigkeit. Sofern Sie den Aufstellort besonders gegen Druckstellen, Verschmutzungen u.ä. schützen wollen, empfehlen wir Ihnen eine geeignete, rutschfeste Unterlage unter das Gerät zu legen. •...
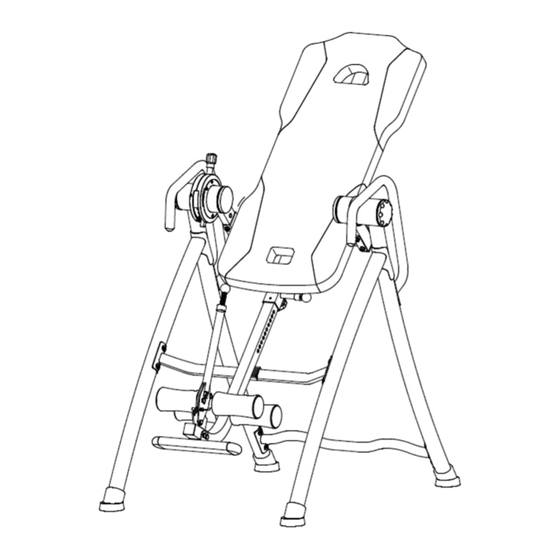
  • Seite 5: Teileliste

    Teileliste 1. Rahmenteil A 2. Rahmenteil B 10. Handgriffe 4. Vordere Stange 3. Hintere Stange 17. End- 16./18. Fuß- 19. Fußstütze kappe polster 9. Rückenpolster 20. Verlängerungsrohr 5. Schraube M8x20 (8 St.) 6. Schraube M8x65 (8 St.) 8. Mutter M8 (10 St.) 7. Unterlegschei- 14. Mutter 15. Unterleg- 11.
  • Seite 6: Aufbauanleitung

    Aufbauanleitung Schritt 1 Wir empfehlen, den Aufbau des Gerätes mit 2 Personen durchzuführen, um Beschädigungen und Verletzungen zu vermeiden. Verbinden Sie Rahmenteil A (1), Rahmenteil B (2), die hintere Stange (3) und die vordere Stange (4) mit den Schrauben M8x20 (5) wie unten abgebildet. Schritt 2 Befestigen Sie nun die Handgriffe (10) mit den Schrauben M8x65 (6) und den passenden Unterleg- scheiben (7) und Muttern (8) wie abgebildet.
  • Seite 7 Schritt 3 Montieren Sie das Rückenpolster (9) mit den Schrauben M8x65 (6) und den passenden Unterleg- scheiben (7) und Muttern (8) wie abgebildet. Schritt 4 Verbinden Sie das Verlängerungsrohr (20) mit der Fußstütze (19), den Fußpolstern (16/18) und den Endkappen (17) wie abgebildet unter Zuhilfenahme der Schrauben M6x40 (12) und M6x45 (13), Muttern (14), Unterlegscheiben (15), Schrauben M8x55 (11), Unterlegscheiben (7) und Muttern (8).
  • Seite 8 Schritt 5 Schieben Sie das Verlängerungsrohr (20) in das untere Ende des Rückenpolster-Rahmens ein und fixieren Sie das Rohr nun in einer für Ihre Körpergröße passenden Länge. Für die korrekte Einstellung des Verlängerungsrohres (20) gemäß Ihrer Körpergröße beachten Sie bitte die Markierungen auf dem Rohr: Bitte beachten Sie, dass Sie das Gerät nicht benutzen dürfen, wenn Sie größer als 1,98 m sind.
  • Seite 9: Generelle Hinweise

    Generelle Hinweise Die Handgriffe Die Handgriffe (10) unterstützen Sie bei Ihrem Training. Sie können aus einer Inversion schnell wieder in die aufrechte Position gelangen, in- dem Sie sich an den Handgriffen nach oben ziehen. Normalerweise bewegt sich das Rücken- polster von allein in Richtung Ausgangsposition, wenn Sie Ihre Hände unter die Taille bewegen.
  • Seite 10: Auf- Und Abwärmen

    Auf- und Abwärmen Ein erfolgreiches Trainingsprogramm besteht aus einer Aufwärmphase, einer Trainingsphase und dem Abkühlen. Die Trainingshäufigkeit sollte für Anfänger bei 2- bis 3-mal die Woche angesetzt werden, immer mit mindestens einem Tag Pause zwischen den Trainingseinheiten. Nach einigen Monaten kann die Häufigkeit auf 4- bis 5-mal wöchentlich gesteigert werden.
  • Seite 11: Übungsanleitung

    Übungsanleitung Vor dem Training 1. Wir empfehlen, immer eine zweite Person zum Training hinzuzunehmen, die Hilfestellung geben kann. Insbesondere bei den ersten Trainingseinheiten ist dies wichtig. 2. Stellen Sie sicher, dass die Fußpolster (16/18) Ihren Füßen sicheren Halt bieten. 3. Stellen Sie sicher, dass das Verlängerungsrohr (20) entsprechend Ihrer Körpergröße einge- stellt ist.
  • Seite 12: Weitere Hinweise

    Weitere Hinweise 1. Beginnen Sie langsam: Drehen Sie nicht mehr als 25 Grad zu Beginn. Bleiben Sie nur so lange gedreht, wie Sie sich wohl fühlen. Kehren Sie langsam zur Ausgangsposition zurück. 2. Ändern Sie Winkel und Trainingszeit nur allmählich: Vergrößern Sie den Drehwinkel nur dann langsam, wenn Sie sich dabei gut fühlen.
  • Seite 13: Wartung

    Warum Inversionstraining? Die Idee hinter einem Inversionstraining ist, eine angenehme Traktion auf die Wirbelsäule aus- zuüben. Diese Traktion öffnet die Abstände zwischen den Wirbeln und erlaubt so den Band- scheiben eine bessere Versorgung. Dies resultiert in einer besseren Dämpfungswirkung, welche den Spinalnerven zuträglich ist.
  • Seite 14: Garantiebedingungen

    Umwelt. Bitte erfragen Sie bei der Gemeindeverwaltung die zuständige Entsorgungsstelle. Ersatzteile Für kontaktieren Sie bitte folgende E-Mail-Adresse: info@skandika.com Service durch: MAX Trader GmbH, Wilhelm-Beckmann-Straße 19, 45307 Essen, Deutschland Im Zuge ständiger Produktverbesserungen behalten wir uns technische und gestalterische Änderungen vor.
  • Seite 15 Notizen / Notes _____________________________________________________ _____________________________________________________ _____________________________________________________ _____________________________________________________ _____________________________________________________ _____________________________________________________ _____________________________________________________ _____________________________________________________ _____________________________________________________ _____________________________________________________ _____________________________________________________ _____________________________________________________ _____________________________________________________ _____________________________________________________ _____________________________________________________ _____________________________________________________...
  • Seite 16 Parts list ..........................19 Assembly instructions ......................20 General precautions ......................23 Warm-up and cool-down ....................24 Exercise instructions ......................25 Maintenance ........................27 Guarantee Conditions ....................... 28 Visit our website Scan the QR code for further information with your smartphone www.skandika.com...
  • Seite 17: Important Safety Notice

    WARNING To reduce risk of injury, read and understand this instruction manual before using the device! This machine is intended for home use only in accordance with the instructions provided in this manu- al. Read the instruction manual carefully before using this device and keep the instruction manual for future use.
  • Seite 18 IMPORTANT SAFETY NOTICE • Be sure to set up the device in a dry and even place and always protect it from humidity. If you wish to protect the place particularly against pressure points, contamination, etc., it is recommended to put a suitable, non-slip mat under the device.
  • Seite 19: Parts List

    Parts list 1. Frame A 2. Frame B 10. Handlebars 4. Front rod 3. Rear rod 17. Endcap 16. / 18. 19. Footrest Foot pads 9. Back frame 20. Extension tube 5. Screw M8x20 (8 pcs.) 6. Screw M8x65 (8 pcs.) 8.
  • Seite 20: Assembly Instructions

    Assembly instructions Step 1 We recommend to set-up the device with the assistance of a second person to avoid injuries and damages. Connect frame A (1), frame B (2), the rear (3) and front (4) rod with the screws M8x20 (5) as shown below.
  • Seite 21 Step 3 Mount the back frame (9) with screws M8x65 (6) and corresponding washers (7) and nuts (8) as shown. Step 4 Connect the extension tube (20) with the footrest (19), the foot pads (16/18) and the endcaps (17) as shown by fixing the parts with the screws M6x40 (12) and M6x45 (13), nuts (14), washers (15), screws M8x55 (11), washers (7) and nuts (8).
  • Seite 22 Step 5 Slide the extension tube (20) in corresponding direction through the lower end of backrest frame and secure in a matching position for your body height. For correct adjustment of the extension tube (20) according to your body height please check the markings on the tube: Please note, that you must not use the device if you are taller than 1.98 meters as this would ex- ceed the maximum possible height adjustment of the tube.
  • Seite 23: General Precautions

    General precautions The handlebars The handlebars (10) support you while exer- cising. You may return to an upright position more quickly if you grab them and pull slightly, until you have returned to the initial position. Normally, the backrest of the inversion trainer should return to upright position when you move your hands below your waist.
  • Seite 24: Warm-Up And Cool-Down

    WARM-UP and COOL-DOWN A successful exercise program consists of a warm-up, aerobic exercise and a cool-down. Exercise for at least two or preferably three times a week, resting for a day between workouts. After several months, you may increase the frequency to four or five times per week. WARM-UP This stage helps to improve the blood circulation and prepares the muscles for your workout.
  • Seite 25: Exercise Instructions

    Exercise instructions Before exercise 1. We recommend that always a second person is present to support you during exercise, especially during the first few times. 2. Make sure, that the foot pads (16/18) can hold your feet securely. 3. Make sure, that the extension tube (20) is properly set to your height. 4.
  • Seite 26 Further hints 1. Begin slowly: Do not exceed 25 degrees inversion at the beginning. Stay inverted only as long as you are comfortable. Return upright slowly. 2. Make gradual changes: Increase the angle only if it is comfortable and only slowly. Increase the exercise time only for 1 or 2 minutes at a time.
  • Seite 27: Maintenance

    Why try inversion? The idea of the activity is to give gentle traction to the spinal table. This traction opens up the gaps between ‚ the‘ spinal vertebrae and has the effect of allowing the discs between these vertebrae to pump up with fluid and be nourished by blood supply. This means they have a bet- ter cushioning effect, allowing spinal nerves to be free from aggravation.
  • Seite 28: Guarantee Conditions

    , please contact: info@skandika.com Service centre: MAX Trader GmbH, Wilhelm-Beckmann-Straße 19, 45307 Essen, Germany In accordance with our policy of continual product improvement, we reserve the right to make technical and visual...
  • Seite 29 Notizen / Notes _____________________________________________________ _____________________________________________________ _____________________________________________________ _____________________________________________________ _____________________________________________________ _____________________________________________________ _____________________________________________________ _____________________________________________________ _____________________________________________________ _____________________________________________________ _____________________________________________________ _____________________________________________________ _____________________________________________________ _____________________________________________________ _____________________________________________________ _____________________________________________________...
  • Seite 30 Instructions de montage ....................34 Précautions générales ....................... 37 Échauffement et récupération ..................38 Instructions d‘exercice ....................... 39 Instructions d‘entretien ....................41 Conditions de garantie ..................... 42 Rendez-vous sur notre site internet Scannez ce QR-Code pour plus d‘informations avec votre smartphone www.skandika.com...
  • Seite 31: Informations De Sécurité Importantes

    AVERTISSEMENT Pour réduire les risques de blessures, veuillez lire attentivement ce mode d’emploi avant d‘utiliser la plate-forme vibrante! Cet appareil est uniquement destiné à une utilisation domestique conformé- ment aux instructions contenues dans ce mode d’emploi. Lisez attentivement le mode d’emploi avant d’utiliser l’appareil et conservez bien ce mode d’emploi.
  • Seite 32 AVIS DE SÉCURITÉ IMPORTANT • Placez l’appareil dans un endroit sec et plan et protégez-le de l’humidité. Afin de protéger le lieu d’installation des saletés, des marques de pression etc., nous vous recommandons de placer un support adapté et antidérapant sous l’appareil. •...
  • Seite 33: Liste Des Pièces

    Liste des pièces 1. Cadre A 2. Cadre B 10. Poignée 4. Tige avant 3. Tige arrière 17. Ca- 16. / 18. 19. Repose-pied puchon Tampons 9. Cadre arrière 20. Tube d’extension 5. Vis M8x20 (8 pc.) 6. Vis M8x65 (8 pc.) 8.
  • Seite 34: Instructions De Montage

    Instructions de montage Étape 1 Nous recommandons d’installer l’appareil avec l’aide d’une deuxième personne afin d’éviter les blessures et les dommages éventuels. Fixez la pièce 1 (cadre A), la pièce 2 (cadre B), la pièce 3 (tige arrière) et la pièce 4 (tige avant) en utilisant les vis M8 x 20 (5), comme indiqué...
  • Seite 35 Étape 3 Fixez le cadre arrière (9) avec les vis M8x65 (6), les rondelles (7) et les écrous (8) comme indiqué. Étape 4 Raccordez le tube d’extension (20) au repose-pied (19), aux tampons (16/18) et aux capuchons (17) comme indiqué à l’aide des vis M6x40 (12) et M6x45 (13), écrous (14), rondelles (15), vis M8x55 (11), rondelles (7) et écrous (8).
  • Seite 36 Étape 5 Faites glisser le tube d’extension (20) dans la direction correspondante de vers le bas à travers le lo- gement de capitonnage à travers et d‘assurer un appariement position pour votre hauteur. Pour régler correctement le tube d’extension (20) en fonction de votre taille, veuillez consulter les repères situés sur le tube : Veuillez noter que cet appareil ne doit pas être utilisé...
  • Seite 37: Précautions Générales

    Précautions générales Les poignees Les poignées (10) vous offrent un soutien pen- dant les exercices. Vous pouvez retourner à une position debout plus rapidement si vous les attra- pez et que vous tirez légèrement dessus, jusqu’à ce que vous soyez en position initiale. Norma- lement, le dossier de la table d’inversion dev- rait retourner en position debout lorsque vous placez vos mains en-dessous de vos hanches.
  • Seite 38: Échauffement Et Récupération

    ÉCHAUFFEMENT et RÉCUPÉRATION Un programme d‘exercices réussi consiste en un échauffement, un exercice aérobique et une récupé- ration Entraînez-vous de préférence au moins deux ou trois fois par semaine, avec une pause d’un jour entre les séances d‘entraînement. Après plusieurs mois, vous pouvez augmenter la fréquence à quatre ou cinq fois par semaine.
  • Seite 39: Instructions D'exercice

    Instructions d‘exercice Avant l‘entraînement 1. Nous recommandons qu’une deuxième personne soit présente à vos côtés pour vous aider durant les exercices, surtout les premières fois. 2. Assurez-vous que les tampons (16/18) peuvent maintenir solidement vos pieds. 3. Assurez-vous que le tube d’extension (20) est réglé convenablement pour votre taille. 4.
  • Seite 40 Conseils supplementaires 1. Commencez doucement : Ne pas dépasser 25° d’inversion au début. Ne restez en position inver- sée que tant que vous vous sentez à l’aise. Revenez en position debout lentement. 2. Faites des changements graduels : N’augmentez l’angle d’inclinaison que si vous êtes à l’aise et ne le faites que lentement.
  • Seite 41: Instructions D'entretien

    Pourquoi essayer l‘inversion ? L’idée de l’activité est d’appliquer une traction légère sur la colonne vertébrale. Cette traction ouvre les interstices entre les vertèbres, et elle a pour effet de permettre aux disques situés entre ces vertèbres de se gonfler de fluide et d’être nourri par l’irrigation sanguine. Ils ont alors un meilleur effet d’amortissement, ce qui permet d’éviter la détérioration des nerfs rachidiens.
  • Seite 42: Conditions De Garantie

    Pour toute demande de réparations, d’accessoires ou de pièces de rechange, veuillez contacter : info@skandika.com Centre de service clients : MAX Trader GmbH, Wilhelm-Beckmann-Str. 19, 45307 Essen, Allemagne Dans le cadre du travail continu d’amélioration des produits, nous nous réservons le droit de procéder à des modi-...
  • Seite 43 Notizen / Notes _____________________________________________________ _____________________________________________________ _____________________________________________________ _____________________________________________________ _____________________________________________________ _____________________________________________________ _____________________________________________________ _____________________________________________________ _____________________________________________________ _____________________________________________________ _____________________________________________________ _____________________________________________________ _____________________________________________________ _____________________________________________________ _____________________________________________________ _____________________________________________________...
  • Seite 44 Vertrieb & Service durch: MAX Trader GmbH Wilhelm-Beckmann-Straße 19 WEE-Reg. Nr. 45307 Essen DE81400428 Deutschland SF-2170 de_en_fr 09/2018 Ver. 1.0...

Inhaltsverzeichnis