Herunterladen Inhalt Inhalt Diese Seite drucken

Werbung

Verfügbare Sprachen
  • DE

Verfügbare Sprachen

  • DEUTSCH, seite 1
Sous-vide Pumpe
Sous Vide Circulator
Dispositivo de cocción al vacío
Pompe sous vide
Circolatore ad immersione per cottura sottovuoto
10032081 10032082

Werbung

Inhaltsverzeichnis
loading

Inhaltszusammenfassung für Klarstein 10032081

  • Seite 1 Sous-vide Pumpe Sous Vide Circulator Dispositivo de cocción al vacío Pompe sous vide Circolatore ad immersione per cottura sottovuoto 10032081 10032082...
  • Seite 3: Inhaltsverzeichnis

    Sicherheitshinweise 4 Italiano 31 Geräteübersicht 5 Inbetriebnahme und Bedienung 5 Reinigung und Pflege 7 Fehlersuche und Fehlerbehebung 8 Hinweise zur Entsorgung 9 TECHNISCHE DATEN Artikelnummer 10032081, 1032082 Stromversorgung 220-240 V ~ 50-60 Hz Temperaturbereich 0-90 °C Temperatur-Genauigkeit ± 0,1 °C KONFORMITÄTSERKLÄRUNG Hersteller: Chal-Tec GmbH, Wallstraße 16, 10179 Berlin, Deutschland.
  • Seite 4: Sicherheitshinweise

    SICHERHEITSHINWEISE • Arbeitsplatten aus Marmor oder Holz sind für die Hitze, die der Stick produziert ungeeignet. Stellen Sie das Gerät samt Topf nur auf hitzebeständige Oberfl ächen. • Verwenden Sie kein Verlängerungskabel. Benutzen Sie das Gerät nicht wenn das Netzkabel oder der Stecker beschädigt sind. Schließen Sie das Gerät nur an geerdete Steckdosen an.
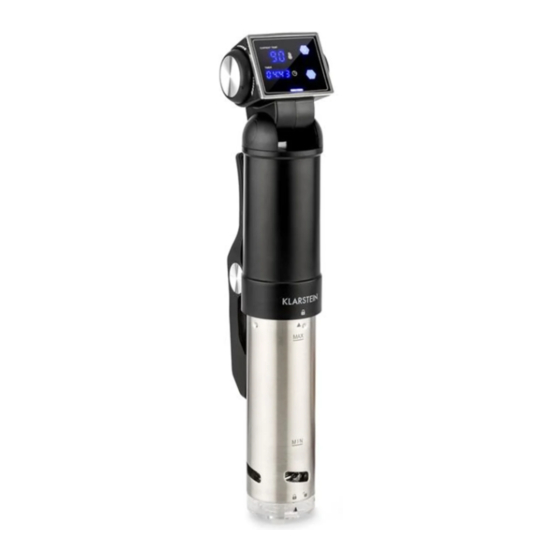
  • Seite 5: Geräteübersicht

    • Das Gerät ist nicht für den kommerziellen Gebrauch, sondern nur für Gebrauch im Haushalt und in ähnlichen Umgebungen vorgesehen. Dazu zählen Küchen in Büros, Bauernhöfen, Hotels, Motels und Einrichtungen, die Bed & Breakfast anbieten. • Schließen Sie das Gerät nicht an externe Zeitschaltuhren oder ferngesteuerte Steckdosen an.
  • Seite 6 Display und Bedienfeld Temperatur und Timer einstellen Stecken Sie den Stecker in die Steckdose. Die Betriebsleuchte und das Symbol gehen an und das Gerät befindet sich im Standby-Modus. Drücken Sie auf die Power-Taste , um in den Einstellungs-Modus zu gelangen. Bei jedem tastendruck ertönt ein Piepton.
  • Seite 7: Reinigung Und Pflege

    Unterteil anbringen und abnehmen Halten Sie die Klammer gedrückt und richten Sie den Pfeil am geöffneten Schloss aus. Drehen Sie das Unterteil dann im Uhrzeigersinn fest, bis der Pfeil auf das geschlossene Schloss zeigt. Wichtig: Seien Sie vorsichtig, wenn Sie den Propeller in das Unterteil schieben! Wenn Sie das Unterteil abnehmen möchten, halten Sie die Klammer gedrückt und...
  • Seite 8: Fehlersuche Und Fehlerbehebung

    FEHLERSUCHE UND FEHLERBEHEBUNG Im normalen Betrieb ist aufgrund des Motors, der Umwälzpumpe und der Kühlung ein Brummen zu vernehmen. Mahlende Geräusche Wenn Sie ein mahlendes Geräusch vernehmen kann es sein, dass das Unterteil lose ist. Befestigen Sie das Unterteil erneut am Oberteil und drehen Sie es nach links bis es einrastet.
  • Seite 9: Hinweise Zur Entsorgung

    Der Wasserstand-Alarm geht direkt nach dem Einschalten an Geben Sie mehr Wasser in den Topf. Es kann vorkommen, dass die Pumpe Wellen erzeugt, so dass der Wasserstand-Sensor im Trockenen liegt und anschlägt. Auch in diesem Fall raten wir Ihnen etwas mehr Wasser in den Topf zu geben, um das Problem zu lösen.
  • Seite 10: Technical Data

    Safety Instructions 1 1 Product Description 12 Use and Operation 12 Care and Cleaning 14 Troubleshooting 15 Hints on Disposal 16 TECHNICAL DATA Item number 10032081, 1032082 Power supply 220-240 V ~ 50-60 Hz Temperature range 0-90 °C Temperature stability ± 0,1 °C DECLARATION OF CONFORMITY Producer: Chal-Tec GmbH, Wallstraße 16, 10179 Berlin, Germany.
  • Seite 11: Safety Instructions

    SAFETY INSTRUCTIONS • Counter tops such as marble and corian cannot withstand the heat generated by the circulator. Place cooking container different surface to prevent damage. • Do not use extension cords. Never operate with a damaged cord or plug. Use properly grounded electrical outlets only.
  • Seite 12: Product Description

    • The appliance is not designed for commercial use. It is intended for use in domestic households and in similar working and residential environments, such as staff kitchen areas, farm houses, hotels, motels and bed and breakfast type environments. • The appliance is not intended to be operated by means of any external timer or a separate remote control system.
  • Seite 13 Display and operation panel Setup tempperature and timer Plug it into the outlet. The icon and working lamp will be on and it will enter the standby mode.Press the icon to enter the setting mode. You will hear a sound of beep for every pressing.
  • Seite 14: Care And Cleaning

    Install and Uninstall the skirt Hold and press the clamp, align the unlocking symbol and the arrow, rotate the skirt in clockwise direction until you can see the arrow and locking symbol are in the same horizontal position. Note: Be cautious with the stainless steel propeller when it crosses over the hole of the stainless steel skirt.
  • Seite 15: Troubleshooting

    TROUBLESHOOTING Under normal operation the system will hum due to the motor, impeller and cooling fan in operation. Grinding noise The stainless steel skirt is loose. Push the stainless skirt up into the guide groove and turn to the right until you hear a click. With the skirt secure, the noise will go away. There also might be the chance the stirring shaft was inadvertently bent.
  • Seite 16: Hints On Disposal

    Low water level alarm turns on after a few seconds of operation Add more water – The pump generates “waves” – sometimes these waves will cause the water level at the sensors to fluctuate up and down. The waves sometimes drop the water level right under the sensor and will cause a low water alarm.
  • Seite 17: Datos Técnicos

    Puesta en funcionamiento 19 Limpieza y cuidado 21 Detección y reparación de anomalías 22 Retirada del aparato 23 DATOS TÉCNICOS Número de artículo 10032081, 1032082 Fuente de alimentación 220-240 V ~ 50-60 Hz Rango de temperatura 0-90 °C Precisión de temperatura ± 0,1 °C DECLARACIÓN DE CONFORMIDAD...
  • Seite 18: Indicaciones De Seguridad

    INDICACIONES DE SEGURIDAD • Las encimeras de mármol o madera no son aptas para soportar el calor que produce el dispositivo de cocción al vacío. Coloque tanto el dispositivo como la olla únicamente en una superfi cie resistente al calor. •...
  • Seite 19: Vista General Del Aparato

    • Este aparato no está indicado para un uso comercial, sino doméstico o para entornos similares. Entre estos se encuentran oficinas, granjas, hoteles, moteles e instalaciones que ofrecen servicio bed&breakfast. • No conecte el aparato a tomas de corriente manejadas por control remoto ni con temporizador.
  • Seite 20 Pantalla y teclas de control Configurar la temperatura y el temporizador Introduzca el cable de alimentación en la toma de corriente. Aparecerá el icono , se encenderá el indicador luminoso y el dispositivo se pondrá en modo Standby. Pulse el botón ON/OFF para acceder al modo Configuración.
  • Seite 21: Limpieza Y Cuidado

    Montar y desmontar la parte inferior Presione el soporte y dirija la flecha hacia el icono de desbloqueo. Gire la parte inferior en sentido de las agujas del reloj hasta que la flecha y el icono de desbloqueo estén en la misma posición horizontal.
  • Seite 22: Detección Y Reparación De Anomalías

    DETECCIÓN Y REPARACIÓN DE ANOMALÍAS Durante un funcionamiento normal, se emite un zumbido debido al motor, la bomba de circulación y al sistema de refrigeración. Chirrido Si oye un chirrido, significa que la parte inferior está suelta. Enrosque bien la parte inferior a la superior girándola en sentido de las agujas del reloj hasta que encaje.
  • Seite 23: Retirada Del Aparato

    La alarma del nivel de agua se activa al encender el dispositivo Añada más agua a la olla. Es posible que la bomba genere olas, por lo que el sensor calcula mal el nivel de agua. En este caso también se recomienda añadir más agua. La luz en la pantalla parpadea durante el funcionamiento Es normal cuando el motor está...
  • Seite 24: Fiche Technique

    Mise en service et utilisation 26 Nettoyage et entretien 28 Identification et résolution des problèmes 29 Conseils pour le recyclage 30 FICHE TECHNIQUE Numéro d'article 10032081, 1032082 Alimentation 220-240 V ~ 50-60 Hz Plage de températures 0-90 °C Précision de la température ± 0,1 °C DÉCLARATION DE CONFORMITÉ...
  • Seite 25: Consignes De Sécurité

    CONSIGNES DE SÉCURITÉ • Les plans de travail en marbre ou en bois ne résistent pas à la chaleur produite par le stick. Ne posez l’appareil et la casserole que sur des surfaces résistantes à la chaleur. • N’utilisez aucun câble de rallonge électrique. N’utilisez pas l’appareil si le câble secteur ou la fi che sont endommagés.
  • Seite 26: Aperçu De L'appareil

    • L’appareil n’est pas destiné à une utilisation commerciale mais au cadre domestique et dans des conditions similaires. Cela comprend les cuisines de bureaux, les auberges, hôtels, motels et installations proposant des services de type bed & breakfast. • Ne branchez pas l’appareil sur un interrupteur externe à minuterie ni sur une prise à télécommande.
  • Seite 27 Écran et panneau de commande Réglage de la température et de la minuterie Branchez la fiche dans la prise. Le témoin de fonctionnement et l‘icône s‘allument et l‘appareil se trouve en mode veille. Appuyez sur la touche Power pour accéder au mode des réglages. A chaque appui sur une touche, un bip retentit.
  • Seite 28: Nettoyage Et Entretien

    Poser et retirer la partie inférieure Maintenez la pince enfoncée et alignez la flèche sur le cadenas ouvert. Serrez ensuite la partie inférieure en sens horaire jusqu‘à ce que la flèche montre le cadenas fermé. Important : soyez prudent lorsque vous glissez l‘hélice dans la partie inférieure ! Lorsque vous voulez retirer la partie inférieure, tenez la pince enfoncée et tournez...
  • Seite 29: Identification Et Résolution Des Problèmes

    IDENTIFICATION ET RÉSOLUTION DES PROBLÈMES En fonctionnement normal, vous pouvez entendre un petit bourdonnement du fait du moteur, de la pompe de recirculation et du refroidisseur. Grincements Si vous percevez un grincement, il se peut que la partie inférieure soit desserrée. Refixez la partie inférieure et tournez-la vers la gauche jusqu‘à...
  • Seite 30: Conseils Pour Le Recyclage

    L‘alarme de niveau d‘eau se déclenche dès le démarrage Ajoutez de l‘eau dans la casserole. Il se peut que la pompe produise des vagues laissant à l‘air libre le capteur de niveau d‘eau et déclenchant ainsi l‘alarme. Dans ce cas également nous vous conseillons d‘ajouter un peu d‘eau dans la casserole pour résoudre le problème.
  • Seite 31: Dati Tecnici

    Descrizione del prodotto 33 Messa in funzione e utilizzo 33 Pulizia e manutenzione 35 Ricerca e correzione degli errori 36 Smaltimento 37 DATI TECNICI Numero articolo 10032081, 10032082 Alimentazione 220-240 V ~ 50-60 Hz Intervallo di temperatura 0-90 °C Precisione della temperatura ± 0,1 °C DICHIARAZIONE DI CONFORMITÀ...
  • Seite 32: Avvertenze Di Sicurezza

    AVVERTENZE DI SICUREZZA • Piani di lavoro in marmo o legno non sono adatti al calore generato dal circolatore. Posizionare il dispositivo e la pentola solamente su superfi ci resistenti al calore. • Non utilizzare prolunghe. Non utilizzare il dispositivo, se il cavo di alimentazione o la spina sono danneggiati.
  • Seite 33: Descrizione Del Prodotto

    • Il dispositivo non è inteso per utilizzi commerciali, ma solamente per uso casalingo e in ambienti similari. Tra questi rientrano cucine in uffici, agriturismi, hotel, motel e bed & breakfast. • Non collegare il dispositivo a timer esterni o prese di corrente con comando a distanza.
  • Seite 34 Display e pannello di controllo Impostare temperatura e timer Inserire la spina nella presa di corrente. Le spie di funzionamento e il simbolo si accendono e il dispositivo si trova in modalità standby. Premere il tasto Power per raggiungere la modalità di impostazione. Ogni volta che si preme un tasto viene emesso un segnale acustico.
  • Seite 35: Pulizia E Manutenzione

    Mettere e togliere la parte inferiore Tenere premuta la molletta e allineare la freccia al lucchetto aperto. Ruotare la parte inferiore in senso orario, fino a quando la freccia indica sul lucchetto chiuso. Importante: fare attenzione quando si inserisce il propulsore nella parte inferiore! Per togliere la parte inferiore, tenere premuta la molletta e ruotare la parte inferiore in senso...
  • Seite 36: Ricerca E Correzione Degli Errori

    RICERCA E CORREZIONE DEGLI ERRORI Durante il normale funzionamento è possibile percepire un ronzio a causa del motore, della pompa di circolazione e del raffreddamento. Rumori gracchianti Se si sente un rumore gracchiante, la parte inferiore potrebbe essere smollata. Fissare la parte inferiore a quella superiore, ruotandola verso sinistra fino al bloccaggio.
  • Seite 37: Smaltimento

    L’allarme per il livello dell’acqua si attiva subito dopo aver acceso il dispositivo Aggiungere acqua nella pentola. Può succedere che la pompa generi onde, che attivano il sensore del livello dell’acqua facendolo restare all’asciutto. Anche in questo caso si consiglia di aggiungere acqua per risolvere il problema. Le luci sul display lampeggiano durante il funzionamento Questo è...

Diese Anleitung auch für:

10032082

Inhaltsverzeichnis