auna 10026466 Handbuch
Inhaltsverzeichnis
Verfügbare Sprachen
Verfügbare Sprachen
Quicklinks
Kapitel
Inhaltsverzeichnis
Fehlerbehebung

Verwandte Anleitungen für auna 10026466


Inhaltszusammenfassung für auna 10026466
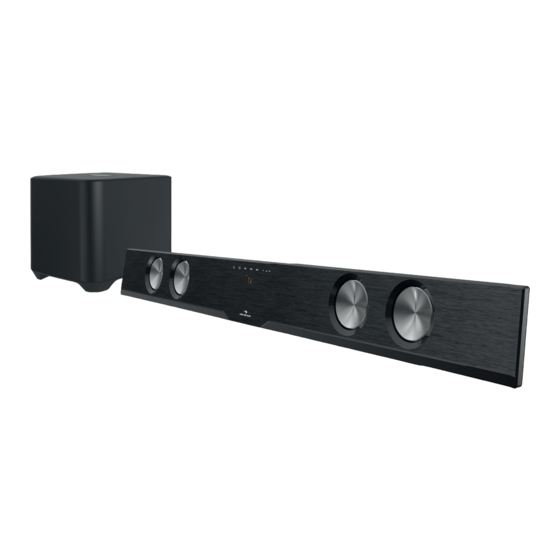
- Seite 1 Soundbar TV, AUX, COAX, BT, OPTC, USB und HDMI 10026466 http://www.auna-multimedia.com...
-
Seite 2: Inhaltsverzeichnis
Allgemeine Funktionen 8 Bluetooth Einstellungen 10 Musik über USB abspielen 11 Pflege und Wartung 11 Fehlersuche und Fehlerbehebung 12 Entsorgung und Konformitätserklärung 12 Technische Daten Artikelnummer 10026466 Verstärker Leistungsabgabe 75 W Frequenzbereich 20Hz-20kHz ± 3 dB Eingangsspannung 550 mV Haupteinheit... -
Seite 3: Lieferumfang Und Sicherheitshinweise
Lieferumfang 1x Soundbar 1x Subwoofer 1x Fernbedienung 1x CR2025 Knopfzelle 1x Audiokabel (3.5 mm Klinkenstecker) 1x Bedienungsanleitung 1x Netzteil 24V 1.5A Sicherheitshinweise WARNUNG Um Stromschläge zu vermeiden entfernen Sie nicht die Abdeckung. Das Gerät enthält Teile, die dem Be- nutzer nicht zugänglich sind. Reparaturen dürfen nur von qualifi zierten Fachkräften durchgeführt werden. •... -
Seite 4: Geräteübersicht Und Fernbedienung
Geräteübersicht und Fernbedienung 1 STANDBY: Soundbar ein- und ausschalten. 2 SOURCE: Audioquelle auswählen (TV, AUX, COAX, BT, OPTC, USB und HDMI). PLAY/PAUSE: Titel starten, anhalten oder fortfahren im USB- und BT-Modus. ZURÜCK/VOR: Titel vor- oder zurückspringen im USB- und BT-Modus. 5 VOLUME +/-: Lautstärke erhöhen oder verringern. -
Seite 5: Wandmontage
Wandmontage 1. Richten Sie die Soundbar gerade an der ge- 3. Stecken Sie Dübel und Schrauben (nicht im wünschten Stelle aus. Markieren Sie mit ei- Lieferumfang enthalten) in die Löcher und nem Stift die Stellen für die Bohrlöcher in ei- schrauben Sie die Schrauben so weit herein, nem Abstand von 630 mm. -
Seite 6: Anschlüsse Und Verbindungen
Anschlüsse und Verbindungen Subwoofer anschließen • Verbinden Sie das feste angeschlossene Lautsprecher- kabel des Subwoofers mit dem Subwoofer-Anschluss an der Rückseite der Soundbar. • Achten Sie darauf, dass Sie das rote Kabel in die rote Buchse und das weiße Kabel in die schwarze Buchse stecken. - Seite 7 Audiogeräte per Cinch-Kabel verbinden Hinweis: Achten Sie darauf, dass es sich bei Ihren TV-Buchsen um Audio-Ausgänge, nicht um Audio- Eingänge handelt. Sollte ihr TV nur Audio-Eingän- ge benutzen verbinden Sie ihn per COAX-Kabel. • Stecken Sie das eine Ende des Cinch-Kabels in den Audioausgang von TV, DVD-Player oder Spielekonsole.
-
Seite 8: Allgemeine Funktionen
TV per Audiokabel mit 3.5 mm Klinkenstecker verbinden • Stecken Sie den 3.5 mm Klinkenstecker in den Kopfhörer-Ausgang des TV. • Stecken Sie den roten und weißen Stecker in den TV-Eingang an der Seite der Soundbar (9). Hinweis: Achten Sie darauf, dass Sie den Roten Stecker in die rote Buchse und den weißen Ste- cker in die weiße Buchse stecken. - Seite 9 Auf dem Display sehen Sie in welchem Modus Sie sich gerade befinden: TV-Eingang AUX-Eingang COAX-Eingang COAX Bluetooth Optischer-Eingang OPTC USB-Eingang HDMI-Eingang HDMI Lautstärke einstellen Um die Laustärke zu erhöhen drücken Sie mehrmals hintereinander auf die VOL+ Taste an der Soundbar oder Fernbedienung oder halten Sie die Taste gedrückt. Um die Laustärke zu verringern drücken Sie mehrmals hintereinander auf die VOL- Taste an der Soundbar oder Fernbedienung oder halten Sie die Taste ge- drückt.
-
Seite 10: Bluetooth Einstellungen
Bluetooth Einstellungen Bevor Sie die Soundbar mit einem Bluetooth-Gerät (beispielsweise einem Mobiltelefon) verwenden können müs- sen Sie Ihr Gerät zunächst mit der Soundbar per Bluetooth verbinden. NFC kompatible Smartphones Drücken Sie auf die NFC-Symbol auf der Einheit mit dem Smartphone. Halten Sie die taste grdrückt bis das Smartphone antwortet. -
Seite 11: Musik Über Usb Abspielen
Musik von USB abspielen Sie können über die Soundbar Musik von diversen USB-Geräten abspielen unter folgender Voraussetzung: • Der USB-Speicher muss FAT-formatiert sein • Die Musik muss im MP3 oder WMA-Format vorliegen. Stecken Sie einen USB-Stick oder MP3-Player in den USB-Port an der Soundbar. -
Seite 12: Fehlersuche Und Fehlerbehebung
Fehlersuche und Fehlerbehebung Problem Mögliche Lösung Die Soundbar geht nicht an. Versichern Sie sich, dass der Netzstecker eingesteckt ist. Versichern Sie sich, dass die Steckdose Strom liefert. Es kommt kein Ton. Versichern Sie sich, dass der Ton bei der externen Quel-le an ist und ein Titel läuft.