Seite 1
OLIBOARD INTERACTIVE WHITEBOARDS User Manual Manuel de l'utilisateur Benutzerhandbuch Manuale utente Manual del usuario INTERACTIVE WHITEBOARDS - TABLEAUX INTERACTIFS - INTERAKTIVE TAFELN - LAVAGNE INTERATTIVE - PIZARRAS INTERACTIVAS...
Seite 2
Oliboard whiteboard and of the documentation written in this manual; nevertheless Olivetti S.p.A. disclaims any liability of any kind for any damages whatsoever resulting from the use of the software and of the manual. The same thing can be said for any person or company involved in the creation, realization, production and verification of the software and of the manual.
Seite 3
INSTRUCTION: provides additional software instructions. NOTE: describes problems that could occur when using the whiteboard and how to avoid and resolve them. WARNING: draws attention to the danger of personal injury or product damage if improperly used. Caution Warning • In order to avoid electric shocks, do not install the interactive whiteboard in damp or smoky environments.
Seite 4
Important notes • The interactive whiteboard must be used only with the special electronic pens. Do not use marker pens, pencils or other types of pen. If necessary, clean the whiteboard using alcohol. • Make sure that the whiteboard is correctly connected to the computer and to the electrical mains.
Seite 5
Warning FURTHER WARNINGS FOR INSTALLATIONS IN SCHOOL ENVIRONMENTS The warnings and precautions for using the whiteboard and projector must be recommended to students as well. The following in particular must be stressed: • Do not look directly at the beam of light emitted by the projector onto the whiteboard.
Seite 6
Page left intentionally blank OLIBOARD – Interactive Whiteboard...
TABLE OF CONTENTS INTRODUCTION ....................1 Overview....................... 1 System Requirements .................... 2 Unpacking the Interactive Whiteboard and accessories .......... 3 Main Features ....................... 6 External View ....................6 Whiteboard Function Keys..................7 Technical Specifications ..................8 Hardware Installation .................... 9 Installing the Battery of the Electronic Pen ............10 WINDOWS SOFTWARE INSTALLATION ............11 Express Installation ....................
Seite 8
Page left intentionally blank VIII OLIBOARD - Interactive Whiteboards...
INTRODUCTION VERVIEW The Interactive Whiteboard is an input peripheral device that, thanks to the application of stable, advanced technologies, allows an interactive environment to be created that, by connecting a computer and a video-projector, can be used for teaching and demos. Features •...
(its resolution) and of the projector must be the same as that of the whiteboard. Therefore, for whiteboards in format 4/3 (Oliboard 78S and Oliboard 78D), it is recommended to use an output resolution corresponding to the 4/3 format (e.g.
NPACKING THE NTERACTIVE HITEBOARD AND ACCESSORIES The standard Interactive Whiteboard kit contains the following components: • Interactive Whiteboard (the colour of the product could vary) • Accessories OLIBOARD - Interactive Whiteboards...
Seite 12
The standard accessories provided include: Description Quantity Purpose Image Special pen for Interactive Whiteboard. Electronic pen Each pen has one 1.5V AAA battery (mini-Style). Colours can vary Cable for connecting the Special 10-meter computer to the cable Interactive Whiteboard Drivers and application Oliboard Up to 3...
Seite 13
• Optional Accessories Instead of wall installation, you can also choose to install the Interactive Whiteboard on a special floor stand, available on order. In the following, the model B5848. Optional floor stand (mod. B5848) Floor stand dimensions (without whiteboard or projector) model B5848: width: 127 cm;...
EATURES External View (The colour varies according to the model). Ref. Description Writing Area Function Keys Pen Holder Interface Board Interface for the special cable to connect to the USB port of the computer (the whiteboard is normally powered via this same cable).
HITEBOARD UNCTION Function Window Annota- Definition Control Mode keys Mode tion Mode Orientation Orientation Orientation Orientation (tuning) Switch to Switch to Control Mode No effect Control Control (mouse-like) Mode Mode Switch to Switch to Annotation Mode Annotation No effect Annotation Mode Mode Window Mode No effect...
NSTALLATION Wall or stand installation must be carried out by authorised personnel according to the requirements stated in the Olivetti documentation. The cable for connecting the whiteboard must be connected to the USB port of the computer. The VGA (or HDMI) cable of the video-projector must be connected to the VGA (or HDMI) port of the computer.
NSTALLING THE ATTERY OF THE LECTRONIC Unscrew the rear cap of the electronic pen, turning it in an anti-clockwise direction. Insert one 1.5V AAA (mini Style) battery, as shown in the figure below, then tighten the rear cap again, turning in a clockwise direction. The external colour of the pen can be different from the photo.
WINDOWS SOFTWARE INSTALLATION The Oliboard software provides two types of installation: “Express installation” and “Step-by-step installation”. Express installation includes the following phases that are carried out automatically in sequence: Installation of Oliboard software driver. Installation of Oliboard application software. Installation of software driver for USB cable. Step-by-step installation allows the software to be installed one step at a time.
When the installation completed message is displayed, click on “Finish” then, on returning to the main screen, click “Exit”. Follow the instructions in the paragraph “Running the Software”. STEP NSTALLATION This type of installation is recommended only when upgrading the software provided with the whiteboard.
Installing the Oliboard Software Click Choose the language you want to install. Select the installation path. The software installation starts. When installation completes a message appears; click on “Finish”. Installing the Software Driver for the USB Cable Normally it is not necessary to execute this procedure if the “Express installation” has already been performed.
Starting the Driver of the Interactive Whiteboard Click “Start“ → “All programs“ → “Olivetti“ → “Oliboard Software “ and start the Oliboard Driver. The Communications module icon appears in the lower right corner of the Status bar on the desktop.
NOTE: After having started the driver, click on the icon of the Oliboard driver to activate or deactivate the “autostart” parameter, depending on whether or not you want the Oliboard driver to be run automatically the next time the computer is powered on. If the computer is permanently connected to the whiteboard, it is advisable to activate “autostart”.
Seite 24
Wth the mouse left button click on “Re-orientation“ to open the popup window for Orientation. With the electronic pen, click on the mid-point of the flashing cross “+“ on the whiteboard. Repeat this same operation for all the other orientation points (there are six in all), being careful to canter well the mid-point of the flashing cross with the electronic pen.
Starting the Whiteboard Application Software Click “Start” → “All programs” → “Olivetti” → “Oliboard Software” and start the application program. A Logon window opens in which you can enter the user name and the password. To start the software using the default account, click simply on the “Login”...
Creating a Personal Account and Password Click “Start” → ”All Programs” → ”Olivetti” → ”Oliboard Software” → “User Manager” to display the following window: Key-in the administrator account data to access the software. The default administrator account is Administrator and the Password is Oliboard.
Seite 27
Select “Edit” → ”New User” to create a personal account. Key-in the user name and password and select “Create”. When the process completes, the new user appears in the window: OLIBOARD - Interactive Whiteboards...
Setting Up the Oliboard Functions Click “Options” to open the window shown below. For the Oliboard 78D and Oliboard 95D models of whiteboard, set the “Double Pen” function as shown below. OLIBOARD - Interactive Whiteboards...
LINUX-UBUNTU SOFTWARE INSTALLATION NSTALLING THE OLIBOARD SOFTWARE Note that you must have Administrator access and its related password, if set, to be able to install the software and drivers. In the installation folder, two installation procedures are present for the Ubuntu software distribution: one for Intel processors (i386 architecture and derivations) and the other for AMD64 processors.
Seite 30
The installation procedure consists of the following steps (follow the instructions on the screen): • Click “Install Package”. • Enter the password (depends on the permissions the user account has on the operating system). • The installation procedure is performed. At the end, a message is displayed to the effect that installation has completed.
EMOVING THE OFTWARE Before removing the software, deactivate the software driver (via the “Exit” command that can be activated by clicking on the driver icon in the control bar) and exit from the application if it is still running. The Oliboard for Linux software can be removed from your computer in one of two ways.
UNNING THE OFTWARE The whiteboard cable must be connected to the USB port of the computer. To run the software, you must first of all run the whiteboard software driver, then perform the orientation operation if necessary before finally starting the whiteboard software.
Orienting the Interactive Whiteboard This function is used to tune the whiteboard for the image projected on it. Click on the driver icon in the panel at the top of the desktop and select “Re- orientation” in the popup menu, then select the orientation mode required (see the INSTRUCTION note at the end of this paragraph).
Seite 34
Clicking with the mouse left button on “Re-orientation”, a popup window appears. With the electronic pen, click at the mid-point of the flashing cross “+” on the whiteboard. Repeat this same operation for all the other orientation points (there are six in all), being careful to center precisely the mid-point of the flashing cross with the electronic pen.
Running the Whiteboard Software Application Click “Applications” → ”Oliboard” → ”Oliboard” to start the application. A login window is displayed into which you can enter a user name and password. To start the software using the default account, just click on the “Login” button without entering any data, otherwise enter your personal account details.
MAC SOFTWARE INSTALLATION Note that Administrator access rights and its related password, if any, are necessary for installing both the software and the drivers. NSTALLING THE LIBOARD SOFTWARE 1. Insert the Oliboard Software disk. Don’t connect the USB whiteboard cable. 2.
3. Click on “Continue” and follow the instructions displayed until installation completes. At this point, you must install the software driver for the USB cable. NSTALLING THE CABLE SOFTWARE DRIVER Go back to the main installation display mask and click on “USB_Cable_Driver”and then to FTDI driver to enter in the folder containing two installation drivers: - FTDIUSBSerialDriver_10_3.dmg (for MAC OS 10.3) - FTDIUSBSerialDriver_10_4_10_5_10_6.dmg, (for MAC OS 10.4, 10.5 and 10.6)
Seite 38
At this point you must double-click on the driver to start the installation. OLIBOARD - Interactive Whiteboards...
Seite 39
Then follow the instructions displayed on the video. OLIBOARD - Interactive Whiteboards...
EMOVING THE OFTWARE Select the Oliboard software in “Applications” then click “Uninstall” to start the software removal procedure and confirm the software removal. Click “YES” to start the software removal. UNNING THE OFTWARE To run the software, you must first of all start the software driver of the whiteboard, then if necessary perform the orientation operation before starting the whiteboard software.
Orienting the Interactive Whiteboard This function calibrates the whiteboard for the image projected onto it. Click the driver icon, select “Orientation“ from the popup menu then select the orientation mode you require (see the INSTRUCTION note at the end of this paragraph).
Seite 42
With the mouse left button click on “Re-orientation“ to open the popup window for Orientation shown below. With the electronic pen, click at the mid- point of the flashing cross “+“ on the whiteboard. Repeat the same operation for all the other orientation points (there are six in all), being careful to center precisely the mid-point of the flashing cross with the electronic pen.
Running the Whiteboard Software Application 1. Click “System“ → “Applications“ → “Oliboard Software“ → “Software“ → “Oliboard“ to start the application. 2. A login window is displayed into which you can enter a user name and password. To start the software using the default account, just click on the “Login” button without entering any data, otherwise enter your personal account details.
SOFTWARE REGISTRATION First time Oliboard software runs on a computer not connected to the whiteboard, the registration of the software is requested. It is possible to immediately execute the procedure, or it is possible to postpone the registration. When the number of execution without registration is finished, it is necessary to remove the software.
TROUBLESHOOTING If a message is displayed: “Failed to verify the whiteboard, the program can't run further!“, check whether there is a good connection between whiteboard and the computer. • Make sure that the special-purpose connection cable of the whiteboard has been used, and that the cable has been connected correctly. •...
Seite 46
6. How to exit from the Oliboard software? • Click on the Operation Round Plate in ”Control Mode” , then on ”Exit” in the popup menu. • Click ”File” (in the main menu), then ”Exit”, or Click the Oliboard icon in the “Main Tool Bar”, then click ”Exit”...
Seite 47
10. How to clean the panel of the whiteboard? Clean the panel passing over it lightly with a damp cloth. CAUTION: After wetting the cloth, you must wring it out to remove any excess water. This is to avoid water penetrating inside the whiteboard.
Seite 48
Page left intentionally blank OLIBOARD - Interactive Whiteboards...
Seite 50
électronique ou mécanique, y compris la photocopie, enregistrement ou autres, et ce, sans autorisation écrite préalable d'Olivetti S.p.A. Le contenu de ce manuel peut être modifié sans préavis. Le plus grand soin ayant été apporté lors de la création, du contrôle et de la documentation du logiciel associé...
Seite 51
INSTRUCTION : constitue une instruction supplémentaire relative au logiciel. REMARQUE : décrit d'éventuels problèmes susceptibles de surgir durant l'utilisation du tableau ainsi que les solutions permettant de les résoudre et d'en prévenir la survenance. ATTENTION : attire l'attention de l'utilisation sur les risques de blessures ou dommages au produit en cas d'usage inapproprié.
Remarques importantes • Le tableau interactif ne doit être utilisé qu'avec les stylets électroniques spéciaux. Ne pas utiliser de marqueurs, crayons ou d'autres types de stylos. Si nécessaire, nettoyer le tableau avec de l'alcool. • Contrôler que le tableau ait été branché correctement à l'ordinateur et au réseau électrique.
Seite 53
Avertissement AUTRES AVERTISSEMENTS SE RAPPORTANT À L'INSTALLATION DANS UN ENVIRONNEMENT SCOLAIRE Il est nécessaire que les élèves soient informés des avertissements et précautions d'usage se rapportant au tableau et au projecteur. Comme, entre autres : • Ne pas regarder directement le rayon de lumière émis par le projecteur sur le tableau.
Seite 54
Page laissée blanche intentionnellement OLIBOARD - Tableaux interactifs...
Seite 55
SOMMAIRE INTRODUCTION ....................1 Préambule......................1 Configuration minimale du système............... 2 Déballage et accessoires ..................3 CARACTÉRISTIQUES PRINCIPALES ................. 6 Aspect extérieur ....................6 Touches de fonction présentes sur le tableau............7 Informations techniques ................... 8 Installation ......................9 Installation de la pile dans le stylet électronique ........... 10 INSTALLATION DU LOGICIEL SOUS WINDOWS ..........11 Installation rapide....................
Seite 56
Page laissée blanche intentionnellement VIII OLIBOARD - Tableaux interactifs...
INTRODUCTION REAMBULE Le tableau interactif est un appareil périphérique d'entrée qui, grâce à l'application de technologies avancées et d'une haute fiabilité, permet de disposer, en le branchant à un PC et à un vidéoprojecteur, d'un environnement interactif pour un usage didactique ou démonstratif.
(soit la résolution) et du projecteur doivent être paramétrés sur le même format que celui du tableau. Soit, pour les tableaux au format 4/3 (Oliboard 78S et Oliboard 78D), il est conseillé d'utiliser une résolution de la sortie correspondant au format 4/3 (par exemple 1024x768 ou 800x600).
EBALLAGE ET ACCESSOIRES Le tableau interactif comprend normalement les composants suivants : • Tableau interactif (la couleur du produit peut varier) • Accessoires OLIBOARD - Tableaux interactifs...
Seite 60
Le kit d'accessoires normal comprend : Description Quantité Fonction Position Stylet électronique pour tableau interactif, Stylet électronique 2 avec une pile AAA de 1,5 V par stylet. Les couleurs peuvent varier Câble pour Câble spécial de 10 brancher mètres l'ordinateur au tableau interactif Pilote et logiciel CD d'installation...
Seite 61
• Accessoires en option En alternative à l'installation murale, il est possible de placer le tableau interactif sur un piédestal spécial qui peut être commandé séparément. Ci-après, le modèle B5848. Piédestal en option (mod. B5848) Dimensions piédestal (sans tableau ni projecteur) modèle B5848 : largeur : 127 cm ;...
CARACTÉRISTIQUES PRINCIPALES Aspect extérieur (La couleur peut varier en fonction du modèle) Réf. Description Zone d'écriture Touches de fonction Pot à crayons Fiche interface Interface pour le câble spécial à brancher à la porte USB de l'ordinateur (le tableau est normalement alimenté par le biais de ce câble) Connecteur d'alimentation (normalement, non utilisé) OLIBOARD - Tableaux interactifs...
OUCHES DE FONCTION PRESENTES SUR LE TABLEAU Touches de Modalité Modalité Modalité Définition fonction commande fenêtre Annotation Orientation Orientation Orient. Orient. (équilibrage) Modalité Passer à Passer à commande Aucun effet modalité modalité (similaire à souris) commande commande Passer à Modalité Passer à...
NSTALLATION L'installation murale ou sur piédestal doit être effectuée par un personnel agréé conformément aux dispositions visées dans la documentation Olivetti. Le câble de branchement du tableau doit être branché à la porte USB de l'ordinateur. Le câble BGA (ou HDMI) du vidéoprojecteur doit être branché à la porte VGA (ou HDMI) de l'ordinateur.
NSTALLATION DE LA PILE DANS LE STYLET ELECTRONIQUE Ouvrir le capuchon arrière du stylet électronique en le faisant tournant dans le sens contraire des aiguilles d’une montre, y placer la pile AAA de 1,5 V tel qu'illustré puis visser à nouveau le capuchon arrière dans le sens des aiguilles d'une montre. La couleur extérieure du stylet peut différer de celle illustrée.
INSTALLATION DU LOGICIEL SOUS WINDOWS Le logiciel Oliboard prévoit deux types d'installation : une « installation rapide » et une « installation guidée ». L'installation rapide comprend les phases suivantes exécutées automatiquement et dans l'ordre suivant : - Installation du pilote du logiciel Oliboard. - Installation du logiciel Oliboard.
Lorsque le message d'installation terminée s'affichera, cliquer sur « Fin » et, une fois revenu à la fenêtre initiale, cliquer sur « Quitter ». Suivre les instructions indiquées dans le paragraphe « Exécution du logiciel ». NSTALLATION GUIDEE Ce type d'installation est recommandé uniquement en cas de nécessité de mise à jour du logiciel fourni avec le tableau.
Installation du logiciel Oliboard Cliquer sur Sélectionner la langue voulue. Sélectionner la destination de l'installation du logiciel. L'installation du logiciel commencera. Lorsque le message de conclusion de l'installation s'affichera, cliquer sur « Fin ». Installation du pilote du câble USB Normalement, il n'est pas nécessaire d'exécuter cette procédure si l'installation rapide a déjà...
Lancement du pilote du tableau interactif Cliquer sur « Démarrer » → « Tous les programmes » → « Olivetti »→ « Logiciel Oliboard » et lancer le pilote Oliboard. Dans le coin inférieur à droite de la barre des tâches du bureau, l'icône du module de communication devrait être affichée.
REMARQUE : après avoir lancé l'exécution du pilote, cliquer sur l'icône du pilote Oliboard afin d'activer ou de désactiver le paramètre de « démarrage automatique » selon si l'on souhaite lancer ou non automatiquement l'exécution d'Oliboard lors du prochain démarrage de l'ordinateur. Si l'ordinateur est branché...
Seite 72
En cliquant sur la touche gauche de la souris sur « Réorientation », un menu déroulant intitulé Orientation s'ouvrira. Cliquer, à l'aide du stylet électronique, au centre de la croix clignotante « + » sur le tableau. Puis, répéter l’opération pour les autres points d'orientation (soit six au total), tout en veillant à...
Lancement du logiciel du tableau Cliquer sur « Démarrer » → « Tous les programmes » → « Olivetti » → « Logiciel Oliboard » et lancer le programme. Une fenêtre d'accès s'ouvrira : celle-ci permettra de saisir le nom utilisateur et le mot de passe.
Création d'un compte et d'un mot de passe personnels Cliquer sur « Démarrer » → « Tous les programmes » → « Olivetti » → « Logiciel Oliboard » → « Gestionnaire utilisateur » pour afficher la fenêtre suivante : Saisir les données du compte administrateur afin de pouvoir accéder au logiciel.
Seite 75
Sélectionner « Modifier » → « Nouvel utilisateur » pour créer un compte personnel. Saisir le nom utilisateur et le mot de passe puis sélectionner « Créer ». À la fin, le nouvel utilisateur sera affiché dans la fenêtre : OLIBOARD - Tableaux interactifs...
Configuration des fonctions Oliboard Cliquer sur « Options » pour ouvrir la fenêtre illustrée ci-dessous. Pour les modèles de tableau Oliboard 78D et Oliboard 95D, configurer la fonction « double stylet » tel qu'illustré ci-dessous. OLIBOARD - Tableaux interactifs...
INSTALLATION DU LOGICIEL SOUS LINUX-UBUNTU NSTALLATION Il faut savoir qu'afin de pouvoir finaliser l'installation, tant du logiciel que des différents pilotes, il est nécessaire de disposer des droits d'administrateur ainsi que de l'éventuel mot de passe. Dans le dossier d'installation, sont disponibles, pour la distribution Ubuntu, deux procédures d'installation : celle pour les processeurs Intel (architecture i386 et dérivées) et celles pour les processeurs AMD64.
Seite 78
La procédure d'installation prévoit de suivre les étapes suivantes (suivre les instructions affichées à l'écran) : • Sélectionner « Installer paquet ». • Saisir le mot de passe (en fonction des droits du compte utilisateur enregistré dans le système d'exploitation). •...
ESINSTALLATION DU LOGICIEL Avant de pouvoir désinstaller le logiciel, il est nécessaire de désactiver le pilote du logiciel (par le biais de la commande « Quitter » activable en cliquant sur l'icône du pilote dans la barre de commande) et quitter l'application si encore en exécution. Oliboard pour Linux peut être supprimé...
XECUTION DU LOGICIEL Le câble du tableau doit être branché à la porte USB de l'ordinateur. Pour ce qui est de l'exécution du logiciel, il est tout d'abord nécessaire de lancer le pilote du logiciel du tableau, exécuter, si besoin est, la fonction d'orientation puis lancer le logiciel du tableau.
Orientation du tableau interactif Cette fonction permet de régler le tableau pour ce qui est de l'image projetée sur ce dernier. Cliquer sur l'icône du Pilote Oliboard située sur le panneau en haut du bureau ; sélectionner « Réorientation » dans le menu déroulant puis sélectionner la modalité...
Seite 82
En cliquant sur la touche gauche de la souris sur « Réorientation », un menu déroulant intitulé Orientation s'ouvrira. Cliquer, à l'aide du stylet électronique, au centre de la croix clignotante « + » sur le tableau. Puis, répéter l’opération pour les autres points d'orientation (soit six au total), tout en veillant à...
Lancement du logiciel du tableau Cliquer sur « Applications » → « Oliboard » → « Oliboard » pour lancer l'application. Une fenêtre d'accès s'ouvrira : celle-ci permettra de saisir le nom utilisateur et le mot de passe. Pour lancer le logiciel en utilisant le compte par défaut, il suffit de cliquer sur la touche de connexion «...
INSTALLATION DU LOGICIEL POUR MAC Il faut savoir qu'afin de pouvoir finaliser l'installation, tant du logiciel que des différents pilotes, il est nécessaire de disposer des droits d'administrateur ainsi que de l'éventuel mot de passe. NSTALLATION DU LOGICIEL LIBOARD 1. Insérer le CD du logiciel Oliboard pour MAC (ne pas brancher le câble USB du tableau à...
Seite 85
3. Cliquer sur « Continuer » et suivre les instructions affichées sur l'écran jusqu'à ce que l'installation ait abouti. Installer ensuite le pilote du logiciel du câble USB. NSTALLATION DU PILOTE DU LOGICIEL DU CABLE Revenir à l'écran initial et cliquer afin de pouvoir accéder au dossier «...
Seite 86
Pour lancer l'installation, double cliquer sur le pilote choisi. OLIBOARD - Tableaux interactifs...
Seite 87
Puis suivre les instructions affichées sur l'écran. OLIBOARD - Tableaux interactifs...
ESINSTALLATION DU LOGICIEL Sélectionner le logiciel Oliboard dans « Applications », puis cliquer sur « Désinstaller » afin de lancer la procédure de désinstallation du logiciel. Enfin, confirmer la désinstallation. Cliquer sur "Oui" pour lancer la désinstallation du logiciel. XECUTION DU LOGICIEL Pour ce qui est de l'exécution du logiciel, il est tout d'abord nécessaire de lancer le pilote du logiciel du tableau, exécuter, si besoin est, la fonction d'orientation puis lancer le logiciel du tableau.
Orientation du tableau interactif Cette fonction permet de régler le tableau pour ce qui est de l'image projetée sur ce dernier. Cliquer sur l'icône du pilote, sélectionner « Orientation » dans le menu déroulant puis sélectionner la modalité d'orientation souhaitée (voir remarque INSTRUCTION à...
Seite 90
En cliquant sur la touche gauche de la souris sur « Réorientation », un menu déroulant intitulé Orientation s'ouvrira. Cliquer, à l'aide du stylet électronique, au centre de la croix clignotante « + » sur le tableau. Puis, répéter l’opération pour les autres points d'orientation (soit six au total), tout en veillant à...
Lancement du logiciel du tableau Cliquer sur « Système » → « Applications » → « Logiciel Oliboard » → « Logiciel » → « Oliboard » pour lancer l'application. Une fenêtre d'accès s'ouvrira : celle-ci permettra de saisir le nom utilisateur et le mot de passe. Pour lancer le logiciel en utilisant le compte par défaut, il suffit de cliquer sur la touche de connexion «...
ENREGISTREMENT DU LOGICIEL Lors de la toute première exécution du logiciel Oliboard sur un ordinateur non branché à un tableau, il est demandé de procéder à l'enregistrement du logiciel. Il est possible ou de procéder à l'enregistrement immédiatement ou bien de le faire plus tard.
RECHERCHE DES PANNES Si le message « Échec contrôle tableau, le programme ne peut plus fonctionner ! », contrôler le branchement entre le tableau et l'ordinateur. • Contrôler que le câble spécial ait été utilisé pour brancher le tableau à l'ordinateur et qu'il ait été...
Seite 94
6. Comment quitter l'Oliboard ? • Cliquer sur la Palette opérationnelle en « Modalité commande » puis cliquer sur « Quitter » dans le menu déroulant. • Ou bien, cliquer sur « Fichier » (menu principal) puis sur « Quitter » ou encore cliquer sur l'icône Oliboard dans la «...
Seite 95
10. Comment nettoyer le panneau du tableau ? Nettoyer le panneau en frottant délicatement à l'aide d'un chiffon humide. ATTENTION : après avoir mouillé le chiffon, l'essorer afin d'éliminer l'excès d'eau. De cette façon, l'on éviter le risque d'infiltrations d'eau à l'intérieur du tableau. 11.
Seite 96
Page laissée blanche intentionnellement OLIBOARD - Tableaux interactifs...
Seite 98
Der Inhalt dieses Handbuches kann ohne vorherige Ankündigung geändert werden. Die Software der Oliboard-Tafel sowie der Inhalt des vorliegenden Handbuches wurden mit größter Sorgfalt konzipiert, ausgearbeitet und überprüft; trotzdem kann die Fa. Olivetti S.p.A. keinerlei Haftung für jegliche Schäden übernehmen, die durch den Gebrauch der Software und der Bedienungsanleitung entstanden sind.
Seite 99
ANWEISUNG: Zusätzliche Software-Anweisungen stehen zur Verfügung. HINWEIS: Beschreibung von Fehlern, die beim Gebrauch der Tafel auftreten können, sowie Tipps zur Vermeidung und Behebung. VORSICHT: Hinweis auf Verletzungsgefahr oder Beschädigung des Produkts bei unsachgemäßer Benutzung. Sicherheitshinweise • Um Stromschläge zu vermeiden, stellen Sie die interaktive Tafel nicht in einer feuchten oder dunstigen Umgebung auf.
Wichtige Hinweise Die interaktive Tafel darf nur mit den dafür vorgesehenen elektronischen • Stiften verwendet werden. Benutzen Sie keine Textmarker, Bleistifte oder sonstige Stifte. Falls nötig, reinigen Sie die Tafel mit Alkohol. • Vergewissern Sie sich, dass die Tafel korrekt am Rechner und an der Stromversorgung angeschlossen ist.
Seite 101
Vorsicht WEITERE HINWEISE FÜR DEN AUFBAU IN SCHULEN Die Warnhinweise und Vorsichtsmaßnahmen für den Gebrauch der Tafel und des Projektors müssen auch den Schülern mitgeteilt werden. Insbesondere wird auf Folgendes hingewiesen: • Nicht direkt in den Lichtstrahl schauen, der vom Projektor auf die Tafel geworfen wird.
Seite 102
Beabsichtigte Leerseite OLIBOARD – Interaktive Tafeln...
Seite 103
INHALT EINLEITUNG ....................1 Vorwort ........................ 1 Systemanforderungen ................... 2 Auspacken der Tafel und der Zubehörteile............. 3 Hauptmerkmale ....................6 Vorderansicht....................6 Funktionstasten auf der Tafel ................7 Technische Daten ..................... 8 Aufbau ......................... 9 Batterie in den elektronischen Stift einlegen ............10 SOFTWARE FÜR WINDOWS INSTALLIEREN............11 Schnellinstallation ....................
Seite 104
Beabsichtigte Leerseite VIII OLIBOARD - Interaktive Tafeln...
EINLEITUNG ORWORT Die interaktive Tafel ist eine Eingabe-/Ausgabeeinheit, die dank des Einsatzes fortschrittlicher und zuverlässiger Technologie und durch den Anschluss an einen PC und an einen Videoprojektor eine interaktive Umgebung für Schulunterricht und Demonstrationszwecke schafft. Eigenschaften • Die Oliboard-Tafel zeichnet sich durch ihre harte Oberfläche aus, die widerstandsfähig gegen Abnutzung und unsachgemäße Handhabung ist.
Bildschirmausgabe des Rechners (seine Auflösung) und das des Projektors identisch mit dem Format der Tafel sein. Daher wird für Tafeln vom Format 4/3 (Oliboard 78S und Oliboard 78D) empfohlen, eine Ausgangsauflösung einzustellen, die dem Format 4/3 entspricht (z.B. 1024x768 oder 800x600).
USPACKEN DER AFEL UND DER UBEHÖRTEILE Im Lieferumfang der interaktiven Tafel sind folgende Komponenten enthalten: • Interaktive Tafel (Die Farbe des Produktes kann variieren) • Zubehörteile OLIBOARD – Interaktive Tafeln...
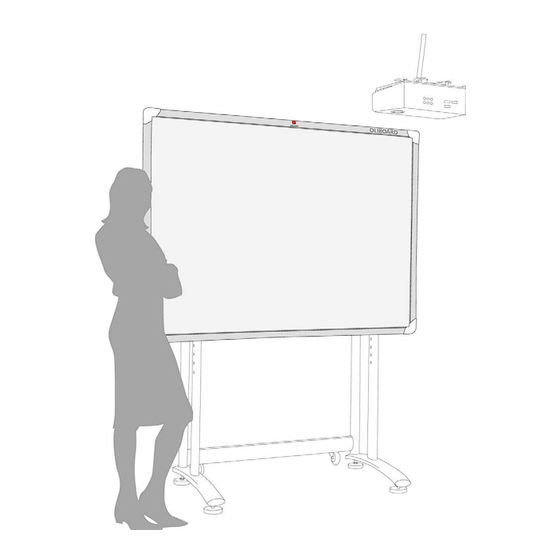
Standardmäßig werden folgende Zubehörteile mitgeliefert: Bezeichnung Menge Funktion Abbildung Spezialstifte für die interaktive Tafel. Jeder Stift Elektronischer Stift ist mit einer 1,5 V Batterie AAA (Mini-Ausführung) ausgestattet. Die Farben können variieren Kabel, um die Spezialkabel von 10 interaktive Tafel Meter Länge an einen Rechner anzuschließen Treiber und...
Seite 109
• Optionale Zubehörteile Alternativ zur Wandmontage kann die interaktive Tafel auf einem speziellen Ständer (lieferbar auf Bestellung) aufgestellt werden. Nachfolgend Modell B5848. Optionaler Tafelständer (Mod. B5848) Abmessungen des Ständers (ohne Tafel und Projektor) Modell B5848: Breite: 127 cm; Tiefe: 75 cm; Höhe: 246 cm (max.
AUPTMERKMALE Vorderansicht (Die Farbe kann je nach Modell variieren) Ref. Bezeichnung Schreibbereich Funktionstasten Stifthalterung Interface-Karte Schnittstelle für das Spezialkabel, das an den USB-Anschluss des Rechners anzuschließen ist (die Tafel wird im Regelfall über das selbe Kabel mit Strom versorgt) Stromversorgungsbuchse (wird im Regelfall nicht gebraucht) OLIBOARD - Interaktive Tafeln...
UNKTIONSTASTEN AUF DER AFEL Funktions- Steuerungs- Fenster- Notizen- Bezeichnung tasten modus modus modus Kalibrierung Kalibrierung Kalibrierung Kalibrierung (Einstellung) Schaltet in Schaltet in Steuerungsmodus Keine Auswirkung Steuerungs- Steuerungs- (ähnlich Maus) modus modus Schaltet in Schaltet in Keine Notizenmodus Notizen- Notizenmodus Auswirkung modus Fenstermodus Keine Auswirkung...
UFBAU Die Tafel darf nur von zugelassenem Fachpersonal unter Beachtung der in der Olivetti- Dokumentation angegebenen Anweisungen an die Wand oder auf dem Ständer montiert werden. Das Verbindungskabel der Tafel muss am USB-Anschluss des Rechners angeschlossen werden. Das VGA-Kabel (oder HDMI) des Videoprojektors muss am VGA-Anschluss (oder HDMI) des Rechners angeschlossen werden.
ATTERIE IN DEN ELEKTRONISCHEN TIFT EINLEGEN Die hintere Kappe des elektronischen Stifts abschrauben, indem Sie sie gegen den Uhrzeigersinn drehen. Legen Sie dann eine 1,5 V Batterie AAA (Mini-Ausführung) - wie in der Abbildung gezeigt – in den Stift ein und schrauben Sie die Kappe im Uhrzeigersinn wieder zu.
SOFTWARE FÜR WINDOWS INSTALLIEREN Die Oliboard-Software bietet zwei Installationsarten: Die "Schnellinstallation" und die "schrittweise Installation". Die Schnellinstallation beinhaltet folgende Schritte, die automatisch nacheinander ausgeführt werden: - Installation der Oliboard Software Treiber. - Installation der Oliboard-Anwendungssoftware. - Installation der Software-Treiber für das USB-Kabel. Bei der schrittweisen Installation kann die Software Schritt für Schritt installiert werden.
Wenn die Meldung "Installation abgeschlossen" erscheint, klicken Sie auf “Beenden” und dann bei der Rückkehr zum Hauptbildschirm auf “Beenden”. Befolgen Sie die Anweisungen im Abschnitt “Software starten”. CHRITTWEISE NSTALLATION Diese Installationsart sollte nur verwendet werden, um die mit der Tafel mitgelieferte Software zu aktualisieren.
Oliboard-Software installieren Klicken Sie auf Wählen Sie die Sprache aus, die installiert werden soll. Wählen Sie den Installationspfad. Die Software-Installation beginnt. Wenn die Installation abgeschlossen ist, erscheint eine Meldung; klicken Sie auf “Beenden”. Software-Treiber für USB-Kabel installieren Im Regelfall ist diese Installation nicht nötig, wenn die Schnellinstallation bereits ausgeführt wurde.
Sie dann die Software der Tafel. Treiber der interaktiven Tafel starten Klicken Sie auf “Start“ → “Alle Programme“ → “Olivetti“ → “Oliboard Software“ und starten Sie den Oliboard Treiber. In der Ecke, unten rechts, auf der Desktop-Statusleiste erscheint das Icon des Kommunikationsmoduls HINWEIS: Erscheint die Meldung “Kommunikation mit Tafel fehlgeschlagen”,...
HINWEIS: Nachdem der Treiber gestartet wurde, klicken Sie auf das Icon des Oliboard Treibers, um die “Autostart” Einstellung zu aktivieren oder zu deaktivieren, je nach dem, ob Sie möchten, dass der Oliboard Treiber nach dem Neustart des Rechners automatisch gestartet wird oder nicht. Bleibt der Rechner immer an der Tafel angeschlossen, sollte “Autostart”...
Seite 120
Klicken Sie mit der linken Maustaste auf “Neu Kalibrierung ”, um das Kalibrierungsfenster zu öffnen. Klicken Sie mit dem elektronischen Stift in die Mitte des blinkenden Kreuzes “+” auf der Tafel. Wiederholen Sie dann diese Bedienschritte für alle anderen Kalibrierungspunkte (insgesamt sind es sechs) und achten Sie darauf den elektronischen Stift genau in die Mitte des blinkenden Kreuzes zu setzen.
Anwendungssoftware der Tafel starten Klicken Sie auf “Start” → “Alle Programme” → “Olivetti” → “Oliboard Software” und starten Sie das Anwendungsprogramm. Es wird ein Zugangsfenster geöffnet, in dem der Benutzername und das Passwort einzutragen sind. Um die Software mit dem voreingestellten Benutzerkonto zu starten, klicken Sie einfach auf die Schaltfläche “Anmelden”, ohne Daten einzugeben;...
Persönliches Benutzerkonto und Passwort einrichten Klicken Sie auf “Start” → ”Alle Programme” → ”Olivetti” → “Oliboard Software” → “Benutzer Manager”, folgendes Fenster erscheint: Geben Sie die Daten für das Administrator-Konto ein für den Zugriff auf die Software. Voreingestellt ist als Administrator-Konto Administrator und als Passwort Oliboard.
Seite 123
Wählen Sie “Bearbeiten” → ”Neuer Benutzer”, um ein persönliches Benutzerkonto einzurichten. Geben Sie den Benutzernamen und das Passwort ein und wählen Sie “Erstellen”. Nach dem Einrichten wird der neue Benutzer im Fenster angezeigt: OLIBOARD – Interaktive Tafeln...
Oliboard-Funktionen einstellen Klicken Sie auf “Optionen” , um das nachfolgende Fenster zu öffnen. Für die Tafelmodelle Oliboard 78D und Oliboard 95D ist die Funktion “Zweitstift” wie wie folgt einzustellen: OLIBOARD - Interaktive Tafeln...
SOFTWARE FÜR LINUX-UBUNTU INSTALLIEREN NSTALLATION DER LIBOARD OFTWARE Beachten Sie, dass die Administrator-Berechtigung sowie, falls eingestellt, das gültige Passwort erforderlich sind, um die Installation der Software und der Treiber vorzunehmen. Im Installationsverzeichnis stehen zwei Installationsprozeduren für die Ubuntu- Software zur Verfügung - eine für Intel-Prozessoren (Ausführung i386 und abgeleitete Versionen) und die andere für AMD64 Prozessoren.
Seite 126
Die Installationsprozedur besteht aus folgenden Schritten (Bildschirmanweisungen befolgen): • Wählen Sie “Packet installieren”. • Geben Sie das Passwort ein (abhängig von den Berechtigungen des Benutzerkontos im Betriebssystem). • Der Installationsvorgang wird ausgeführt. Nach Abschluss erscheint eine entsprechende Meldung. Zweite Installationsart: •...
EINSTALLATION DER OFTWARE Vor der Deinstallation der Software müssen die Software-Treiber deaktiviert (dafür den Befehl “Beenden” verwenden, der durch Klicken auf das Treiber-Icon in der Steuerungsleiste aktiviert wird) und die Applikation beendet werden, falls sie noch läuft. Oliboard für Linux kann auf zwei Arten vom Rechner entfernt werden. Sie können die Bildschirmanweisungen befolgen oder die Befehlszeile verwenden.
Seite 128
OFTWARE STARTEN Das Kabel der Tafel muss am USB-Anschluss des Rechners angeschlossen sein. Vor dem Aufrufen der Software muss zuerst der Software-Treiber der Tafel gestartet und, wenn erforderlich, die Kalibrierung ausgeführt werden, dann kann die Software der Tafel gestartet werden. Oliboard Treiber starten Klicken Sie auf “Anwendungen“...
Kalibrierung der interaktiven Tafel Mit dieser Funktion kann das Bild, das auf die Tafel projiziert wird, ausgerichtet werden. Klicken Sie auf das Treiber-Icon im Bedienfeld, oben auf dem Desktop, wählen Sie im Aufklappmenü “Neu Kalibrierung ” und wählen Sie dann die gewünschte Kalibrierung (siehe Anweisungshinweis am Ende dieses Abschnitts).
Klicken Sie mit der linken Maustaste auf “Neu Kalibrierung ”, um das Kalibrierungsfenster zu öffnen. Klicken Sie mit dem elektronischen Stift in die Mitte des blinkenden Kreuzes “+” auf der Tafel. Wiederholen Sie dann diese Bedienschritte für die anderen Kalibrierungspunkte (insgesamt sind es sechs) und achten Sie darauf den elektronischen Stift genau in die Mitte des blinkenden Kreuzes zu setzen.
Seite 131
Anwendungssoftware der Tafel starten Klicken Sie auf “Anwendungen“ → “Oliboard“ → “Oliboard“, um die Anwendung zu starten. Es erscheint ein Zugangsfenster, in dem der Benutzername und das Passwort eingegeben werden können. Um die Software mit dem voreingestellten Benutzerkonto zu starten, klicken Sie einfach auf die Schaltfläche “Anmelden”, ohne Daten einzugeben;...
SOFTWARE FÜR MAC INSTALLIEREN Beachten Sie, dass die Administrator-Berechtigung sowie, falls eingestellt, das gültige Passwort erforderlich sind, um die Installation der Software und der Treiber vorzunehmen. NSTALLATION DER LIBOARD SOFTWARE 1. Legen Sie die CD mit der Oliboard-Software für MAC ein. Das USB-Kabel der Tafel noch nicht anschließen.
3. Klicken Sie auf “Weiter” und befolgen Sie die Bildschirmanweisungen, bis die Installation abgeschlossen ist. An dieser Stelle muss der Software-Treiber des USB-Kabels installiert werden. USB-K OFTWARE REIBER DES ABELS INSTALLIEREN Kehren Sie zum Hauptinstallationsfenster zurück und klicken Sie darauf, um ins Verzeichnis “USB_Cable_Driver”...
Seite 134
Um die Installation zu starten, klicken Sie zweimal auf den zu installierenden Treiber. OLIBOARD - Interaktive Tafeln...
Seite 135
Befolgen Sie dann die Bildschirmanweisungen. OLIBOARD – Interaktive Tafeln...
OFTWARE DEINSTALLIEREN Wählen Sie die Oliboard-Software unter “Anwendungen”, klicken Sie dann auf “Deinstallieren”, um den Deinstallationsvorgang der Software zu starten und bestätigen Sie die Deinstallation. 1. Klicken Sie auf “JA“, um die Deinstallation der Software zu starten. OFTWARE STARTEN Bevor die Software aufgerufen wird, muss zuerst der Software-Treiber der Tafel gestartet werden und dann, wenn nötig, die Kalibrierung vorgenommen werden, danach die Software der Tafel starten.
Kalibrierung der interaktiven Tafel Mit dieser Funktion kann das Bild, das auf die Tafel projiziert wird, ausgerichtet werden. Klicken Sie auf das Treiber-Icon, wählen Sie im Aufklappmenü “Kalibrierung” und wählen Sie dann die gewünschte Kalibrierung (siehe Anweisungshinweis am Ende dieses Abschnitts). HINWEIS: Der Kalibrierungsvorgang kann auch mit der dafür vorgesehenen Taste im oberen Bereich des Funktionsfeldes auf der Tafel aktiviert werden.
Seite 138
Klicken Sie mit der linken Maustaste auf “Neu Kalibrierung ”, um das Kalibrierungsfenster zu öffnen. Klicken Sie mit dem elektronischen Stift in die Mitte des blinkenden Kreuzes “+” auf der Tafel. Wiederholen Sie dann diese Bedienschritte für die anderen Kalibrierungspunkte (insgesamt sind es sechs) und achten Sie darauf den elektronischen Stift genau in die Mitte des blinkenden Kreuzes zu setzen.
Anwendungssoftware der Tafel starten 1. Klicken Sie auf “System“ → “Anwendungen“ → “Oliboard Software“ → “Software“ → “Oliboard“, um die Anwendung zu starten. 2. Es erscheint ein Zugangsfenster, in dem der Benutzername und das Passwort eingegeben werden können. Um die Software mit dem voreingestellten Benutzerkonto zu starten, klicken Sie einfach auf die Schaltfläche “Anmelden”, ohne Daten einzugeben;...
SOFTWARE REGISTRIEREN Beim ersten Starten der Oliboard-Software auf einem nicht an der Tafel angeschlossenen Rechner, werden Sie aufgefordert die Software zu registrieren. Die Registrierung kann sofort oder später erfolgen. Wenn die Anzahl der ohne Registrierung zulässigen Aufrufe erreicht ist, muss die Software deinstalliert werden.
PROBLEMBEHEBUNG Erscheint die Meldung “OLIBOARD-Verbindung fehlgeschlagen, das Programm kann nicht fortgesetzt werden!”, prüfen Sie die Steckverbindungen zwischen Tafel und Rechner. • Prüfen Sie, ob das Spezialkabel für den Anschluss der Tafel benutzt wurde und, ob das Kabel korrekt angeschlossen ist. •...
Seite 142
6. Wie wird die Oliboard-Software beendet? • Klicken Sie im “Steuerungsmodus“ auf das runde Bedienfeld und klicken Sie dann im Aufklappmenü auf “Beenden“. • Alternativ dazu klicken Sie auf “Datei“ (im Hauptmenü), dann auf “Beenden“ oder klicken Sie in der Hilfsmittelleiste auf das Oliboard-Icon und klicken Sie dann bei entsprechender Aufforderung auf “Beenden“.
Seite 143
Was kann man tun, wenn mit einem nicht löschbaren Farbstift auf die Tafel geschrieben wurde? Verwenden Sie niemals Farbstifte, um auf die Tafel zu schreiben! Sollte dies jedoch passiert sein, reinigen Sie die Tafel vorsichtig mit in Alkohol getränkter Watte. 10.
Seite 144
Beabsichtigte Leerseite OLIBOARD - Interaktive Tafeln...
Seite 146
Il contenuto di questo manuale può essere modificato senza preavviso. Ogni cura è stata posta nella creazione, realizzazione, verifica e documentazione del software abbinato alla lavagna Oliboard e della documentazione contenuta in questo manuale; tuttavia Olivetti S.p.A. non può assumersi alcuna responsabilità, di qualsiasi natura, derivante dall’utilizzo del software e della documentazione. Lo stesso dicasi per ogni persona o società...
Seite 147
ISTRUZIONE: fornisce un'istruzione aggiuntiva relativa al software. NOTA: descrive eventuali problemi che possono insorgere durante l'uso della lavagna e i rimedi per risolverli e prevenirli. ATTENZIONE: richiama l'attenzione sul pericolo di subire lesioni fisiche o di arrecare danni al prodotto in caso di uso improprio. Avvertenza •...
Seite 148
Note importanti • La lavagna interattiva deve essere utilizzata esclusivamente con le apposite penne elettroniche. Non usare evidenziatori, matite o altri tipi di penne. Se necessario, pulire la lavagna con alcool. • Assicurarsi che la lavagna sia correttamente collegata al computer e alla rete elettrica.
Seite 149
Avvertenza ULTERIORI AVVERTENZE PER INSTALLAZIONI IN AMBIENTE SCOLASTICO E’ necessario che le avvertenze e le precauzioni di utilizzo della lavagna e del proiettore siano raccomandate anche agli studenti. In particolare si evidenziano le seguenti: • Non guardare direttamente il fascio di luce emesso dal proiettore sulla lavagna.
Seite 150
Pagina lasciata intenzionalmente bianca OLIBOARD - Lavagne interattive...
Seite 151
INDICE INTRODUZIONE ....................1 Premessa....................... 1 Requisiti di sistema ....................2 Disimballaggio e accessori ..................3 CARATTERISTICHE PRINCIPALI................6 Aspetto esteriore....................6 Tasti funzione presenti sulla lavagna ..............7 Dati tecnici ....................... 8 Installazione fisica ....................9 Installazione della batteria della penna elettronica ..........10 INSTALLAZIONE DEL SOFTWARE PER WINDOWS ..........11 Installazione rapida .....................
Seite 152
Pagina lasciata intenzionalmente bianca VIII OLIBOARD - Lavagne interattive...
INTRODUZIONE REMESSA La lavagna interattiva è un’apparecchiatura periferica di input che, grazie all'applicazione di tecnologie avanzate e affidabili, permette di disporre, in collegamento ad un PC e ad un video-proiettore, un ambiente interattivo ad uso didattico o dimostrativo. Caratteristiche • La lavagna Oliboard è...
1) Per una visione ottimale sulla lavagna, il formato dell’uscita video del computer (la risoluzione) e del proiettore devono essere nel medesimo formato della lavagna. Quindi per lavagne in formato 4/3 (Oliboard 78S e Oliboard 78D) si suggerisce di utilizzare una risoluzione di uscita corrispondente al formato 4/3 (es. 1024x768, o 800x600).
ISIMBALLAGGIO E ACCESSORI La dotazione della lavagna interattiva comprende normalmente i seguenti componenti: • Lavagna interattiva (Il colore del prodotto può variare) • Accessori OLIBOARD - Lavagne interattive...
Seite 156
Il corredo normale di accessori comprende: Descrizione Quantità Funzione Figura Penna speciale per lavagna interattiva, con una batteria AAA Penna elettronica (mini Stilo) da 1,5 V per ogni penna. I colori possono variare Cavo per la connessione tra Cavo speciale da computer e 10 metri lavagna...
Seite 157
• Accessori opzionali In alternativa all'installazione a parete è possibile installare la lavagna interattiva su uno speciale piedistallo ordinabile a richiesta. Di seguito il modello B5848. Piedistallo opzionale (mod. B5848) Dimensioni piedistallo (senza lavagna e proiettore) modello B5848: larghezza: 127 cm; prof. 75 cm; altezza: 246 cm (max altezza del supporto proiettore montato).
CARATTERISTICHE PRINCIPALI Aspetto esteriore (Il colore può variare in funzione del modello) Rif. Descrizione Area di scrittura Tasti funzione Portapenne Scheda interfaccia Interfaccia per il cavo speciale da collegare alla porta USB del computer (la lavagna è di norma alimentata attraverso lo stesso cavo) Connettore di alimentazione (di norma non usato) OLIBOARD - Lavagne interattive...
ASTI FUNZIONE PRESENTI SULLA LAVAGNA Tasti Modalità Modalità Modalità Definizione funzione comando finestra annotazione Orientamento Orientamento Orientam. Orientam. (taratura) Passa alla Passa alla Modalità comando Nessun effetto modalità modalità (simile mouse) comando comando Passa alla Modalità Passa alla modalità Nessun modalità...
NSTALLAZIONE FISICA L'installazione a parete o su piedistallo deve essere eseguita da personale autorizzato nel rispetto di quanto prescritto dalla documentazione Olivetti. Il cavo di collegamento della lavagna deve essere connesso alla porta USB del computer. Il cavo VGA (o HDMI) del video-proiettore deve essere connesso alla porta VGA (o HDMI) del computer.
NSTALLAZIONE DELLA BATTERIA DELLA PENNA ELETTRONICA Aprire il cappuccio posteriore della penna elettronica ruotandolo in senso antiorario, inserire una batteria AAA (mini Stilo) da 1,5 V come illustrato in figura e avvitare di nuovo il cappuccio posteriore agendo in senso orario. Il colore esterno della penna può...
INSTALLAZIONE DEL SOFTWARE PER WINDOWS Il software Oliboard prevede due tipi di installazione: "installazione rapida" e "installazione passo-passo". L'installazione rapida comprende le seguenti fasi eseguite automaticamente in sequenza: - Installazione del driver software Oliboard. - Installazione del software applicativo Oliboard. - Installazione del driver software per il cavo USB.
Alla visualizzazione del messaggio di installazione completata, fare clic su “Finish” e, al ritorno alla maschera principale, fare clic su “Exit”. Seguire le istruzioni riportate al paragrafo “Esecuzione del software”. NSTALLAZIONE PASSO PASSO Questo tipo di installazione è consigliato soltanto per aggiornare il software in dotazione alla lavagna.
Installazione del software Oliboard Fare clic su Selezionare la lingua che si desidera installare. Selezionare il percorso di installazione. L'installazione del software avrà inizio. Alla visualizzazione del messaggio di completamento dell’installazione, fare click su “Finish”. Installazione del driver software del cavo USB Normalmente non è...
Avvio del driver della lavagna interattiva Fare clic su “Start“ → “Tutti i programmi“ → “Olivetti“ → “Oliboard Software “ e avviare Oliboard Driver. Nell'angolo inferiore destro della barra di stato del desktop comparirà l'icona del modulo di comunicazione NOTA: se compare il messaggio “Comunicazione con la lavagna fallita”,...
NOTA: dopo aver avviato l’esecuzione del driver, cliccare sull’icona di Oliboard driver per attivare o disattivare il parametro di “autostart” in funzione che si voglia o meno lanciare in automatico l’esecuzione di Oliboard driver alla successiva riaccensione del computer. Se il computer è sempre connesso alla lavagna è...
Seite 168
Facendo clic con il pulsante sinistro del mouse su “Ri-orientamento” si aprirà la finestra a comparsa Orientamento. Fare clic con la penna elettronica al centro della croce lampeggiante “+” sulla lavagna. Successivamente ripetere l’operazione per gli altri punti di orientamento (in totale sono sei), avendo cura di centrare bene con la penna elettronica il centro della croce lampeggiante.
Avvio del software applicativo della lavagna Fare clic su “Start” → “Tutti i programmi” → “Olivetti” → “Oliboard Software” e avviare il programma applicativo. Si aprirà una finestra di accesso nella quale potranno essere digitati il nome utente e la password.
Creazione di un account e di una password personali Fare clic su “Start” → ”Tutti i programmi” → ”Olivetti” → “Oliboard Software” → “User Manager” apparirà la finestra seguente: Digitare i dati dell’account amministratore per accedere al software. L’account amministratore predefinito è: Administrator, Password: oliboard.
Seite 171
Selezionare “Modifica” → ”Nuovo utente” per creare un account personale. Digitare il nome utente e la password e selezionare “Crea”. Al termine del processo, nella finestra comparirà il nuovo utente: OLIBOARD - Lavagne interattive...
Impostazione delle funzioni Oliboard Fare clic su “Opzioni” per aprire la finestra sotto raffigurata. Per i modelli di lavagna Oliboard 78D e Oliboard 95D, impostare la funzione “penna doppia” come sotto indicato. OLIBOARD - Lavagne interattive...
INSTALLAZIONE DEL SW PER LINUX-UBUNTU NSTALLAZIONE Si evidenzia che sono necessari i privilegi da amministratore e l'eventuale password per portare a compimento l'installazione, sia del software che dei driver. Nella cartella di installazione, sono disponibili, per la distribuzione Ubuntu, due procedure di installazione: quella per processori Intel (architettura i386 e derivate) e quella per processori AMD64.
Seite 174
La procedura di installazione prevede i passi seguenti (eseguire le istruzioni a video): • Selezionare “Installa pacchetto”. • Digitare la password (in funzione dei diritti dell’account utente nel sistema operativo). • Esecuzione della procedura di installazione; al suo completamento viene visualizzato un apposito messaggio.
ISINSTALLAZIONE DEL SOFTWARE Prima di disinstallare il sw occorre disattivare il driver sw (tramite il comando “Exit” attivabile cliccando sull’icona del driver nella barra di comando) e uscire dall’applicazione se è ancora in corso di esecuzione. Oliboard per Linux può essere rimosso dal computer in due modi. Uno consiste nel seguire le istruzioni visualizzate sullo schermo, l’altro nell’utilizzare la riga di comando.
SECUZIONE DEL SOFTWARE Il cavo della lavagna deve essere collegato alla porta USB del computer. Per l’esecuzione del software, si deve innanzitutto avviare il driver software della lavagna, eseguire, se necessario, la funzione di orientamento e quindi avviare il software della lavagna. Avvio del Oliboard Driver Fare clic su “Applicazioni“...
Orientamento della lavagna interattiva Questa funzione serve a tarare la lavagna rispetto all’immagine proiettata su di essa. Fare clic sull'icona del driver sul pannello in alto del desktop, selezionare “Ri- orientamento” nel menu a comparsa e quindi selezionare la modalità di orientamento desiderata (vedere nota ISTRUZIONE in fondo a questo paragrafo).
Seite 178
Facendo clic con il pulsante sinistro del mouse su “Ri-orientamento” si aprirà la finestra a comparsa Orientamento. Fare clic con la penna elettronica al centro della croce lampeggiante “+” sulla lavagna. Successivamente ripetere l’operazione per gli altri punti di orientamento (in totale sono sei), avendo cura di centrare bene con la penna elettronica il centro della croce lampeggiante.
Avvio del software applicativo della lavagna Fare clic su “Applicazioni“ → “Oliboard“ → “Oliboard“ per avviare l’applicazione. Si aprirà una finestra di accesso nella quale potranno essere digitati il nome utente e la password. Per avviare il software utilizzando l’account predefinito, basta fare clic sul pulsante di login “Accedi”...
INSTALLAZIONE DEL SOFTWARE PER MAC Si evidenzia che sono necessari i privilegi da amministratore e l'eventuale password per portare a compimento l'installazione sia del software che dei driver. NSTALLAZIONE DEL SOFTWARE LIBOARD 1. Inserire il disco con il software Oliboard per MAC (non collegare il cavo USB della lavagna al computer).
3. Fare clic su “Continua”, quindi attenersi alle istruzioni visualizzate fino al completamento dell'installazione. A questo punto bisogna installare il driver software del cavo USB. NSTALLAZIONE DEL RIVER SOFTWARE DEL CAVO Tornare alla videata iniziale e fare click per entrare nella cartella “USB_Cable_Driver”; quindi entrare nella cartella FTDI Driver, che contiene due driver di installazione alternativi: - FTDIUSBSerialDriver_10_3.dmg (per sistemi operativi MAC 10.3)
Seite 182
Per eseguire l’installazione, fare Click due volte sul driver da installare. OLIBOARD - Lavagne interattive...
Seite 183
Quindi seguire le istruzioni a video. OLIBOARD - Lavagne interattive...
ISINSTALLAZIONE DEL SOFTWARE Selezionare il software Oliboard in “Applicazioni”, quindi fare clic su “Disinstalla” per avviare la procedura di disinstallazione del software, quindi confermare la disinstallazione. Fare clic su “SI“ per avviare la disinstallazione del software. SECUZIONE DEL SOFTWARE Per l’esecuzione del software, si deve innanzitutto avviare il driver software della lavagna, eseguire,se necessario, la funzione di orientamento e quindi avviare il software della lavagna.
Orientamento della lavagna interattiva Questa funzione serve a tarare la lavagna rispetto all’immagine proiettata su di essa. Fare clic sull’icona del driver, selezionare “Orientamento” dal menu a comparsa e quindi selezionare la modalità di orientamento desiderata (vedere nota ISTRUZIONE in fondo a questo paragrafo). NOTA: la funzione di orientamento può...
Seite 186
Facendo clic con il pulsante sinistro del mouse su “Ri-orientamento” si aprirà la finestra a comparsa di Orientamento seguente. Fare clic con la penna elettronica al centro della croce lampeggiante “+” sulla lavagna. Successivamente ripetere l’operazione per gli altri punti di orientamento (in totale sono sei), avendo cura di centrare bene con la penna elettronica il centro della croce lampeggiante.
Avvio del software applicativo della lavagna 1. Fare clic su “Sistema“ → “Applicazioni“ → “Oliboard Software“ → “Software“ → “Oliboard“ per avviare l'applicazione. 2. Si aprirà una finestra di accesso nella quale potranno essere digitati il nome utente e la password. Per avviare il software utilizzando l’account predefinito, basta fare clic sul pulsante di login “Accedi”...
REGISTRAZIONE DEL SOFTWARE La prima volta che il software Oliboard viene eseguito su un computer non collegato ad una lavagna, viene richiesta una registrazione del software. E’ possibile eseguire subito la registrazione, oppure la si può eseguire in tempi successivi. Quando si è...
RICERCA GUASTI Se viene visualizzato il messaggio “Verifica lavagna fallita, il programma non può proseguire!”, controllare la connessione tra la lavagna e il computer. • Verificare che sia stato utilizzato il cavo speciale di collegamento della lavagna e che tale cavo sia stato collegato correttamente. •...
Seite 190
6. Come uscire dal software Oliboard? • Fare clic sulla Tavolozza operativa in “Modalità comando“ , e fare quindi clic su “Esci“ nel menu a comparsa. • In alternativa, fare clic su “File“ (nel menu principale) “Esci“, ppure fare clic sull'icona Oliboard nella "Barra strumenti principale"...
Seite 191
10. Come si pulisce il pannello della lavagna? Pulire il pannello strofinandolo delicatamente con uno straccio inumidito. ATTENZIONE: dopo averlo bagnato, strizzare lo straccio per rimuovere l’acqua in eccesso. In tal modo si eviteranno infiltrazioni d’acqua all’interno della lavagna. 11. Perché non è possibile utilizzare la funzionalità di rete? •...
Seite 192
Pagina lasciata intenzionalmente bianca OLIBOARD - Lavagne interattive...
Seite 194
Oliboard y de la documentación escrita en este manual; no obstante Olivetti S.p.A. rechaza cualquier responsabilidad de cualquier tipo por cualesquiera daños resultantes del uso del software y del manual. Lo mismo se aplica a cualquier persona o compañía implicada en la creación, realización, producción y verificación del...
Seite 195
INSTRUCCIONES: ofrece instrucciones adicionales acerca del software. NOTA: describe problemas que podrían producirse durante el uso de la pizarra y cómo evitarlos y resolverlos. ADVERTENCIA: llama la atención acerca del peligro de lesiones o daños en el producto si se utiliza incorrectamente. Advertencia Con el fin de evitar descargas eléctricas, no instale la pizarra interactiva en •...
Seite 196
Notas importantes La pizarra interactiva sólo debe utilizarse con los lápices electrónicos • especiales. No utilice rotuladores, bolígrafos ni ningún otro tipo de lápiz. Si es necesario, limpie la pizarra usando alcohol. Asegúrese de que la pizarra esté conectada correctamente al ordenador y a •...
Seite 197
Advertencia ADVERTENCIAS ADICIONALES PARA INSTALACIONES EN CENTROS EDUCATIVOS Las advertencias y precauciones relativas al uso de la pizarra y el proyector deben darse a conocer también a los alumnos. En concreto debe ponerse énfasis en las siguientes: No mire directamente al haz de luz que emite el proyector hacia la pizarra. •...
Seite 198
Esta página se ha dejado en blanco intencionadamente OLIBOARD – Pizarra interactiva...
Seite 199
ÍNDICE INTRODUCCIÓN .....................1 Descripción general....................1 Requisitos del sistema.................... 2 Desembalaje de la Pizarra interactiva y los accesorios ..........3 Características principales..................6 Vista exterior ....................6 Teclas de función de la pizarra................7 Especificaciones técnicas................... 8 Instalación del hardware..................9 Instalación de la pila del lápiz electrónico.............
Seite 200
Esta página se ha dejado en blanco intencionadamente VIII OLIBOARD - Pizarras interactivas...
INTRODUCCIÓN ESCRIPCIÓN GENERAL La Pizarra interactiva es un dispositivo de entrada periférico que, gracias a la aplicación de tecnologías estables y avanzadas, permite crear un entorno interactivo que, al conectar un ordenador y un proyector de vídeo, se puede utilizar para la enseñanza y para realizar demostraciones.
(su resolución) y del proyector debe ser el mismo que el de la pizarra. Por tanto, para las pizarras en formato 4/3 (Oliboard 78S y Oliboard 78D) se recomienda utilizar una resolución de salida correspondiente al formato 4/3 (p. ej., 1024x768 ó...
ESEMBALAJE DE LA IZARRA INTERACTIVA Y LOS ACCESORIOS El kit estándar de la Pizarra interactiva contiene los siguientes componentes: • Pizarra interactiva (el color del producto puede variar) • Accesorios OLIBOARD - Pizarras interactivas...
Seite 204
Los accesorios estándar suministrados son: Cantida Descripción Función Imagen Lápiz especial para la Pizarra interactiva. Cada Lápiz electrónico lápiz tiene una pila de 1,5V AAA (estilo mini). Los colores pueden variar Cable para Cable especial de conectar el 10 metros ordenador a la Pizarra interactiva Controladores y...
Seite 205
• Accesorios opcionales En lugar de la instalación en la pared, también puede elegir instalar la Pizarra interactiva en un soporte especial de suelo, disponible bajo pedido. A continuación, se muestra el modelo B5848. Soporte especial de suelo (mod. B5848) Dimensiones del soporte de suelo (sin pizarra ni proyector), modelo B5848: anchura: 127 cm;...
ARACTERÍSTICAS PRINCIPALES Vista exterior (El color varía según el modelo). Ref. Descripción Área de escritura Teclas de función Soporte para lápiz Panel de interfaz Interfaz para el cable especial para conectar al puerto USB del ordenador (la pizarra normalmente recibe la alimentación eléctrica a través de este mismo cable).
ECLAS DE FUNCIÓN DE LA PIZARRA Teclas de Modo de Modo de Definición Modo de control función ventana anotación Orientación Orientación Orientación Orientación (ajuste) Cambiar al Cambiar al Modo de control Sin efecto Modo de Modo de (como con el ratón) control control Cambiar al...
Especificaciones técnicas Plataforma de hardware Dispositivo periférico para ordenador o portátil. Oliboard 78S: 17 m/s (669 pulgadas/s) Velocidad de seguimiento Oliboard 78D, Oliboard 95D: 8 m/s (314 pulgadas/s) Precisión +/- 0,05 mm Principio de funcionamiento Inducción electromagnética Modo de control...
La instalación en la pared o en un soporte debe ser realizada por personal autorizado de acuerdo con los requisitos establecidos en la documentación de Olivetti. El cable para conectar la pizarra debe conectarse al puerto USB del ordenador. El cable VGA (o HDMI) del proyector de vídeo debe conectarse al puerto VGA (o HDMI)
NSTALACIÓN DE LA PILA DEL LÁPIZ ELECTRÓNICO Desenrosque el capuchón posterior del lápiz electrónico girándolo en el sentido contrario a las agujas del reloj. Introduzca una pila de 1,5 V AAA (estilo mini) como se muestra en la siguiente figura. A continuación, vuelva a enroscar el capuchón posterior girándolo en el sentido de las agujas del reloj.
INSTALACIÓN DEL SOFTWARE EN WINDOWS El software Oliboard ofrece dos tipos de instalación: "Instalación exprés" e "Instalación paso a paso". La Instalación exprés incluye las siguientes fases, que se realizan por orden automáticamente: Instalación del controlador del software Oliboard Instalación del software de la aplicación Oliboard. Instalación del controlador de software para el cable USB.
Cuando aparezca el mensaje de instalación completa, haga clic en "Finalizar" y, a continuación, haga clic en "Salir" para volver a la pantalla principal. Siga las instrucciones del apartado "Ejecución del software". NSTALACIÓN PASO A PASO Este tipo de instalación sólo se recomienda al actualizar el software suministrado con la pizarra.
Instalación del software Oliboard Haga clic en Seleccione el idioma que desee instalar. Seleccione la ruta de instalación. Se inicia la instalación del software. Una vez completada la instalación, aparece un mensaje; haga clic en "Finalizar". Instalación del controlador de software para el cable USB Normalmente, no es necesario ejecutar este proceso si ya se ha realizado la "Instalación exprés".
Inicio del controlador de la Pizarra interactiva Haga clic en "Inicio" → "Todos los programas" → "Olivetti" → "Oliboard Software" e inicie el controlador de Oliboard. El icono del módulo Comunicaciones aparece en la esquina inferior derecha de la barra de estado del escritorio.
NOTA: después de iniciar el controlador, haga clic en el icono del controlador de Oliboard para activar o desactivar el parámetro "inicio automático", en función de si desea o no ejecutar automáticamente el controlador de Oliboard la próxima vez que encienda el ordenador. Si el ordenador está conectado a la pizarra de forma permanente, es aconsejable activar "inicio automático".
Seite 216
Con el botón izquierdo del ratón, haga clic en "Reorientación" para abrir la ventana emergente de Orientación. Con el lápiz electrónico, haga clic en el centro del cursor intermitente "+" de la pizarra. Repita esta misma operación para el resto de puntos de orientación (seis en total), con cuidado de centrar bien el cursor intermitente con el lápiz electrónico.
Inicio del software de la aplicación Oliboard Haga clic en "Inicio" → "Todos los programas" → "Olivetti" → "Oliboard Software" e inicie el programa de la aplicación. Se abre una ventana de Inicio de sesión en la que puede introducir su nombre de usuario y contraseña.
Creación de una cuenta personal y una contraseña Haga clic en "Inicio" → "Todos los programas" → "Olivetti" → "Oliboard Software" → "Administrador de usuarios" para que aparezca la siguiente ventana: Introduzca los datos de la cuenta del administrador para acceder al software. La cuenta de administrador predeterminada es Administrador y la contraseña,...
Seite 219
Seleccione "Editar" → "Nuevo usuario" para crear una cuenta personal. Introduzca un nombre de usuario y contraseña y seleccione "Crear". Cuando se haya completado el proceso, el nuevo usuario aparece en la ventana: OLIBOARD - Pizarras interactivas...
Configuración de las funciones de Oliboard Haga clic en "Opciones" para abrir la ventana que se muestra a continuación. Para los modelos de pizarra Oliboard 78D y Oliboard 95D, configure la función "Lápiz doble" como se muestra a continuación. OLIBOARD - Pizarras interactivas...
INSTALACIÓN DEL SOFTWARE EN LINUX-UBUNTU NSTALACIÓN DEL SOFTWARE LIBOARD Recuerde que debe tener acceso de Administrador y su contraseña asociada, si se ha establecido, para poder instalar el software y los controladores. En la carpeta de instalación, existen dos procedimientos de instalación para la distribución de software Ubuntu: una para los procesadores Intel (arquitectura i386 y demás derivaciones) y otra para los procesadores AMD64.
Seite 222
El proceso de instalación consta de los siguientes pasos (siga las instrucciones de la pantalla): • Haga clic en "Instalar paquete". • Introduzca la contraseña (según los permisos que tenga la cuenta de usuario en el sistema operativo). • Se realiza el proceso de instalación. Al final, aparece un mensaje indicando que la instalación se ha completado.
ESINSTALACIÓN DEL SOFTWARE Antes de desinstalar el software, desactive el controlador de software (mediante el comando "Salir", que se puede activar haciendo clic en el icono del controlador de la barra de control) y salga de la aplicación si todavía se encuentra en ejecución. El software Oliboard para Linux se puede desinstalar de su ordenador de dos formas distintas.
JECUCIÓN DEL SOFTWARE El cable de la pizarra debe conectarse al puerto USB del ordenador. Para ejecutar el software, en primer lugar debe iniciar el controlador del software de la pizarra y realizar la operación de orientación si es necesario. A continuación, puede iniciar el software de la pizarra.
Orientación de la Pizarra interactiva Esta función se utiliza para ajustar la pizarra en relación a la imagen que se va a proyectar en ella. Haga clic en el icono del controlador del panel situado en la parte superior del escritorio y seleccione "Reorientación"...
Seite 226
Si hace clic con el botón izquierdo del ratón en "Reorientación", aparece una ventana emergente. Con el lápiz electrónico, haga clic en el centro del cursor intermitente "+" de la pizarra. Repita esta misma operación para el resto de puntos de orientación (seis en total), con cuidado de centrar de forma precisa el cursor intermitente con el lápiz electrónico.
Ejecución de la aplicación de software Oliboard Haga clic en "Aplicaciones" → "Oliboard" → "Oliboard" para iniciar la aplicación. Aparece una ventana de inicio de sesión en la que puede introducir un nombre de usuario y contraseña. Para iniciar el software mediante la cuenta predeterminada, simplemente haga clic en el botón "Inicio de sesión"...
INSTALACIÓN DEL SOFTWARE EN MAC Recuerde que los derechos de acceso de Administrador y su contraseña correspondiente, si cuenta con una, son necesarios para la instalación tanto del software como de los controladores. NSTALACIÓN DEL SOFTWARE LIBOARD 1. Introduzca el disco Oliboard Software. No conecte el cable USB de la pizarra. 2.
3. Haga clic en "Continuar" y siga las instrucciones mostradas hasta completar la instalación. En este punto, debe instalar el controlador del software para el cable USB. NSTALACIÓN DEL CONTROLADOR DE SOFTWARE PARA EL CABLE Vuelva a la pantalla principal de instalación, haga clic en "USB_Cable_Driver" y, a continuación, en el controlador de FTDI para entrar en la carpeta que contiene los dos controladores de instalación: FTDIUSBSerialDriver_10_3.dmg (para MAC OS 10.3)
Seite 230
En este punto, debe hacer doble clic en el controlador para iniciar la instalación. OLIBOARD - Pizarras interactivas...
Seite 231
A continuación, siga las instrucciones que se muestran en el vídeo. OLIBOARD - Pizarras interactivas...
ESINSTALACIÓN DEL SOFTWARE Seleccione el software Oliboard en "Aplicaciones" y haga clic en "Desinstalar" para iniciar el procedimiento de desinstalación del software y confirmar la desinstalación del software. Haga clic en "SÍ" para iniciar la desinstalación del software. JECUCIÓN DEL SOFTWARE Para ejecutar el software, primero debe iniciar el controlador del software de la pizarra y realizar la operación de orientación si es necesario, antes de iniciar el software de la pizarra.
Orientación de la Pizarra interactiva Esta función calibra la pizarra en relación a la imagen proyectada en ella. Haga clic en el icono del controlador, seleccione "Orientación" en el menú emergente y, a continuación, seleccione el modo de orientación que desee (consulte la nota de INSTRUCCIÓN al final de este apartado).
Seite 234
Con el botón izquierdo del ratón, haga clic en "Reorientación" para abrir la ventana emergente de Orientación que se muestra a continuación. Con el lápiz electrónico, haga clic en el centro del cursor intermitente "+" de la pizarra. Repita la misma operación para el resto de puntos de orientación (seis en total), con cuidado de centrar de forma precisa el cursor intermitente con el lápiz electrónico.
Ejecución de la aplicación de software Oliboard 1. Haga clic en "Sistema" → "Aplicaciones" → "Oliboard Software" → "Software" → "Oliboard" para iniciar la aplicación. 2. Aparece una ventana de inicio de sesión en la que puede introducir un nombre de usuario y contraseña.
REGISTRO DEL SOFTWARE La primera vez que se ejecute el software Oliboard en un ordenador no conectado a la pizarra, se le pide que registre el software. Es posible ejecutar este procedimiento inmediatamente o posponer el registro. Cuando finalice el número de ejecuciones sin registro, es necesario desinstalar el software.
RESOLUCIÓN DE PROBLEMAS Si aparece este mensaje: "Imposible verificar la pizarra. ¡El programa no se puede ejecutar!", compruebe si la conexión entre la pizarra y el ordenador es correcta. • Asegúrese de que se haya utilizado el cable de conexión especial de la pizarra y que el cable esté...
Seite 238
6. ¿Cómo salir del software de Oliboard? • Haga clic en la placa circular de manejo en el "Modo de control" y , a continuación en "Salir" en el menú emergente. • Haga clic en "Archivo" (en el menú principal) y a continuación en "Salir", o bien, haga clic en el icono de Oliboard en la "Barra de herramientas principal"...
Seite 239
10. ¿Cómo limpiar el panel de la pizarra? Limpie el panel pasando suavemente un paño húmedo. ADVERTENCIA: después de humedecer el paño, debe escurrirlo para eliminar cualquier exceso de agua. De esta forma se evita que el agua penetre en la pizarra. 11.
Seite 240
Esta página se ha dejado en blanco intencionadamente OLIBOARD - Pizarras interactivas...
Seite 241
- Au terme de sa durée de vie, l'équipement doit être remis à un centre de collecte approprié, et doit être traité séparément des déchets municipaux non triés ; - Olivetti garantit l'activation des procédures de traitement, de collecte, de recyclage et de mise au rebut de l'équipement, conformément à la Directive 2002/96/CE (et modifications successives).
Seite 242
- L’apparecchiatura, quando sarà giunta a fine vita, deve essere portata in centri di raccolta attrezzati e deve essere trattata separatamente dai rifiuti urbani; - Olivetti garantisce l’attivazione delle procedure in materia di trattamento, raccolta, riciclaggio e smaltimento della apparecchiatura in conformità alla Direttiva 2002/96/CE (e succ.mod.).
Seite 243
- Olivetti garantiza la activación de los procedimientos en materia de tratamiento, recogida, reciclaje y eliminación de los equipos, de conformidad con la Directiva 2002/96/CE (y suces.
Seite 244
Det viste symbol, som findes på udstyret, betyder: - At, brugt udstyr skal afleveres på særlige opsamlingssteder og bortskaffes separat; - at, Olivetti garanterer at procedurerne for behandling, opsamling, genbrug og bortskaffelse af udstyret i henhold til EU-direktiv 2002/96/EF (og efterfølgende tilføjelser) efterleves.
Seite 245
DIRECTIVE 2006/66/CE ON BATTERIES AND ACCUMULATORS AND ON WASTE BATTERIES AND ACCUMULATORS INFORMATION Applicable in European Union countries and in other countries with recycling collection systems The symbol shown on batteries, on their packaging or on their documentation means that the batteries supplied with the product must not be disposed of as solid urban waste but must be collected separately.
Seite 246
RICHTLINIE 2006/66/CE FÜR ALTBATTERIEN UND AKKUS INFORMATIONEN Für alle Länder der Europäischen Union sowie die Länder, in denen die getrennte Hausmüllsammlung erfolgt Dieses Symbol, das auf den Batterien bzw. Akkus, auf deren Verpackung oder in deren Unterlagen erscheint, bedeutet, dass die mitgelieferten Batterien oder Akkus nicht gemeinsam mit den Siedlungsabfällen entsorgt werden dürfen sondern getrennt gesammelt, d.h.
Seite 247
DIRECTIVA 2006/66/CE RELATIVA A LAS BATERÍAS Y LOS ACUMULADORES Y A LOS RESIDUOS DE PILAS Y ACUMULADORES INFORMACIÓN Aplicable en los países de la Unión Europea y en otros países con sistemas de recogida y reciclado La presencia de este símbolo en las pilas, su embalaje o su documentación significa que las pilas suministradas con el producto no deben ser eliminadas como parte de los residuos sólidos urbanos y que deben recogerse de forma separada.
Seite 248
EU-DIREKTIV 2006/66/CE OM BATTERIER OG AKKUMULATORER OG BRUGTE BATTERIER OG AKKUMULATORER INFORMATIONER Gældende for lande i EU og lande med affaldssortering Symbolet ’ingen skraldespand’ på batterier, produktemballage eller vejledning og betyder, at batterierne der leveres med produktet efter endt levetid skal holdes adskilt fra andet husholdningsaffald, og efterfølgende bringes til en genbrugsstation.