Herunterladen Inhalt Inhalt Diese Seite drucken

Werbung

Verfügbare Sprachen
  • DE

Verfügbare Sprachen

  • DEUTSCH, seite 52
MACINACAFFÈ
I
MANUALE D'USO E MANUTENZIONE
COFFEE GRINDER
GB
USE AND MAINTENANCE MANUAL
MOULIN À CAFÉ
F
MANUEL D'UTILISATION
KAFFEEMÜHLE
D
BEDIENUNGS- UND WARTUNGSANLEITUNG
MOLINILLO DE CAFÉ
E
MANUAL DE USO Y MANTENIMIENTO
E37S
E92

Werbung

Inhaltsverzeichnis
loading

Inhaltszusammenfassung für Ceado E37S

  • Seite 1 MACINACAFFÈ MANUALE D’USO E MANUTENZIONE COFFEE GRINDER USE AND MAINTENANCE MANUAL MOULIN À CAFÉ MANUEL D'UTILISATION KAFFEEMÜHLE BEDIENUNGS- UND WARTUNGSANLEITUNG MOLINILLO DE CAFÉ MANUAL DE USO Y MANTENIMIENTO E37S...
  • Seite 2 Page 20 MOULIN À CAFÉ E37S et E92 Les moulins à café modèle E37S et modèle E92 sont des appareils professionnels pour la mouture du café en grains et la distribution de ce dernier à travers une bouche de sortie.
  • Seite 3 Seite 52 MOLINILLO DE CAFÉ E37S y E92 Los molinillos de café modelo E37S y modelo E92 son aparatos profesionales para moler el café y para distribuir el mismo por medio de una boca de descarga. Como todos los electrodomésticos se tiene que utilizar con mucha prudencia para evitar lesiones a personas y daños en el aparato.
  • Seite 4 MACINACAFFÈ E37S e E92 Componenti principali (Fig. 1, Fig. 2, Fig. 3) Base Tasto SET Campana Selezione 1 tazza Coperchio campana Selezione 2 tazze Leva regolazione macinatura Interruttore ON-OFF (I-O) Otturatore campana Supporto coppa porta filtro Bocchetta erogatrice (optional) (vedi anche Fig. 6) Pulsante erogazione (start) Particolarità...
  • Seite 5 Fig. 3 NORME DI SICUREZZA AVVERTENZE GENERALI Leggere attentamente le seguenti istruzioni prima di utilizzare l'apparecchio. L'installazione ed ogni operazione di manutenzione devono essere effettuate da personale specializzato. Questo apparecchio è destinato all'uso professionale perciò deve essere utilizzato solo da persone adulte e qualificate.
  • Seite 6: Conservare Queste Istruzioni

    CONSERVARE QUESTE ISTRUZIONI! La dichiarazione di conformità CE di questo apparecchio è disponibile nella sezione Prodotti del nostro sito web www.ceado.com. INSTALLAZIONE Prima di installare l'apparecchio attenersi scrupolosamente alle Norme di sicurezza sopra indicate. Per l’installazione dell’apparecchio è necessaria le presenza di personale qualificato che sia in grado di controllare il grado di macinatura del caffè.
  • Seite 7 Caricare la campana con i chicchi di caffè chiudendola poi con il suo coperchio. Portare l’interruttore ON-OFF (16 Fig. 2) in posizione “I”. All’accensione dell’apparecchio il display visualizzerà: Coffee Grinder CEADO Funzionamento automatico Per macinare la quantità di caffè per una singola dose premere il tasto . Oltre all’accensione del relativo LED, il display visualizzerà:...
  • Seite 8 Funzionamento manuale Per macinare caffè in modo continuo, senza nessuna impostazione di tempo, premere contemporaneamente i tasti Si accenderanno entrambi i LED e il display visualizzerà: Dose manuale PRONTO Prelievo del caffè Quando l’apparecchio è nello stato di PRONTO, per iniziare la macinatura premere con la coppa porta-filtro il pulsante di erogazione (7 Fig.
  • Seite 9: Regolazione Macinatura

    Dosi singole da Dosi doppie da reset reset Nota: Il valore delle dosi totali può essere diverso dalla somma del valore delle dosi singole più il doppio del valore delle dosi doppie, perché tiene conto anche delle dosi erogate con il funzionamento manuale.
  • Seite 10 Fig. 4 SISTEMA SCC (disponibile solo sul modello E37S) Il sistema SCC (Static and Clumping Control) è progettato per permettere le regolazioni più fini dell’aspetto del caffè ed incidere, quando necessario, su fenomeni come il clumping e la statica, legati alle condizioni meteorologiche, alla qualità...
  • Seite 11 Fig. 5 • Chiudere completamente il portellino (girare il cacciavite in senso antiorario) per compattare il caffè rimanente. • Erogare una doppia dose. • Pulire con un pennello lo scivolo di erogazione del caffè da eventuali residui. • Regolare il sistema SCC agendo sulla vite di regolazione fino a raggiungere l’aspetto desiderato, ricordando che, come per tutti i cambi di qualunque parametro, le primissime dosi erogate non corrisponderanno immediatamente a quelle impostate.
  • Seite 12 Per impostare il tempo della dose singola premere . Il display visualizzerà il tempo attualmente impostato: Usa tasti + - t.singola 2.0 Premere il tasto per modificare questo tempo con la precisione di 0,1 secondi e confermare poi la scelta con il tasto .
  • Seite 13: Altre Impostazioni

    ALTRE IMPOSTAZIONI Premere il tasto per 3 secondi per entrare, come descritto anche nel paragrafo precedente, nel menù impostazioni. Il display visualizzerà la prima pagina: Imposta tempo dose singola Partendo da questa pagina si possono eseguire le seguenti operazioni: Selezione lingua del menù Premere il tasto per due volte fino a visualizzare la pagina: Imposta...
  • Seite 14 Per cambiare il funzionamento del pulsante start, premere il tasto per cinque volte fino a visualizzare la pagina: Imposta pulsante start Confermare premendo . Il display visualizzerà: Usa tasti + - impulsivo OFF Premendo il tasto si può impostare la funzione in ON oppure in OFF. Uscire dal menu impostazione Per uscire dal menù...
  • Seite 15: Avvertenze E Suggerimenti

    AVVERTENZE E SUGGERIMENTI Non operare mai senza la campana o con la campana senza il suo coperchio. Accertarsi della completa apertura dell’otturatore della campana fino a fine corsa (ultimo scatto) (vedi Fig. 7). Non lasciare funzionare il macinacaffè a lungo senza caffè...
  • Seite 16 PULIZIA Mantenere l'apparecchio ben pulito ed in ordine garantisce una qualità ottimale dei prodotti e una maggiore durata dell'apparecchio stesso. Scollegare sempre la spina dell’apparecchio dalla presa di corrente prima di effettuare la pulizia. Per la pulizia della base e del piattino, utilizzare un panno umido di acqua o di alcol o un detergente generico spray.
  • Seite 17: Guasti E Rimedi

    600 kg per il modello E37S ed ogni 1000 kg per il modello E92. Questa quantità può variare in relazione al tipo di caffè utilizzato ed al grado di tostatura. L ’efficienza delle macine è importante per garantire la qualità della macinatura sia come granulometria sia come temperatura all’uscita del prodotto macinato, parametri questi che possono...
  • Seite 18 Soluzione Problema Controllare che la spina sia inserita. • Controllare che l’interruttore di protezione a muro sia • acceso. Controllare che l’interruttore dell’apparecchio sia su ON. • L ’apparecchio non si Se il problema si manifesta dopo un lungo periodo di uso accende.
  • Seite 19: Smaltimento

    SMALTIMENTO Corretto smaltimento del prodotto (rifiuti elettrici ed elettronici) (Applicabile nei paesi dell’Unione Europea ed in quelli con sistema di raccolta differenziata in conformità con la direttiva europea 2002/96/CE) Questo prodotto è stato realizzato con materiali e componenti di prima qualità...
  • Seite 20 COFFEE GRINDER models E37S and E92 Main parts (Fig. 1, Fig. 2, Fig. 3) Motor housing Button SET Bean hopper Single shot selection Hopper lid Double shot selection Grind regulating lever ON-OFF (I-O) switch Bean hopper shutter Filter-holder support Discharge opening (optional) (see also Fig.
  • Seite 21 Fig. 3 SAFETY RECOMMENDATIONS GENERAL INSTRUCTIONS Read the following instructions carefully before using the appliance. Installation and maintenance should be carried out by qualified personnel only. This appliance is intended for professional use, and should therefore be used by adults and qualified personnel only.
  • Seite 22 Due to statistical tests on the product in the factory, some coffee grounds may be found in the appliance. SAVE THESE INSTRUCTIONS! The EC declaration of conformity for this appliance is available in the Products section of our website www.ceado.com. INSTALLATION Comply with the Safety recommendations indicated above and hereafter when installing the appliance.
  • Seite 23 Turn the ON-OFF switch (16 Fig. 2) to position “I”. When the appliance is switched on the display will show: Coffee Grinder CEADO Automatic operation To grind the amount of coffee for a single shot press the button . The respective LED will light up and the display will show: Single shot 2.0...
  • Seite 24 Manual operation To grind coffee continuously, without any time setting, press the buttons simultaneously. Both LEDs will light up and the display will show: Manual dose READY Taking out the coffee When the appliance is READY, to start grinding press the start button (7 Fig. 1) with the filter holder and keep the filter holder in position until distribution is ended.
  • Seite 25 Sing. shots from Doub. shots from reset reset Note: The value of the total shots may be different from the sum of the value of the single shots plus double the value of the double shots, because it also allows for the shots distributed with manual operation.
  • Seite 26 Fig. 4 SCC SYSTEM (available only on model E37S) SCC (Static and Clumping Control) system is designed to enable the slightest tweaks of the appearance of the ground coffee, and, when necessary, to work on issues like static and clumping, which are in connection with humidity, temperature, composition of the coffee blend etc.
  • Seite 27 Fig. 5 • Close completely the flap (turning counter-clockwise the slotted screwdriver) to compact the remaining ground coffee. • Pull a double shot. • Thoroughly clean the discharge opening with a brush. • Adjust the SCC system through the adjusting screw, until reaching the desired appearance of the ground coffee;...
  • Seite 28 To set the time for the single shot press . The display will show the currently set time: Use button + - t. single 2.0 Press the button to change this time with a precision of 0.1 seconds, then confirm your choice with the button .
  • Seite 29: Other Settings

    OTHER SETTINGS Hold down the button for 3 seconds to enter the settings menu, as described in the previous paragraph. The display will show the first screen: Set time single shot Starting from this screen, you can perform the following operations: Selecting the menu language Press the button twice to display the page:...
  • Seite 30 To change the operating mode of the start button, press the button five times until this screen is displayed: start button Press to confirm. The display will show: Use buttons + - pulse OFF Press the button to set the function ON or OFF. Leaving the settings menu To leave the settings menu and return to READY status, press the button six times until this...
  • Seite 31: Warnings And Suggestions

    WARNINGS AND SUGGESTIONS Never operate without hopper and lid in place. Make sure that shutter is completely open (to the last click) (see Fig. 7). Do not let the coffee grinder run long without coffee beans in the hopper; if this were to happen it would cause tripping of the motor thermal overload protection.
  • Seite 32 The burrs are subject to normal wear and the manufacturer recommends replacing them roughly every 600 kg for model E37S and every 1000 kg for model E92. This quantity may noticeably change according to the kind of coffee blend/origin and the type of roast.
  • Seite 33 The efficiency of the burrs is important in order to guarantee the quality of the grind as regards size and the temperature of the ground product; these parameters may have a considerable influence on the success of a good espresso coffee. TROUBLESHOOTING (See Table on the next page) In case of any malfunction, defect of the appliance or if you suspect any breakage after a fall, unplug...
  • Seite 34 Problem Solution Make sure it is plugged in. • Make sure the safety circuit breaker is closed. • Check that the main switch of the appliance is ON. • The appliance does not turn If the problem occurs itself after a long period of intensive •...
  • Seite 35 DISPOSAL Correct disposal of this product (waste electrical and electronic equipment) (Applicable in the European Union and other countries with separate collection systems in conformity with European Directive 2002/96/EC) This product has been made from high-quality parts and materials, which can be re-used and recycled.
  • Seite 36 MOULIN À CAFÉ E37S et E92 Composants principaux (Fig. 1, Fig. 2, Fig. 3) Socle-moteur Touche SET Cloche Sélection 1 tasse Couvercle cloche Sélection 2 tasses Levier réglage mouture Interrupteur ON-OFF (I-O) Obturateur cloche Support porte-filtre Bouche de sortie (option) (voir aussi Fig. 6) Bouton de démarrage...
  • Seite 37 Fig. 3 NORMES DE SÉCURITÉ INSTRUCTIONS GÉNÉRALES Lire attentivement les instructions suivantes avant toute utilisation de l'appareil. L'installation et toute opération d'entretien doivent être effectuées par du personnel spécialisé. Cet appareil est destiné à l'usage professionnel, il ne doit donc être utilisé que par des personnes adultes et qualifiées.
  • Seite 38 GARDER CES INSTRUCTIONS ° La déclaration de conformité CE de cet appareil est disponible dans la section Produits de notre site web www.ceado.com. INSTALLATION Avant d'installer l'appareil, observer scrupuleusement les Normes de sécurité indiquées ci-dessus. Pour l'installation de l'appareil, il faut avoir une personne qualifiée, apte à contrôler le degré de mouture du café.
  • Seite 39 Mettre l'interrupteur ON-OFF (16 Fig. 2) en position « I ». À l'allumage de l'appareil l'écran affichera : Coffee Grinder CEADO Fonctionnement automatique Pour moudre la quantité de café pour une dose (une tasse) presser la touche . En plus de l'allumage de la led relative, l'écran affichera :...
  • Seite 40 Fonctionnement manuel Pour moudre du café en mode continu, sans aucune programmation de temps, presser les touches en même temps. Les deux leds s'allumeront et l'écran affichera : Dose manuelle PRET Moudre du café Quand l'appareil est à l'état de PRÊT, pour commencer la mouture presser avec le porte-filtre le bouton de démarrage (7 Fig.
  • Seite 41: Réglage Mouture

    D uniques depuis D doubles depuis reset reset Remarque : La valeur des doses totales peut être différent de la somme de la valeur des doses une tasse plus le double de la valeur des doses deux tasses, parce qu'elle tient compte aussi des doses moulues avec le fonctionnement manuel.
  • Seite 42 Fig. 4 SYSTÈME SCC (disponible uniquement pour le modèle E37S) Le système SCC (Static and Clumping Control) est conçu pour permettre les réglages les plus fines de l'aspect du café et influencer, quand c’est nécessaire, sur des phénomènes comme le clumping et la statique, liés aux conditions météorologiques, à...
  • Seite 43 Fig. 5 • Fermer complètement la porte (tourner le tournevis dans le sens inverse des aiguilles d'une montre) pour compacter le café restant. • Moudre une dose deux tasses. • Nettoyer avec un pinceau la bouche de sortie du café des résidus éventuels. •...
  • Seite 44 Pour programmer le temps de la dose une tasse presser . L'écran affichera le temps programmé actuel : Presser bouton + - t.une 2.0 Presser la touche pour modifier ce temps avec la précision de 0,1 secondes et puis confirmer le choix avec la touche .
  • Seite 45: Autres Réglages

    AUTRES RÉGLAGES Presser la touche pendant 3 secondes pour entrer, comme décrit aussi dans le paragraphe précédent, dans le menu réglage. L'écran affichera la première page : Réglage temps une dose En partant de cette page, on peut exécuter les opérations suivantes : Choix langue du menu Presser la touche deux fois jusqu'à...
  • Seite 46 Pour changer le fonctionnement du bouton de démarrage, presser la touche cinq fois jusqu'à afficher la page : Réglage bouton démarrage Confirmer en pressant . L'écran affichera : Presser bouton + - impulsion OFF En pressant la touche on peut mettre la fonction en ON ou en OFF. Sortir du menu réglage Pour sortir du menu réglage et revenir à...
  • Seite 47: Avertissements Et Conseils

    AVERTISSEMENTS ET CONSEILS Ne jamais opérer sans la cloche ou avec la cloche sans son couvercle. S'assurer de l’ouverture complète de l'obturateur de la cloche jusqu'à la fin de sa course (dernier déclic) (voir Fig. 7). Ne pas laisser fonctionner le moulin à café longtemps sans café...
  • Seite 48 NETTOYAGE Garder l'appareil bien propre et en ordre garantit une qualité optimale des produits et une plus grande durée de vie de l'appareil. Avant d'effectuer le nettoyage, il faut toujours débrancher la fiche de l'appareil de la prise de courant. Pour le nettoyage du socle moteur et du plateau, utiliser un chiffon humide d'eau ou d’alcool ou d’un détergent spray générique.
  • Seite 49: Pannes Et Remèdes

    600 kg de café pour le modèle E37S et tous les 1000 kg pour le modèle E92. Cette quantité peut varier selon le type de café utilisé et le degré de torréfaction. L'efficacité des meules est importante pour garantir la qualité de la mouture aussi bien comme granulométrie que comme température à...
  • Seite 50 Problème Solution Contrôler si la fiche est branchée. • Contrôler si l'interrupteur de protection du secteur est • allumé. Contrôler si l'interrupteur général de l'appareil est en • position ON. L'appareil ne s'allume pas. Si le problème se révèle après une longue période •...
  • Seite 51: Conditions De Garantie

    ÉLIMINATION Comment éliminer ce produit (déchets d’équipements électriques et électroniques) (Applicable dans les pays de l’Union Européenne et aux autres pays disposant de systèmes de collecte sélective en conformité avec la Directive européenne 2002/96/CE) Les matériaux et pièces composant ce produit sont d’excellente qualité et peuvent être recyclés et réutilisés.
  • Seite 52: Kaffeemühle E37S Und E92

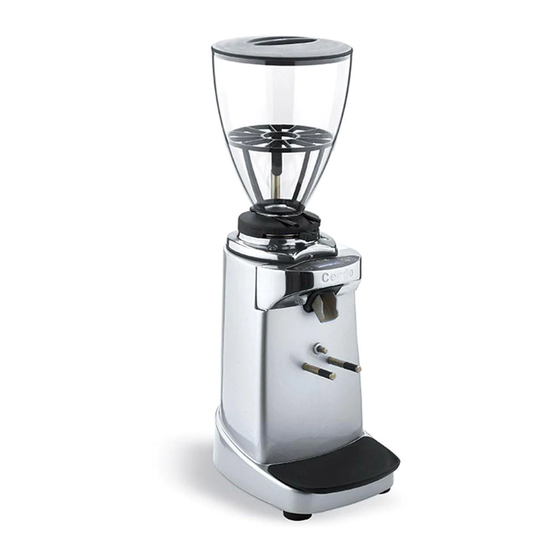
    KAFFEEMÜHLE E37S und E92 Hauptkomponenten (Abb. 1, Abb. 2, Abb. 3) Untersatz Taste SET Kaffeebohnenbehälter Wahl 1 Tasse Kaffeebohnenbehälterdeckel Wahl 2 Tassen Einstellhebel zum Mahlen ON-OFF (I-O)-Schalte Kaffeebohnenbehälterverschluss Filterbehälterhalter Auswurföffnung (Option) (siehe auch Abb. 6) Starttaste Besonderheit des Modells E37S Auflage des Filterbehälters...
  • Seite 53 Abb . 3 SICHERHEITSVORSCHRIFTEN ALLGEMEINE HINWEISE Die folgenden Anweisungen vor der Benutzung des Gerätes gründlich lesen. Die Installation und sämtliche Wartungsarbeiten dürfen ausschließlich vom spezialisierten Personal durchgeführt werden. Dieses Gerät ist für den Profigebrauch bestimmt und darf daher nur von erwachsenen, qualifizierten Personen benutzt werden.
  • Seite 54 Anmerkung: Aufgrund von statistischen Produktkontrollen könnte das Gerät mit Kaffeeresten geliefert werden. DIE VORLIEGENDE BEDIENUNGSANLEITUNG AUFBEWAHREN! Die CE-Konformitätserklärung dieses Geräts steht im Abschnitt Produkte unserer Web-Site www.ceado.com zur Verfügung. INSTALLATION Vor der Installation des Gerätes muss man die zuvor genannten Sicherheitsvorschriften befolgen.
  • Seite 55: Vorbereitung Und Einsatz

    Den Behälter mit Kaffeebohnen füllen und mit dem Deckel schließen. Den ON-OFF-Schalter (16 Abb. 2) auf “I” einstellen. Bei Einschalten des Geräts, erscheint am Display folgendes: Coffee Grinder CEADO Automatischer Betrieb Zum Mahlen der Menge für eine Einzelportion, muss die Taste gedrückt werden. Die entsprechende LED schaltet sich ein und am Display wird folgendes angezeigt: Einzelport.
  • Seite 56: Zähler Der Ausgeworfenen Portionen

    Manueller Betrieb Zum fortlaufenden Mahlen des Kaffees ohne Zeiteinstellung, müssen die Tasten gleichzeitig gedrückt werden. Es schalten sich beide LED ein und am Display wird folgendes angezeigt: Manuelle Portion BEREIT Entnahme des Kaffees Wenn sich das Gerät im Zustand “BEREIT” befindet, muss zum Mahlen mit dem Filterbehälter die Starttaste (7 Abb.
  • Seite 57: Einstellungen

    Einzelport. von Doppelport. von Reset Reset oder Anmerkung: Der Wert der Gesamtportionen kann mehr als das Doppelte der Summe des Werts der Einzel- und Doppelportionen betragen, da auch die mit dem manuellen Betrieb ausgeworfenen Portionen gezählt werden. Zum Rückstellen eines Zählers muss die Taste 3 Sekunden lang gedrückt werden, bis ein Doppelpiep zu hören ist.
  • Seite 58 Kaffee: gegen den Uhrzeigersinn Abb . 4 SCC-SYSTEM (nur für Mühle E37S verfügbar) Das SCC-System (Static and Clumping Control) dient der Feineinstellung des Aussehens des Kaffeepulvers und kann bei Bedarf beim Vorkommen von Clumping und statischer Aufladung, was eng mit den Wetterbedingungen, der Qualität der Kaffeebohnen etc. verbunden ist, genutzt werden.
  • Seite 59: Einstellung Der Mahlzeiten

    Abb. 5 • Die Klappe (durch Drehen des Schraubenziehers gegen den Uhrzeigersinn) schließen, um den verbleibenden Kaffee zusammenzupressen. • Eine Doppelportion auswerfen. • Mit einem Pinsel die Auswurföffnung von eventuellen Resten befreien. • Die Einstellschraube des SCC-Systems so lange drehen, bis der Kaffee das gewünschte Aussehen hat, dabei ist zu beachten, dass, wie bei allen Änderungen, die ersten Portionen nicht sofort den Einstellungen entsprechen.
  • Seite 60 Zum Einstellen der Zeit einer Einzelportion, muss gedrückt werden. Am Display wird die aktuell eingestellte Zeit angezeigt: Tasten+- drücken Z. Einzelp. 2.0 Zum Ändern dieser Zeit mit einer Präzision von 0,1 Sekunden, muss die Taste oder gedrückt werden und dann die Wahl mit der Taste bestätigen.
  • Seite 61: Sonstige Einstellungen

    SONSTIGE EINSTELLUNGEN Die Taste 3 Sekunden lang drücken, um wie schon im vorherigen Abschnitt beschrieben, das Einstellungsmenü abzurufen. Am Display wird die erste Seite angezeigt: Zeit einstellen Einzelportion Von dieser Seite aus, können nachfolgende Vorgänge durchgeführt werden: Wahl der Menüsprache Die Taste zwei Mal drücken, bis die Seite angezeigt wird: Einstellen...
  • Seite 62 Zum Wechsel der Funktion der Starttaste, muss die Taste fünf Mal gedrückt werden, bis die folgende Seite angezeigt wird: Einstellen Starttaste Zur Bestätigung drücken. Am Display wird folgendes angezeigt: Tasten+- drücken Impuls OFF Zum Einstellen der Funktion auf ON bzw. OFF, muss die Taste oder gedrückt werden.
  • Seite 63: Warnungen Und Tipps

    WARNUNGEN UND TIPPS Niemals ohne den Kaffeebohnenbehälter oder mit dem Kaffeebohnenbehälter ohne Kaffeebohnenbehälterdeckel arbeiten. Vergewissern sich, dass Kaffeebohnenbehälterverschluss Kaffeebohnenbehälters vollständig bis zum Anschlag offen ist (letztes Einrasten) (siehe Abb. 7). Die Kaffeemühle nicht zu lange ohne Kaffeebohnen im Behälter laufen lassen. Sollte dies geschehen, könnte der Motorschutz ausgelöst werden.
  • Seite 64: Reinigung

    REINIGUNG Ein immer gut gereinigtes und ordentliches Gerät garantiert eine optimale Qualität des Produktes und eine längere Lebensdauer des Gerätes selbst. Vor Reinigung muss der Stecker des Geräts immer vom Stromstecker getrennt werden. Zur Reinigung des Untersatzes und der Auflage, diese mit Wasser bzw. Alkohol oder gewöhnlichem Sprayreinigungsmittel befeuchten.
  • Seite 65: Störungen Und Abhilfen

    Kaffee beim Modell E37S und 1000 kg beim Modell E92 zu wechseln. Diese Mengenangabe kann je nach Art des benutzten Kaffees und Röstungsgrad variieren. Die Leistungsfähigkeit der Mahlscheiben ist sehr wichtig, um die Mahlqualität der Bohnengröße und Temperatur bei Austritt des gemahlenen Produkts zu gewährleisten. Diese Parameter können den Erfolg eines guten Espressokaffees bemerkenswert beeinflussen.
  • Seite 66 Problem Lösung Kontrollieren, dass der Stecker eingesteckt wurde. • Kontrollieren, dass der Wandschutzschalter eingeschalten ist. • Kontrollieren, dass sich der Schalter des Geräts auf ON • befindet. Das Gerät schaltet sich nicht Wenn das Problem nach einer längeren, starken • ein.
  • Seite 67: Entsorgung

    ENTSORGUNG Korrekte Entsorgung dieses Produkts (Elektromüll) (Gemäß der europäischen Richtlinie 2002/96/EG in Ländern der Europäischen Union und anderen Ländern mit einem getrennten Sammelsystem anzuwenden) Dieses Produkt wurde aus hochwertigen Materialien und Teilen hergestellt, die für das Recycling tauglich sind und wiederverwendet werden können.
  • Seite 68 MOLINILLO DE CAFÉ E37S y E92 Componentes principales (Fig. 1, Fig. 2, Fig. 3) Carrocería Botón SET Tolva Selección 1 taza Tapa tolva Selección 2 tazas Palanca regulación molido Interruptor ON-OFF (I-O) Obturador tolva Soporte copa porta-filtro Boca de descarga (opcional) (véase también Fig.
  • Seite 69 Fig. 3 NORMAS DE SEGURIDAD ADVERTENCIAS GENERALES Leer atentamente las siguientes instrucciones antes de utilizar el aparato. La instalación y cualquier tipo de operación de mantenimiento tiene que ser efectuada por personal especializado. Este aparato está destinado al uso profesional, por lo tanto puede ser utilizado sólo por personas adultas y cualificadas.
  • Seite 70 Por causa de la realización de controles estadísticos del producto, el aparato podría estar sucio de café. ¡CONSERVAR ESTAS INSTRUCCIONES! La declaración de conformidad CE de este equipo se encuentra a disposición en la sección Productos de nuestro sitio web www.ceado.com. INSTALACIÓN Antes de instalar el aparato respetar escrupulosamente las Normas de Seguridad anteriormente indicadas.
  • Seite 71 Cargar la tolva con granos de café cerrándola con su tapa. Colocar el interruptor ON-OFF (16 Fig. 2) en la posición “I”. Cuando se encienda el aparato el display visualizará: Coffee Grinder CEADO Funcionamiento automático Para moler la cantidad de café para una dosis, pulsar el botón . Además de encenderse el correspondiente LED, el display visualizará:...
  • Seite 72 Funcionamiento manual Para moler café de modo continuado, sin ninguna regulación de tiempo, pulsar contemporáneamente los botones Se encenderán ambos LED y el display visualizará: Dosis manual LISTO Extracción del café Cuando el aparato está en el estado de LISTO, para iniciar el molido pulsar con la copa porta- filtro el pulsador de suministro (7 Fig.
  • Seite 73 Una dosis desde Doble dos. desde reset reset Nota: El valor de las dosis totales puede ser diferente de la suma del valor de una dosis más el valor de las dos dosis, porque considera también las dosis molidas con el funcionamiento manual.
  • Seite 74 Fig. 4 SISTEMA SCC (disponible sòlo en el modelo E37S) El sistema SCC (Static and Clumping Control) ha sido proyectado para permitir las regulaciones más finas del aspecto del café e intervenir, cuando es necesario, en fenómenos como el apelmazamiento y la estática, relacionados con las condiciones meteorológicas, con la calidad del...
  • Seite 75 Fig. 5 • Cerrar completamente la portilla (girar el destornillador en sentido contrario a las agujas del reloj) para compactar el café restante. • Suministrar dos dosis. • Limpiar de posibles residuos la boca de descarga de café con un pincel. •...
  • Seite 76 Para regular el tiempo de una dosis pulsar . El display visualizará el tiempo actualmente regulado: Usar botón + - t.una 2.0 Pulsar el botón para modificar este tiempo con la precisión de 0,1 segundos y después confirmar la elección con el botón .
  • Seite 77 OTRAS REGULACIONES Pulsar el botón por 3 segundos para entrar, como descrito también en el párrafo anterior, en el menú regulaciones. El display visualizará la primera página: Ajustar tiempo una dosis Comenzando de esta página se pueden realizar las siguientes operaciones: Selección idioma del menú...
  • Seite 78 Para cambiar el funcionamiento del pulsador start, pulsar el botón por cinco veces hasta visualizar la página: Regular pulsador start Confirmar pulsando . El display visualizará: Usar botón + - impulso OFF Pulsando el botón se puede regular la función en ON o en OFF. Salir del menú...
  • Seite 79 ADVERTENCIAS Y SUGERENCIAS No trabajar nunca sin la tolva o con la tolva sin su tapa. Controlar que el obturador de la tolva esté completamente abierto hasta el final de la carrera (último clic) (véase Fig. 7). No dejar que el molinillo de café funcione por largo tiempo sin café...
  • Seite 80 Las muelas son una parte sometida a desgaste normal y el fabricante aconseja sustituir las mismas cada 600 kg para el modelo E37S y cada 1000 kg para el modelo E92 aproximadamente. Esta...
  • Seite 81: Averías Y Soluciones

    cantidad puede variar según el tipo de café utilizado y el grado de tostado. La eficiencia de las muelas es importante para garantizar la calidad del molido tanto por su granulometría como por la temperatura en la salida del producto molido, parámetros que pueden influenciar notablemente el éxito de un buen café...
  • Seite 82 Problema Solución Controlar que se haya conectado el enchufe. • Controlar que el interruptor de protección de pared esté • encendido. Controlar que el interruptor general del aparato esté en • El aparato no se enciende. Si el problema se presenta después de un largo periodo de •...
  • Seite 83: Condiciones De Garantía

    ELIMINACIÓN Eliminación correcta de este producto (material eléctrico y electrónico de descarte) (Aplicable en la Unión Europea y en países con sistemas de recogida selectiva de residuos en conformidad con la directiva europea 2002/96/CE) Este producto está elaborado con materiales y piezas de gran calidad apropiados para su reciclaje y reutilización.
  • Seite 84 Ceado S.r.l. Tel.: (00-39) 041 50 30 767 Fax: (00-39) 041 50 38 413 E-mail: info@ceado.com http://www.ceado.com Cod. 80422 - 09/2015...

Diese Anleitung auch für:

E92

Inhaltsverzeichnis