
Verwandte Anleitungen für Omni Bead Ruptor 96

Inhaltszusammenfassung für Omni Bead Ruptor 96
- Seite 1 Bead Ruptor 96 Well Plate Homogenizer en User Manual fr Manuel d’utilisation Manuale d’uso es Manual del usuario de Benutzerhandbuch...
- Seite 2 This page left blank intentionally...
- Seite 3 This product is warranted to be free from defects in material and workmanship for a period of ONE YEAR from the date of delivery. Omni International will repair or replace and return free of charge any part which is returned to its factory within said period, transportation prepaid by user, and which is found upon inspection to have been defective in materials or workmanship.
-
Seite 4: Technical Data
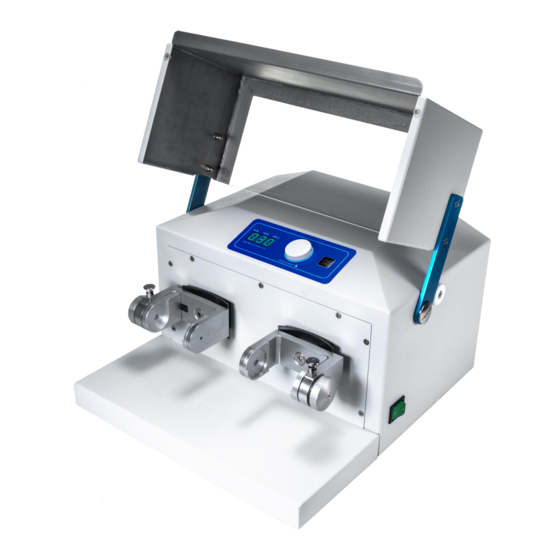
2. Control Panel 6. On/Off Switch 3. Milling Jar holder (left) 7. Fuse Compartment 4. Milling Jar holder (right) 8. Power Cord Port The Bead Ruptor 96 consists of the following: Description Quantity Bead Ruptor 96 Assembly Power Cord Spare Fuse... -
Seite 5: Control Panel
• RUN Signal light (green) - lit when the Bead Ruptor 96 is running. • TIME Signal light (yellow) - lit when the Bead Ruptor 96 timer selection is active. • FREQUENCY Signal light (yellow) - lit when the Bead Ruptor 96 frequency selection is active. - Seite 6 Milling Jar and Rack Holders A. Centering Points B. Locking Pin C. Knob Milling Jars O-Rings...
- Seite 7 Inserting Milling Jars • Fill milling jar with material to be milled. Ensure the two-white o-rings are in place prior to sealing jars. • Lift the locking pin (B) upwards from the groove and turn it 90° in any direction to unlock.
- Seite 8 Inserting Well Plate Adapters • Bead Ruptor 96 well plate adapters can hold 1 X 2 mL deep well plate, 2 X 1 mL deep well plates or 3 X standard well plates per processing arm. • Place samples and beads in the well plate.
- Seite 9 Safety instructions when working with Liquid Nitrogen The Bead Ruptor 96 can be operated with liquid nitrogen for cyrogenic milling of milling jars. Milling jars can be pre-cooled in a liquid nitrogen bath then placed on the Bead Ruptor 96 for dissociation of tough materials. Cooling times and processing times will be dependent on target material.
- Seite 10 For any issue that is unsuccessfully correct- ed using this guide, please contact your authorized dealer or call DO NOT: attempt to service the Bead Ruptor 96 in a manner other than those Omni International at 1-800-776-4431.
- Seite 11 ; elle ne s’applique pas aux instruments ni aux pièces qui ont été modifiés par quiconque autre qu’un employé d’Omni International, ni à tout instrument qui a été endommagé par accident, négligence, non-respect des consignes d’utilisation, l’utilisation de courants électriques ou de circuits autres que ceux indiqués sur la plaque apposée sur l’instrument, par une mauvaise...
-
Seite 12: Données Techniques
3. Support de bol de broyage (gauche) 7. Compartiment à fusibles 4. Support de bol de broyage (droit) 8. Port du cordon d’alimentation Le Bead Ruptor 96 est composé des éléments suivants : Description Quantité Ensemble Bead Ruptor 96 Cordon d’alimentation Fusible de rechange Manuel d’utilisation... -
Seite 13: Panneau De Commande
• Voyant MARCHE (vert) – allumé lorsque le Bead Ruptor 96 est en marche. • Voyant DURÉE (jaune) – allumé lorsque la sélection de la minuterie du Bead Ruptor 96 est active. • Voyant FRÉQUENCE (jaune) – allumé lorsque la sélection de la fréquence du Bead Ruptor 96 est active. - Seite 14 Supports de bols de broyage et portoirs A. Points de centrage B. Goupille de verrouillage C. Molette Bols de broyage Joints toriques...
- Seite 15 Comment insérer les bols de broyage • Remplir le bol de broyage de matières à broyer. S’assurer que les deux joints toriques sont en place avant de sceller les bols. • Soulever la goupille de verrouillage (B) vers le haut à partir de la rainure, et la faire pivoter de 90°...
- Seite 16 • Les adaptateurs de plaque multipuits du Bead Ruptor 96 peuvent tenir 1 x plaque multipuits de 2 ml de profondeur, 2 x plaques multipuits de 1 ml ou 3 x plaques multipuits standard par bras de traitement.
- Seite 17 Consignes de sécurité lorsqu’on travaille avec de l’azote liquide Le Bead Ruptor 96 peut être utilisé avec de l’azote liquide pour le broyage cryogénique des bols de broyage. Les bols de broyage peuvent être prérefroidis dans un bain d’azote liquide et placés ensuite dans le Bead Ruptor 96 pour la dissociation de matières tenaces.
- Seite 18 à fonctionner. DO NOT: attempt to service the Bead Ruptor 96 in a manner other than those discussed in this manual. For any issue that is unsuccessfully correct- NE PAS : essayer d’entretenir le Bead Ruptor 96 d’une autre façon que celle ed using this guide, please contact your authorized dealer or call décrite dans ce manuel.
- Seite 19 Omni International né a qualsiasi strumento che sia stato danneggiato a causa di incidente, negligenza, inosservanza delle istruzioni d’uso, dell’uso di correnti elettriche o circuiti diversi da quelli indicati sulla targhetta applicata allo strumento, uso improprio o abuso.
-
Seite 20: Dati Tecnici
6. Interruttore ON/OFF 3. Portacontenitore per la macinazione (a sinistra) 7. Scomparto fusibili 4. Portacontenitore per la macinazione (a destra) 8. Portello per il cavo di alimentazione Il Bead Ruptor 96 comprende: Descrizione Quantità Assemblaggio Bead Ruptor 96 Cavo di alimentazione... -
Seite 21: Pannello Di Controllo
Ruptor 96 è attiva. • Segnale luminoso (giallo) di FREQUENCY acceso quando la selezione della frequenza per Bead Ruptor 96 è attiva. La frequenza è definita come numero di cicli al secondo (1/s). Misurata in Hz. • MANOPOLA DI COMANDO (ruotare/spingere) - ruotare a destra (+) o a sinistra (-) per modificare i valori di impostazione del tempo o della frequenza. - Seite 22 Contenitore per la macinazione e supporti per i cestelli A. Punti di centraggio B. Perno di serraggio C. Manopola Contenitori per la macinazione O-Rings...
- Seite 23 Inserimento dei contenitori per la macinazione • Riempire il contenitore per la macinazione con il materiale da macinare. Assicurarsi che i due o-ring bianchi siano al loro posto prima di sigillare i contenitori. • Sollevare il perno di bloccaggio (B) verso l’alto dalla scanalatura e ruotarla di 90° in qualsi asi direzione per sbloccare.
- Seite 24 Inserimento degli adattatori della piastra a pozzetti • Gli adattatori della piastra a pozzetti del Bead Ruptor 96 possono contenere una piastra a pozzetti 1 X 2 mL, delle piastre a pozzetti 2 X 1 mL o 3 X piastra a pozzetti standard per il braccio di lavorazione.
- Seite 25 I contenitori per la macinazione possono essere preraffreddati in un bagno di azoto liquido poi inseriti sul Bead Ruptor 96 per la separazione delle materie dure. I tempi di raffreddamento e i tempi di lavorazione dipenderanno dal materiale.
- Seite 26 For any issue that is unsuccessfully correct- ed using this guide, please contact your authorized dealer or call COSE DA NON FARE: tentare di riparare il Bead Ruptor 96 in modo diverso da Omni International at 1-800-776-4431.
- Seite 27 Se garantiza que este producto está libre de defectos en materiales y mano de obra durante un período de UN AÑO desde la fecha de su entrega. Omni International reparará o reemplazará y devolverá sin cargo cualquier pieza que se devuelva a su fábrica dentro de dicho período, transporte prepagado por el usuario, y que al inspeccionarse se determine que haya tenido un defecto en materiales o en mano de obra.
-
Seite 28: Descripción General
3. Soporte de recipiente de molienda (izquierdo) 7. Portafusibles 4. Soporte de recipiente de molienda (derecho) 8. Puerto del cable de alimentación El Bead Ruptor 96 consta de lo siguiente: Descripción Cantidad Ensamblado del Bead Ruptor 96 Cable de alimentación... -
Seite 29: Panel De Control
Bead Ruptor 96 está activa. • FRECUENCIA Luz de señal (amarilla) - se enciende cuando la selección de frecuencia del Bead Ruptor 96 está activa. La frecuencia se define como número de ciclos de onda por segundo (1/s). Medido en Hz. - Seite 30 Soportes de recipientes de molienda y anaquel A. Puntos de centrado B. Perno de bloqueo C. Perilla Recipientes de molienda Juntas tóricas...
- Seite 31 Insertar recipientes de molienda • Llene el recipiente de molienda con el material a ser molido. Asegúrese de que las dos juntas tóricas blancas estén en su sitio antes de sellar los recipientes. • Levante el perno de bloqueo (B) hacia arriba desde la ranura y gírelo 90° en cualquier dirección para desbloquearlo.
- Seite 32 Insertar los adaptadores de placas de pozos • Los adaptadores de las placas de pozos del Bead Ruptor 96 pueden contener 1 placa de pozos de 2 mL de profundidad, 2 placas de pozos de 1 mL de profundidad o 3 placas de pozos estándar en cada brazo de procesamiento.
- Seite 33 Instrucciones de seguridad al trabajar con nitrógeno líquido El Bead Ruptor 96 puede utilizarse con nitrógeno líquido para la molienda criogénica de recipientes de molienda. Los recipientes de molienda pueden preenfriarse en un baño de nitrógeno líquido y luego colocarse en el Bead Ruptor 96 para disociar materiales resistentes.
- Seite 34 For any issue that is unsuccessfully correct- ed using this guide, please contact your authorized dealer or call NO: intente reparar el Bead Ruptor 96 de modo distinto de los expuestos en este Omni International at 1-800-776-4431.
- Seite 35 Empfehlung zur Verletzung von Verfahrenspatenten dar. Für dieses Produkt gilt eine Gewährleistung gegen Material- und Verarbeitungsfehler für einen Zeitraum von EINEM JAHR ab Lieferdatum. Omni International repariert oder ersetzt kostenfrei sämtliche Teile, die innerhalb des angegebenen Zeitraums mit vorausbezahlen Transportkosten an sein Werk zurückgesendet werden, wenn bei der Überprüfung festgestellt wird, dass Material- oder Verarbeitungsfehler vorliegen.
-
Seite 36: Technische Daten
1. Klappe 5. Klappe 2. Bedienfeld 6. Ein-/Aus-Schalter 3. Mahlgefäßhalterung (links) 7. Sicherungsfach 4. Mahlgefäßhalterung (rechts) 8. Stromkabelanschluss Der Bead Ruptor 96 besteht aus den nachstehenden Elementen: Beschreibung Anzahl Bead Ruptor 96 Stromkabel Ersatzsicherung Benutzerhandbuch Technische Daten 230V ± 10% - 50/60Hz Netzteil 115V ±... - Seite 37 • BETRIEB Signallicht (grün) - leuchtet auf, wenn der Bead Ruptor 96 läuft. • ZEIT Signallicht (gelb) - leuchtet auf, wenn die Timer-Auswahl des Bead Ruptor 96 aktiv ist. • FREQUENZ Signallicht (gelb) - leuchtet auf, wenn die Frequenz-Auswahl des Bead Ruptor 96 aktiv ist.
-
Seite 38: Mahlgefäß Und Halterungen
Mahlgefäß und Halterungen A. Zentrierspitzen B. Arretierstift C. Knopf Mahlgefäße O-Ringe... -
Seite 39: Mahlgefäße Einsetzen
Mahlgefäße einsetzen • Füllen Sie das Mahlgefäß mit dem Material, das gemahlen werden soll. Vergewissern Sie sich, dass zwei weiße O-Ringe vorhanden sind, bevor Sie die Gefäße verschließen. • Heben Sie den Arretierstift (B) nach oben aus der Kerbe und drehen Sie ihn um 90° in eine beliebige Richtung, um ihn zu entsperren. -
Seite 40: Well-Platten-Adapter Einsetzen
Well-Platten-Adapter einsetzen • Die Bead Ruptor 96 Well-Platten-Adapter können 1 X 2 ml Deep-Well-Platten, 2 X 1 ml Deep-Well-Platten, oder 3 X Standard-Well-Platten pro Verarbeitungsarm halten. • Platzieren Sie Proben und Beads in der Well-Platte. • Verschließen Sie die Well-Platte vollständig mit einer Well-Platten-Matte. Vergewissern Sie sich, dass die Well-Platte korrekt verschlossen ist. -
Seite 41: Sicherheitsanweisungen Für Die Arbeit Mit Flüssigstickstoff
Sicherheitsanweisungen für die Arbeit mit Flüssigstickstoff Der Bead Ruptor 96 kann mit Flüssigstickstoff zum kryogenen Mahlen von Mahlgefäßen betrieben werden. Mahlgefäße können zur Dissoziation widerstandsfähiger Materialien in einem Flüssigstickstoffbad vorgekühlt und anschließend auf dem Bead Ruptor 96 platziert werden. Die Kühl- und Verarbeitungszeiten sind vom Zielmaterial abhängig. Es wird dringend empfohlen, dass Sie die Sicherheitsanweisungen zur Handhabung von Flüssigstickstoff befolgen, die von Ihrem Händler für Flüssigstickstoff bereitgestellt werden. -
Seite 42: Fehlerbehebung Troubleshooting
EINGESCHALTET angezeigt werden, um die Fehlernachricht zu löschen, DO NOT: attempt to service the Bead Ruptor 96 in a manner other than bevor der Betrieb fortgesetzt werden kann. those discussed in this manual. For any issue that is unsuccessfully correct-... - Seite 43 This page left blank intentionally...
- Seite 44 935C Cobb Place Blvd. Kennesaw, GA 30144 800.776.4431 • 770.421.0058 www.omni-inc.com PN: 03-296 Rev. C...