Herunterladen Inhalt Inhalt Diese Seite drucken
Inhaltsverzeichnis

Werbung

Verfügbare Sprachen

Verfügbare Sprachen

WT117
Bedienungsanleitung
Mode d'emploi
Istruzioni per l'uso
Operating Instructions

Werbung

Inhaltsverzeichnis
loading

Inhaltszusammenfassung für switel WT117

  • Seite 1 WT117 Bedienungsanleitung Mode d’emploi Istruzioni per l'uso Operating Instructions...
  • Seite 2 WT117 Bedienungsanleitung __________ 1 Mode d’emploi ______________ 13 Istruzioni per l'uso __________ 23 Operating instructions ________ 33 Declaration of Conformity_____ 43...
  • Seite 3: Inhaltsverzeichnis

    - Inhaltsverzeichnis - Bedienelemente ......4 Inbetriebnahme ......5 Verpackungsinhalt prüfen ..... 5 Akkupacks einsetzen ......5 Gürtelclip anbringen......6 Ladestation anschliessen ...... 6 Funkgeräte laden......... 6 Headset anschliessen ......6 Bedienung ........7 Einschalten der Funkgeräte ....7 Automatischer Energiesparmodus ..7 Kanalwahl...........
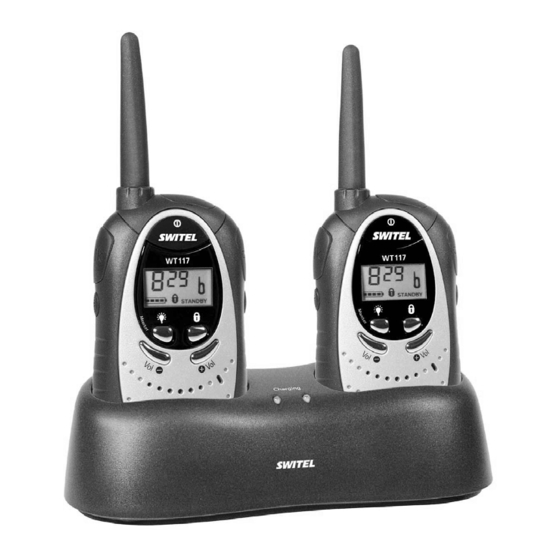
  • Seite 4: Bedienelemente

    - Bedienelemente - Bedienelemente Mikro- Kopfhöreranschluss Lautstärke leiser Ein/Aus-Taste Displaybeleuchtung Kanalschalter CHANNEL Taste CALL Taste MODE 10. Taste TALK Kanalsperre 11. Headset Lautstärke lauter 12. Akkupack...
  • Seite 5: Inbetriebnahme

    - Inbetriebnahme - Inbetriebnahme Verpackungsinhalt prüfen Zum Lieferumfang gehören: zwei Funkgeräte mit Gürtelclip eine Ladestation zwei Akkupacks ein Steckernetzteil eine Bedienungsanleitung zwei Headsets Akkupacks einsetzen Ihr Funkgerät wurde mit zwei wiederaufladbaren Ni-MH Akkupacks geliefert, die vor der Inbetriebnahme eingebaut werden müssen. Entriegeln Sie den Akkufachdeckel auf der Rückseite und öffnen Sie das Fach.
  • Seite 6: Gürtelclip Anbringen

    - Inbetriebnahme - Gürtelclip anbringen Nachdem Sie die Akkupacks eingebaut haben, können Sie die mitgelieferten Gürtelclips befestigen. Schieben Sie den Gürtelclip von unten in die Führung bis er hörbar einrastet. Um den Gürtelclip wieder zu lösen, ziehen Sie die Befestigungslasche etwas nach oben und ziehen Sie den Gürtelclip nach unten.
  • Seite 7: Bedienung

    - Bedienung - Bedienung Einschalten der Funkgeräte Um ein Funkgerät einzuschalten, halten Sie die Ein/Aus-Taste bis zu einem Signalton gedrückt. Für einige Sekunden wird das Display beleuchtet und alle Displaysymbole werden angezeigt. Danach zeigt das Display den aktuell eingestellten Kanal. Automatischer Energiesparmodus Die Funkgeräte sind mit einem Stromsparmodus ausgestattet.
  • Seite 8: Ändern Des Rufcodes

    - Bedienung - 3.3.1 Ändern des Rufcodes Normalerweise werden alle Gespräche auf dem gewählten Kanal an allen Funkgeräten signalisiert, die sich im Empfangsbereich befinden. Somit hören Sie eventuell auch Gespräche, die nicht für Sie bestimmt sind, wenn in der Nähe anderen Personen Funkgeräte auf dem selben Kanal verwenden.
  • Seite 9: Kanalsperre

    - Bedienung - Die Lautstärke des ankommenden Anrufsignals hängt von Ihrer Lautstärkeeinstellung ab. Mit den Tasten VOL- und VOL+ können acht Lautstärkestufen eingestellt werden. Für 5 Sekunden wird die gewählte Lautstärke im Display angezeigt. Danach springt das Display wieder zur Kanaleinstellung. Hinweis: Während Sie die Taste TALK festhalten, können Sie keine ankommenden Anrufe hören.
  • Seite 10: Reichweite Der Funkgeräte

    - Bedienung - Reichweite der Funkgeräte Die Funkgeräte haben eine Reichweite von bis zu 3 km. Diese maximale Reichweite kann durch bestimmte Umstände verringert werden. Bei flachen, offenen Bedingungen erreichen Sie die maximale Reichweite. Befinden sich Gebäude oder Bäume im Signalweg wird die Reichweite verringert.
  • Seite 11: Wichtige Informationen

    - Wichtige Informationen - Wichtige Informationen Technische Daten PMR Kanal Frequenzen (MHz) : Kanal 1: 446,00625 Kanal 5: 446,05625 Kanal 2: 446,01875 Kanal 6: 446,06875 Kanal 3: 446,03125 Kanal 7: 446,08125 Kanal 4: 446,04375 Kanal 8: 446,09375 38 CTCSS Ruffreqeuenzen: CH1=67.0Hz CH11= 97.4Hz CH21= 136.5Hz...
  • Seite 12: Pflegeanleitung

    - Wichtige Informationen - Sender: Effektive Ausgangsleistung 500 mW Trägerfrequenzbeständigkeit 500 Hz Modulationsbegrenzung 2,5 kHz Ansprechzeit Träger 30 ms Tonfrequenzverhalten bei 300 Hz -10 dB bei 2,5 kHz 2 dB Tonverzerrung Brummen und Rauschen 35 dB Vorübergehendes Frequenzverhalten Sender ein 30 ms Sender aus <10 ms...
  • Seite 13 - Sommaire - Eléments de commande ....14 Mise en service ......15 Vérifier le contenu de l’emballage ..15 Mettre les blocs de batterie en place ..15 Fixer le clip-ceinture ......16 Raccorder le chargeur ......16 Charger les émetteurs-récepteurs..16 Raccorder le micro-casque ....16 Utilisation ........17 Mise en marche des émetteurs-récepteurs......17...
  • Seite 14: Eléments De Commande

    - Eléments de commande - Eléments de commande Raccordement micro-casque Volume plus faible Touche marche/arrêt Éclairage de l’écran Interrupteur de canal Touche CALL CHANNEL 10. Touche TALK Touche MODE 11. Micro-casque Verrouillage de canal 12. Blocs de batterie Volume plus fort...
  • Seite 15: Mise En Service

    - Mise en service - Mise en service Vérifier le contenu de l’emballage Le contenu de l’emballage : Deux émetteurs-récepteurs avec Un chargeur clip-ceinture Deux blocs de batterie Un bloc d’alimentation Un mode d’emploi Deux micro-casques Mettre les blocs de batterie en place Votre émetteur-récepteur est fourni avec deux blocs de batterie NI-MH rechargeables que vous devez mettre en place avant la mise en service.
  • Seite 16: Fixer Le Clip-Ceinture

    - Mise en service - Fixer le clip-ceinture Après avoir mis en place le bloc de batterie, vous pouvez fixer le clip- ceinture fourni. Enfoncez le clip-ceinture par le bas dans la coulisse jusqu'à ce qu'il s'enclenche de manière perceptible. Pour détacher à nouveau le clip-ceinture, tirez légèrement la languette de fixation vers le haut, puis tirez le clip-ceinture vers le bas.
  • Seite 17: Utilisation

    - Utilisation - Utilisation Mise en marche des émetteurs- récepteurs Pour mettre en marche un émetteur-récepteur, maintenez la touche marche/arrêt enfoncée jusqu’au retentissement d’un signal sonore. L’écran s’éclaire pendant quelques secondes et toutes les icônes d’écran s’affichent. L’écran affiche ensuite le canal actuellement réglé. Mode automatique d’économie d’énergie Les émetteurs-récepteurs sont équipés d’un mode d’économie de...
  • Seite 18: Modifier Le Code D'appel

    - Utilisation - 3.3.1 Modifier le code d’appel Normalement, tous les signaux d’appel sont signalés sur le canal sélectionné sur tous les émetteurs-récepteurs se trouvant dans la zone de réception. Vous pouvez ainsi éventuellement entendre également des signaux d’appareil qui ne vous sont pas destinés lorsque d’autres utilisateurs d’émetteurs-récepteurs se trouvant à...
  • Seite 19: Verrouillage De Canal

    - Utilisation - Le volume du signal d’appel que vous recevez dépend du volume que vous avez réglé. Les touches VOL- et VOL+ vous permettent de régler le volume sur huit niveaux différents. Le volume sélectionné est affiché à l’écran durant 5 secondes. L’écran affiche ensuite de nouveau le réglage de canal.
  • Seite 20: Portée Des Émetteurs-Récepteurs

    - Utilisation - Portée des émetteurs-récepteurs Les émetteurs-récepteurs ont une portée pouvant atteindre 3 km. Cette portée maximale peut être réduite dans certaines conditions. Vous obtenez une portée maximale sur un terrain plat et dans un espace ouvert. La portée est réduite si la trajectoire des signaux est entravée par des bâtiments ou des arbres.
  • Seite 21: Informations Importantes

    - Informations importantes - Informations importantes Caractéristiques techniques Fréquences des canaux PMR (MHz) : Canal 1 : 446,00625 Canal 5 : 446,05625 Canal 2 : 446,01875 Canal 6 : 446,06875 Canal 3 : 446,03125 Canal 7 : 446,08125 Canal 4 : 446,04375 Canal 8 : 446,09375 38 fréquences sonores CTCSS : CH1=67.0Hz...
  • Seite 22: Instructions D'entretien

    - Informations importantes - Émetteur: Puissance de sortie effective 500 mW Stabilité de la fréquence porteuse +/- 1 kHz Limitation de modulation 2,5 kHz Durée de réponse porteuse 30 ms Comportement de fréquence vocale à 300 Hz -10 dB à 2,5 kHz 2 dB Distorsion du son Ronflement et souffle...
  • Seite 23 - Sommario - Elementi di comando........24 Messa in funzione ........25 2.1 Controllo del contenuto della confezione ... 25 2.2 Inserimento degli accumulatori ....... 25 2.3 Applicazione del clip della cintura..... 26 2.4 Collegamento della stazione di carica ....26 2.5 Caricamento delle ricetrasmittenti ....
  • Seite 24: Elementi Di Comando

    - Elementi di comando - Elementi di comando micro-collegamento cuffia riduzione volume interruttore ON/OFF illuminazione del display selettore canale tasto CALL CHANNEL 10. tasto TALK tasto MODE 11. auricolare Blocco canale 12. accumulatori aumento volume...
  • Seite 25: Messa In Funzione

    - Messa in funzione - Messa in funzione Controllo del contenuto della confezione La dotazione comprende: due ricetrasmittenti con clip a una stazione di carica cintura due accumulatori un alimentatore di rete istruzioni per l'uso due auricolari Inserimento degli accumulatori La Vostra ricetrasmittente è...
  • Seite 26: Applicazione Del Clip Della Cintura

    - Messa in funzione - Applicazione del clip della cintura Dopo aver integrato gli accumulatori, potete fissare il clip della cintura fornito in dotazione. Spingere il clip della cintura dal basso nella guida, fino a farlo scattare in posizione . Per staccare nuovamente il clip, basta tirare la linguetta di fissaggio leggermente verso l'alto e staccare poi il clip verso il basso.
  • Seite 27: Impiego

    - Impiego - Impiego Inserimento delle ricetrasmittenti Per inserire una ricetrasmittente, mantenere premuto il tasto ON/OFF, fino a sentire un segnale acustico. Per alcuni secondi si illumina il display con la visualizzazione di tutti i simboli d'indicazione. Dopodiché nel display viene visualizzato il canale attualmente selezionato.
  • Seite 28: Modifica Del Codice Di Chiamata

    - Impiego - 3.3.1 Modifica del codice di chiamata Normalmente tutti i segnali di chiamata in tutte le ricetrasmittenti vengono segnalati sul canale selezionato, e che si trovano attualmente sul campo di ricezione. In questo modo potete sentire anche eventuali di chiamata non per voi stabiliti, quando in prossimità altre persone stanno utilizzando le ricetrasmittenti sullo stesso canale.
  • Seite 29: Blocco Canale

    - Impiego - sente un segnale acustico, non appena rilasciate il tasto TALK. In tal modo al Vostro interlocutore viene segnalato il termine della Vostra frase e che siete in attesa di una risposta. Il volume del segnale di chiamata dipende sostanzialmente dalla regolazione del Vostro volume.
  • Seite 30: Portata Delle Ricetrasmittenti

    - Impiego - Portata delle ricetrasmittenti Le ricetrasmittenti hanno una portata massima di 3 km. Questa portata massima può essere ridotta a causa di determinate circostanze. La massima portata è raggiungibile in zone di pianura senza ostacoli. Nella presenza di edifici o alberi nella traiettoria dei segnali verrà...
  • Seite 31: Informazioni Importanti

    - Informazioni importanti - Informazioni importanti Dati tecnici PMR Canale Frequenze (MHz) : canale canale 1: 446,00625 5: 446,05625 canale canale 2: 446,01875 6: 446,06875 canale canale 3: 446,03125 7: 446,08125 canale canale 4: 446,04375 8: 446,09375 38 CTCSS Tone Frequenze: CH1=67.0Hz CH11= 97.4Hz CH21= 136.5Hz...
  • Seite 32: Istruzioni Per La Manutenzione

    - Informazioni importanti - Trasmettitore: potenza d’uscita effettiva 500 mW resistenza della frequenza portante 500 Hz delimitazione della modulazione 2,5 kHz tempo di reazione portante 30 ms comportamento di frequenza a 300 Hz -10 dB a 2,5 kHz 2 dB distorsione acustica ronzio e fruscio 35 dB...
  • Seite 33 - Contents - Operational Elements .....34 Commissioning......35 Check contents of pack .......35 Fitting the battery packs......35 Fitting the belt clip......36 Connecting the charging station ...36 Charging the radios ......36 Connecting the headset .......36 Operation ........37 Switching on the radios .......37 Automatic energy saving mode ....37 Channel selection .......37 3.3.1 Changing the call code ....38...
  • Seite 34: Operational Elements

    - Operational elements - Operational Elements Microphone and headphone Volume louder connection Volume softer On/Off button Display illumination CHANNEL switch CALL button MODE button 10. TALK button Channel lock 11. Headset...
  • Seite 35: Commissioning

    - Commissioning - Commissioning Check contents of pack The following items are supplied two radios with belt clip one charging station two battery packs one mains power supply one instruction manual two headsets Fitting the battery packs Your radio is supplied with two rechargeable Ni-MH battery packs, which must be fitted before using the equipment.
  • Seite 36: Fitting The Belt Clip

    - Commissioning - Fitting the belt clip After you have installed the batteries, you can fit the belt clip supplied with the unit. Slide the belt clip into the guide from below until it audibly engages. To remove the belt clip again, pull the fixing strap up slightly and pull the belt clip downwards.
  • Seite 37: Operation

    - Operation - Operation Switching on the radios To switch on the radio, hold the On/Off button pressed until a signal tone sounds. The display will be illuminated for some seconds and all the symbols will be shown in the display. After this the display will show the currently selected channel.
  • Seite 38: Changing The Call Code

    - Operation - 3.3.1 Changing the call code Normally, all calls on the selected channel are sent to all radios that are in receiving range. You may therefore also hear calls that are not intended for you when other people are using radios on the same channel in the vicinity.
  • Seite 39: Channel Lock

    - Operation - The volume of the incoming call signal depends on your volume setting. Eight volume levels can be set using the VOL- and VOL+ buttons. The selected volume will be shown in the display for 5 seconds. After this the display will revert to the channel setting. Note: While you are holding the TALK button, you will not be able to hear any incoming calls.
  • Seite 40: Range Of The Radios

    - Operation - Range of the radios The radios have a range of up to 3 km. This maximum range can be reduced under certain circumstances. You can achieve maximum range in open, flat conditions. If there are buildings or trees in the signal path then the range will be reduced.
  • Seite 41: Important Information

    - Important information - Important information Technical data PMR Channel Frequencies (MHz) : Channel 1: 446,00625 Channel 5: 446,05625 Channel 2: 446,01875 Channel 6: 446,06875 Channel 3: 446,03125 Channel 7: 446,08125 Channel 4: 446,04375 Channel 8: 446,09375 38 CTCSS Tone Frequencies: CH1=67.0Hz CH11= 97.4Hz CH21= 136.5Hz...
  • Seite 42: Care Instructions

    - Important information - Transmitter: Effective output power 500 mW Carrier frequency persistence +/- 1kHz Modulation limit 2.5 kHz Reaction time, carrier 30 ms Audio frequency response at 400Hz -10 dB at 2,5 kHz 2 dB Audio distortion Hum and noise 35 dB Transient frequency response Transmitter on...
  • Seite 43: Declaration Of Conformity

    Unit 207-219, 2/F, Century Sentre, 44-46 Hung to Road, Kwun Tong, Kowloon, Hong Kong Declare under our own responsibility that the product Model: SWITEL WT117 Description: Private Mobile Radio, frequency 446 MHz Is in conformity with directives: 1999/5/EC R & TTE Directives Compliance is achieved by conformity to the following: EN 300 296-2 V1.1.1 2001-3, EN 300 279 V1.2.1 1999-2,...

Diese Anleitung auch für:

Wt118

Inhaltsverzeichnis