Herunterladen Inhalt Inhalt Diese Seite drucken

Werbung

Verfügbare Sprachen
  • DE

Verfügbare Sprachen

  • DEUTSCH, seite 1
Weinkühlschrank
10029629

Werbung

Inhaltsverzeichnis
loading

Inhaltszusammenfassung für Klarstein 10029629

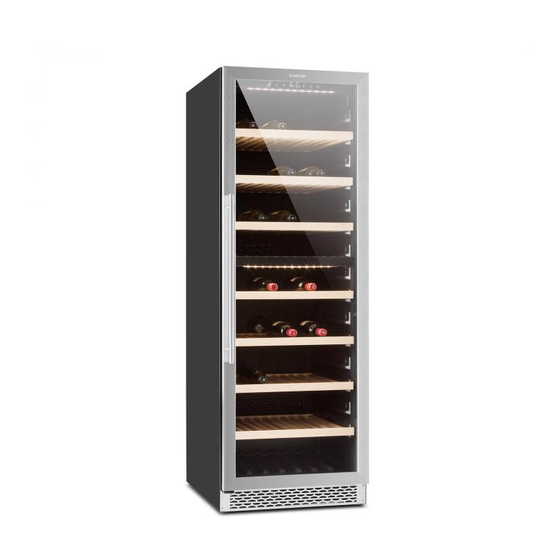
  • Seite 1 Weinkühlschrank 10029629...
  • Seite 2: Inhaltsverzeichnis

    Sehr geehrter Kunde, wir gratulieren Ihnen zum Erwerb Ihres Klarstein Gerätes. Lesen Sie die folgenden Anschluss- und Anwendungshinweise sorgfältig durch und befolgen Sie diese, um möglichen technischen Schäden vorzubeugen. Für Schäden, die durch Missachtung der Sicherheitshinweise und unsachgemäßen Gebrauch entstehen, übernehmen wir keine Haftung.
  • Seite 3: Sicherheitshinweise

    Sicherheitshinweise • Benutzen Sie das Gerät bestimmungsgemäß: Das Gerät dient dem Aufbewahren von Wein. • Gefahr des Einsperrens von Kindern. Bevor Sie Ihren alten Kühlschrank entsorgen: Nehmen Sie die Türen heraus. Lassen Sie die Regale im Fach, so dass Kinder nicht hineinklettern können. Hinweise zum Kältemittel R600a: Befolgen Sie zu Ihrer eigenen Sicherheit die folgenden Hinweise: •...
  • Seite 4: Aufstellung

    • Die falsche Benutzung der Erdung kann zu einem Stromschlag führen. Ziehen Sie einen qualifizierten Elektriker oder den Kundendienst zu Rate, um Gefahren zu vermeiden. • Falls das Netzkabel beschädigt ist, muss es von einem qualifizierten Elektriker oder vom Kundendienst ausgetauscht werden.
  • Seite 5 • Dieses Gerät ist nicht für den Einbau geeignet. • Das Gerät braucht zu den Seiten und nach oben hin mindesten 5 mm Abstand, zur Rückseite hin mindestens 30 mm. Dies dient dazu, den Einbau, den Ausbau, die Wartung und die Ventilation zu erleichtern.
  • Seite 6: Inbetriebnahme

    Inbetriebnahme Inbetriebnahme des Weinkühlschranks Schließen Sie den Netzstecker an und drücken Sie einige Sekunden lang den Ein/Aus-Schalter. Wenn Sie den Weinkühlschrank zum ersten Mal benutzen oder ihn nach langer Zeit wieder in Betrieb nehmen, gibt es eine Temperaturabweichung von einigen Grad zwischen der Temperatur, die Sie gewählt haben und die auf der LED-Anzeige angegebenen.
  • Seite 7 Vor dem Befüllen und Anschluss des Weinkühlschranks Der Aufstellungort, den Sie für den Weinkühlschrank gewählt haben sollte: ◦ nicht überladen und gut belüftet sein. ◦ ein gutes Stück entfernt von Wärmequellen und direkter Sonneneintstrahlung sein. ◦ nicht zu feucht sein (Waschküche, Vorratsraum, Badezimmer). ◦...
  • Seite 8: Einstellungen

    Einstellungen Bitte beachten Sie, dass der Weinkühlschrank, abhängig von der Befüllung und der gewählten Einstellung, 24 Stunden braucht, die Temperatur zu stabilisieren. Während dieser Zeit springt die LED-Anzeige beliebig. Dies ist normal und kommt immer dann vor, wenn die Einstellung verändert wurde und wenn eine große Menge Flaschen hinzugefügt wurde. Konstruiert, um alle Weine zu lagern und reifen zu lassen: Rotwein, Weißwein und Schaumwein.
  • Seite 9 Anzeige der Temperatur im unteren Fach. Anzeige von Fehlermeldungen (“E3, E4, E5, E6”). Anzeige des Countdowns beim Ausschalten (3, 2, 1).  Einstellung der Temperatur im unteren Fach: Taste drücken. In der rechten LED-Anzeige  erhöht sich der eingestellte Wert bei jedem Druck um 1 °C.
  • Seite 10 Informationen zur Temperatur Der Weinkühlschrank wurde entwickelt, um optimale Umgebungsbedinungen für Ihre Weine zu gewährleisten. Gute Weine brauchen eine lange und sorgsame Entwicklung und besondere Bedingungen, in denen Sie ihr volles Potential erreichen. Alle guten Weine reifen konstant bei 12-14 °C. Nur die Temperatur bei der Verkostung variiert je nach Weinsorte (siehe Tabelle der Trinktemperatur).
  • Seite 11 Holzregale verstellen Die Regale einlegen und herausnehmen Um einen leichten Zugriff auf den Lagerbestand zu haben, ziehen Sie das Regal etwa zu einem Drittel aus der Schiene. Der Weinkühlschrank hat auf jeder Seite der Schiene eine Nut, um zu verhindern, dass die Flaschen herausfallen.
  • Seite 12 Türanschlag wechseln Warnung: Um während des Umbaus Unfälle zu vermeiden, besorgen Sie sich Hilfe. Die Glastür ist schwer und kann Verletzungen verursachen, wenn sie fallen gelassen wird. Stellen Sie den Weinkühlschrank auf eine freie Fläche. 2. Öffnen Sie die Tür so weit wie möglich. Nehmen die Schraubenblende auf der anderen Seite ab. 3.
  • Seite 13: Fehlerbehebung

    Fehlerbehebung Bei Unregelmäßigkeiten im Betrieb Überprüfen Sie, ob die Steckdose Strom führt, indem Sie dort ein anderes elektrisches Gerät anschließen. Kontrollieren Sie die Sicherung, falls vorhanden. Achten Sie darauf, dass die Tür vollständig geschlossen ist. Wenn Ihr Gerät eine Fehlfunktion hat, ziehen Sie den Netzstecker und treten Sie mit dem Kundendienst in Kontakt.
  • Seite 14 Problem Möglicher Grund / Lösung Das Gerät funktioniert nicht. Netzstecker nicht angeschlossen. Das Gerät ist ausgeschaltet. Der Schutzschalter ist ausgelöst oder die Sicherung ist durchgebrannt. Das Gerät ist nicht kalt genug. Prüfen Sie die Temperatureinstellung. Die Umgebung erfordert eine höhere Einstellung. Die Tür wird zu oft geöffnet.
  • Seite 15: Hinweise Zur Entsorgung

    Hinweise zur Entsorgung Befindet sich die linke Abbildung (durchgestrichene Mülltonne auf Rädern) auf dem Produkt, gilt die Europäische Richtlinie 2012/19/EU. Diese Produkte dürfen nicht mit dem normalen Hausmüll entsorgt werden. Informieren Sie sich über die örtlichen Regelungen zur getrennten Sammlung elektrischer und elektronischer Gerätschaften. Richten Sie sich nach den örtlichen Regelungen und entsorgen Sie Altgeräte nicht über den Hausmüll.
  • Seite 16: Technical Data

    Declaration of Conformity ......... 29 Technical Data Item number 10029629 Power supply 220 V~ 50 Hz...
  • Seite 17: Safety Instructions

    Safety Instructions • Use this appliance only in the manner intended: The appliance is for storing wine. • Risk of child entrapment. Before you throw away your old wine chiller: Take off the doors. Leave the shelves in place so that children may not easily climb inside. R600a WARNINGS: For your safety observe the following recommendations.
  • Seite 18: Installation

    • In locations where there is frequent lightning, it is advisable to use surge protectors. Installation Installing Unpack and remove all of the protection and adhesive strips from the packaging around and inside the wine cellar.The wine cellar must be positioned such that the plug is accessible. Release the power cord. Move your wine cellar to its final location.
  • Seite 19 • “Built in” wine cellars have a power switch located on the control panel so power point location is not critical. • The unit requires a standard 240 volt/10 amp power point. (Or according to different countries specifications). • The power cord is 2.0m in length and is fixed on the right side at the back when looking from front of cabinet.
  • Seite 20: Operation

    Operation Initial operation Plug in and switch on the cellar by pressing on the power button for a few seconds. When you use the wine cellar for the first time (or restart the wine cellar after having it shut off for a long time), there will be a few degrees variance between the temperature you have selected and the one indicated on the LED readout.
  • Seite 21 The appliance is in line with international standards for such appliance. Klarstein will always do its utmost to satisfy its customers but will not retake possession of the goods due to complaints based on normal operating noise occurrences.
  • Seite 22: Settings

    Settings Please note that depending on the loading and settings chosen it takes about 24 hours for the wine cellar to see the temperature stabilizing. During this time LED seems to move erratically in particular for “D” models. It is normal and this process occurs whenever the setting is modified and/or whenever a large amount of bottles are added to the cellar.
  • Seite 23  Window: Display lower zone temperature, display “E3, E4, E5, E6” code, display power off countdown numbers (3, 2, 1).  Lower zone temperature setting up button: Press one time, window  the set value will increase 1 degree Celsius in the original setting tempera- ture, the setting range accordingly to customer requirements.
  • Seite 24 Cabernet & Merlot 20 °C Vintage Bordeaux 20 °C Important information about temperature Your wine cellar has been designed to guarantee optimum conditions for storing and/or serving your wines. Fine wines require long and gentle developments and need specific conditions in which to reach their full potential.
  • Seite 25 the shelf tracks to prevent bottles from falling. When removing any of these shelves out of the rail compartment, tilt the shelf as per the diagram and simply pull out, or push in the shelf until it sits on the support brackets securely. Shelf installation: According to below instruction drawing to push in the shelf alignment with two sides of sliding roller following the arrow mark .
  • Seite 26 Reversing the door Warning: To avoid accidents during the process of changing the door, we recommend that you get assistance. The glass door is heavy and may cause injury if dropped. To put the cabinet on open operation place; 2. The door opened to the maximum angle, take off the decorative nail on opposite side (Drawing 1); 3.
  • Seite 27: Troubleshooting

    Troubleshooting Operation anormalities Ensure that there is power to the electrical supply plug by connecting another electrical appliance to it. Check fuse, if any. Make sure that the door is closed properly. If your wine cellar appears to be malfunctioning, unplug it and contact your VINICOLE’ s after sales service. Any intervention on the cold circuit should be performed by a refrigeration technician who should carry out an inspection of the circuit sealing system.
  • Seite 28 Problem Possible Cause / Solution Wine cellar does not operate. Not plugged in. The appliance is turned off. The circuit breaker tripped or the fuse is broken. Wine cellar is not cold enough Check the temperature control setting. External environment may require a higher setting. The door is opened too often.
  • Seite 29: Disposal Considerations

    Disposal Considerations According to the European waste regulation 2012/19/EU this symbol on the product or on its packaging indicates that this product may not be treated as household waste. In- stead it should be taken to the appropriate collection point for the recycling of electrical and electronic equipment.
  • Seite 30: Datos Técnicos

    Declaración de conformidad ........71 Datos técnicos Número de artículo 10029629 Suministro eléctrico 220 V~ 50 Hz...
  • Seite 31: Indicaciones De Seguridad

    Indicaciones de seguridad • Utilice el aparato adecuadamente: el aparato ha sido concebido para almacenar vino. • Existe el riesgo de que los niños se queden atrapados. Antes de desechar la vinoteca: extraiga la puerta. Deje las baldas en el interior para evitar que los niños se queden encerrados. Indicaciones sobre el refrigerante R600a: •...
  • Seite 32: Colocación

    • Una utilización incorrecta de la toma de tierra pude provocar una descarga eléctrica. Contacte con un electricista o con el servicio de atención al cliente para evitar riesgos. • Si el cable de alimentación está dañado, deberá ser sustituido por un electricista o por el servicio de atención al cliente.
  • Seite 33 • Este aparato no está concebido para empotrarse en otros muebles. • El aparato necesita al menos 5 mm de espacio a los lados y en la parte superior y almenos 30 mm en la parte trasera. Esto ayudará a facilitar el montaje, desmontaje, mantenimiento y la ventilación. •...
  • Seite 34: Funcionamiento

    Funcionamiento Puesta en marcha de la vinoteca Conecte el enchufe y pulse unos segundos el interruptor On/Off. Si utiliza la vinoteca por primera vez o hace tiempo que no utiliza el aparato, es posible que haya una diferencia de temperatura con respecto a la que ha seleccionado y la que aparece en el indicador LED. Se trata de un fenómeno normal provocado por un largo periodo sin utilización.
  • Seite 35 Antes del llenado y de la conexión de la vinoteca El lugar de instalación que ha seleccionado para la vinoteca debe cumplir con las siguientes pautas: • No debe estar sobrecargada y debe estar bien ventilada. • Debe estar separada de fuentes de calor y de la luz directa de sol. •...
  • Seite 36: Ajustes

    Ajustes Tenga en cuenta que la vinoteca, dependiendo del llenado y de los ajustes seleccionados, necesita 24 horas para estabilizar la temperatura. Durante este tiempo, el indicador LED indicará cualquier temperatura. Este proceso es normal y siempre se produce cuando se modifica la selección de temperatura y si se introduce una gran cantidad de botellas. La vinoteca está...
  • Seite 37  Indicador derecho LED: Indicador de temperatura en el compartimento inferior. Indicador de errores (“E3, E4, E5, E6”). Indicador de la cuenta atrás al apagar (3, 2, 1).  Ajuste de temperatura en el compartimento inferior: Pulse el botón. En el indicador derecho  aumenta la temperatura en intervalos de 1 °C cada vez que pulsa el botón.
  • Seite 38 Información sobre la temperatura La vinoteca se ha concebido para garantizar unas condiciones ambientales óptimas para su vino. Los buenos vinos necesitan un proceso de maduración largo y delicado y condiciones especiales para poder alcanzar su mayor potencial. Todos los buenos vinos maduran de manera constante a 12-14 °C. Solo la temperatura de la degustación varía dependiendo del tipo de vino (consulte la tabla de temperatura de consumo).
  • Seite 39 Distribuir las baldas de madera Introducir y extraer las baldas Para acceder fácilmente a las botellas almacenadas, extraiga un tercio de la balda de su guía. La vinoteca tiene a cada lado de las guías una muesca para evitar que las botellas se caigan. Extraer una balda: Para extraer una balda, agárrela (consulte ilustración) y tire de ella.
  • Seite 40 Cambiar la orientación de apertura de la puerta Advertencia: para evitar accidentes durante la instalación, pida ayuda a otra persona. La puerta de cristal es pesada y puede provocar lesiones si se deja caer. Coloque la vinoteca en una superficie libre de otros objetos. 2.
  • Seite 41: Resolución De Problemas

    Resolución de problemas Problemas durante el funcionamiento Compruebe que la toma de corriente cuenta con suministro eléctrico conectando otro aparato eléctrico diferente. Controle los fusibles si fuera pertinente. Asegúrese de que la puerta está cerrada correctamente. Si su aparato está averiado, desconecte el enchufe y contacte con el servicio de atención al cliente. La manipulación del circuito de refrigeración debe ser realizada solamente por un frigorista que lleve a cabo una inspección del aislamiento del circuito.
  • Seite 42 Problema Posible causa / solución El aparato no funciona. El enchufe no está conectado. El aparato está apagado. Se ha activado el interruptor de seguridad o el fusible se ha fundido. La vinoteca no enfría lo suficiente. Compruebe la configuración de temperatura. El entorno requiere un ajuste mayor de temperatura.
  • Seite 43: Indicaciones Para La Retirada Del Aparato

    Indicaciones para la retirada del aparato Si el aparato lleva adherida la ilustración de la izquierda (el contenedor de basura tachado) entonces rige la normativa europea, directiva 2012/19/UE. Este producto no debe arrojarse a un contenedor de basura común. Infórmese sobre las leyes territoriales que regulan la recogida separada de aparatos eléctricos y electrónicos.
  • Seite 44: Fiche Technique

    Déclaration de conformité ......... 57 Fiche technique Numéro d’article 10029629 Alimentation électrique 220 V~ 50 Hz...
  • Seite 45: Consignes De Sécurité

    Consignes de sécurité • Utiliser l’ a ppareil de manière conforme : l’ a ppareil sert au stockage de vin. • Empêcher les enfants de s’ e nfermer dans le réfrigérateur. Avant d’ é liminer son ancien réfrigérateur : reti- rer les portes.
  • Seite 46: Installation

    • Dans des zones à orages fréquents, il est conseillé d’utiliser un parafoudre. Installation Installation Sortir l’ a ppareil de l’ e mballage et retirer toutes les bandes adhésives de l’ a ppareil ainsi que les protections pour le transport. Installer l’ a ppareil de sorte à ce que la prise électrique soit facilement accessible. Ne pas encombrer le cordon d’...
  • Seite 47 • L’ a ppareil aspire l’ a ir par l’ a rrière et l’ e xpulse par la grille métallique à l’ a vant. • Si un cache est monté sur la face, celui-ci doit aussi être équipé d’une grille d’ a ération dont la dimension permet un débit d’...
  • Seite 48: Mise En Marche

    Mise en marche Mise en marche du réfrigérateur à vin • Brancher la fiche d’ a limentation et rester appuyer pendant plusieurs secondes sur le bouton marche/arrêt. • Lors de la première utilisation du réfrigérateur ou après une longue inutilisation de celui-ci, il existe une différence de température de quelques degrés entre la température sélectionnée et celle affichée sur l’...
  • Seite 49 Avant de remplir et de brancher le réfrigérateur à vin L’ e mplacement choisi pour le réfrigérateur à vin doit respecter les critères suivants : ◦ Il ne doit pas être encombré et doit être bien ventilé. ◦ Il doit être suffisamment éloigné de sources de chaleur et de la lumière directe du soleil. ◦...
  • Seite 50: Réglages

    Réglages Prendre en considération que le réfrigérateur à vin nécessite 24 heures pour stabiliser la température, indépendamment du remplissage ou du réglage sélectionné. Pendant ce temps, l’ a ffichage LED paraît instable. Cela est normal et survient toujours lorsque les réglages ont été...
  • Seite 51 2, 1).  Appuyer sur la touche. Sur l’ a ffichage LED de droite , la valeur réglée augmente de 1 °C à chaque pression sur la touche  Réglage de la température du compartiment du bas : Appuyer sur la touche. Sur l’ a ffichage LED de droite , la valeur réglée diminue de 1 °C à chaque pression sur la touche.
  • Seite 52 Informations sur les températures Le réfrigérateur à vin a été conçu pour assurer aux vins des conditions d’ e nvironnement optimales. Les bons vins nécessitent une maturation longue et minutieuse et en particulier des conditions leur permettant d’ e xprimer tout leur potentiel. Tous les bons vins mûrissent de manière constante à...
  • Seite 53 Déplacer les étagères en bois Insérer les étagères et les sortir Pour un accès facile à son stock de vin, sortir l’ é tagère d’un tiers en la faisant coulisser le long de la glissière. De chaque côté des glissières, une encoche empêche les bouteilles de tomber. Sortir une étagère : pour tirer vers soi une étagère, la soulever (cf.
  • Seite 54 Changer le sens d’ouverture de la porte Attention : pour éviter tout accident pendant le remontage, se faire aider par d’ a utres personnes. La porte vitrée est lourde et peut provoquer des blessures si elle tombe. Placer le réfrigérateur sur une surface dégagée. 2.
  • Seite 55: Résolution Des Problèmes

    Résolution des problèmes Dysfonctionnements Vérifier que la prise électrique fournit du courant en y branchant un autre appareil électrique. Vérifier les fusibles le cas échéant. Veiller à ce que la porte soit complètement fermée. Si l’ a ppareil présente un dysfonctionnement, le débrancher et contacter le service client.
  • Seite 56 Problème Cause possible / solution L’ a ppareil ne fonctionne pas. La fiche d’ a limentation n’ e st pas branchée. L’ a ppareil est éteint. Le disjoncteur a été déclenché et le fusible a sauté. L’ a ppareil n’ e st pas assez froid. Vérifier le réglage de la température.
  • Seite 57: Information Sur Le Recyclage

    Information sur le recyclage Vous trouverez sur le produit l’image ci-contre (une poubelle sur roues, barrée d'une croix), ce qui indique que le produit se trouve soumis à la directive européenne 2002/96/CE. Renseignez-vous sur les dispositions en vigueur dans votre région concernant la collecte séparée des appareils électriques et électroniques.
  • Seite 58: Dati Tecnici

    Dichiarazione di conformità ........43 Dati tecnici Numero articolo 10029629 Alimentazione 220 V~ 50 Hz...
  • Seite 59: Avvertenze Di Sicurezza

    Avvertenze di sicurezza • Utilizzare il dispositivo in maniera conforme: il dispositivo serve a conservare i vini. • Per evitare il pericolo che i bambini si chiudano dentro il frigorifero, rimuovere lo sportello prima di smal- tire il vecchio frigorifero. Lasciare i ripiani all’interno in modo che i bambini non possano arrampicarsi. Avvertenze per il refrigerante R600a: Seguire le seguenti indicazioni per ragioni di sicurezza: •...
  • Seite 60: Collocazione

    • Se il cavo è danneggiato, farlo sostituire da un elettricista qualificato o rivolgersi al servizio clienti. • In zone soggette a temporali frequenti, si consiglia di collegare il dispositivo ad una protezione contro le sovratensioni. Collocazione Collocazione Togliere il dispositivo dalla confezione e rimuovere il nastro adesivo. Collocare il dispositivo in modo che la spina possa essere facilmente accessibile.
  • Seite 61 • Il dispositivo non è adatto per essere incassato in un mobile. • Lasciare almeno 5 cm di spazio libero ai lati e verso l’ a lto, sul retro almeno 30 mm: ciò facilita il montaggio, lo smontaggio, la manutenzione e garantisce un’ a deguata ventilazione. •...
  • Seite 62: Messa In Funzione

    Messa in funzione Messa in funzione del frigorifero per vini Inserire la spina e tenere premuto per qualche secondo l’interruttore on/off. Se si utilizza il frigorifero per la prima volta oppure non lo si riutilizza dopo un tempo prolungato, si verificano variazioni di temperatura di qualche grado tra la temperatura impostata e la temperatura che compare sul display a LED.
  • Seite 63 Prima di riempire e di collegare il frigorifero per vini Il luogo di installazione del frigorifero deve: ◦ essere libero ed ben arieggiato. ◦ essere lontano da fonti di calore e dalla luce diretta del sole. ◦ non essere troppo umido (lavanderia, ripostiglio, bagno). ◦...
  • Seite 64: Impostazioni

    Impostazioni Tenere presente che il frigorifero necessita di 24 ore per stabilizzare la temperatura in base al numero di bottiglie contenute all’interno e all'impostazione selezionata. Durante questo lasso di tempo, il display a LED sembra non funzionare correttamente. Questo è normale e si verifica ogni volta che si modifica l’impostazione o si introduce una grande quantità...
  • Seite 65 Indica la temperatura nello scomparto inferiore. Indica anche i messaggi di errore (“E3, E4, E5, E6”) e il conto alla rovescio dello spegnimento del dispositivo).  Impostazione della temperatura nello scomparto inferiore: Premere il tasto. L’indicatore a LED destro  aumenta il valore impostato di 1°C ad ogni pressione del tasto.
  • Seite 66 Informazioni per la temperatura Il frigorifero è progettato per garantire temperature ottimali per la conservazione del vino. I vini di qualità necessitano di una maturazione lunga e di condizioni particolari per raggiungere il loro pieno potenziale. Tutti i vini di qualità maturano in maniera costante a 12-14°C. Solo la temperatura per la degustazione varia in base al tipo di vino (vedere la tabella con le temperature).
  • Seite 67 Ripiani rimovibili Inserire e rimuovere i ripiani Per prendere con facilità le bottiglie, estrarre di un terzo il ripiano dal binario. Il frigorifero dispone di una scanalatura su ogni lato del binario per evitare che le bottiglie cadano. Estrarre un ripiano: se si estraggono uno o più ripiani, inclinare il ripiano (vedere l’illustrazione) e tirarlo sem- plicemente.
  • Seite 68 Modificare il lato di apertura Attenzione: per evitare incidenti mentre si modifica il lato di apertura, servirsi di un aiutante. Lo sportello è pesante e può causare lesioni se viene fatto cadere. Collocare il frigorifero su una superficie piana. 2. Aprire completamente lo sportello. Rimuovere le viti sull’ a ltro lato (Figura 1). 3.
  • Seite 69: Risoluzione Dei Problemi

    Risoluzione dei problemi In caso di irregolarità nel funzionamento Verificare che la presa elettrica funzioni collegando un altro dispositivo elettrico. Controllare il fusibile, se pre- sente. Assicurarsi che lo sportello sia completamente chiuso. Se il dispositivo non funziona correttamente, scollegare il cavo di alimentazione e contattare il centro di assistenza. Qualsiasi intervento sul circuito refrige- rante può...
  • Seite 70 Problema Causa possibile / soluzione Il frigorifero non funziona. La spina non è inserita. Il frigorifero è spento. L’interruttore di sicurezza si è attivato oppure un fusibile è bruciato. Il frigorifero non è freddo abbastanza. Controllare l’impostazione della temperatura. La temperatura ambiente richiede un’impostazione più alta. Lo sportello non è...
  • Seite 71: Smaltimento

    Smaltimento Se sul prodotto è presente la figura a sinistra (il cassonetto dei rifiuti mobile sbarrato), si applica la direttiva europea 2002/96/CE. Questi prodotti non possono essere smaltiti con i rifiuti normali. Informarsi sulle disposizioni vigenti in merito alla raccolta separata di dispositivi elettrici ed elettronici.

Inhaltsverzeichnis