Inhaltsverzeichnis
Werbung
Verfügbare Sprachen
Verfügbare Sprachen
Quicklinks
Werbung
Inhaltsverzeichnis

Verwandte Anleitungen für Klarstein 10026898


Inhaltszusammenfassung für Klarstein 10026898
- Seite 1 Zitruspresse orange Weinkühlschrank 10008166 10008167 10008168 10026898 10026899...
-
Seite 2: Kleine Objekte/Verpackungsteile
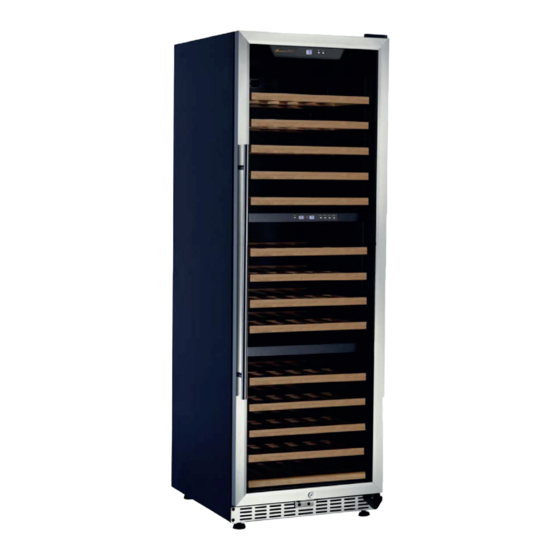
Warnung Gerät Zur Reduzierung der Gefahr von Brand, elektrischem Schlag und Beschädigung: • Setzen Sie dieses Gerät nicht dem Regen aus. • Stellen Sie keine mit Flüssigkeiten gefüllten Gefäße, wie Vasen, auf dieses Gerät. • Ausschließlich das empfohlene Zubehör verwenden. •... - Seite 3 • Das Gerät ist zur freistehenden Aufstellung vorgesehen. Lassen Sie zu jeder Seite ca. 10 cm Raum. • Stellen Sie das Gerät so auf, dass sich Personen – vorzugsweise Kinder – nicht hinter oder am Gerät verfangen können. • Achten Sie darauf, dass Kinder nicht in das Gerät klettern können. Bedienelemente 10026898 (1) Bedienfeld (2) Ventilator (3) Regal (4) Sensor (5) Prallblech (6) Aktivkohlefi lter (7) Ventilator...
-
Seite 4: Bedienung
Bedienung 10026898 „SET“-Knopf (neben dem Display „Lower Chamber“): Drücken Sie wiederholt diesen Knopf, um die Temperatur für das untereFach zu variieren. Der einstellbare Temperaturbereich liegt zwischen 5 und 12° Celsius. Display „Lower Chamber“: Zeigt die Temperatur des unteren Kühlfachs an. „SET“-Knopf (neben dem Display „Upper Chamber“): Drücken Sie wiederholt diesen Knopf, um die Temperatur für das obere Fach zu variieren. Der einstellbare Temperaturbereich liegt zwischen 12 und 22° Celsius. Display „Upper Chamber“: Zeigt die Temperatur des oberen Kühlfachs an. „Light“-Knopf: Drücken Sie diesen Knopf, um die Innenbeleuchtung an- und auszuschalten. Das Lciht erlischt nach 10 Minuten automatisch. „C/F“-Knopf: Drücken Sie diesen Knopf, um zwischen der Celsius- und der Fahrenheit-Skala zu wech- seln. „On/Off“-Knopf: Drücken Sie diesen Knopf, um das Gerät an- und auszuschalten. 10026898 Display: Zeigt die Temperatur des Weinfachs an. „+“ und „-“-Knöpfe: Drücken Sie diese Knöpfe, um die Temperatur des Weinfachs zu variieren. „SET“-Knopf: Drücken Sie diesen Knopf, um zwischen mittlerem und unteren Weinfach zu wechseln. Display „Lower Chamber“: Zeigt die Temperatur des unteren Kühlfachs an. „+“ und „-“-Knöpfe: Drücken Sie diese Knöpfe, um die Temperatur des gewähltenWeinfachs zu variieren. Display „Middle Chamber“: Zeigt die Temperatur des mittleren Kühlfachs an. „Light“-Knopf: Drücken Sie diesen Knopf, um die Innenbeleuchtung an- und auszuschalten. Das Lciht erlischt nach 10 Minuten automatisch. - Seite 5 „C/F“-Knopf: Drücken Sie diesen Knopf, um zwischen der Celsius- und der Fahrenheit-Skala zu wechseln. „On/Off “-Knopf: Drücken Sie diesen Knopf, um das Gerät an- und auszuschalten. Weinregalwechsel Weinregalwechsel 1. Entnehmen Sie alle Weinfl aschen und ziehen Sie das Regal qweiterstmöglich heraus. 1. Entnehmen Sie alle Weinfl aschen und ziehen Sie das Regal qweiterstmöglich heraus. 2. Drücken Sie die linke Seite wie abgebildet nach unten, während Sie die rechte nach oben drücken und gleichzeitig das Regel herausziehen Platzierung der Weinfaschen...
-
Seite 6: Hinweise Zur Ensorgung
Reparaturen • Reparaturen am Gerät sollten nur von einer autorisierten Fachwerkstatt durchgeführt werden. • Ein Umbauen oder Verändern des Produktes beeinträchtigt die Produktsicherheit. Achtung Verletzungsgefahr! • Öff nen Sie das Produkt niemals eigenmächtig und führen Sie Reparaturen nie selber aus! • Falscher Zusammenbau führt möglicherweise zu Fehlfunktionen oder dem Totalausfall. • Öff nen Sie in keinem Fall das Gerät. Achtung: Es wird keine Haftung für Folgeschäden übernommen. Technische Änderungen und Irrtümer vorbehalten! Beachten Sie: Die Gewährleistung verfällt bei Fremdeingriff en in das Gerät. Hinweise zur Ensorgung Befi ndet sich die linke Abbildung (durchgestrichene Mülltonne auf Rädern) auf dem Produkt, gilt die Europäische Richtlinie 2002/96/EG. Diese Produkte dürfen nicht mit... -
Seite 7: Important Safety Notes
Important Safety Notes Warnings To reduce the risk of fire, electrical shock, or injury when using your appliance, follow these basic precautions: • Read all instructions before using the Wine cooler. • Do keep the children away from the wine cooler. Never allow children to operate, play with, or crawl inside the appliance. • Never clean appliance parts with flammable fluids. The fumes can create a fire hazard or explosion. • While wine cooler stops working, please call our after-sell service department or other related technicians to check and repair. Never do it by yourself in case of accident. - Seite 8 10026898 series structure diagram: 10026898 series structure diagram: 10026899 series structure diagram: 10026899 series structure diagram:...
-
Seite 9: Installation
Installation Before Using Your Wine Cooler • Remove the exterior and interior packing. • Before connecting the Wine Cooler to the power source, let it stand upright for approximately 2 hours. This will reduce the possibility of a malfunction in the cooling system from handling during transportation. • Clean the interior surface with lukewarm water with a soft cloth. • The cooler is specially designed for wine storage, please do not put in other goods. Installation: • The cooler should be placed independently so as to make sure good heat dissipation. The back of the cooler should be away from the wall 10cm at minimum. • Place your wine cooler on a fl oor that is strong enough to support it when it is fully loaded. To level your Wine Cooler, adjust the front leveling leg at the bottom of the Wine Cooler. • Locate the Wine Cooler away from direct sunlight and sources of heat (stove, heater, radiator, etc.).Direct sunlight may aff ect the acrylic coating and heat sources may increase electrical con- sumption. Extreme cold ambient temperatures may also cause the unit not to perform properly. - Seite 10 10026898 series structure diagram: 10026898 series structure diagram: 10026899 series structure diagram: 10026899 series structure diagram:...
- Seite 11 Installation Before Using Your Wine Cooler • Remove the exterior and interior packing. • Before connecting the Wine Cooler to the power source, let it stand upright for approximately 2 hours. This will reduce the possibility of a malfunction in the cooling system from handling during transportation. • Clean the interior surface with lukewarm water with a soft cloth. • The cooler is specially designed for wine storage, please do not put in other goods. Installation: • The cooler should be placed independently so as to make sure good heat dissipation. The back of the cooler should be away from the wall 10cm at minimum. • Place your wine cooler on a fl oor that is strong enough to support it when it is fully loaded. To level your Wine Cooler, adjust the front leveling leg at the bottom of the Wine Cooler. • Locate the Wine Cooler away from direct sunlight and sources of heat (stove, heater, radiator, etc.).Direct sunlight may aff ect the acrylic coating and heat sources may increase electrical con- sumption. Extreme cold ambient temperatures may also cause the unit not to perform properly.
- Seite 12 Control Panel Below (dual zone): Display Windows Display Windows · RUN light: Indicator light of compressor working. While the compressor operating, the red light is on. While it stops operating, the red light is off . Display o f t he a ctual t emperature o f t he u pper c hamber. T he r ange i s 0 ℃~37℃ or ·...
- Seite 13 Button Operation • SET Button: Temperature setting button; Once you press the button, the temperature increase 1℃ or 1℉. Setting range is between 5℃~22℃ or 41℉~72℉. (Lower Control Panel) Display Windows · RUN light: Indicator light of compressor working. While the compressor operating, the red light is on. While it stops operating, the red light is off . ·...
- Seite 14 Firstly take out all the wines from the shelves and pull shelf out to the limit. Then press down the left limit of sliding rail and meanwhile press up the right one, pull the shelves out at this time. It could be easily pulled out if doing the three steps (Press down left limit, press up the right one and puling out) at the same time. Placement and storage of wines Several common layouts of wines: Your cabinet was designed to store a maximum number of bottles in total security. The wines are kindly advised to layout equally. The best temperature for red wines is 11-18℃; For white wines is 6-12℃; The temperature range of our wine coolers could set between 5-22℃.
-
Seite 15: Care And Maintenance
Care and Maintenance Cleaning Your Wine Cooler • Wash the inside surfaces with warm water and baking soda solution. The solution should be about 2 tablespoons of baking soda with a quart of water. • Wash the shelves with a mild detergent solution. •... -
Seite 16: Hints On Disposal
PROBLEM POSSIBLE CAUSE Turn on and off frequently. The room temperature is hotter than normal. A large amount of contents has been added to the Wine Cooler. The door is opened too often. The door is not closed completely. The temperature control is not set correctly. The door gasket does not seal properly. The light does not work. Not plugged in. The circuit breaker tripped or a blown fuse. - Seite 17 Avertissement Appareil Pour réduire les risques d’incendie, d’électrocution et de détérioration : • Ne jamais exposer cet appareil à la pluie. • Ne pas poser de récipient rempli de liquide sur l’appareil, comme par exemple un vase. • Utiliser exclusivement les accessoires recommandés. • Ne pas réparer l’appareil soi-même. • Se tourner vers un service après-vente qualifié pour la maintenance de l’appareil. • Ne pas introduire d‘objet métallique dans cet appareil. Cordon d’alimentation / bloc d’alimentation Pour réduire les risques d’incendie, d’électrocution et de détérioration : • L‘appareil doit être branché uniquement à une prise de terre correspondant à la tension supportée par l’appareil.
-
Seite 18: Éléments De Commande
• L’appareil est conçu pour une installation en pose libre. Ménager un espace de 10 cm de chaque côté. • Installer l’appareil de telle manière à ce que personne - particulièrement les enfants - ne puisse se retrouver coincer derrière l’appareil. • Veiller à ce que les enfants ne grimpent pas dans l’appareil. Éléments de commande 10026898 (1) Panneau de commande (2) Ventilateur (3) Étagère (4) Capteur (5) Tôle défl ectrice (6) Filtre à charbon actif... - Seite 19 Utilisation 10026898 Touche « SET » (près de l’affichage « Lower Chamber ») : appuyer plusieurs fois sur cette touche pour modifier la température du compartiment du bas. La plage de température ajustable est comprise entre 5 et 12 ° Celsius. Affichage « Lower Chamber » : indique la température du compartiment du bas. Touche « SET » (près de l’affichage « Upper Chamber ») : appuyer plusieurs fois sur cette touche pour modifier la température du compartiment du haut. La plage de température ajustable est comprise entre 5 et 12 ° Celsius. Affichage « Upper Chamber » : indique la température du compartiment du haut. Touche « Light » : appuyer sur cette touche pour éteindre et allumer l’éclairage interne. La lumière s’éteint automatiquement après 10 minutes. Touche « C/F » : appuyer sur cette touche pour basculer entre l’affichage en degrés Celsius et en degrés Fahrenheit. Touche « On/Off » : appuyer sur cette touche pour allumer et éteindre l’appareil. 10026898 Affichage : indique la température des compartiments à vin. Touches « + » et « - » : appuyer sur ces touches pour modifier la température du compartiment à vin. Touche « SET » : appuyer sur cette touche pour basculer entre le compartiment à vin intermédiaire et inférieur. Affichage « Lower Chamber » : indique la température du compartiment du bas. Touches « + » et « - » : appuyer sur ces touches pour modifier la température du compartiment à vin. Affichage « Middle Chamber » : indique la température du compartiment intermédiaire. Touche « Light » : appuyer sur cette touche pour éteindre et allumer l’éclairage interne. La lumière s’éteint automatiquement après 10 minutes.
- Seite 20 Touche « C/F » : appuyer sur cette touche pour basculer entre l’affi chage en degrés Celsius et en degrés Fahrenheit. Touche « On/Off » : appuyer sur cette touche pour allumer et éteindre l’appareil. Touche « On/Off » : appuyer sur cette touche pour allumer et éteindre l’appareil. Repositionnement Repositionnement des étagères à vin des étagères à vin 1. Enlever toutes les bouteilles de vin et sortir l’étagère le plus possible. 1. Enlever toutes les bouteilles de vin et sortir l’étagère le plus possible. 2. Appuyer sur le côté gauche comme illustré ci-dessus tout en poussant le côté droit vers le haut, et tirer simultanément sur l’étagère pour la sortir. Rangement des bouteilles...
-
Seite 21: Information Sur Le Recyclage
Réparations • Seul un atelier spécialisé autorisé est habilité à eff ectuer des réparations sur l’appareil. • Tout démontage ou toute modifi cation apportée au produit réduit la sécurité de celui-ci. Risques de blessure ! • Ne jamais ouvrir le produit de sa propre initiative et ne jamais eff ectuer de réparations soi-même ! • Un mauvais assemblage est susceptible de provoquer des dysfonctionnements ou une panne. • Ne jamais ouvrir l’appareil. Attention : Le fabricant n’est pas tenu responsable des dégâts ainsi causés. Sous réserve de modifi cations tech- niques et d’erreurs ! Remarque : Toute ouverture non autorisée de l’appareil entraîne l’annulation de la garantie.