Herunterladen Inhalt Inhalt Diese Seite drucken
HQ Power VDPC146 Bedienungsanleitung

HQ Power VDPC146 Bedienungsanleitung

24-dmx-bedienfeld für beleuchtung
Vorschau ausblenden Andere Handbücher für VDPC146:

Werbung

Verfügbare Sprachen
  • DE

Verfügbare Sprachen

  • DEUTSCH, seite 39
VDPC146
24-CHANNEL DMX LIGHT CONTROL PANEL
24-KANAALS DMX LICHTSTURING
RÉGIE LUMIÈRE DMX 24 CANAUX
CONTROLADOR DE ILUMINACIÓN DMX DE 24 CANALES
24-DMX-BEDIENFELD FÜR BELEUCHTUNG
CONTROLLER DMX 24 CANALI
3
12
21
30
39
48

Werbung

Inhaltsverzeichnis
loading

Inhaltszusammenfassung für HQ Power VDPC146

  • Seite 1: Inhaltsverzeichnis

    VDPC146 24-CHANNEL DMX LIGHT CONTROL PANEL 24-KANAALS DMX LICHTSTURING RÉGIE LUMIÈRE DMX 24 CANAUX CONTROLADOR DE ILUMINACIÓN DMX DE 24 CANALES 24-DMX-BEDIENFELD FÜR BELEUCHTUNG CONTROLLER DMX 24 CANALI USER MANUAL GEBRUIKERSHANDLEIDING MODE D'EMPLOI MANUAL DEL USUARIO BEDIENUNGSANLEITUNG MANUALE UTENTE...
  • Seite 2 VDPC146 V. 02 – 21/10/2013 ©Velleman nv...
  • Seite 3: Safety Instructions

    VDPC146 USER MANUAL Introduction To all residents of the European Union Important environmental information about this product This symbol on the device or the package indicates that disposal of the device after its lifecycle could harm the environment. Do not dispose of the unit (or batteries) as unsorted municipal waste; it should be taken to a specialized company for recycling.
  • Seite 4 VDPC146 Do not switch the device on immediately after it has been exposed to changes in temperature. Protect the • device against damage by leaving it switched off until it has reached room temperature. • This device is designed for professional use on stage, in discos, theatres, etc. The device should only be used indoors with the appropriate current and power supply (see Technical Specifications below).
  • Seite 5 VDPC146 Front panel (image A) Press this button to advance step by step in a STEP programme. (speed slider should be in the lowest position: SHOW MODE) AUDIO Press this button to access the audio control mode. HOLD Hold this button to stop the chase.
  • Seite 6 VDPC146 The red LED indicator above the RECORD key is now dimmed, meaning that the programming mode has been deactivated and cannot be accessed. Activating the Recording Mode 1. Hold the RECORD button. 2. Press the following flash keys in PRESET A: 1-5-6-8 3.
  • Seite 7: Programming Example

    VDPC146 3. Release the EDIT button. The yellow LED indicator of the selected scene is lit. 4. Bring the speed fader down (to SHOW MODE) and use the STEP button to find the scene to be deleted. 5. Press the DELETE button to remove the step.
  • Seite 8: Speed Settings

    VDPC146 7. Slide channel faders 2-4-6-8-10-12-14-16-18-20-22-24 to the top. 8. Press RECORD The LED display shows 002. 9. Select CHASE / SCENES by pressing the MODE SELECT button. 10. Hold the RECORD button. 11. Press the first flash button in the lower channel faders portion (the flash button of channel 13).
  • Seite 9: Midi Settings

    VDPC146 Midi settings MIDI-IN mode 1. Hold the RECORD button. 2. Press flash button 1 three times in PRESET A. 3. Release the RECORD button. The display now shows CH1, indicating that the device is in the MIDI-IN mode. 4. Press the desired flash button (1 – 16) to assign this MIDI channel to this DMX channel.
  • Seite 10: Cleaning And Maintenance

    VDPC146 Closed-loop mode • TRANSMITTER RECEIVER MIDI out MIDI in MIDI out MIDI in Low Power When the power voltage is low, the display will show LOP. Please check your power supply. LOP may appear briefly just after you have turned the device on. Pay no attention to this, it’s normal.
  • Seite 11: Technical Specifications

    VDPC146 12. Technical Specifications power supply 12 VDC / 500 mA (adapter supplied) number of DMX channels maximum cable length 100 m DMX output 3-pin XLR connector female audio line input RCA 100 mV - 1 Vpp midi connectors thru/out/in, via 5-pin DIN connectors foot control input 6.35 mm stereo socket...
  • Seite 12: Gebruikershandleiding

    VDPC146 GEBRUIKERSHANDLEIDING Inleiding Aan alle ingezetenen van de Europese Unie Belangrijke milieu-informatie betreffende dit product Dit symbool op het toestel of de verpakking geeft aan dat, als het na zijn levenscyclus wordt weggeworpen, dit toestel schade kan toebrengen aan het milieu. Gooi dit toestel (en eventuele batterijen) niet bij het gewone huishoudelijke afval;...
  • Seite 13 VDPC146 De garantie geldt niet voor schade door het negeren van bepaalde richtlijnen in deze handleiding en uw • dealer zal de verantwoordelijkheid afwijzen voor defecten of problemen die hier rechtstreeks verband mee houden. De leds en mechanische schade vallen niet onder de garantie.
  • Seite 14 VDPC146 Frontpaneel (afb. A) Schuifregelaar AUDIO LEVEL Regelt de muziekgevoeligheid van de audio-ingang. Druk op deze knop om het uitgangsniveau van alle BLACK OUT kanalen terug te brengen tot 0%. Druk op deze knop om stap voor stap vooruit te gaan...
  • Seite 15 VDPC146 • Verbind de MIDI-kabels met de juiste MIDI-aansluitingen. Programmeren De opnamemodus verlaten 1. Houd RECORD ingedrukt. 2. Druk op de REC EXIT-knop. 3. Laat RECORD los. De rode LED-indicator boven de RECORD-knop dooft nu uit. De programmeermodus is nu gedeactiveerd en kan niet worden gebruikt.
  • Seite 16: Een Stap Invoegen In Een Programma

    VDPC146 8. Herhaal de laatste twee stappen tot maximum 999 scènes zijn geprogrammeerd. 9. Plaats beide master faders na het programmeren op de minimumstand (MASTER A = 0 and MASTER B = 10). 10. Druk een flashtoets in naar keuze (13 – 24).
  • Seite 17: Andere Functies

    VDPC146 5. Houd REC SPEED ingedrukt. 6. Druk de juiste flashtoets van PRESET B in om de nieuwe instellingen op te slaan. Het programma wordt nu gestuurd door de realtime bewegingen van de SPEED-regeling. Voorbeeld 1. Zet het toestel in programmeermodus (zie 6.2 De opnamemodus activeren) 2.
  • Seite 18: Midi-In-Modus

    VDPC146 HOME-knop Houd de HOME-knop ingedrukt. Druk op een willekeurige flashtoets om dit kanaal opnieuw te activeren. TAP SYNC-knop Druk deze knop tweemaal in om het ritme van de muziek manueel te bepalen (dit werkt enkel in de STEP- modus en niet in de AUDIO-modus). Het interval tussen de eerste en tweede druk op de knop bepaalt de...
  • Seite 19 VDPC146 Enkelvoudige Chase De scènes worden om beurt uitgevoerd en op de display leest u NO af. Regel de snelheid met de SPEED-fader. Mix-modus Alle geselecteerde programma’s worden gelijktijdig uitgevoerd, waarbij elk programma zijn eigen chasesnelheid heeft. Aanduidingen voor fadetijd en chasesnelheid Bij een duur van meer dan 1 minuut worden twee puntjes gebruikt bv.
  • Seite 20: Reiniging En Onderhoud

    VDPC146 De display omschakelen van 0-100% naar 0-255 of omgekeerd 1. Houd RECORD ingedrukt. 2. Druk de % OF 0-255-toets in. 3. Laat RECORD los. 11. Reiniging en onderhoud Alle gebruikte schroeven moeten goed zijn aangespannen en mogen geen sporen van roest vertonen.
  • Seite 21: Mode D'emploi

    VDPC146 MODE D'EMPLOI Introduction Aux résidents de l'Union européenne Informations environnementales importantes concernant ce produit Ce symbole sur l'appareil ou l'emballage indique que l’élimination d’un appareil en fin de vie peut polluer l'environnement. Ne pas jeter un appareil électrique ou électronique (et des piles éventuelles) parmi les déchets municipaux non sujets au tri sélectif ;...
  • Seite 22 VDPC146 La garantie ne s’applique pas aux dommages survenus en négligeant certaines directives de ce mode • d'emploi et votre revendeur déclinera toute responsabilité pour les problèmes et les défauts qui en résultent. Les LEDs et l’usure mécanique ne tombent pas sous la garantie.
  • Seite 23 VDPC146 Panneau frontal (fig. A) sortie de tous les canaux à 100%. Glissière AUDIO LEVEL Règle la sensibilité musicale de l’entrée audio. Appuyer sur ce bouton pour réduire le niveau de BLACK OUT sortie de tous les canaux à 0%.
  • Seite 24 VDPC146 • Brancher les câbles MIDI aux bonnes connections MIDI. Programmer Quitter le mode d’enregistrement 1. Maintenir le bouton RECORD enfoncé. 2. Appuyer sur REC EXIT. 3. Lâcher le bouton RECORD. La LED rouge du bouton RECORD s’éteint. Le mode de programmation est désactivé et ne peut pas être utilisé.
  • Seite 25 VDPC146 9. Après la programmation, il faut mettre les deux master faders en position min. (MASTER A = 0 et MASTER B = 10). 10. Appuyer sur une touche flash arbitraire (13 – 24). 11. Lâcher le bouton RECORD. Le chase est mémorisé sous un des boutons n°7 dans la fig.1 à la page 2.
  • Seite 26: Autres Fonctions

    VDPC146 5. Maintenir le bouton REC SPEED enfoncé. 6. Appuyer sur le bouton flash correct de PRESET B pour mémoriser les nouveaux réglages. Le programme est alors piloté par les mouvements en temps réel de la glissière SPEED. Exemple 1. Instaurer le mode de programmation (voir Activating the Recording Mode à la page 6.) 2.
  • Seite 27: Réglages Midi

    VDPC146 Presser sur le bouton FLASH arbitraire pour réactiver ce canal. Bouton TAP SYNC Appuyer sur ce bouton deux fois pour déterminer le rythme de la musique de façon manuelle (uniquement possible dans le mode STEP et non pas dans le mode AUDIO). La vitesse est déterminée par la longueur de l’intervalle entre la première et deuxième fois que vous presser sur le bouton.
  • Seite 28 VDPC146 Mode mix Tous les programmes sélectionnés sont exécutés simultanément et chaque programme a son propre vitesse d’exécution. Façon d’afficher le fade time et la vitesse d’un chase Deux points sont employés lors d’une durée > 1 minute p.ex. 1 minute 15 secondes s'affiche comme suit : 1.15.
  • Seite 29: Nettoyage Et Entretien

    VDPC146 11. Nettoyage et entretien Serrer les écrous et les vis et vérifier qu'ils ne rouillent pas. • Le boîtier, les supports de montage et les connexions ne peuvent pas être déformés, adaptés ou bricolés p. • ex. ne pas forer des trous additionnels dans les supports, ne pas déplacer les connexions, etc.
  • Seite 30: Instrucciones De Seguridad

    VDPC146 MANUAL DEL USUARIO Introducción A los ciudadanos de la Unión Europea Importantes informaciones sobre el medio ambiente concerniente a este producto Este símbolo en este aparato o el embalaje indica que, si tira las muestras inservibles, podrían dañar el medio ambiente. No tire este aparato (ni las pilas, si las hubiera) en la basura doméstica; debe ir a una empresa especializada en reciclaje.
  • Seite 31: Características

    VDPC146 No conecte el aparato si ha estado expuesto a grandes cambios de temperatura. Espere hasta que el • aparato llegue a la temperatura ambiente. • Este aparato ha sido diseñado para uso profesional en una discoteca, un teatro, etc. El aparato sólo es apto para el uso en interiores con la corriente y la alimentación adecuadas (véase Especificaciones).
  • Seite 32 VDPC146 Panel frontal (fig. A) mínima: el modo SHOW) AUDIO Pulse este botón para entrar en el modo de ajuste audio. HOLD Mantenga pulsado este botón para el chase. Pulse PARK B en el modo DOUBLE PRESET para activar el valor PARK máximo de MASTER B.
  • Seite 33 VDPC146 Programar Salir del modo de grabación 1. Mantenga pulsado el botón RECORD. 2. Pulse REC EXIT. 3. Suelte el botón RECORD. El LED rojo del botón RECORD se apaga. El modo de programación está desactivado y no puede ser usado.
  • Seite 34 VDPC146 Borrar un paso de un programa 1. Mantenga pulsado el botón EDIT. 2. Pulse un botón flash arbitrario (13 – 24). 3. Suelte el botón EDIT. El LED amarillo de la escena seleccionado se ilumina. 4. Coloque el fader speed en la posición mínima (en el modo SHOW) y busque la escena que quiere borrar con el botón STEP...
  • Seite 35: Otras Funciones

    VDPC146 2. Pulse MODE SELECT hasta que el LED verde se ilumine al indicar 1-24 SINGLE / PRESET PARK. 3. Coloque los dos master fader y el conmutador deslizante FADE en la posición máxima y el conmutador deslizante SPEED en la posición mínima.
  • Seite 36: Funciones Especiales

    VDPC146 Botón FULL-ON El nivel de salida de todos los canales quedará en la posición máxima (100%) mientras mantenga pulsado el botón. Botón BLACK OUT El aparato continúa ejecutando el programa, pero los aparatos conectados no recibirán ninguna señal mientras el LED amarillo BLACK OUT quede iluminado.
  • Seite 37 Introduzca el código del aparato (=55H) para transmitir o recibir un fichero. Puede añadir o llamar escenas a la memoria. También es posible intercambiar informaciones con otro aparato conectado al VDPC146. El aparato emite y recibe informaciones NOTE de la manera siguiente: Número “note on"...
  • Seite 38: Limpieza Y Mantenimiento

    VDPC146 11. Limpieza y mantenimiento Apriete bien las tuercas y los tornillos y verifique que no hay señales de oxidación. • No modifique la caja, los soportes ni las conexiones p.ej. no taladre agujeros adicionales en un soporte o no •...
  • Seite 39: Bedienungsanleitung

    VDPC146 BEDIENUNGSANLEITUNG Einführung An alle Einwohner der Europäischen Union Wichtige Umweltinformationen über dieses Produkt Dieses Symbol auf dem Produkt oder der Verpackung zeigt an, dass die Entsorgung dieses Produktes nach seinem Lebenszyklus der Umwelt Schaden zufügen kann. Entsorgen Sie die Einheit (oder verwendeten Batterien) nicht als unsortiertes Hausmüll;...
  • Seite 40: Eigenschaften

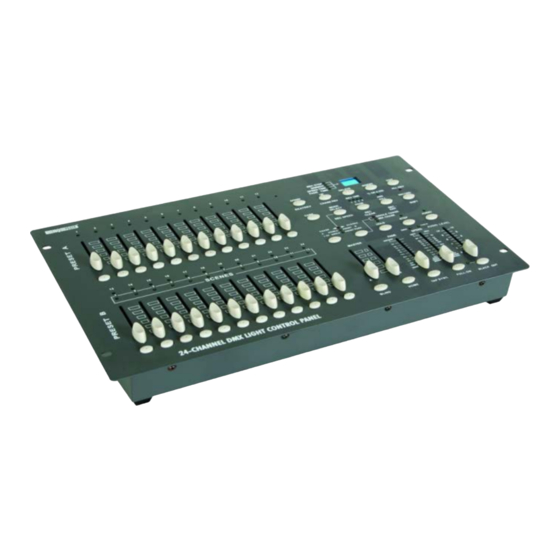
    VDPC146 Verwenden Sie das Gerät nur für Anwendungen beschrieben in dieser Bedienungsanleitung Jede andere • Verwendung ist mit Gefahren wie Kurzschluss, Brandwunden, elektrischem Schlag, usw. verbunden. Dies kann zu Schäden am Produkt führen und dafür sorgen, dass der Garantieanspruch erlischt.
  • Seite 41 VDPC146 Vorderseite (Abb. A) Drücken Sie diese Taste um die CHASE- Schiebeschalter für SPEED Geschwindigkeit manuell einzustellen. Drücken Sie diese Taste um das Ausgangsniveau aller FULL ON Kanäle sofort auf das Maximum (100%) zu stellen. Schiebeschalter AUDIO LEVEL Drücken Sie die diese Taste um die Musikempfindlichkeit des Audio-Eingangs zu regeln.
  • Seite 42: Programmieren

    VDPC146 Klinkenstecker fernbedient werden. Anschlüsse Der Hersteller übernimmt keine Haftung für Schäden, verursacht durch falsche Anschlüsse. Verbinden Sie den mitgelieferten Adapter mit dem DC-Klinkenstecker und stecken Sie das andere Ende in • einer Steckdose. Verwenden Sie das XLR-Kabel für den Anschluss des Gerätes, das Sie steuern möchten, ans Netz.
  • Seite 43: Chaser Aufnehmen

    VDPC146 Chaser aufnehmen 1. Drücken Sie MODE SELECT um die Funktion 1-24 SINGLE / PRESET PARK auszuwählen. Die grüne LED- Anzeige leuchtet. 2. Wählen Sie die gewünschte Page mit der PAGE-Taste. 3. Stellen Sie beide Master Fader auf Maximum (MASTER A = 10 & MASTER B = 0).
  • Seite 44: Ein Programm Mit Dem Speed-Schiebeschalter Ausführen

    VDPC146 4. Stellen Sie die Geschwindigkeit mit dem SPEED-Schiebeschalter ein und drücken Sie 2 x TAP SYNC um die Geschwindigkeit zu definieren. 5. Halten Sie REC SPEED gedrückt. 6. Drücken Sie die entsprechende Flash-Taste unter PRESET B, um die neuen Einstellungen zu speichern.
  • Seite 45: Andere Funktionen

    VDPC146 2. Drücken Sie die FLASH-Taste 10 in PRESET A 3 x. 3. Lassen die RECORD-Taste los. Die gelbe LED-Anzeige neben 10MIN (rechts) leuchtet und zeigt, dass die linke Skale für den SPEED Fader verwendet wird. Andere Funktionen BLIND-Taste Halten Sie die BLIND-Taste gedrückt.
  • Seite 46: Funktion

    VDPC146 3. Lassen die RECORD-Taste los. Im Display erscheint OUT. Dies bedeutet, dass das Gerät endlich fertig ist um eine Datei zu senden. 4. Alle anderen Funktionen werden deaktiviert wenn die Datei gesandt wird. Das Senden hört automatisch auf Nach Beendigung oder wenn ein Fehler auftritt.
  • Seite 47: Reinigung Und Wartung

    VDPC146 “Note on"-Nummer Geschwindigkeit Funktion HOLD Audio Chase ein-/ausschalten CHASE / SCENES Modus DOUBLE PRESET Modus SINGLE PRESET Modus Step Change (den Schritt ändern) BLACK OUT Das Display zwischen 0-100% und 0-255 oder umgekehrt umschalten 1. Halten Sie RECORD gedrückt 2.
  • Seite 48: Informazioni Generali

    VDPC146 MANUALE UTENTE Introduzione A tutti i residenti dell’Unione Europea Importanti informazioni ambientali relative a questo prodotto Questo simbolo riportato sul prodotto o sull’imballaggio, indica che è vietato smaltire il prodotto nell’ambiente al termine del suo ciclo vitale in quanto può essere nocivo per l’ambiente stesso. Non smaltire il prodotto (o le pile, se utilizzate) come rifiuto urbano indifferenziato;...
  • Seite 49: Caratteristiche

    VDPC146 Utilizzare il dispositivo solamente per lo scopo per il quale è stato progettato. Ogni altro tipo di utilizzo • potrebbe causare, bruciature, cortocircuiti, elettroshock, esplosioni di lampade, arresti di apparecchiature, ecc... L’uso improprio del dispositivo determina la decadenza della garanzia.
  • Seite 50 VDPC146 Pannello frontale (immagine A) tasto, a ritmo di musica, per definire la velocità di esecuzione di una sequenza (chase). Permette di regolare manualmente la velocità di Slider SPEED esecuzione di una sequenza. FULL ON Premere questo tasto per forzare il livello d'uscita di tutti i canali al 100%.
  • Seite 51 Collegare il cavo dell'adattatore di rete, fornito in dotazione, alla presa DC di alimentazione, quindi inserire • l'adattatore in una presa di rete. Collegare un capo del cavo XLR al connettore DMX OUT del VDPC146 e l'altro capo al primo dispositivo • DMX, della serie, che si desidera controllare.
  • Seite 52 VDPC146 Registrazione di una sequenza (chase) 1. Premere MODE SELECT per selezionare 1-24 SINGLE / PRESET PARK. Il LED d'indicazione verde si illumina. 2. Selezionare la pagina desiderata tramite il tasto PAGE. 3. Spostare verso l'alto entrambi gli slider del MASTER fader (MASTER A = 10 e MASTER B = 0).
  • Seite 53: Impostazione Della Velocità

    VDPC146 5. Tenere premuto il tasto REC SPEED. 6. Premere l'appropriato tasto FLASH del PRESET B per memorizzare le nuove impostazioni. 6.12 Esecuzione di un programma con lo slider SPEED 1. Assicurarsi che la funzione controllo musicale non sia attiva (se necessario premere il tasto AUDIO per spegnere il LED d'indicazione AUDIO).
  • Seite 54: Altre Funzioni

    VDPC146 3. Rilasciare il tasto RECORD. l LED d'indicazione giallo posto a sinistra della scritta “10MIN” si illumina, indicando che la scala attualmente utilizzata per lo slider SPEED è quella di destra. Altre funzioni Tasto BLIND Tenere premuto il tasto BLIND.
  • Seite 55: Funzioni Speciali

    È necessario immettere l’ID del dispositivo (= 55H) per poter inviare o ricevere un file. L’utente può memorizzare nuove scene, richiamare quelle già salvate ed anche scambiare informazioni con un altro dispositivo collegato al proprio VDPC146. Questa unità invia o riceve NOTE information come di seguito specificato: numero di nota velocità...
  • Seite 56: Pulizia E Manutenzione

    VDPC146 numero di nota velocità funzione SINGLE PRESET mode Step change BLACK OUT Cambiare la visualizzazione da 0-100% a 0-255 e viceversa 1. Tenere premuto il tasto RECORD. 2. Premere il tasto % OR 0-255. 3. Rilasciare il tasto RECORD.
  • Seite 57 • Elke commerciële garantie laat deze rechten onverminderd. Bovenstaande opsomming kan eventueel aangepast worden naargelang Velleman® Service and Quality Warranty de aard van het product (zie handleiding van het betreffende product). Since its foundation in 1972, Velleman® acquired extensive experience in the electronics world and currently distributes its products in over 85 countries.
  • Seite 58 - daños causados por reparaciones o modificaciones efectuadas por una tercera persona sin la autorización explícita de Velleman®; Garanzia di Qualità Velleman® - se calcula gastos de transporte de y a Velleman® si el aparato ya no está Velleman® ha oltre 35 anni di esperienza nel mondo dell'elettronica e cubierto por la garantía.

Inhaltsverzeichnis