Herunterladen Inhalt Inhalt Diese Seite drucken
HQ Power VDPDMXC174 Handbuch

HQ Power VDPDMXC174 Handbuch

Dmx-controller für 192 kanäle mit joystick

Werbung

Verfügbare Sprachen
  • DE

Verfügbare Sprachen

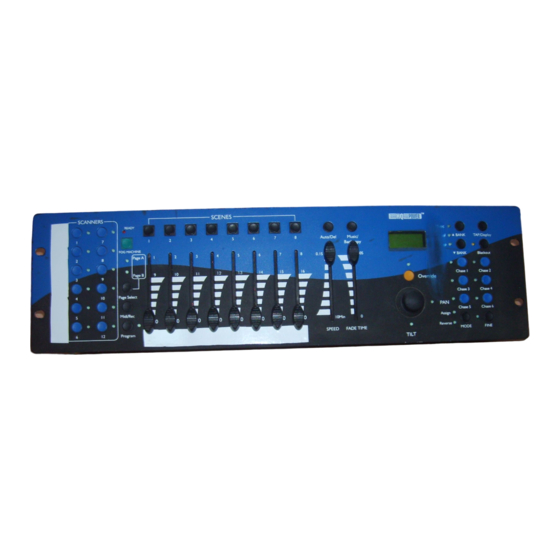
VDPDMXC174 – 192-CHANNEL DMX CONTROLLER WITH JOYSTICK
1. Introduction & Features
To all residents of the European Union
Important environmental information about this product
This symbol on the device or the package indicates that disposal of the device after its lifecycle could harm
the environment.
Do not dispose of the unit (or batteries) as unsorted municipal waste; it should be taken to a specialised
company for recycling.
This device should be returned to your distributor or to a local recycling service.
Respect the local environmental rules.
If in doubt, contact your local waste disposal authorities.
Thank you for buying the VDPDMXC174! Please read the manual thoroughly before bringing this device into service.
If the device was damaged in transit, don't install or use it and contact your dealer.
2. Safety Instructions
Be very careful during the installation: touching live wires can cause life-threatening electroshocks.
Keep this device away from rain and moisture.
Unplug the mains lead before opening the housing.
• Damage caused by disregard of certain guidelines in this manual is not covered by the warranty and the dealer
will not accept responsibility for any ensuing defects or problems.
• A qualified technician should install and service this device.
• Do not switch the device on immediately after it has been exposed to changes in temperature. Protect the device
against damage by leaving it switched off until it has reached room temperature.
• Make sure that the available voltage does not exceed the voltage stated in the specifications of this manual.
• Do not crimp the power cord and protect it against damage. Have an authorised dealer replace it if necessary.
• Disconnect the device from the mains to clean it or when it is not in use. Handle the power cord by the plug only.
• Note that damage caused by user modifications to the device is not covered by the warranty.
• Keep the device away from children and unauthorised users.
3. General Guidelines
• This device is designed for professional use on stage, in discos, theatres, etc. The VDPDMXC174 should only be
used indoors and be connected to a current of max. 9-12VDC / 500mA.
• Do not shake the device. Avoid brute force when installing or operating the device.
• Select a location where the device is protected against extreme heat (see "Technical Specifications"), dust and
moisture. Respect a minimum distance of 0.5m between the device's light output and any illuminated surface.
• Familiarise yourself with the functions of the device before actually using it. Do not allow operation by unqualified
people. Any damage that may occur will most probably be due to unprofessional use of the device.
• Use the original packaging if the device is to be transported.
• All modifications of the device are forbidden for safety reasons.
• Only use the device for its intended purpose. All other uses may lead to short circuits, burns, electroshocks,
crash, etc. Using the device in an unauthorised way will void the warranty.
VDPDMXC174
1
VELLEMAN

Werbung

Inhaltsverzeichnis
loading

Inhaltszusammenfassung für HQ Power VDPDMXC174

  • Seite 1 • Keep the device away from children and unauthorised users. 3. General Guidelines • This device is designed for professional use on stage, in discos, theatres, etc. The VDPDMXC174 should only be used indoors and be connected to a current of max. 9-12VDC / 500mA.
  • Seite 2 Press the Up / Down button to select one of the 30 banks. 16. Tap / Display Used to create a standard beat or to change the value mode between % and 0 ~ 255. 17. Blackout Button Tap to momentarily pause the whole output. VDPDMXC174 VELLEMAN...
  • Seite 3: Display Information

    Operation • General The VDPDMXC174 allows you to program 12 scanners with 16 DMX channels each, 30 banks of 8 programmable scenes, 6 chases of 240 scenes and all this by means of 8 channel sliders, a joystick and other buttons.
  • Seite 4 • Programming a Scene 1. Enter the PROGRAM mode (See “Enabling the PROGRAM Mode”). 2. Check the blackout key and verify that the LED is not lit. If the LED is lit, press it once to exit the BLACKOUT mode. VDPDMXC174 VELLEMAN...
  • Seite 5 3. Select the scene you wish to copy by pressing its scene button. 4. Using the bank UP / DOWN button select the bank you wish to copy the scene to. 5. Tap the MIDI / REC button. 6. Tap the scene button you wish to copy the scene to. VDPDMXC174 VELLEMAN...
  • Seite 6 7. Once you have selected the scene you wish to add, press the MIDI / REC button again. All LEDs will flash three times indicating the new step has been inserted into the chase. VDPDMXC174 VELLEMAN...
  • Seite 7 1. Activate the ASSIGN or REVERSE mode. 2. Tap the scanner button to select the scanner you wish to delete. 3. Press the MODE and AUTO / DEL buttons simultaneously. All LEDs will flash three times indicating the requested operation has been performed. VDPDMXC174 VELLEMAN...
  • Seite 8 2. Use the bank UP / DOWN button to select a bank of scenes you wish to run. The scenes selected will run through sequentially to the beat of the music identified by the built-in microphone. 3. Tap the MUSIC / BANK COPY button again to exit MUSIC mode. VDPDMXC174 VELLEMAN...
  • Seite 9: File Transfer

    File Transfer A file transfer allows the user to transfer all information stored in one VDPDMXC174 to a second VDPDMXC174 unit. Connect the units using 3-pin XLR cables. The unit sending the information will have the cable plugged into the DMX OUT plug while the receiving unit will have the cable running into the DMX IN plug.
  • Seite 10: Technical Specifications

    2.7kg Max. Ambient Temperature 45°C The information in this manual is subject to change without prior notice. VDPDMXC174 – 192-KANAALS DMX CONTROLLER MET JOYSTICK 1. Inleiding en kenmerken Aan alle ingezetenen van de Europese Unie Belangrijke milieu-informatie betreffende dit product Dit symbool op het toestel of de verpakking geeft aan dat, als het na zijn levenscyclus wordt weggeworpen, dit toestel schade kan toebrengen aan het milieu.
  • Seite 11 Druk op deze knop op de uitgang te pauzeren. 18. Chase-knop (1 ~ 6) Activering van de chase van de geprogrammeerde scènes. 19. Fine-knop Wanneer deze is ingedrukt, dan kunt u met de pan of tilt joystick de scanner met de kleinste stappen besturen. VDPDMXC174 VELLEMAN...
  • Seite 12 Omkeren van kanalen 10 en 13 b. Opstelling • Opstelling van een toestel De VDPDMXC174 kent 16 kanalen per toestel toe. Om uw toestellen aan de scannerknoppen links van de controller toe te wijzen, houd 16 kanalen vrij per ingegeven toestel. VDPDMXC174...
  • Seite 13 10. Herhaal stap 2 tot 7 tot alle scanners geprogrammeerd zijn. 11. Wenst u verder geen andere toestellen meer in te geven, houd de PROGRAM-knop gedurende een drietal seconden ingedrukt om de PROGRAM-modus te verlaten. De LED dooft. VDPDMXC174 VELLEMAN...
  • Seite 14 4. Druk op UP / DOWN om de gewenste bank te selecteren. 5. Druk op MUSIC / BANK COPY, alle LEDs lichten eventjes op om aan te geven dat de functie voltooid is. 6. Om de modus te verlaten, houd de PROGRAM-knop gedurende een drietal seconden ingedrukt. VDPDMXC174 VELLEMAN...
  • Seite 15 1. Houd de PROGRAM-knop ingedrukt tot de LED oplicht. 2. Houd gelijktijdig de MODE- en de FINE-knop ingedrukt. De ASSIGN LED licht op. Licht de REVERSE LED op, druk opnieuw op FINE en MODE om u in de ASSIGN-modus te begeven. VDPDMXC174 VELLEMAN...
  • Seite 16 De LCD geeft het volgende weer: ONLY TIME TIME 3. Druk gelijktijdig op MODE en TAP / DISPLAY om de instelling op te slaan. Wenst u de instelling niet op te slaan, druk op BLACKOUT om te verlaten. VDPDMXC174 VELLEMAN...
  • Seite 17: Automatische Modus

    Bestandsoverdracht Een bestandsoverdracht laat toe alle informatie opgeslagen in uw VDPDMXC174 naar een tweede VDPDMXC174 te zenden. Koppel de toestellen met 3-pin XLR-kabels als volgt: Koppel de DMX OUT van het zendtoestel met de DMX IN van het ontvangsttoestel.
  • Seite 18: Reiniging En Onderhoud

    DMX IN / OUT 3-pin vrouwelijke / mannelijke XLR-stekker MIDI IN 5-pin DIN-stekker Afmetingen 482 x 134 x 85m Gewicht 2.7kg Max. omgevingstemperatuur 45°C De informatie in deze handleiding kan te allen tijde worden gewijzigd zonder voorafgaande kennisgeving. VDPDMXC174 VELLEMAN...
  • Seite 19: Prescriptions De Sécurité

    • Débranchez l’appareil s’il n’est pas utilisé ou pour le nettoyer. Tirez la fiche pour débrancher l'appareil ; non pas le câble. • Les dommages occasionnés par des modifications à l'appareil par le client, ne tombent pas sous la garantie. • Gardez votre VDPDMXC174 hors de la portée de personnes non qualifiées et de jeunes enfants. 3. Directives générales •...
  • Seite 20 Activez le mode « ASSIGN » ou « REVERSE » en enfonçant simultanément les boutons « FINE » et « MODE ». b. Panneau arrière (voir ill. 2) 1. MIDI In Entrée des données MIDI. 2. DMX Polarity Select Sélection de la polarité DMX. VDPDMXC174 VELLEMAN...
  • Seite 21 Opération • En général Le VDPDMXC174 permet la programmation de 12 scanners à 16 canaux DMX, 30 bancs de 8 scènes programmables, 6 poursuites de 240 scènes à l’aide de 8 glissières, d’une manette et d’autres boutons. Il est possible de contrôler le mouvement d’un appareil plus facilement et précisément à...
  • Seite 22 3. Veillez à ce que la page A soit sélectionnée. Enfoncez « PAGE SELECT » pour sélectionner la page. 4. Placez la première et la deuxième glissière au maximum. 5. Sélectionnez le banc 1 à l’aide des boutons « UP / DOWN ». 6. Enfoncez le bouton « MIDI / REC ». VDPDMXC174 VELLEMAN...
  • Seite 23 5. Enfoncez « MUSIC / BANK COPY ». Toutes les LEDs flashent trois fois pour indiquer que l’opération est réussite. 6. Maintenez enfoncé le bouton « PROGRAM » pendant trios secondes pour quitter le mode « PROGRAM ». VDPDMXC174 VELLEMAN...
  • Seite 24 • Effacement de toutes les poursuites 1. Débranchez l’appareil. Maintenez simultanément enfoncé « AUTO / DEL » et « DOWN ». 2. Rebranchez l’appareil. Toutes les poursuites ont été effacées. VDPDMXC174 VELLEMAN...
  • Seite 25 1. Débranchez l’appareil et enfoncez simultanément les boutons « MODE » et « TAP / DISPLAY ». 2. Rebranchez l’appareil. Enfoncez les boutons « TAP / DISPLAY » pour choisir entre « FADE TIME » et « ASSIGN FADE TIME ». Le résultat s’affiche sur le LCD. VDPDMXC174 VELLEMAN...
  • Seite 26 1. Enfoncez le bouton « MUSIC / BANK COPY » pour activer le mode « MUSIC ». 2. Sélectionnez la poursuite en enfonçant un des six boutons « CHASE ». Ceci activera la poursuite qui réagira au rythme de la musique. VDPDMXC174 VELLEMAN...
  • Seite 27: Nettoyage Et Entretien

    Un transfert de fichiers permet de copier toutes les données sauvegardées dans un VDPDMXC174 vers un deuxième VDPDMXC174. Raccordez les unités à l’aide de câbles XLR à trois broches. Branchez le câble à la connexion « DMX OUT » de l’appareil transférant les données, branchez l’autre fiche du câble à la connexion « DMX IN »...
  • Seite 28: Instrucciones De Seguridad

    • Mantenga el VDPDMXC174 lejos del alcance de personas no capacitadas y niños. 3. Normas generales • Este aparato ha sido diseñado para uso profesional en una discoteca, un teatro, etc. El VDPDMXC174 sólo está permitido para una conexión con una fuente de corriente de máx. 9-12VCC / 500mA.
  • Seite 29 Active el modo « ASSIGN » o « REVERSE » al pulsar simultáneamente los botones « FINE » y « MODE ». b. Panel trasero (véase fig. 2) 1. MIDI In Entrada de datos MIDI. 2. DMX Polarity Select Selección de la polaridad DMX. VDPDMXC174 VELLEMAN...
  • Seite 30 Funcionamiento • En general El VDPDMXC174 permite programar 12 escáneres de 16 canales DMX, 30 bancos de 8 escenas programables y 6 chases de 240 escenas con los 8 deslizadores, una palanca y otros botones. Con la palanca es posible controlar el movimiento de un aparato de manera más fácil y precisa.
  • Seite 31 3. Asegúrese de que el rango A esté seleccionado. Pulse « PAGE SELECT » para seleccionar el rango. 4. Ponga el primer y el segundo deslizador en la posición máxima. 5. Seleccione el banco 1 con los botones « UP / DOWN ». 6. Pulse el botón « MIDI / REC ». VDPDMXC174 VELLEMAN...
  • Seite 32 5. Pulse « MUSIC / BANK COPY ». Todos los LEDs parpadean tres veces para indicar que la operación ha salido bien. 6. Mantenga pulsado el botón « PROGRAM » durante tres segundos para salirse del modo « PROGRAM ». VDPDMXC174 VELLEMAN...
  • Seite 33 • Borrar todos los chases 1. Desconecte el aparato. Mantenga pulsado simultáneamente « AUTO / DEL » y « DOWN ». 2. Vuelva a conectar el aparato. Todos los chases están borrados. VDPDMXC174 VELLEMAN...
  • Seite 34 1. Desconecte el aparato y pulse simultáneamente los botones « MODE » y « TAP / DISPLAY ». 2. Vuelva desconectar el aparato. Pulse los botones « TAP / DISPLAY » para seleccionar entre « FADE TIME » y « ASSIGN FADE TIME ». El resultado se visualiza en la pantalla LCD. VDPDMXC174 VELLEMAN...
  • Seite 35 1. Pulse el botón « MUSIC / BANK COPY » para activar el modo « MUSIC ». 2. Seleccione el chase al pulsar uno de los seis botones « CHASE ». Esto activará el chase que reaccionará al ritmo de la música. VDPDMXC174 VELLEMAN...
  • Seite 36: Limpieza Y Mantenimiento

    Una transmisión de ficheros permite copiar todos los datos guardados en un VDPDMXC174 a un segundo VDPDMXC174. Conecte los aparatos con los cables XLR de tres polos. Conecte el cable a la conexión « DMX OUT » de aparato que transmite los datos, conecte el otro conector del cable a la conexión « DMX IN » del aparato que recibe los datos.
  • Seite 37: Einführung & Eigenschaften

    VDPDMXC174 – DMX-CONTROLLER FÜR 192 KANÄLE MIT JOYSTICK 1. Einführung & Eigenschaften An alle Einwohner der Europäischen Union Wichtige Umweltinformationen über dieses Produkt Dieses Symbol auf dem Produkt oder der Verpackung zeigt an, dass die Entsorgung dieses Produktes nach seinem Lebenszyklus der Umwelt Schaden zufügen kann.
  • Seite 38 Drücken Sie diese Taste um den Ausgang zu pausieren. 18. Chase-Taste (1 ~ 6) Chase-Aktivierung der programmierten Chases. 19. Fine-Taste Wenn diese Taste gedrückt ist, können Sie mit dem Schwenk- oder Neigejoystick den Scanner mit den kleinsten Schritten steuern. VDPDMXC174 VELLEMAN...
  • Seite 39: Bedienung

    Zuteilen der Kanäle 4 und 5 Umkehren der Kanäle 10 und 13 b. Aufstellung • Gerät aufstellen Der VDPDMXC174 weist 16 Kanäle pro Gerät zu. Um Ihre Geräte an die Scannertaste links auf dem Steuergerät zuzuweisen, halten Sie 16 Kanäle pro Gerät frei. VDPDMXC174 VELLEMAN...
  • Seite 40: Joystick Einstellen

    Sie einen anderen. 10. Wiederholen Sie Schritt 2 bis 7 bis alle Scanner programmiert sind. 11. Wenn Sie keine anderen Geräte eingeben wollen, halten Sie die PROGRAMM-Taste einige Sekunden gedrückt um den Programmmodus zu verlassen. Die LED erlischt. VDPDMXC174 VELLEMAN...
  • Seite 41: Scannereinstellungen Kopieren

    2. Schalten Sie das Gerät ein. Alle Szenen sind gelöscht. • Eine vollständige Bank mit Szenen kopieren 1. Schalten Sie den Programmmodus ein. 2. Drücken Sie UP / DOWN bis Sie die gewünschte Bank erreicht haben. 3. Drücken Sie MIDI / REC. VDPDMXC174 VELLEMAN...
  • Seite 42 2. Halten Sie AUTO / DEL und die CHASE-Taste gedrückt. Alle LEDs blinken dreimal als Anzeige, dass die Aufgabe ausgeführt ist. • Alle Chases löschen 1. Bei einem ausgeschalteten Gerät, halten Sie die AUTO / DEL und die DOWN-Taste zur gleichen Zeit gedrückt. 2. Schalten Sie das Gerät erneut ein. Alle Chases sind gelöscht worden. VDPDMXC174 VELLEMAN...
  • Seite 43 1. Bei einem ausgeschalteten Gerät, drücken Sie gleichzeitig MODE und TAP / DISPLAY. 2. Schalten Sie das Gerät ein und drücken Sie TAP / DISPLAY um zwischen FADE TIME und ASSIGN FADE TIME zu wählen. Das LCD zeigt das folgende: VDPDMXC174 VELLEMAN...
  • Seite 44: Automatischer Modus

    3. Verwenden Sie den SPEED- und FADE TIME-Schiebeschalter um die Chase nach Wunsch einzustellen. • Musikgesteuerter Modus 1. Drücken Sie MUSIC / BANK COPY um den Modus einzuschalten. 2. Wählen Sie die gewünschte Chase mit der entsprechenden Chase-Taste. Das schaltet die Chase ein und lässt sie im Takt der Musik bewegen. VDPDMXC174 VELLEMAN...
  • Seite 45: Reinigung/Wartung

    Dateiübertragung Eine Dateiübertragung ermöglicht Ihnen, alle gespeicherten Informationen Ihres VDPDMXC174 an einen zweiten VDPDMXC174 zu senden. Verbinden Sie die Geräte mit 3-poligen XLR-Kabeln: Verbinden Sie den DMX OUT des Sendegerätes mit dem DMX IN des Empfangsgerätes. • Eine Dumpdatei versenden 1.

Inhaltsverzeichnis