Tescoma Handy Gebrauchsanleitung
Vorschau ausblenden
Andere Handbücher für Handy:
- Gebrauchsanleitung (33 Seiten) ,
- Bedienungsanleitung (2 Seiten) ,
- Gebrauchsanleitung (2 Seiten)
Quicklinks
Cherry stoner
Odpeckovač třešní
Kirschentkerner
Dénoyauteur de cerises
Snocciola ciliegie
Vaciador de cerezas
Descaroçador de cerejas
Drylownica
Odkôstkovač čerešní
Удалитель черешневых
косточек
DESCRIPTION / POPIS / BESCHREIBUNG / DESCRIPTION / DESCRIZIONE
DESCRIPCIÓN / DESCRIÇÃO / OPIS / POPIS / ОПИСАНИЕ
Cherry container / Zásobník na třešně / Magazin für Kirschen / Récipient à cerises
Contenitore per ciliegie / Depósito de cerezas / Contentor de cerejas
Pojemnik na czereśnie / Zásobník na čerešne / Емкость для черешен
Stone retainer / Nádoba na pecky / Kernauffangbehälter / Récipient à noyaux
Recipiente per noccioli / Depósito de huesos / Contentor de caroços
Pojemnik na pestki / Nádoba na kôstky / Поддон для косточек
Punch with handle / Trn s rukojetí / Dorn mit Griff
Lower handle / Spodní rukojeť / Unterer Griff
Pointe avec poignée / Manico con punzone / Pincho
Poignée inférieure / Parte inferiore del manico
con mango / Furador com pega / Trzpień z rękojeścią
Mango inferior / Pega inferior / Rękojeść dolna
Tŕň s rukoväťou / Шип с ручкой
Spodná rukoväť / Нижняя ручка
Protective punch cover / Ochranný kryt
Spring / Pružina / Feder
trnu / Schutzhülse des Dornes
Ressort / Molla / Muelle
Protection de la pointe / Protezione del
Mola / Sprężyna / Pružina
punzone / Funda protectora del pincho
Пружина
Capa protectora do furador / Osłona
ochronna trzpienia / Ochranný kryt tŕňa
Охранный чехол шипа
INSTRUCTIONS FOR USE
We congratulate you on the purchase of this Tescoma product. Thank you for buying Tescoma. If needed,
please contact your retailer or Tescoma at www.tescoma.com.
CHARACTERISTICS
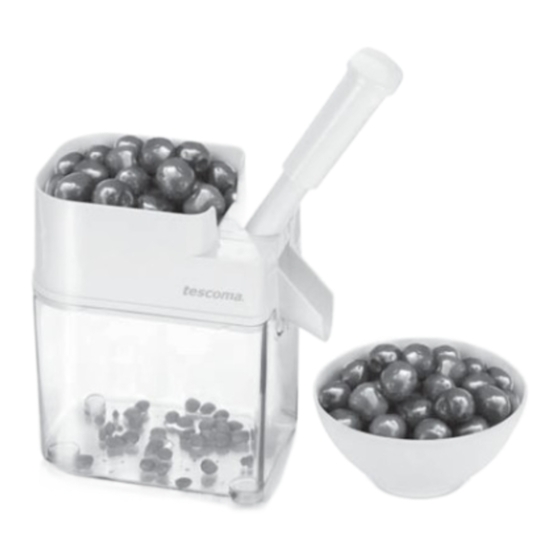
Cherry stoner is excellent for easy and quick removing of stones from fresh, compote and frozen
cherries without damaging the pulp. The stoning punch is made of high-grade stainless steel,
and the other parts of resistant plastic and silicone. The bottom is provided with an anti-skid surface for
comfortable and safe use.
ASSEMBLY
Push the silicone pad into the hole on the bottom of the container (A). Place the container on the stone
retainer and push the lower handle into the container (B). Remove the protective cover from the
punch, push the punch into hole in the lower handle and press (C). Make sure that the handle is
correctly assembled and the upper part moves up and down and springs.
NOTICE!
The punch end is very sharp! Always handle and maintain the punch with utmost care – risk
of injury! Always store the punch with the protective cover on.
INSTRUCTIONS FOR USE
Put fresh, compote or thawed cherries without stems into the container and press the upper handle
several times. The removed stones are pressed into the lower vessel, cherries free of stones will fall
through the hole below the handle – place a bowl, plate, etc. under the hole (D).
DISASSEMBLY
Disassemble the handle by pressing the arresters on the bottom handle (E) and removing the upper
part with the punch; attach the protective cover on the punch immediately after removing the upper
part. Press the arresters on the lower handle on the bottom of the container against each other and
pull the lower handle from the container (F).
STORAGE
Disassemble the product (see above) to save maximum space in storage and store all the parts in the lower
vessel (G). Always store the stoning punch with the protective cover on (H)!
MAINTENANCE
Wash thoroughly all parts of the product and wipe them dry before first use. Clean after each
subsequent use, avoid using sharp objects and sand-based agents for cleaning, leave to soak if excessively
dirty. All the parts of the stoner are dishwasher safe, do not wash the punch with the handle in
dishwasher! Notice: If the silicone pad is worn due to an intense use, replace it with the
attached spare pad; if needed, contact your retailer.
3YEAR WARRANTY
A 3-year warranty period applies to this product from the date of purchase. The warranty never covers
defects:
- due to improper use incompatible with the Instructions for Use
- resulting from an impact, fall or mishandling
- due to unauthorised repairs of, or alterations to, the product
In case of a justified complaint please contact your retailer or one of the service centres; for their list please
refer to www.tescoma.com.
NÁVOD K POUŽITÍ
Blahopřejeme k zakoupení výrobku Tescoma a děkujeme za důvěru projevenou naší značce. V případě potřeby
se prosím obraťte na svého prodejce nebo na firmu Tescoma prostřednictvím www.tescoma.com.
CHARAKTERISTIKA
Odpeckovač třešní je vynikající pro snadné a rychlé odpeckování čerstvých, kompotovaných
i mražených třešní bez poškození dužiny. Vykrajovací trn je vyroben z prvotřídní nerezavějící
oceli, ostatní části z odolného plastu a silikonu. Dno je opatřeno protiskluzovou úpravou pro komfortní
a bezpečné použití.
SESTAVENÍ
Do otvoru na dně zásobníku zasuňte silikonovou podložku (A). Zásobník položte na nádobu na pecky
a spodní rukojeť zasuňte do zásobníku (B). Sejměte ochranný kryt z trnu, vsuňte trn do otvoru ve
spodní rukojeti a zatlačte (C). Ujistěte se, že je rukojeť správně sestavena a její horní část se pohybuje
nahoru a dolů - pruží.
UPOZORNĚNÍ!
Zakončení trnu je velmi ostré! Manipulaci s trnem a jeho údržbě věnujte maximální pozornost
– nebezpeční poranění! Trn skladujte vždy s nasazeným ochranným krytem.
POUŽITÍ
Do zásobníku vložte čerstvé, kompotované nebo rozmražené třešně bez stopek a opakovaně
stlačujte horní rukojeť. Odstraněné pecky jsou vtlačeny do spodní nádoby, odpeckované třešně
vypadávají otvorem pod rukojetí - umístěte pod něj misku, talíř apod. (D).
DEMONTÁŽ
Rukojeť rozložte stlačením západek na spodní rukojeti (E) a vyjmutím horní části s trnem, ihned
po vyjmutí na trn nasaďte ochranný kryt. Západky spodní rukojeti na dně zásobníku stiskněte proti
sobě a spodní rukojeť vysuňte ze zásobníku (F).
SKLADOVÁNÍ
Pro maximální úsporu místa při skladování výrobek demontujte (viz. výše) a všechny díly uložte do spodní
nádoby (G). Vykrajovací trn skladujte vždy s nasazeným ochranným krytem (H)!
ÚDRŽBA
Před prvním použitím všechny části výrobku důkladně umyjte a osušte. Čistěte po každém použití,
k čištění nepoužívejte ostré předměty ani čisticí prostředky na bázi písku, v případě silného znečištění
nechte odmočit. Všechny díly odpeckovače lze mýt v myčce, rukojeť s trnem v myčce nemyjte!
Upozornění: Pokud dojde intenzivním používáním k opotřebení silikonové podložky, použijte
přiloženou náhradní podložku, v případě potřeby se obraťte na svého prodejce.
3 ROKY ZÁRUKA
Na tento výrobek je poskytována 3-letá záruka, počínaje dnem prodeje. Záruka se zásadně nevztahuje
na tyto případy:
- výrobek byl používán v rozporu s Návodem k použití
- závady byly způsobeny úderem, pádem či neodbornou manipulací
- na výrobku byly provedeny neautorizované opravy a změny
V případě oprávněné reklamace se prosím obraťte na svého prodejce nebo na některé ze servisních
středisek, seznam na www.tescoma.com.
GEBRAUCHSANLEITUNG
Wir gratulieren zum Kauf des Produktes Tescoma und danken für Ihr in unsere Marke gezeigtes Vertrauen. Im
Bedarfsfall wenden Sie sich bitte an Ihren Händler, bzw. na die Firma Tescoma über www.tescoma.com.
Silicone pad, 2 pcs / Silikonová
EIGENSCHAFTEN
podložka, 2 ks / Silikon-Unterlage, 2 St.
Insert en silicone, 2 pièces / Tappetino
Der Kirschentkerner ist zum leichten und schnellen Entkernen von frischen, konservierten sowie
in silicone, 2 pz / Pieza de silicona, 2 pz
tiefgekühlten Kirschen hervorragend, wobei das Obstfleisch unbeschädigt bleibt. Der Dorn des
Base em silicone, 2 pcs / Podkładka
Entkerners ist aus erstklassigem rostfreien Edelstahl hergestellt, andere Teile aus robustem Kunststoff
silikonowa, 2 szt. / Silikónová podložka,
und Silikon. Der rutschfeste Boden ermöglicht eine komfortable und sichere Handhabung.
2 ks / Силиконовая подставка, 2 шт.
ZUSAMMENSTELLUNG
In die Öffnung im Boden des Magazins die Silikon-Unterlage (A) einlegen. Das Magazin auf den
Kernauffangbehälter aufsetzen und den unteren Griff in den Kirschenbehälter (B) einschieben.
Die Schutzhülse vom Dorn abnehmen, den Dorn ins Loch am unteren Griff geben und drücken
(C). Überprüfen Sie, ob der Griff richtig zusammengestellt ist und der Kolben nach oben und unten läuft
– federt.
HINWEIS!
Das Ende des Dornes ist sehr scharf! Den Dorn beim Gebrauch sowie bei der Wartung
höchstens vorsichtig handhaben – Verletzungsgefahr! Den Dorn immer mit der Schützhülse
aufbewahren.
GEBRAUCH
Ins Magazin die entstielten frischen, konservierten, bzw. aufgetauten Kirschen geben und
wiederholt den oberen Griff betätigen. Die Kerne fallen in den unteren Kernauffangbehälter, die
entkernten Kirschen fallen durch die Kirschschütte unter dem Griff heraus – hier ist eine Schüssel,
Tasse usw. zu stellen. (D).
DEMONTAGE
Die Verriegelungen am unteren Griff (E) drücken und den oberen Teil mit Dorn herausnehmen,
unverzüglich danach auf den Dorn die Schutzhülse aufsetzen. Die Verriegelungen am unteren Griff am
Boden des Magazins gegeneinander drücken und den unteren Griff vom Magazin herausschieben (F).
LAGERUNG
Das Produkt demontieren, um die maximale Platzersparnis beim Lagerung zu erzielen (siehe oben), und
sämtliche Teile in den Kernauffangbehälter aufbewahren (G). Den Dorn immer mit der Schützhülse
aufbewahren (H)!
WARTUNG
Vor dem ersten Gebrauch sämtliche Teile des Produktes gründlich abspülen und abtrocknen. Nach
jedem Gebrauch reinigen, zur Reinigung keine aggressiven Chemikalien, scharfen Gegenstände, bzw.
Scheuersande verwenden, im Falle einer starken Verschmutzung einweichen lassen. Sämtliche Teile des
Entkerners sind spülmaschinengeeignet, der Griff mit Dorn ist nicht spülmaschinenfest! Hinweis:
kommt es durch den intensiven Gebrauch zum Verschleiß der Silikon-Unterlage, verwenden
Sie die beigefügte Ersatzunterlage, im Bedarfsfall wenden Sie sich an Ihren Händler.
3 JAHRE GARANTIE
Für dieses Produkt wird eine Garantiefrist von 3 Jahren ab Verkaufsdatum gewährt. Die Garantie erstreckt
sich grundsätzlich nicht auf folgende Fälle:
- anleitungswidrige Produktnutzung
- Stoß-, Sturzbeschädigungen, nicht fachgerechte Handhabung
- Nichtautorisierte Reparaturen und Änderungen am Produkt
Im Falle einer berechtigten Beanstandung wenden Sie sich bitte an Ihren Händler, bzw. an eine
Servicestelle, die Liste finden Sie auf www.tescoma.com.
MODE D'EMPLOI
Nous vous félicitons de l'achat d'un produit Tescoma et vous remercions de la confiance que vous accordez
à notre marque. Pour toute question, veuillez vous adresser à votre revendeur habituel ou directement à la
société Tescoma par l'intermédiaire de son site Internet www.tescoma.com.
CARACTÉRISTIQUE
Le dénoyauteur de cerises est excellent pour dénoyauter rapidement et facilement les cerises fraîches,
en conserve ou congelées sans en abîmer la chair. La pointe du dénoyauteur est fabriquée en acier
inoxydable de haute qualité, les autres éléments en matière plastique de qualité et en silicone. Le fond
est muni d'un revêtement anti-glisse pour une utilisation confortable et en toute sécurité.
MONTAGE
Placer l'insert en silicone (A) dans le fond du récipient. Placer ce récipient sur le récipient à noyaux
et insérer la poignée inférieure dans le récipient (B). Enlever la protection de la pointe, insérer la
pointe dans la poignée inférieure et appuyer (C). S'assurer que la poignée est bien montée et que sa
partie supérieure est mobile – avec ressort.
ATTENTION!
La pointe est particulièrement aiguë! Veuillez donc accorder une attention spéciale à la
manipulation et à l'entretien de la pointe – risque de blessures! Toujours ranger la pointe
avec sa protection.
UTILISATION
Placer des cerises, fraîches, conservées ou décongelées, sans queue dans le récipient et appuyer
à répétition sur la poignée supérieure. Les noyaux enlevés tombent dans le récipient inférieur tandis que
les cerises dénoyautées tombent par l' o rifice sous la poignée – y placer une coupe ou une assiette (D).
DÉMONTAGE
Démonter la poignée en appuyant sur le rochet dans sa partie inférieure (E) et en enlevant
la partie supérieure avec la pointe; placer immédiatement la protection de la pointe. Serrer les
deux rochets de la partie inférieure et enlever la poignée inférieure du récipient (F).
RANGEMENT
Pour une économie de place de rangement, démonter entièrement l'appareil et placer tous les éléments
dans le récipient inférieur (voir ci-dessus) (G). Toujours ranger la pointe avec sa protection en
place (H)!
ENTRETIEN
Nettoyer et sécher tous les éléments avant la première utilisation. Nettoyer après chaque usage; ne
pas utiliser de produits ou ustensiles agressifs ou abrasifs, laisser tremper si besoin. Tous les éléments
à l'exception de la pointe avec sa poignée peuvent être nettoyés au lave-vaisselle. Remarque: Si,
suite à un usage intensif, l'insert en silicone est usé, utiliser l'insert de rechange fourni avec
l'appareil; si besoin veuillez vous adresser à votre revendeur habituel.
3 ANS DE GARANTIE
Ce produit fait l' o bjet d'une garantie de trois ans à partir de la date de l'achat. La garantie ne couvre
toutefois pas les cas suivants :
- le produit a été utilisé en opposition avec le présent Mode d' e mploi
- les défauts sont la suite de chocs, de chute ou de mauvaise manipulation
- des modifications ou réparations non autorisées ont été apportées au produit
Veuillez adresser toute réclamation éventuelle à votre revendeur ou aux services agréés d' e ntretien, dont
la liste se trouve sur le site www.tescoma.com.
ISTRUZIONI PER L'USO
Ci congratuliamo con voi per l'acquisto di questo prodotto Tescoma. Grazie per aver scelto Tescoma.
Per qualsiasi informazione, potete contattare il vs. rivenditore o direttamente Tescoma al sito web
www.tescoma.com.
CARATTERISTICHE
Lo Snocciola ciliegie è ideale per rimuovere facilmente e velocemente i noccioli da ciliegie fresche,
conservate e surgelate senza schiacciare la polpa. Il punzone dello snocciola ciliegie è prodotto
in acciaio inossidabile di ottima qualità mentre le altre parti sono in plastica resistente e silicone.
Il fondo è provvisto di superficie antiscivolo per un comodo utilizzo in massima sicurezza.
ASSEMBLAGGIO
Premere il tappetino in silicone nel foro sul fondo del contenitore (A). Posizionare il contenitore
sul recipiente per noccioli e premere la parte inferiore del manico nel contenitore (B). Rimuovere la
protezione dal punzone, premere il punzone nel foro della parte inferiore del manico e spingere
(C). Assicurarsi che il manico sia correttamente inserito e la parte superiore si muova su e giù grazie
alla molla.
NOTA!
La parte terminale del punzone è molto pungente! Maneggiare sempre e conservare con cura
il punzone – rischio di ferirsi! Conservare sempre il punzone con la protezione inserita.
ISTRUZIONI PER L'USO
Inserire le ciliegie fresche, conservate o decongelate senza picciolo nel contenitore e premere la
parte superiore del manico diverse volte. Il nocciolo rimosso viene espulso nel recipiente basso,
le ciliegie libere dai noccioli cadono attraverso il foro del manico – posizionare sotto una ciotola, un
piatto, ecc. per raccoglierle (D).
SMONTAGGIO
Smontare il manico premendo sui ganci sul fondo del manico (E) e rimuovendo la parte superiore con
il punzone; inserire la protezione sul punzone immediatamente dopo aver rimosso la parte superiore.
Schiacciare i ganci nella parte inferiore del manico sul fondo del contenitore l'uno contro l'altro
e estrarre la parte inferiore del manico dal contenitore (F).
CONSERVAZIONE
Smontare il prodotto (leggere sopra) per risparmiare spazio nel riporre il prodotto
e conservare tutte le sue parti nel recipiente inferiore (G). Conservare sempre con la protezione
inserita sul punzone (H)!

Verwandte Anleitungen für Tescoma Handy


Inhaltszusammenfassung für Tescoma Handy
- Seite 1 - due to improper use incompatible with the Instructions for Use - resulting from an impact, fall or mishandling Nous vous félicitons de l’achat d’un produit Tescoma et vous remercions de la confiance que vous accordez - due to unauthorised repairs of, or alterations to, the product à...
- Seite 2 Поздравляем с приобретением изделия Tescoma и благодарим за доверие, оказанное нашей марке. Tescoma s.r.o. - U Tescomy 241, 760 01 Zlín - Česká republika; Distribuito da: Tescoma spa - Cazzago S. Martino (BS) - Italia - utilização inadequada incompatível com as Instruções de utilização В...