Herunterladen Diese Seite drucken
Velleman CAMCOLVC16 Bedienungsanleitung

Velleman CAMCOLVC16 Bedienungsanleitung

Kugelschreiber mit hd-videokamera

Werbung

Verfügbare Sprachen
  • DE

Verfügbare Sprachen

CAMCOL
LVC16
HIGH DEFINI
PEN MET HD-
STYLO AVEC C
BOLÍGRAFO C
KUGELSCHRE
EIBER MIT HD-VIDE
USER MANUAL
GEBRUIKERSH
MODE D'EMPLO
MANUAL DEL U
BEDIENUNGSA
ANLEITUNG
ITION VIDEO CAPTU
VIDEOCAMERA
CAMÉRA VIDÉO HD
CON CÁMARA DE VÍ
ANDLEIDING
OI
USUARIO
URE PEN CAMERA
DEO DE ALTA DEFIN
OKAMERA
3
 
10
 
17
 
24
 
31
NICIÓN

Werbung

loading

Inhaltszusammenfassung für Velleman CAMCOLVC16

  • Seite 1 CAMCOL LVC16 HIGH DEFINI ITION VIDEO CAPTU URE PEN CAMERA PEN MET HD- VIDEOCAMERA STYLO AVEC C CAMÉRA VIDÉO HD BOLÍGRAFO C CON CÁMARA DE VÍ DEO DE ALTA DEFIN NICIÓN KUGELSCHRE EIBER MIT HD-VIDE OKAMERA USER MANUAL   GEBRUIKERSH ANDLEIDING  ...
  • Seite 2 CAMCOLVC16 V. 01 – 13/07/2012 ©Velleman nv...
  • Seite 3 If in doubt, co ontact your local wa aste disposal autho orities. Thank you for choosing Velleman! P lease read the manua al thoroughly before bringing g this device into serv vice. If the device was damaged in...
  • Seite 4 CAMCOLVC16 • Familiarise yourself with the functions of the device before actually using it. • All modifications of the device are forbidden for safety reasons. Damage caused by user modifications to the device is not covered by the warranty. • Only use the device for its intended purpose. Using the device in an unauthorised way will void the warranty.
  • Seite 5 CAMCOLVC16 Operation Turning the camera on and off • To switch on the camera, press the power/recording button [1] for 3-5 seconds. • To switch off the camera, press the power/recording button [1] for 3-5 seconds. If the camera is idle for more than 1 minute, it switches off automatically.
  • Seite 6 CAMCOLVC16 Connecting to a pc Switch the camera off. Unscrew the pen. Plug the pen’s USB plug [8] into the female connector of the included USB cable. Plug the male connector into a USB port on your computer. On the pc, open My Computer and look for the drive that represents the camera.
  • Seite 7 CAMCOLVC16 Click Update. The screen below appears: Click OK. The screen below appears: Click Quit to exit. Using the camera as a webcam Switch the camera on. Unscrew the pen. Connect the camera to your computer with the included USB cable.
  • Seite 8 (incorrect) use of f this device. For mo ore info concerning th his product and the latest version of th is manual, V. 01 – 13/07/ /2012 © ©Velleman nv...
  • Seite 9 © COPYRIGHT NOTICE The copyright to this manual is owned by Velleman nv. All worldwide rights reserved. No part of this manual may be copied, reproduced, translated or reduced to any electronic medium or otherwise without the prior written consent of the copyright holder.
  • Seite 10 . Gooi het toestel niet in het vuur, het ka an immers ontploffen. Algemene e richtlijnen Raadpleeg de V Velleman® service- en kwaliteitsgaran ntie achteraan deze e handleiding. • Bescherm te egen stof en extreme temperaturen. • Bescherm te egen schokken.
  • Seite 11 CAMCOLVC16 • Richt de camera nooit naar de zon of naar andere weerkaatsende objecten. • Leer eerst de functies van het toestel kennen voor u het gaat gebruiken. • Om veiligheidsredenen mag u geen wijzigingen aanbrengen. Schade door wijzigingen die de gebruiker heeft aangebracht valt niet onder de garantie.
  • Seite 12 CAMCOLVC16 Gebruik De camera in- en uitschakelen • Om de camera in te schakelen, druk op de aan-uit/opnameknop [1] gedurende 3-5 seconden. • Om de camera uit te schakelen, druk op de aan-uit/opnameknop [1] gedurende 3-5 seconden. Indien de camera langer dan 1 minuut niet gebruikt wordt, schakelt deze automatisch uit.
  • Seite 13 CAMCOLVC16 Wacht totdat de oranje led knippert voor het nemen van de volgende foto. Aansluiten op een pc Schakel de camera uit. Draai de pen open. Plug de USB-stekker [8] in de vrouwelijke connector van de meegeleverde USB-kabel. Sluit de mannelijke connector aan op de USB-poort van uw computer.
  • Seite 14 CAMCOLVC16 Klik op Update. Het scherm hieronder verschijnt: Klik op OK. Het scherm hieronder verschijnt: Klik op Quit om het scherm te verlaten. De camera gebruiken als webcam Schakel de camera in. Draai de pen open. Sluit de camera aan op uw computer met de meegeleverde USB- kabel.
  • Seite 15 MJPEG (aud io PCM) beelden per s seconde 30 videoresoluti 1280 x 720 pixels opnamecapac citeit ±100MB/mi beeldopname opnameforma JPEG beeldresoluti 1600 x 1200 0 pixels laadtijd capaciteit batte erij 150mAH V. 01 – 13/07/ /2012 © ©Velleman nv...
  • Seite 16 -10°C ~ 50°C Gebruik dit toestel enkel met originele accessoires. Velleman nv is niet aansprakelijk voor schade of kwetsuren bij (verkeerd) gebruik van dit toestel. Voor meer informatie over dit product en de laatste versie van deze handleiding, zie www.velleman.eu.
  • Seite 17 Ne jetez pas l'a appareil au feu po our éviter tout risque d'explosion. V. 01 – 13/07/ /2012 © ©Velleman nv...
  • Seite 18 CAMCOLVC16 Directives générales Se référer à la garantie de service et de qualité Velleman® en fin de notice. • Protéger contre la poussière. Protéger contre la chaleur extrême. • Protéger contre les chocs et le traiter avec circonspection pendant l’opération.
  • Seite 19 CAMCOLVC16 Description Se référer aux illustrations en page 2 de cette notice. bouton marche-arrêt bouton de réinitialisation /enregistrement objectif commutateur vidéo/photo microphone connexion USB slot pour carte micro SD pointe du stylo LED d’état Emploi Allumer et éteindre la caméra •...
  • Seite 20 CAMCOLVC16 Utiliser la fonction photo Allumez la caméra. Desserrez le stylo et mettez le commutateur [7] sur 1. La LED orange clignote. Fermez le stylo. Pour prendre une photo, appuyez brièvement sur le bouton marche-arrêt/enregistrement [1]. La caméra enregistre la photo sur la carte mémoire. La LED bleue s'allume pendant la prise de la photo et la mémorisation.
  • Seite 21 CAMCOLVC16 Localisez et double-cliquez sur le fichier WriteTime.exe sur le CD-ROM. La fenêtre ci-dessous apparaît: Cliquez sur Update. La fenêtre ci-dessous apparaît: Cliquez sur OK. La fenêtre ci-dessous apparaît: Cliquez sur Quit pour quitter. Utiliser la caméra comme webcam Allumez la caméra.
  • Seite 22 62° illumination mi 1 lux enregistrement t vidéo format MJPEG (aud io PCM) d'enregistrem ment images par s econde résolution vid déo 1280 x 720 pixels capacité ±100MB/mi d'enregistrem ment V. 01 – 13/07/ /2012 © ©Velleman nv...
  • Seite 23 être modifiées sans notification préalable. © DROITS D’AUTEUR SA Velleman est l’ayant droit des droits d’auteur pour cette notice. Tous droits mondiaux réservés. Toute reproduction, traduction, copie ou diffusion, intégrale ou partielle, du contenu de cette notice par quelque procédé ou sur tout support électronique que se soit est interdite sans l’accord préalable écrit de l’ayant droit.
  • Seite 24 Al final de su vid da útil, respete las leye es locales en relación con el medio o ambiente. No eche e el aparato al fuego por rque puede explot tar. V. 01 – 13/07/ /2012 © ©Velleman nv...
  • Seite 25 CAMCOLVC16 Normas generales Véase la Garantía de servicio y calidad Velleman ® al final de este manual del usuario. • No exponga este equipo a polvo. No exponga este equipo a temperaturas extremas. • No agite el aparato. Evite usar excesiva fuerza durante el manejo y la instalación.
  • Seite 26 CAMCOLVC16 Descripción Véase las figuras en la página 2 de este manual del usuario. botón botón de reinicialización activar/desactivar/grabar (reset) óptica botón vídeo/foto micrófono conector USB punta del bolígrafo tarjeta micro SD ranura para  LED de estado Activar y desactivar la cámara • Para activar la cámara, pulse el botón activar/desactivar/grabar [1] unos 3-5 segundos.
  • Seite 27 CAMCOLVC16 Observación: Durante una grabación larga, el aparato guarda un fichero de vídeo cada 20 minutos. Utilizar la función de fotos Active la cámara. Desatornille el bolígrafo y ponga el botón [7] en la posición 1. El LED parpadea en naranja.
  • Seite 28 CAMCOLVC16 Localice el fichero WriteTime.exe en el CD-ROM y haga clic dos veces en ello. La siguiente pantalla aparece: Haga clic en Update. La siguiente pantalla aparece: Haga clic en OK. La siguiente pantalla aparece: Haga clic en Quit para salir.
  • Seite 29 1 lux grabación de v vídeo formato de g rabación MJPEG (a audio PCM) imágenes po r segundo (fps) resolución víd 1280 x 7 20 píxeles capacidad de e grabación ±100MB/ /min V. 01 – 13/07/ /2012 © ©Velleman nv...
  • Seite 30 Se pueden modificar las especificaciones y el contenido de este manual sin previo aviso. © DERECHOS DE AUTOR Velleman NV dispone de los derechos de autor para este manual del usuario. Todos los derechos mundiales reservados. Está estrictamente prohibido reproducir, traducir, copiar, editar y guardar este manual del usuario o partes de ello sin previo permiso escrito del derecho habiente.
  • Seite 31 S Sie sich für Entsorgungsr richtlinien an Ihre ö örtliche Behörde. Wir bedanken uns für den Kauf des CAMCOLVC16! Lesen n Sie diese Bedienungsanl eitung vor Inbetriebna ahme sorgfältig durch Überprüfen Sie e, ob Transportschäde en vorliegen. Sollte die...
  • Seite 32 CAMCOLVC16 Allgemeine Richtlinien Siehe Velleman® Service- und Qualitätsgarantie am Ende dieser Bedienungsanleitung. • Schützen Sie das Gerät vor Staub. Schützen Sie das Gerät vor extremen Temperaturen. • Vermeiden Sie Erschütterungen. Vermeiden Sie rohe Gewalt während der Installation und Bedienung des Gerätes.
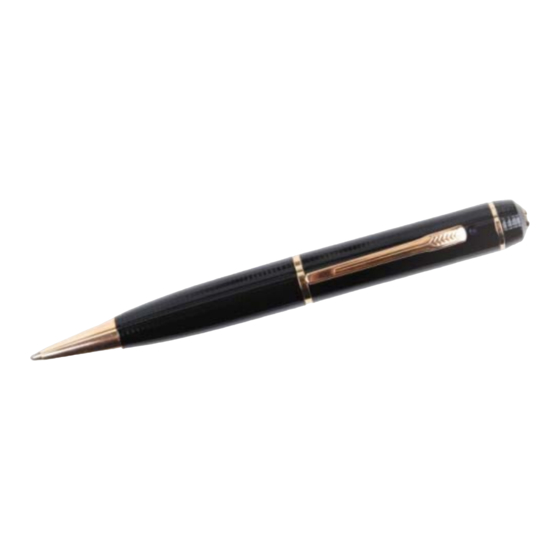
  • Seite 33 CAMCOLVC16 Umschreibung Siehe Abbildungen, Seite 2 dieser Bedienungsanleitung. EIN-/AUS-/Aufnahme-Taste Reset-Taste (Rücksetzung) Objektiv Video/Photo-Taste Mikrofon USB-Anschluss Einschub für Micro SD-Karte Spitze des Kugelschreibers Status-LED Anwendung Die Kamera ein- und ausschalten • Um die Kamera einzuschalten, drücken Sie die EIN-/AUS- /Aufnahme-Taste [1] etwa 3-5 Sekunden.
  • Seite 34 CAMCOLVC16 Die Photo-Funktion verwenden Schalten Sie die Kamera ein. Lockern Sie den Kugelschreiber und stellen Sie Taste [7] auf 1. Die LED blinkt orange. Schließen Sie den Kugelschreiber. Um ein Photo zu machen, drücken Sie kurz die EIN-/AUS- /Aufnahme-Taste [1].
  • Seite 35 CAMCOLVC16 Lokalisieren und klicken Sie zwei Mal auf die Datei WriteTime.exe. Nachfolgendes Fenster erscheint: Klicken Sie auf Update. Nachfolgendes Fenster erscheint: Klicken Sie auf OK. Nachfolgendes Fenster erscheint: Klicken Sie auf Quit zum Verlassen. Die Kamera als Webcam verwenden Schalten Sie die Kamera ein.
  • Seite 36 Gerät nicht ins Feu uer, denn es könnte e explodieren. Technisch he Daten Speicherkapaz ität max. 16GB M Micro SD-HC-Karte (ni mitgeliefert) Aufnahme-Elem ment 2 Megapixel C CMOS Gesichtswinkel 62° minimale Licht stärke 1 lux V. 01 – 13/07/ /2012 © ©Velleman nv...
  • Seite 37 Betriebstemperatur -10°C ~ 50°C Verwenden Sie dieses Gerät nur mit originellen Zubehörteilen. Velleman NV übernimmt keine Haftung für Schaden oder Verletzungen bei (falscher) Anwendung dieses Gerätes. Für mehr Informationen zu diesem Produkt und die neueste Version dieser Bedienungsanleitung, siehe www.velleman.eu.
  • Seite 38 • Repairs occurring after warranty expiration purchase. are subject to shipping costs. • Velleman® can decide to replace an article • The above conditions are without prejudice to with an equivalent article, or to refund the retail all commercial warranties.
  • Seite 39 (onbeperkte lijst). - defecten ten gevolge van brand, Velleman® service- en kwaliteitsgarantie waterschade, bliksem, ongevallen, Velleman® heeft sinds zijn oprichting in 1972 natuurrampen, enz. een ruime ervaring opgebouwd in de - defecten veroorzaakt door opzet, nalatigheid elektronicawereld en verdeelt op dit moment of door een onoordeelkundige behandeling, producten in meer dan 85 landen.
  • Seite 40 (pour une tierce personne sans l’autorisation explicite l’UE) : de SA Velleman® ; - frais de transport de et vers Velleman® si l’appareil n’est plus couvert • tout produit grand public est garanti 24 mois sous la garantie.
  • Seite 41 24 meses - se calcula gastos de transporte de y a contra errores de producción o errores en Velleman® si el aparato ya no está cubierto por materiales desde la adquisición original; la garantía.
  • Seite 42 Liste). - Schäden verursacht durch Brandschaden, Velleman® Service- und Qualitätsgarantie Wasserschaden, Blitz, Unfälle, Seit der Gründung in 1972 hat Velleman® sehr Naturkatastrophen, usw. viel Erfahrung als Verteiler in der Elektronikwelt - Schäden verursacht durch absichtliche, in über 85 Ländern aufgebaut.