Herunterladen Inhalt Inhalt Diese Seite drucken

Werbung

Verfügbare Sprachen
  • DE

Verfügbare Sprachen

  • DEUTSCH, seite 1
Standventilator
10030977 10030978

Werbung

Inhaltsverzeichnis
loading

Inhaltszusammenfassung für Klarstein 10030977

  • Seite 1 Standventilator 10030977 10030978...
  • Seite 2: Inhaltsverzeichnis

    Reinigung und Pflege 8 Hinweise zur Entsorgung 8 Konformitätserklärung 8 Technische Daten Artikelnummer 10030977, 10030978 Stromversorgung 220-240 V ~ 50 Hz Sicherheitshinweise • Lesen Sie die Regeln, für ein sicheren Betrieb, und Anleitungen aufmerksam durch und bewahren Sie diese für zukünftiges Nachschlagen gut auf.
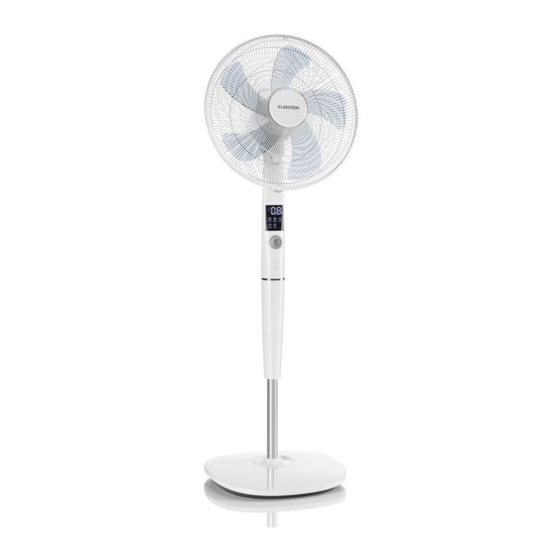
  • Seite 3: Geräteübersicht

    Geräteübersicht 1 Vorderes Gitter 2 Sicherungsring 3 Flügel 4 Kunststoff-Mutter 5 Hinteres Gitter 6 Antriebswelle 7 Motor 8 Display 9 Kontrolleinheit 10 Bedienfeld 11 Netzkabel 12 Schraube 13 Stange 14 Buchsenklemmen 15 Abdeckung 16 Standfuß 17 Schmetterlingsschrauben 18 Festziehen 19 Lösen 20 Drehrad 21 Klammer 22 Mittelstück...
  • Seite 4 So bauen Sie Basis, Unterrohr und Kontrolleinheit zusammen: Klammerposition Federposition Positions- markierung So bauen Sie Flügel, Gitter und Fernbedienung zusammen: Drehrad Drehrad festziehen Fest- ziehen Schlitz Lösen Haltestift Kunststoff- Flügel Mutter Fernbedienung Ein/Aus Batterie Batteriefach Antrieb Timer Schwingen Modus...
  • Seite 5: Inbetriebnahme Und Bedienung

    1. Drehen Sie das Drehrad im Uhrzeigersinn (oder nehmen Sie es aus der Verpackung) und die Kunststoff- Mutter gegen den Uhrzeigersinn. Nehmen Sie beide Teile ab. Befestigen Sie das hintere Gitter am Motor und ziehen Sie die Kunststoff-Mutter wieder fest. 2.
  • Seite 6 OSC (Schwingen) Nachdem der Ventilator gestartet ist, drücken Sie wiederholt auf diese Taste, um das Schwingen zu starten und zu beenden. PRO (Timer) Drücken Sie wenn der Ventilator läuft auf die Timer-Taste, um einen Ausschalt-Timer einzustellen. Das Timer Icon blinkt im Sekundentakt im Display. •...
  • Seite 7: Motor-Überhitzungsschutz

    Neigungseinstellung Um den Luftstrom nach oben oder unten zu lenken, neigen Sie den Ventilator leicht in die gewünschte Rich- tung. Höhe einstellen • Anheben: Halten Sie den Ventilator mit einer Hand hoch und lösen Sie mit der anderen Hand den Befesti- gungsknopf, indem Sie sie gegen den Uhrzeigersinn herausdrehen.
  • Seite 8: Reinigung Und Pflege

    Reinigung und Pflege Sie können das Gerät selbstständig reinigen. Versuchen Sie jedoch nicht das Gerät selbst zu reparieren. Repa- ratur und Wartung darf nur von geschultem Fachpersonal ausgeführt werden. • Ziehen Sie vor der Reinigung den Stecker aus der Steckdose. •...
  • Seite 9: Technical Data Daten

    Cleaning and Care 15 Hints on Disposal 15 Declaration of Conformity 15 Technical Data Item numberr 10030977, 10030978 Power supply 220-240 V ~ 50 Hz Safety Instructions • Read Rules for Safe Operation and Instructions Carefully. • If the supply cord is damaged, it must be replaced by manufacturer or its service agent or a similarly qualified person in order to avoid a hazard.
  • Seite 10: Product Description

    Product Description 1 Front grill 2 Circlip 3 Blade 4 Plastic nut 5 Rear grill 6 Shaft 7 Motor 8 Display 9 Fan body 10 Control panel 11 Power cord 12 Screw 13 Pole 14 Female terminals 15 Column cover 16 Base 17 Butterfly screws 18 Tighten...
  • Seite 11 Base Assembly: Position fixed rope Position fixed gap Position logo Grill and Fan Assembly: Spinner Spinner tighten Tighten Slot Loosen Retaining Plastic Blade Remote On/Off Battery Battery cover Driver Timer Mode...
  • Seite 12: Use And Operation

    1. Unscrew the spinner clockwise (or take the spinner out from the bag) and the plastic nut counterclockwise to remove both of them. Fix the rear grill to the motor then tighten the plastic nut again. 2. Insert the blade into shaft, and make sure the rotor shaft pin is fitted into groove of the blade. Turn the spin- ner counterclockwise to tighten the blade.
  • Seite 13 OSC Key After the fan starts, repeatedly touch this button to start or stop oscillation. PRO Key (Timer) Under power-on state, timed power-off can be set. Press the PRO button; it starts the timing power-off state. „Timing“ and icon displayed on the fan display will flash once per second. •...
  • Seite 14 Tilt Adjustment To adjust the air flow upward or downward, push the guards lightly to the desired direction. Height Adjustment • Lowing: lift up the head with a hand, unscrew the fastening knob counterclockwise with the other hand, slowly lower the head to an appropriate height, and tighten the knob clockwise. •...
  • Seite 15: Cleaning And Care

    Cleaning and Care The fan requires little maintenance. Do not try to fix it by yourself. Refer it to qualified service personnel if service is needed. • Before cleaning and assembling, fan must be unplugged. • To ensure adequate air circulation to the motor, keep vents at the rear of the motor free of dust. Do not disassemble the fan to remove dust.
  • Seite 16: Datos Técnicos

    Indicaciones para la retirada del aparato 22 Declaración de conformidad 22 Datos técnicos Número de artículo 10030977, 10030978 Suministro eléctrico 220-240 V ~ 50 Hz Indicaciones de seguridad • Lea las normas para un funcionamiento seguro y las instrucciones con detenimiento y consérvelas para consultas posteriores.
  • Seite 17: Descripción Del Aparato

    Descripción del aparato 1 Rejilla superior 2 Anilla de seguridad 3 Aspa 4 Tuerca de plástico 5 Rejilla inferior 6 Eje de transmisión 7 Motor 8 Display 9 Unidad de control 10 Panel de control 11 Cable de alimentación 12 Tornillo 13 Varilla 14 Hembrillas 15 Cubierta...
  • Seite 18 Cómo montar la base, el conducto inferior y la unidad de control: Posición de la pinza Posición del muelle Marca de posición Cómo montar las aspas, las rejillas y el mando a distancia: Apretar rueda Rueda giratoria giratoria Apretar Ranura Soltar Espiga de fijación...
  • Seite 19: Puesta En Marcha Y Uso

    1. Gire la rueda giratoria en el sentido de las agujas del reloj (o retírela del embalaje) y la tuerca de plástico en el sentido contrario de las agujas del reloj. Retire ambas piezas. Fije la rejilla trasera al motor y apriete la tuerca de plástico de nuevo.
  • Seite 20 OSC (Oscilación) Una vez haya iniciado el ventilador, pulse varias veces este botón para iniciar y finalizar la oscila- ción. PRO (Temporizador) Pulse el botón Timer con el ventilador en marcha para programar un apagado automático. El icono del temporizador parpadea cada segundo en el display. •...
  • Seite 21 Ajuste de inclinación Para orientar la corriente de aire hacia arriba o hacia abajo, incline el ventilador en la dirección deseada. Ajustar altura • Levantar: sujete el ventilador con una mano y suelte el pin de fijación con la otra desenroscándolo en el sentido contrario de las agujas del reloj.
  • Seite 22: Limpieza Y Cuidado

    Limpieza y cuidado Puede limpiar usted mismo el aparato. No intente repararlo usted mismo. La reparación y mantenimiento deberá llevarse a cabo por parte de personal autorizado. • Desconecte el enchufe antes de limpiar el aparato. • Para evitar un grado de suciedad alto, asegúrese de que durante el funcionamiento del ventilador sus orifi- cios no estén obstruidos y que la parte trasera del motor esté...
  • Seite 23: Fiche Technique

    Information sur le recyclage 29 Déclaration de conformité 29 Fiche technique Numéro d’ a rticle 10030977, 10030978 Alimentation électrique 220-240 V ~ 50 Hz Consignes de sécurité • Lire attentivement les règles pour une utilisation sécurisée ainsi que les instructions et conserver ce mode d’...
  • Seite 24: Aperçu De L' A Ppareil

    Aperçu de l’ a ppareil 1 Grille avant 2 Anneau de protection 3 Pale 4 Écrou en plastique 5 Grille arrière 6 Arbre de transmission 7 Moteur 8 Écran 9 Unité de contrôle 10 Panneau de commande 11 Cordon d’ a limentation 12 Vis 13 Tige 14 Borne à...
  • Seite 25 Voici comment assembler le socle, le tube inférieur et l’unité de contrôle : Position de l’ a ttache Position du ressort Repère de position So bauen Sie Flügel, Gitter und Fernbedienung zusammen: Serrer le bouton Bouton rotatif rotatif Serrer Fente Desser- Tige de maintien...
  • Seite 26: Mise En Marche Et Utilisation

    1. Tourner le bouton rotatif dans le sens des aiguilles d’une montre (ou le sortir du carton d’ e mballage) et tour- ner l’ é crou en plastique dans le sens antihoraire. Enlever les deux pièces. Fixer la grille arrière au moteur et resserrer de nouveau l’...
  • Seite 27 OSC (Oscillation) Après le démarrage du ventilateur, appuyer sur cette touche pour démarrer et arrêter l’ o scillation. PRO (Minuteur) Appuyer sur la touche minuteur lorsque le ventilateur est en marche pour régler le minuteur d’ é teinte automatique. L’icône minuteur clignote toutes les secondes à l’ é cran. •...
  • Seite 28 Réglage de l’inclinaison Pour diriger le flux d’ a ir vers le haut ou vers le bas, incliner légèrement le ventilateur dans la direction souhaitée. Réglage de la hauteur • Élever : tenir le ventilateur d’une main et desserrer le bouton de fixation de l’ a utre main en le dévissant dans le sens antihoraire.
  • Seite 29: Nettoyage Et Entretien

    Nettoyage et entretien Il est possible de nettoyer l’ a ppareil soi-même. Cependant, ne pas essayer de réparer soi-même l’ a ppareil. Seul un technicien qualifié est habilité à réparer et entretenir l’ a ppareil. • Débrancher l’ a ppareil avant de le nettoyer. •...
  • Seite 30: Dati Tecnici

    Pulizia e manutenzione 36 Smaltimento 36 Dichiarazione di conformità 36 Dati tecnici Articolo numero 10030977, 10030978 Alimentazione 220-240 V ~ 50 Hz Avvertenze di sicurezza • Leggere attentamente le istruzioni per un utilizzo sicuro del ventilatore e conservare il manuale per consul- tazioni future.
  • Seite 31: Descrizione Del Prodotto

    Descrizione del prodotto 1 Griglia frontale 2 Anello di sicurezza 3 Pala 4 Dado in plastica 5 Griglia posteriore 6 Albero motore 7 Motore 8 Display 9 Unità di controllo 10 Pannello dei comandi 11 Cavo di alimentazione 12 Vite 13 Tubo 14 Terminali 15 Coperchio...
  • Seite 32 Assemblare la base, il tubo inferiore e l’unità di controllo: Posizione gancetti Posizione linguetta Posizione segni Assemblare le pale, la griglia e il telecomando: Serrare la Rotella rotella Serrare Intaglio Svitare Perno di bloccaggio Dado in Pale plastica Telecomando On/off Pila Vano pila Motore...
  • Seite 33: Messa In Funzione E Utilizzo

    1. Svitare la rotella in senso orario e il dado in plastica in senso antiorario per rimuovere entrambi. Fissare la griglia posteriore al motore e serrare di nuovo il dado in plastica. 2. Fissare le pale all´albero motore e assicurarsi che il perno di bloccaggio sia ben fissato nell´intaglio. Ruotare la rotella in senso antiorario per avvitare le pale.
  • Seite 34 OSC (oscillazione) Premere ripetutamente il tasto quando il ventilatore è in funzione per avviare e terminare l´oscillazione. PRO (Timer) Premere questo tasto quando il ventilatore è in funzione per impostare il timer di spegnimento. L‘icona del timer lampeggia sul display. •...
  • Seite 35 Impostare l´inclinazione Per direzionare il flusso dell´aria verso l´alto o verso il basso, inclinare il ventilatore leggermente nella direzione desiderata. Impostare l´altezza • Sollevare: sollevare il ventilatore con una mano e svitare con l‘altra mano la manopola di fissaggio ruotando- la in senso antiorario.
  • Seite 36: Pulizia E Manutenzione

    Pulizia e manutenzione Il ventilatore necessita di poca manutenzione. Non tentare di riparare il dispositivo da soli. Le riparazioni devo- no essere eseguite esclusivamente da personale qualificato. • Prima di pulire il dispositivo, staccare la spina dalla presa di corrente. •...

Diese Anleitung auch für:

10030978

Inhaltsverzeichnis