Warm-on MCS400 Installationsanleitung
Wifi/wlan thermostate
Inhaltsverzeichnis
Quicklinks
MCS400 WiFi/WLAN THERMOSTAT
MON TUE WED THU FRI SAT SUN
MON TUE WED THU FRI SAT SUN
MON TUE WED THU FRI SAT SUN
WED
M
M
M
M
CONTENT
HEATING MATS
INSTALLATIONSANLEITUNG
INSTALLATION INSTRUCTIONS
INSTRUCTIONS D'INSTALLATION
° C
° C
° C
° C
1
1
1
1
2
2
2
3
3
3
4
4
4
<
<
<
<
>
>
>
>
2
3
3
4
5
6
9
9
10
13
14
14
17
22
23
INHALT
CONTENU
INSTALLATION
NATTES CHAUFFANTES
GARANTIE
DE
EN
FR
2
3
3
4
5
6
9
9
10
13
14
14
17
22
23
2
3
3
4
5
6
9
9
10
13
14
14
17
22
22
23
Inhaltsverzeichnis

Verwandte Anleitungen für Warm-on MCS400


Inhaltszusammenfassung für Warm-on MCS400
-
Seite 1: Inhaltsverzeichnis
MCS400 WiFi/WLAN THERMOSTAT INHALT BEDIENELEMENTE UND DISPLAYSTRUKTUR VORSICHTSMASSNAHMEN MONTAGE MON TUE WED THU FRI SAT SUN MON TUE WED THU FRI SAT SUN MON TUE WED THU FRI SAT SUN ° C ° C ° C ° C THERMOSTAT-INSTALLATION BEI MEHREREN HEIZMATTEN... -
Seite 2: Am Pm
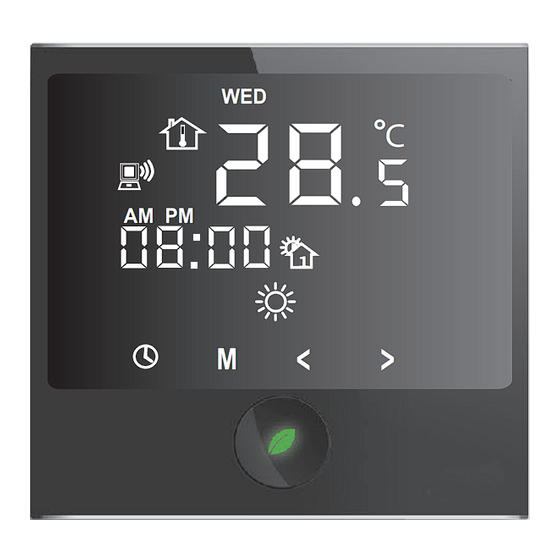
BEDIENELEMENTE UND DISPLAYSTRUKTUR CONTROLS AND SETTINGS COMMANDES ET RÉGLAGES Montag Dienstag Mittwoch MON TUE WED THU FRI SAT SUN ° C Donnerstag Freitag AM PM Samstag Sonntag < > ECONOMY (+10...+21 °C) WLAN Verbindung AM PM Uhrzeit 12/24 Stunden Programmbetrieb (+5...+35 °C) zeigt Bodentemperatur / Parameter-Einstellung Monday Heizung AN... -
Seite 3: Safety Warnings
VORSICHTSMASSNAHMEN SAFETY WARNINGS MESURES DE SÉCURITÉ Die Installation ist ausschließlich durch eine Elektrofachkraft sorgfältig nach den Regeln DIN-VDE auszuführen. Andernfalls erlischt die Garantie. Trennen Sie die Leitungen von der Spannung bevor Sie einen Thermostat installieren, überprüfen oder austauschen. Es dürfen nur Kunststoff unterputzdosen für die Installation des Thermostats eingesetzt werden. -
Seite 4: Thermostat Installation For Two Or More
Sensor Sensor Capteur Last (Heizung) Load (heating) 230 V AC Charge (chauff age) 230 V AC THERMOSTAT-INSTALLATION BEI MEHREREN HEIZMATTEN THERMOSTAT INSTALLATION FOR TWO OR MORE HEATING MATS INSTALLATION DU THERMOSTAT POUR PLUSIERS NATTES CHAUFFANTES H = 30 cm Electrical thermostat; Thermostat électronique, câble Elektronisches Thermostat;... -
Seite 5: Set Day And Time
EINSTELLEN VON TAG UND UHRZEIT SET DAY AND TIME RÉGLAGES DU JOUR ET DE L‘HEURE Thermostat einschalten. Drücken Sie das „Uhr“-Symbol und die Uhr fängt an zu blinken. Switch on the thermostat. ° C Tapp the clock symbol and the hour Allumer le thermostat will start blinking. -
Seite 6: Parameter Settings
PARAMETER-EINSTELLUNGEN PARAMETER SETTINGS RÉGLAGE DE PARAMÈTRE Warten Sie bis das Display in Die Einstellung für Frostschutz (+5°C) erscheint. „Standby“ Modus geht. Dann drücken Sie die Taste für 3 The setting for frost protection (+5°C) Sekunden. will appear. Wait for the display to go into Le réglage pour basse température standby. - Seite 7 Drücken Sie das „M“-Symbol und die Ändern der Einstellung. 12 = 12 Stunden System Display Standby-Betrieb-Einstellung erscheint 24 = 24 Stunden System Tapp the „M“ symbol and the Display standby timer settings will appear. Change the setting. 12 = twelve hour system Taper sur le symbole «...
- Seite 8 Drücken Sie das „M“-Symbol Anzeige der Selbstoptimierungszeit und die nächste Funktion wird in Minuten für den Wechsel der eingeschaltet. Raumtemperatur um +1 °C. Tapp the „M“ symbol and the next This is the amount of time in minutes function will appear. that it takes the self-lerning to change the room temperature +1 Taper sur le symbole «...
-
Seite 9: Temperature Indication
ANZEIGEN VON TEMPERATUREN TEMPERATURE INDICATION TEMPÉRATUR MESURÉE Die gemessene Lufttemperatur Um die gemessene Bodentemperatur wird gezeigt, wenn das Display anzuzeigen, drücken Sie das Symbol aktiv ist. „M“. ° C ° C The measured air temperature For the measured floor temperature will be shown when the display to be displayed tapp the symbol „M“. -
Seite 10: Operation Mode Selection
AUSWAHL BETRIEBSMODUS OPERATION MODE SELECTION SÉLECTION DU MODE DE FONCTIONNEMENT Drücken und halten Sie das Das Symbol und die Symbol für 2 Sekunden, um Einstelltemperatur für den Economy- den Modus zu wechseln. Betrieb erscheinen im Display ° C ° C Press and hold the symbol for symbol and set temperature... - Seite 11 Die Minuten beginnen zu blinken. Bestätigen Sie Ihre Wahl mit der Stellen Sie Ihre AUFWACHEN Zeit Taste. mit Hilfe der < oder > Taste ein. ° C ° C Confirm the setting with the The minutes begins to blink. Set button.
- Seite 12 EREIGNIS KOMMEN COMING HOME EVENT ÉVÉNEMENT ARRIVER Bestätigen Sie Ihre Wahl mit der 12 Die Uhrzeit beginnt zu blinken. Stellen Sie Ihre KOMMEN Zeit mit Taste. Hilfe der < oder > Taste ein. ° C ° C Confirm the setting with the The clock time begins to blink.
-
Seite 13: Default Settings
Stellen Sie Ihre SCHLAFEN GEHEN Bestätigen Sie Ihre Wahl mit der Temperatur mit Hilfe der < oder > Taste. Taste ein. ° C ° C Confirm the setting with the Set your GOING TO SLEEP button. temperature using the < or > button. -
Seite 14: Alarm Indication
ALARMHINWEISE ALARM INDICATION INDICATEURS D‘ALARME Anzeige im Fall eines SENSORFEHLERS. HI Anzeige für den Fall, dass eine Temperatur höher als +55°C erreicht Appears on display by SENSOR FAILURE. wird. Affichage en cas d‘une ERREUR DU HI appears on the display when the a CAPTEUR. - Seite 15 WiFi VERBINDUNG WiFi CONNECTION CONNEXION WiFi Öffnen Sie die App und registrieren Sie Open APP and register or log in directly. Ouvrez l‘application enregitrez vous ou sich direkt bzw. loggen Sie sich direkt ein. identifiez vous directement. After log in, press and then choose Aprés connexion, appuyer sur le symbole Drück Sie...
- Seite 16 Geben Sie den Name vom WiFi und das Input name from WiFi and Password. Entrée le nom et le mot de passe de votre Passwort ein. Do not press the „CONNECT“ button! WiFi. Ne pas Appuyer sur le boutton « Drücken Sie nicht den „CONNECT“...
-
Seite 17: Smartphone "Main Menu" Overview
SMARTPHONE „HAUPTMENÜ“ BILDSCHIRMAUFBAU SMARTPHONE „MAIN MENU“ OVERVIEW SMARTPHONE « MENU PRINCIPAL » ECRAN Bildschirm Einstellungen öffnen Display Settings open Ecran paramétres ouvrir Thermostat öffnen Thermostat open Thermostat ouvrir Thermostat hinzufügen Add new thermosat Ajouter une nouvelle thermostat EINSTELLUNGEN SETTINGS RÉGLAGE DE PARAMÈTRE... - Seite 18 Drücken Sie den Schieberegler, um die Tapp the C/F slider to change the Taper le C/F faite glisser le curseur pour Temperatur zwischen °C und °F zu ändern. temperature unit between °C and °F. changer la température entre °C et °F. Smart Link dient dazu, die Smartphone Used to connect your Smartphone APP Vous pouvez l‘tiliser en connectant votre...
- Seite 19 Ausloggen von der Smartphone APP. Logout from your Smartphone APP. Déconnectez vous de votre Smatphone. THERMOSTAT-EINSTELLUNGEN THERMOSTAT SETTINGS LE RÉGLAGES DE THERMOSTAT Zurück zu den „Einstellungen“ Return to Settings Revenez aux paramétre Sparbetrieb AUS Economy operation OFF Mode économique est éteint Sparbetrieb EIN Economy operation ON Mode économique en marche...
- Seite 20 Raumtemperatur-Regelung und Anzeige der Room temperature setting slide and set Réglage de la température ambiante et Einstelltemperatur temperature indication indication de temérature Ändern der Temperatureinstellung durch Change the temperature setting by sliding En glissant le boutton vous changez le Schieben des Reglers the button réglage de la température Thermostat und Heizung EIN oder...
- Seite 21 Geben Sie die MAC-Adresse des nächsten Enter the MAC address of the next Entrez l‘adresse MAC du prochain Thermostats ein, das verbunden werden thermostat to be connected. thermostat à connecter. soll. Drücken Sie den „ADD“ Knopf und das Press the „ADD“ button and the Appuyer sur le boutton «...
-
Seite 22: Technical Data, Claims, Warranty
TECHNISCHE DATEN TECHNICAL DATA CARACTÉRISTIQUES TECHNIQUES Spannung Power supply Tension 230 V AC Max. Stromstärke Maximum load current Courant max. 16 A Stromverbrauch Thermostat power consumption Consommation de courant <2 W Stromverbrauch bei Standby Standby power consumption Consommation en mode veille 1.2 W Gewicht Weight... -
Seite 23: Acceptance Test Certificate
GARANTIESCHEIN GUARANTEE CARD CERTIFICAT DE GARANTIE Ausgefülltes Prüfprotokoll ist Grundlage für Garantieanspruch. The fi lled out resistance acceptance test certifi cate is necessary for warranty claims. Le certifi cat d‘essai de réception de résistance rempli est nécessaire pour les réclamations sous garantie. Name / Name / E-Mail /... - Seite 24 Bedienen Sie alle verbundenen Bodenheizungsthermostate von einem mobilen Gerät Operate all connected floor heating thermostats from one mobile device. Contrôler plusieurs thermostats connecté a des planchers chauffants par un seul Smartphone. MON TUE WED THU FRI SAT SUN MON TUE WED THU FRI SAT SUN MON TUE WED THU FRI SAT SUN MON TUE WED THU FRI SAT SUN MON TUE WED THU FRI SAT SUN...