Sony VG-C70AM Bedienungsanleitung
Quicklinks
3-277-674-23 (2)
Vertical Grip
Poignée verticale
Operating Instructions
Mode d'emploi
Manual de instrucciones
Bedienungsanleitung
VG-C70AM
© 2007 Sony Corporation Printed in Japan
Printed on 70% or more rectcled paper
using VOC (Volatile Organic Compound)
-free vegetable oil based ink.
1
2
3
14
13
4
12
11
5
9 10
8
7
6
19
20
15
18
16 17
1
2
3
4
5
1
2
3
4
5
6
7
English
Before operating the product, please read this manual thoroughly and retain it for
future reference.
WARNING
To reduce fire or shock hazard, do not expose the unit to rain or moisture.
Tape over lithium battery contacts to avoid short-circuit when disposing of batteries,
and follow local regulations for battery disposal.
Keep batteries or things that could be swallowed away from young children. Contact a
doctor immediately if an object is swallowed.
Immediately remove the batteries and discontinue use if...
the product is dropped or subjected to an impact in which the interior is exposed.
the product emits a strange smell, heat, or smoke.
Do not disassemble. Electric shock may occur if a high voltage circuit inside the
product is touched.
CAUTION
Replace the battery with the specified type only. Otherwise, fire or injury may result.
Do not expose the batteries to excessive heat such as sunshine, fire or the like.
For the Customers in Europe
Disposal of Old Electrical & Electronic Equipment (Applicable
in the European Union and other European countries with
separate collection systems)
This symbol on the product or on its packaging indicates that this
product shall not be treated as household waste. Instead it shall
be handed over to the applicable collection point for the recycling
of electrical and electronic equipment. By ensuring this product
is disposed of correctly, you will help prevent potential negative
consequences for the environment and human health, which could
otherwise be caused by inappropriate waste handling of this product.
The recycling of materials will help to conserve natural resources. For
more detailed information about recycling of this product, please
contact your local Civic Office, your household waste disposal service
or the shop where you purchased the product.
<Notice for the customers in the countries applying EU
Directives>
The manufacturer of this product is Sony Corporation, 1-7-1 Konan Minato-ku
Tokyo, 108-0075 Japan. The Authorized Representative for EMC and product safety is
Sony Deutschland GmbH, Hedelfinger Strasse 61, 70327 Stuttgart, Germany. For any
service or guarantee matters please refer to the addresses given in separate service or
guarantee documents.
What is the "InfoLITHIUM" ?
The "InfoLITHIUM" is a lithium ion battery pack which can exchange data with
compatible electronic equipment about its battery consumption. Sony recommends
that you use the "InfoLITHIUM" battery pack with electronic equipment having the
logo.
Notes on Use
This unit is a Vertical Grip for DSLR-A700. Do not attach it
to other devices.
This unit is designed to be dust-and moisture-resistant but
not to be waterproof and splash-proof.
Only one or two "InfoLITHIUM" battery pack(s) NP-FM500H
can be used.
NP-FM55H, NP-FM50, NP-FM30 cannot be used.
Remove the battery packs when storing this unit for an extended period of time.
Leaving the battery packs inserted in the unit may cause the battery chamber to be
damaged because liquid can leak from a battery. If that should occur, take the unit
immediately to the nearest Sony dealer for repair.
Be sure to use a genuine Sony battery pack with this unit.
This unit does not have a battery charger function.
Places to avoid for unit use and storage
Regardless of whether this unit is in use or in storage, do not leave it where it can be
exposed to:
Extremely high temperatures
Do not leave this unit where it might be exposed to direct sunlight; Avoid places
like vehicle dashboards or near heat sources. The inside of a vehicle can become
extremely hot if the vehicle windows are closed in the summer or if the vehicle is
under direct sunlight. The unit can become deformed or experience malfunctions if
left inside a vehicle.
Excessive vibrations
Strong electromagnetism or rays
Excessive sand or dust
Other cautions
This unit is designed for use from 0 °C to 40 °C (32 °F to 104 °F).
A rapid and dramatic rise in temperature causes condensation to form. Therefore,
seal the unit in a plastic bag and remove as much of the air inside of the bag as
you can before attempting to bring this unit inside after being in the cold for any
extended period of time. Once the temperature in the bag has had a change to rise
gradually to the temperature in the room, you can safely remove it from the bag.
These procedures will prevent the unit from changing temperatures rapidly, and
therefore prevent condensation from forming.
When dirty, this unit may be cleaned with a clean, dry cloth. Do not allow this unit
to come in contact with alcohol or other chemicals.
This unit has an electrically-connected signal contact point with the camera.
If you load the battery pack(s) while this unit is not attached to the camera, the unit
could malfunction or be damaged by a shorting of the contact point.
When attaching this unit to the camera, detaching this unit from the camera or
storing this unit separately, be sure to remove the battery pack(s) from this unit.
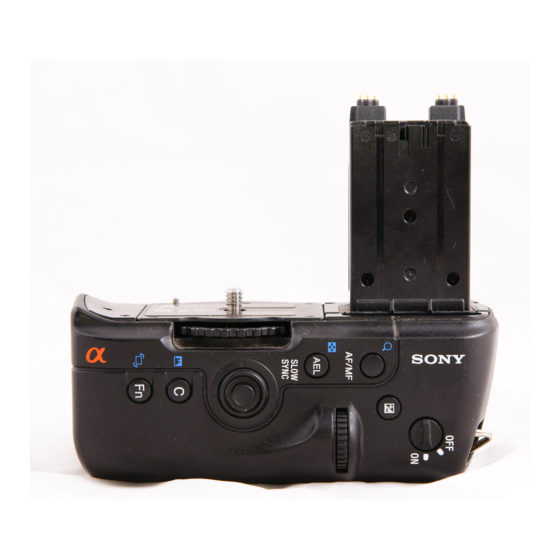
Identifying the Parts
1 Electrical contacts
2 Guide bar
3 Attachment screw
4 Locating pin
5 Battery chamber OPEN/CLOSE knob
6 Recording: Fn button
Playback:
(Rotate) button
7 Recording: C (Custom) button
Playback:
(Histogram) button
8 Multi selector
9 Rear control dial
10 Grip control ON/OFF switch
11
(Exposure) button
12 Recording: AF/MF (Auto focus/Manual focus) button
Playback:
(Close focus) button
13 Recording: AEL (AE lock) button
Playback:
(Index) button
14 Camera battery cover slot
15 Strap hook
16 Shutter button
17 Front control dial
18 Tripod receptacle
19 Battery pack stopper
20 Battery pack tray
Attaching this unit to the camera
1 Set the POWER switch of the camera to "OFF."
If the battery pack(s) is in this unit, remove the battery pack(s) from this unit.
2 Remove the battery pack from the camera.
3 Remove the terminal cover of this unit's electrical contacts.
After use, put the terminal cover back on to protect the electrical contacts.
4 Align the following part to attach this unit to the camera.
[This unit] Guide bar [Camera] Battery chamber
[This unit] Camera battery cover slot [Camera]Battery chamber door
[This unit] Attachment screw [Camera] Tripod receptacle
[This unit] Locating pin [Camera] The hole on the bottom
5 Rotate the attachment screw to lock it.
Periodically confirm that the attachment screw is not loose while in use.
Inserting the battery packs
Battery pack NP-FM500H (1 or 2 required)
NP-FM55H, NP-FM50, NP-FM30 are not available with this unit.
Be sure to charge the battery packs with the specified battery adaptor before use.
1 When replacing the battery packs with this unit attached to the
camera, set the POWER switch of the camera to OFF.
2 Rotate the battery chamber OPEN/CLOSE knob to "OPEN."
3 Press up the battery pack stopper with your finger as illustrated.
When releasing the lock of the battery pack stopper, be careful to pop up the
battery pack tray.
4 Remove the battery pack tray.
5 Attach the battery packs to the battery tray according to the
display on the battery tray.
When attaching a battery pack, attach it to either side.
Do not touch the terminal of the battery pack tray .
Attach the battery pack NP-FM500H only to the battery pack tray. Do not attach
the other battery packs.
Do not disassemble the battery pack tray.
When inserting two battery packs, start by using the one that has less power.
When the battery capacity of the used battery pack runs out, the unit will
automatically switch to the other battery pack.
6 Insert the battery pack tray into the original position by pressing
it until it clicks.
Make sure that the battery pack stopper locks the battery pack tray.
7 Close the battery chamber door and rotate the battery chamber
OPEN/CLOSE knob to "CLOSE" to close the cover.
Rotate the battery chamber OPEN/CLOSE knob properly to the position as
illustrated and close the cover.
Shooting vertical images
The operations of the unit's dials and buttons are same as those for the camera main
body.
When using this unit in vertical orientation, set the grip control ON/OFF switch to
"ON."
The grip control ON/OFF switch switches the dial and button functions ON and
OFF.
Regardless of the position of the grip control ON/OFF switch, the camera operating
button always operates.
Switch the power ON and OFF with the POWER switch of the camera. The grip
control ON/OFF switch can not switch the power ON and OFF.
Remaining battery power indicator
When inserting the two battery packs, the following indicator will be displayed on the
LCD screen of the camera.
Of the two battery packs, use the one that has less power first.
When doing so, the mark of the battery pack in use is bright and the mark of the other
battery pack is dark. The remaining battery level of the battery pack in use is displayed
as a percentage (%).
The mark of the battery pack in use changes as shown below. When the power of
battery in use runs out, the unit automatically switches to the other battery pack.
Remaining
battery capacity
high
low
If images are still being shot for a short time after the
mark appears, the
power of that battery will run out, but the unit will automatically switch to the
other battery pack.
Notes relating to the lens
When using this unit attached to the camera with the 70-200mm F2.8 G or 300mm
F2.8 G lens attached to the tripod-mounting collar, rotate tripod-mounting collar
to the position that allows the grip to be used.
When using this unit attached to the camera with 70-200mm F2.8 G lens attached
to the tripod-mounting collar, the following lens switches may not operate at the
vertical shooting. Before vertical shooting, set them at the horizontal position.
Focus-mode switch
DMF-mode switch
Focus-range limiter
When using a tripod, use one screws that are 5.5 mm or shorter. This unit cannot
be firmly fastened on a tripod using long screws. Attempting to do so will damage
this unit.
Troubleshooting
Symptom
Remedy
The camera does not work even after the
Check that the unit attachment screw
unit is attached to the camera, the battery
is securely tightened.
pack(s) are inserted into the unit and the
Check that the battery pack(s) are
camera POWER switch is set to ON.
charged.
Reattach the battery pack tray to the
unit.
Shutter button or other operating
Reattach the battery pack tray to the
buttons do not work.
unit.
Set the camera POWER switch to
OFF, remove the battery pack(s), and
reattach the unit to the camera.
"For "InfoLITHIUM" battery only" is
Reattach the battery pack tray to the
displayed even though genuine Sony
unit.
battery pack(s) are being used.
Set the camera POWER switch to
OFF, remove the battery pack(s), and
reattach the unit to the camera.
Specifications
Battery pack
NP-FM500H DC7.2V
Recording performance
With two NP-FM500H battery packs:
Approx. 1,300 frames
The measuring method conforms to CIPA standard.
Depending on the condition of use, recording performance may be lower less
than what was listed.
For details, refer to the operating instructions supplied with DSLR-A700.
Dimensions
Approx. 137.7 mm × 121.5 mm × 87.2 mm (w/h/d)
(5.42 in. × 4.78 in. × 3.43 in.)
Mass
Approx. 285 g (10.1 oz)
(including the battery tray, excluding the battery packs)
Operating temperature
0°C to 40°C (32°F to 104°F)
Included items
Vertical grip (1), Battery tray (1), Terminal cover (1),
Set of printed documentation
Design and specifications are subject to change without notice.
and "InfoLITHIUM" are trademarks of Sony Corporation.
Français
Avant de faire fonctionner ce produit, lisez attentivement ce mode d'emploi et
conservez-le pour toute référence ultérieure.
AVERTISSEMENT
Afin de réduire les risques d'incendie ou de décharge électrique, n'exposez pas cet
appareil à la pluie ou à l'humidité.
Recouvrez les contacts de la batterie au lithium de bande adhésive pour éviter tout
court-circuit lors de la mise au rebut des batteries et respectez la réglementation locale
en vigueur applicable à la mise au rebut des batteries.
Conservez les batteries hors de la portée des enfants, ainsi que tout objet qu'ils
risqueraient d'avaler. En cas d'ingestion d'un objet, consultez immédiatement un
médecin.
Retirez immédiatement les batteries et arrêtez de les utiliser si...
le produit est tombé ou a subi un choc qui mis à nu ses composants internes ;
le produit dégage de la fumée, une odeur ou une chaleur ou inhabituelle.
Ne démontez pas cet accessoire. Sinon, vous risquez de vous électrocuter en touchant
un circuit haute tension situé à l'intérieur du produit.
ATTENTION
Remplacez la batterie par une batterie correspondant au type spécifié uniquement.
Sinon vous risquez de provoquer un incendie ou des blessures.
N'exposez pas les batteries à une chaleur excessive, notamment aux rayons directs du
soleil, à une flamme, etc.
Pour les clients en Europe
Traitement des appareils électriques et électroniques en fin de
vie (Applicable dans les pays de l'Union Européenne et
aux autres pays européens disposant de systèmes de collecte
sélective)
Ce symbole, apposé sur le produit ou sur son emballage, indique
que ce produit ne doit pas être traité avec les déchets ménagers. Il
doit être remis à un point de collecte approprié pour le recyclage des
équipements électriques et électroniques. En s'assurant que ce produit
est bien mis au rebut de manière appropriée, vous aiderez à prévenir
les conséquences négatives potentielles pour l'environnement et la
santé humaine. Le recyclage des matériaux aidera à préserver les
ressources naturelles. Pour toute information supplémentaire au sujet
du recyclage de ce produit, vous pouvez contacter votre municipalité,
votre déchetterie ou le magasin où vous avez acheté le produit.
< Avis aux consommateurs des pays appliquant les
Directives UE >
Le fabricant de ce produit est Sony Corporation, 1-7-1 Konan Minato-ku Tokyo,
108-0075 Japon. Le représentant agréé pour la compatibilité électromagnétique et
la sécurité du produit est Sony Deutschland GmbH, Hedelfinger Strasse 61, 70327
Stuttgart, Allemagne. Pour toute question relative à la garantie ou aux réparations,
reportez-vous à ľadresse que vous trouverez dans les documents ci-joints, relatifs à la
garantie et aux réparations.
Que signifie « InfoLITHIUM »?
Les batteries « InfoLITHIUM » sont des batteries au lithium-ion qui peuvent échanger
des informations sur leur consommation avec des appareils électroniques compatibles.
Nous vous recommandons d'utiliser une batterie « InfoLITHIUM » avec les appareils
électroniques portant le logo
.
Remarques sur l'emploi
Cet accessoire est une Poignée verticale destinée au
DSLR-A700. Ne la fixez pas à d'autres appareils.
Cet accessoire est conçu pour résister à la poussière
et à l'humidité, mais il n'est étanche ni à l'eau, ni aux
éclaboussures.
Vous ne pouvez utiliser qu'une ou deux batteries
« InfoLITHIUM » NP-FM500H.
Les batteries NP-FM55H, NP-FM50, NP-FM30 ne peuvent
pas être utilisées.
Lorsque vous rangez cet accessoire pendant une période prolongée, retirez les
batteries.
Si vous laissez les batteries insérées dans l'accessoire, leur compartiment risque
d'être endommagé suite à une fuite de liquide de batterie. Si c'est le cas, confiez
immédiatement l'accessoire pour réparation au revendeur Sony le plus proche.
Veillez à utiliser une batterie Sony d'origine avec cet accessoire.
Cet accessoire ne propose pas de fonction de chargeur pour batterie.
Endroits à éviter pour l'utilisation et le rangement de
l'accessoire
N'utilisez et ne rangez jamais cet accessoire à des endroits où il risquerait d'être exposé
aux éléments suivants :
Températures extrêmement élevées
Ne laissez pas cet accessoire à un endroit exposé aux rayons directs du soleil. Evitez
notamment de le placer sur le tableau de bord d'un véhicule ou à proximité de
sources de chaleur. L'intérieur d'un véhicule peut devenir extrêmement chaud si
les vitres sont fermées en plein été ou si le véhicule est exposé aux rayons directs
du soleil. Si vous laissez cet accessoire à l'intérieur d'un véhicule, il risque de se
déformer ou de ne pas fonctionner correctement.
Vibrations excessives
Interférences ou rayons électromagnétiques puissants
Sable ou poussière excessives
Autres mises en garde
Cet accessoire est conçu pour une utilisation entre 0 °C et 40 °C (32 °F et 104 °F).
Une augmentation rapide et considérable de température entraîne la formation de
condensation. Par conséquent, si cet accessoire est resté dans un environnement
froid pendant une période prolongée, mettez-le dans un sac en plastique fermé et
éliminez un maximum d'air du sac avant de l'emmener à l'intérieur. Lorsque la
température à l'intérieur du sac a augmenté peu à peu pour atteindre la température
ambiante, vous pouvez retirer l'accessoire du sac en toute sécurité. Cela permet
d'éviter un changement de température trop rapide de l'accessoire, empêchant ainsi
toute formation de condensation.
Lorsqu'il est sale, l'accessoire peut être nettoyé avec un linge propre et sec. Evitez
tout contact entre l'accessoire et de l'alcool ou d'autres produits chimiques.
Cet accessoire possède un point de contact de signal raccordé électriquement à
l'appareil photo.
Si vous chargez la (les) batterie(s) alors que cet accessoire n'est pas raccordé à
l'appareil photo, il risque de ne pas fonctionner correctement ou d'être endommagé
à la suite d'un court-circuit du point de contact.
Lorsque vous raccordez cet accessoire à l'appareil photo, que vous le débranchez
de l'appareil ou que vous le rangez séparément, n'oubliez pas de retirer sa (ses)
batterie(s).
Nomenclature des pièces
1 Contacts électriques
2 Barre de guidage
3 Vis de fixation
4 Axe de positionnement
5 Bouton OPEN/CLOSE du compartiment pour batteries
6 Enregistrement : Touche Fn
Lecture : Touche
(rotation)
7 Enregistrement : Touche C (personnalisé)
Lecture : Touche
(histogramme)
8 Sélecteur multidirectionnel
9 Molette de commande arrière
10 Commutateur ON/OFF de la commande de la poignée
11 Touche
(exposition)
12 Enregistrement : Touche AF/MF (mise au point automatique/manuelle)
Lecture : Touche
(mise au point rapprochée)
13 Enregistrement : Touche AEL (verrouillage AE)
Lecture : Touche
(index)
14 Fente du couvercle des batteries de l'appareil photo
15 Crochet pour la dragonne
16 Déclencheur
17 Molette de commande avant
18 Logement du trépied
19 Butée de la batterie
20 Plateau pour batterie
Fixation de cet accessoire à l'appareil
1 Réglez le commutateur POWER de l'appareil photo sur « OFF ».
Si une ou plusieurs batteries sont insérées dans cet accessoire, retirez-les.
2 Retirez la batterie de l'appareil photo.
3 Retirez le cache des borne des contacts électriques de cet
accessoire.
Après l'emploi, remettez le cache des bornes en place pour protéger les contacts
électriques.
4 Alignez l'élément suivant pour fixer cet accessoire à l'appareil
photo.
[Cet accessoire]Barre de guidage [Appareil photo]Compartiment pour
batteries
[Cet accessoire]Fente du couvercle des batteries de l'appareil photo [Appareil
photo]Porte du compartiment pour batteries
[Cet accessoire]Vis de fixation [Appareil photo]Logement du trépied
[Cet accessoire]Axe de positionnement [Appareil photo]Trou de la base
5 Tournez la vis de fixation pour verrouiller l'accessoire.
Vérifiez régulièrement que la vis de fixation ne s'est pas desserrée en cours
d'utilisation.
Insertion des batteries
Batterie NP-FM500H (1 ou 2 requises)
Les batteries NP-FM55H, NP-FM50, NP-FM30 ne sont pas disponibles avec cet
accessoire.
Avant l'emploi, veillez à charger les batteries à l'aide de l'adaptateur spécifié.
1 Si vous remplacez les batteries alors que cet accessoire est fixé à
l'appareil photo, réglez le commutateur POWER de l'appareil
photo sur OFF.
2 Tournez le bouton OPEN/CLOSE du compartiment pour batteries
sur la position « OPEN ».
3 Relevez la butée des batteries avec le doigt, de la manière
illustrée.
Lorsque vous relâchez le verrou de la butée des batteries, veillez à extraire leur
tiroir.
4 Retirez le tiroir des batteries.
5 Installez les batteries dans leur tiroir en vous conformant au
schéma indiqué sur celui-ci.
Lors de l'insertion d'une batterie, fixez-la de part et d'autre.
Ne touchez pas la borne du tiroir des batteries .
N'insérez que la batterie NP-FM500H dans le tiroir des batteries. N'installez pas
d'autres batteries.
Ne démontez pas le tiroir des batteries.
Lors de l'insertion de deux batteries, commencez par utiliser la moins chargée.
Lorsque la capacité de celle-ci s'épuise, l'accessoire passe automatiquement à
l'autre batterie.
6 Insérez le tiroir des batteries dans sa position d'origine en
appuyant dessus jusqu'à ce qu'il émette un déclic.
Assurez-vous que la butée de la batterie bloque le plateau pour batterie.
7 Fermez la porte du compartiment pour batteries et tournez le
bouton OPEN/CLOSE du compartiment pour batteries sur la
position « CLOSE » pour refermer le couvercle.
Tournez le bouton OPEN/CLOSE du compartiment pour batteries sur la
position correcte, comme illustrée et fermez le couvercle.
Enregistrement d'images verticales
Les fonctions des molettes et touches de l'accessoire sont identiques à celles du corps
principal de l'appareil photo.
Si vous utilisez cet accessoire en orientation verticale, réglez le commutateur ON/OFF
de la commande de la poignée sur « ON ».
Le commutateur ON/OFF de la commande de la poignée active (ON) et désactive
(OFF) les fonctions des touches et de la molette.
Quelle que soit la position du commutateur ON/OFF de la commande
de la poignée, les touches de commande de l'appareil photo sont toujours
opérationnelles.
Mettez l'accessoire sous tension (ON) et hors tension (OFF) à l'aide du
commutateur POWER de l'appareil photo. Le commutateur ON/OFF de la
commande de la poignée ne peut pas commander la mise sous tension (ON) et hors
tension (OFF).
Témoin d'autonomie des batteries
Lorsque vous insérez les deux batteries, le témoin suivant apparaît sur l'écran LCD de
l'appareil photo.
Lorsque deux batteries sont en place, commencez par utiliser la moins chargée.
Le repère de la batterie utilisée est alors brillant et celui de l'autre batterie est estompé.
Le niveau d'énergie restant de la batterie utilisée est affiché sous la forme d'un
pourcentage (%).
Le repère de la batterie utilisée change de la manière illustrée ci-dessous. Lorsque la
capacité de la batterie utilisée est épuisée, l'accessoire bascule automatiquement vers
l'autre batterie.
Autonomie restante
des batteries
haute
basse
Si vous continuez à photographier alors que le repère
est affiché, cette batterie
s'épuise, mais l'accessoire bascule automatiquement vers l'autre batterie.
Remarques relatives à l'objectif
Si vous utilisez cet accessoire fixé à l'appareil photo avec l'objectif 70-200mm F2.8
G ou 300mm F2.8 G installé sur le collier de fixation du trépied, faites tourner ce
dernier sur la position qui permet l'utilisation de la poignée.
Si vous utilisez cet accessoire fixé à l'appareil photo avec l'objectif 70-200mm F2.8
G installé sur le collier de fixation du trépied, les commutateurs d'objectifs suivants
ne fonctionnent pas en position de vue verticale. Avant une prise de vue verticale,
réglez-les sur la position horizontale.
Commutateur de mise au point
Commutateur du mode DMF
Limiteur de plage de mise au point
Si vous utilisez un trépied, employez des vis de 5,5 mm maximum. Cet accessoire
ne peut être fixés solidement sur un trépied à l'aide de longues vis. Sinon, vous
risquez d'endommager cet accessoire.
Dépannage
Symptôme
Solution
L'appareil photo ne fonctionne pas
Vérifiez si la vis de fixation de
alors que l'accessoire est raccordé, que
l'accessoire est convenablement serrée.
la (les) batterie(s) est (sont) insérée(s)
Vérifiez si la (les) batterie(s) est (sont)
dans l'accessoire et que le commutateur
chargée(s).
POWER est réglé sur ON.
Réinstallez le plateau pour batterie
dans l'accessoire.
Le déclencheur ou d'autres touches ne
Refixez le plateau pour batterie à
fonctionnement pas.
l'accessoire.
Réglez le commutateur POWER de
l'appareil photo sur OFF, retirez la
(les) batterie(s) et refixez l'accessoire à
l'appareil photo.
« Pour batterie "InfoLITHIUM"
Réinstallez le plateau pour batterie
seulement » s'affiche, même si vous
dans l'accessoire.
utilisez une (des) batterie(s) Sony
Réglez le commutateur POWER de
authentiques.
l'appareil photo sur OFF, retirez la
(les) batterie(s) et refixez l'accessoire à
l'appareil photo.
Spécifications
Batterie
NP-FM500H 7,2V CC
Performances d'enregistrement
Avec deux batteries NP-FM500H :
environ 1 300 images
La méthode de mesure est conforme à la norme CIPA.
Les performances d'enregistrement peuvent être inférieures à celles indiquées, en
fonction des conditions d'utilisation.
Pour plus d'informations, reportez-vous au mode d'emploi qui accompagne le
DSLR-A700.
Dimensions
environ 137,7 mm × 121,5 mm × 87,2 mm (l/h/p)
(5,42 po. × 4,78 po. × 3,43 po.)
Poids
environ 285 g (10,1 oz.)
(tiroir des batteries compris, batteries non
comprises)
Température de fonctionnement 0 °C à 40 °C (32 °F à 104 °F)
Articles inclus
Poignée verticale (1), Tiroir des batteries (1),
Cache des bornes (1), Jeu de documents imprimés
La conception et les spécifications peuvent être modifiées sans préavis.
et « InfoLITHIUM » sont des marques commerciales de Sony Corporation.

Verwandte Anleitungen für Sony VG-C70AM


Inhaltszusammenfassung für Sony VG-C70AM
- Seite 1 5 Bouton OPEN/CLOSE du compartiment pour batteries Troubleshooting immediately to the nearest Sony dealer for repair. 6 Enregistrement : Touche Fn Be sure to use a genuine Sony battery pack with this unit. Lecture : Touche (rotation) Spécifications This unit does not have a battery charger function.
- Seite 2 Independientemente de la posición del selector ON/OFF (encendido/apagado) de seinen Ladezustand an kompatible elektronische Geräte übermitteln kann. la directiva EMC y a la seguridad de los productos es Sony Deutschland GmbH, control del mango, el botón de operación de la cámara siempre funciona.