Herunterladen Inhalt Inhalt Diese Seite drucken
JVC RV-NB100B Bedienungsanleitung
Vorschau ausblenden Andere Handbücher für RV-NB100B:
Inhaltsverzeichnis

Werbung

Verfügbare Sprachen
  • DE

Verfügbare Sprachen

POWERED WOOFER CD SYSTEM
RV-NB100B
INSTRUCTIONS
LVT2488-001C
[E]

Werbung

Inhaltsverzeichnis
loading

Inhaltszusammenfassung für JVC RV-NB100B

  • Seite 1 POWERED WOOFER CD SYSTEM RV-NB100B INSTRUCTIONS LVT2488-001C...
  • Seite 2 A copy of the Declaration of Conformity with regard to the RE Directive 2014/53/EU can be downloaded from the following Web sites (http://www3.jvckenwood.com/ecdoc). Hereby, JVC declares that this System [RV-NB100B] is in compliance with the essential requirements and other relevant provision of Directive 2014/53/EU.
  • Seite 3 Preparation Caution: Proper Ventilation To avoid the risk of electric shock and fire, and to prevent damage, locate the apparatus as follows: 1 Front: No obstructions and open spacing. 2 Sides/Top/Back: No obstructions should be placed in the areas indicated by the dimensions in the illustration below. 3 Bottom: Place on a level surface.
  • Seite 4: What You Can Do Using The System

    What you can do using the System Play back files on your iPod or Play back files on your BLUETOOTH iPhone by operating the System device by operating the System P.14 P.17 Play back MP3/WMA files on a music CD or USB device Enjoy listening to music by adjusting the P.20 super woofer (bass sound) volume and...
  • Seite 5: Inhaltsverzeichnis

    Contents Introduction ........2 DAB ..........23 Preparation ............3 Listening to DAB stations ........23 What you can do using the System ..... 4 FM ........... 25 Preparation ........6 Listening to FM stations ........25 Accessories ............6 Presetting stations ..........
  • Seite 6: Preparation

    Preparation Remote control Accessories Match the polarities (+ and –) of the batteries. Check that you have all the following items, which are supplied for the system. Power cord (1) Remote control RM-SRVNB100A (1) R6P (SUM-3)/AA Batteries (for the Remote control) (2) (15F) (supplied) Shoulder strap (1) Buckle (2)
  • Seite 7: Carrying The System

    Using the shoulder strap Carrying the System Attach the supplied shoulder strap (adjustable in length) to each end of the System as illustrated Using the carrying handles below. Be sure to hold both handles when you carry the System. Shoulder strap Buckle If you carry the System by only one handle, the (supplied)
  • Seite 8: Index Of Parts And Controls

    Index of parts and controls Front of the System $ % ^ & CD F button G /TEMPO + button iPod F button H /TEMPO - button STANDBY/ON D button USB/iPod F button Shoulder strap hook METRONOME F button SUPER WOOFER VOLUME +/– USB connector/cover STANDBY indicator Connector for iPod/Front door...
  • Seite 9: Rear Of The System

    Rear of the System Display window A.P.S. HIGH Timer indicators A (timer), PLAY, REC AC IN jack SLEEP indicator AUDIO IN jack A.P.S. (auto power save) indicator PHONES jack CLOCK indicator MIC LEVEL -/+ iPod indicator MIC INPUT connector FM mode indicators GUITAR INPUT connector STEREO, MONO GUITAR LEVEL -/+...
  • Seite 10: Remote Control

    The reference pages are mainly pages Remote control containing descriptions of the respective parts. Number buttons (p. 21) MENU/BLUETOOTH SETTING button Multi control buttons (p. 15 - 25) • UP, DOWN • J , SET, I Gt.AMP MODE button (p. 28) Source buttons (p.
  • Seite 11: Connections

    A small amount of power is always consumed even while on standby. CAUTION Only use JVC power cord provided for this System to avoid malfunction or damage to the System. Remove all the batteries when using the power cord.
  • Seite 12: Basic Operations

    Basic operations Turning on/off the System NOTE The clock setting will be reset about an hour after Press [STANDBY/ON D]. the AC power cord has been disconnected. When the power is supplied through the batteries, the clock does not appear on the display when the System is turned off.
  • Seite 13: Sound Mode

    Sound mode Auto power save mode Sound modes can be selected to enhance the type This function turns off the System automatically if of music being played. no operation is performed for about 15 minutes. Each time you press [A.P.S.], the auto power save Press [SOUND MODE] to select the sound function switches on and off.
  • Seite 14: Ipod

    Connecting iPod See p. 39 for compatible iPod devices. To connect to the iPod dock CAUTION JVC is not responsible for any loss of or damage to iPod that might result from the use of this System. Open the front door Do not connect or disconnect iPod when the System is turned on.
  • Seite 15: Playback

    Playback NOTE Press [iPod F] or [USB/iPod F]. Depending on the type of iPod, iPod may operate differently. If you are using an iPhone or iPod touch, operate your iPhone or iPod touch in the following cases: – when pressing the home button. Each time you press the button, playback is –...
  • Seite 16: Shuffle Playback

    Shuffle playback iPod menu operation You can play the tracks on iPod in random order. Press [MENU] to display the menu. Press [PLAY MODE]. Each time you press the button, the previous menu is displayed. Each time you press the button, the shuffle mode turns on/off.
  • Seite 17: Listening To A Bluetooth Device

    Listening to a BLUETOOTH device You can listen to music from your BLUETOOTH device through the System. Start playback on the target BLUETOOTH device. When you connect your device for the first time, it is necessary to register (pair) your BLUETOOTH The sound from the BLUETOOTH device is device and the System.
  • Seite 18: Pairing (Registering) Other Bluetooth Devices

    To turn on/off the BLUETOOTH function of the System NOTE The connection is canceled automatically in the While the System is turned on following cases. Connection is canceled on the BLUETOOTH device, or BLUETOOTH function is set to “OFF”. The System or the BLUETOOTH device is “BT OFF”...
  • Seite 19: Setting The System To Bluetooth Standby

    Setting the System to Using a remote control application BLUETOOTH standby You can control the System remotely by using “JVC Audio Control BR1”, a special remote control You can turn on the System using the remote application on an Android device which is control application on a BLUETOOTH-enabled compatible with BLUETOOTH.
  • Seite 20: Playing Back A Disc/Usb Device

    Playing back a disc/USB device Preparation Playback Load a disc or connect a USB device. Press [CD F] or [USB/iPod F]. Disc Display during playback 10 0:45 Playback time Current track number To stop playback USB device Press [o]. USB memory (not supplied) To pause Press [CD F] or [USB/iPod F].
  • Seite 21: Program Playback

    To select a track using the remote control Program playback Examples: You can program up to 32 tracks from a disc or a To select number 5, press 5. USB device in any desired order including the same tracks. To select number 15, press +10 then 5. To select number 20, press +10 then 10.
  • Seite 22: Random Playback

    To delete tracks in the program To exit from the random mode While program playback is stopped, press Press [PLAY MODE] during random playback. [CANCEL]. The “RANDOM” indicator goes off. Each time you press the button, the last track in Random playback is also canceled when you the program is erased.
  • Seite 23: Dab

    To search for ensembles Listening to DAB stations Press and hold [UP] or [DOWN]. To listen to DAB/DAB+ While you press and hold the button, the channel changes through all of the Press [TUNER] repeatedly to select ensembles regardless of their signal status. “DAB”.
  • Seite 24 To search for programs using PTY To change the DAB Information codes (PTY search) You can locate a particular kind of program from Each time you press the button, the display window among all the services you can receive by changes as follows: specifying a PTY code.
  • Seite 25: Listening To Fm Stations

    Listening to FM stations Presetting stations You can preset up to 30 FM stations manually. Press [TUNER] repeatedly to select “FM”. Remote control Main unit Tune in to a station you want to preset. Press [SET]. (Press repeatedly) 8750 FM P-01 Select the station.
  • Seite 26: External Device

    External device Adjusting the audio input level Listening to an external device Adjust the audio input level when there is a contrast Set the volume level of the System to between the volume of the external device minimum. connected to the AUDIO IN jack and that of other sources.
  • Seite 27: Metronome

    Metronome Using the metronome function You can use the System as a metronome. You can set the tempo and rhythm separately for your guitar practice, etc. Press [METRONOME F]. Rhythmical beeps are emitted from the speakers. Each time you press the button, beeps are started/paused.
  • Seite 28: Connecting A Microphone/Guitar

    Connecting a microphone/guitar Microphone/guitar mixing Adjusting the tone of a guitar Using a microphone or a guitar, you can mix its Besides the sound mode of the main unit, you can sound with a source sound. select the tone of the guitar. There are three available tones, and the tone can be selected from 1 to 3 respectively.
  • Seite 29 Using the main unit Press and hold the [o] button on main unit for more than 2 seconds until “G AMP” is displayed. Each time you press and hold the button, the function switches between super woofer volume adjustment (“SW VOL” appears on the display window) and the guitar tone adjustment.
  • Seite 30: Recording On A Usb Device

    Recording on a USB device To select the recording speed (only for digital recording) Recording discs You can set the recording speed when recording a You can record a CD to a USB device in two ways, disc using the digital recording function. digital recording and analog recording.
  • Seite 31 To record a music disc using digital To record one track from a music disc recording using digital recording You can only select one track to record. Press [CD F]. Press [CD F]. Press [o] to stop playback. To record all tracks on the disc, skip Step 3 Press [J], [I] to select and proceed to Step 4.
  • Seite 32: Recording Other Sources

    To record a music disc using analog Recording other sources recording You can record an DAB/FM broadcast, metronome Use analog recording when digital recording or an external device. cannot be performed due to SCMS (p. 40). You can divide a file according to the marking Recording is performed in a normal speed.
  • Seite 33: To Record An External Device

    To record DAB/FM stations To record the metronome Press [TUNER]. Press [METRONOME]. Adjust the tempo and rhythm if necessary. Tune into the station you want to record. (p. 27) Press [REC/DELETE]. Press [REC/DELETE]. Main unit Remote control Recording starts. The “REC” indicator lights while recording. Press [o] to stop recording.
  • Seite 34: Deleting A Track

    Deleting a track You can delete a track recorded on a USB device. Before deleting a track, connect the USB device to the USB connector. You cannot restore deleted files. Check the files carefully when deleting. Press the [USB/iPod F] button. Press [J] or [I] to select the track to delete, then play back or pause.
  • Seite 35: Using The Timer

    Using the timer Setting the sleep timer Setting the daily timer The power of the System automatically turns off Using the daily timer (Playback timer), you can after the shut-off time you set has elapsed. wake up with your favorite music. By setting the daily timer, the System turns on Press [SLEEP] repeatedly.
  • Seite 36 To cancel the daily timer Press [UP] or [DOWN] to adjust the “minute” of the starting time, the “hour” After selecting “PLAY TMR” by performing and “minute ” of the ending time, and step 1 to 3 in “Setting the daily timer”, select select the source and the volume.
  • Seite 37: Setting The Recording Timer

    Setting the recording timer Press [UP] or [DOWN] to adjust the “hour” You can set the recording timer for DAB/FM of the starting time. stations or an external device. When you press and hold the button, the By setting the recording timer, the System turns on hour digit changes continuously.
  • Seite 38 To cancel the recording timer After selecting “REC TMR” by performing Step 1 to 3 in “Setting the recording timer”, select “REC OFF”, and then press [SET]. To set the recording timer with the same setting After selecting “REC TMR” by performing Step 1 to 3 in “Setting the recording timer”, select “REC ON”, and then press [SET].
  • Seite 39: About Discs/Files

    About Discs/Files Compatible iPod Playable BLUETOOTH devices To connect the device to this System via Made for Version* BLUETOOTH, the device must be compatible iPod nano (7th generation) 1.0.2 with the BLUETOOTH 2.1+EDR and the A2DP and AVRCP profiles. iPod nano (6th generation) iPod nano (5th generation) 1.0.2 Playable discs/files...
  • Seite 40: Important For Usb Mass Storage Class Devices

    System and the USB device. discs without the consent of the owner of JVC bears no responsibility for any loss of data copyright in the sound or video recording, on the USB mass storage class device while broadcast or cable programme and any using this System.
  • Seite 41: Others

    Bluetooth SIG, – DO NOT allow any rubber or plastic to remain Inc. and any use of such marks by in contact for a long time. JVC KENWOOD Corporation is under license. Android is a trademark of Google Inc..
  • Seite 42: Troubleshooting

    Troubleshooting If you are having a problem with your System, iPod Operations check this list for a possible solution before calling for service. iPod does not play. Connect the USB cable correctly. If the following measures do not resolve the problems: Check the compatibility of your iPod.
  • Seite 43: Timer Operations

    Disc/USB Mass Storage Class Device Timer Operations Operations Unable to set the sleep timer Timer or recording timer is working. Turn off the The disc/USB device does not play. timer. During timer/recording timer is working, The disc is placed upside down. Place the disc sleep timer does not work.
  • Seite 44: Specifications

    Specifications Disc player CD capacity: Signal-to-noise ratio: 85 dB Dynamic range: 90 dB Tuner DAB tuning range BAND III: 174.928 MHz - 239.200 MHz FM tuning range: 87.50 MHz – 108.00 MHz Antenna: Telescopic antenna BLUETOOTH BLUETOOTH version: BLUETOOTH 4.0 + EDR certified Output power: 2.5 mW (MAX), Power Service area:...
  • Seite 45 Input Sensitivity /Impedance (1 kHz): LEVEL 1: 500 mV /47 kK LEVEL 2: 250 mV /47 kK LEVEL 3: 125 mV /47 kK MIC/GUITAR: MIC: 200 K - 2 kK (φ6.3) GUITAR: 100 kK - 1 MK (φ6.3) Output terminal PHONES: φ3.5 32 K - 1 kK...
  • Seite 46 V EN © 2017 JVC KENWOOD Corporation...
  • Seite 47 CD-SYSTEM MIT POWER WOOFER RV-NB100B BEDIENUNGSANLEITUNG LVT2488-001C...
  • Seite 48: Einleitung

    Eine Kopie der Erklärung der Konformität im Hinblick auf die RE-Richtlinie 2014/53/EU kann von den folgenden Websites heruntergeladen werden (http://www3.jvckenwood.com/ecdoc). Hiermit erklärt JVC, dass sich dieses Gerät [RV-NB100B] in Übereinstimmung mit den grundlegenden Anforderungen und den übrigen einschlägigen Bestimmungen der Richtlinie 2014/53/EU befindet.
  • Seite 49 Vorbereitung Achtung: Angemessene Ventilation Stellen Sie das Gerät zur Verhütung von elektrischem Schlag und Feuer und zur Vermeidung von Beschädigung wie folgt auf: 1 Vorderseite: Offener Platz ohne Hindernisse. 2 Seiten/Oben/Hinten: Innerhalb der in der Abbildung unten dargestellten Bereiche dürfen sich keine Hindernisse befinden. 3 Unterseite: Auf eine ebene Oberfläche stellen.
  • Seite 50 Was Sie mit dem System tun können Abspielen von Dateien auf Ihrem Abspielen von Dateien auf Ihrem BLUETOOTH-Gerät über die iPod oder iPhone über das System Bedienung des Systems S. 14 S. 17 Wiedergabe von MP3/WMA-Dateien auf einer Musik-CD oder einem USB-Gerät Genießen Sie das Hören von Musik durch die S.
  • Seite 51 Inhalt Einleitung ......... 2 DAB ..........23 Vorbereitung ............3 Hören von DAB-Sender ........23 Was Sie mit dem System tun können ....4 UKW ..........25 Vorbereitung ........6 Hören von UKW-Sendungen ......25 Zubehör .............. 6 Sender voreinstellen ......... 25 Batterien einsetzen ..........
  • Seite 52: Vorbereitung

    Vorbereitung Fernbedienung Zubehör Achten Sie auf die richtige Polung (+ und –) der Batterien. Überprüfen Sie ob folgende, mit der Anlage mitgelieferten Artikel vorhanden sind. Netzkabel (1) Fernbedienung RM-SRVNB100A (1) R6P (SUM-3)/AA Batterien (für die Fernbedienung) (2) (15F) (mitgeliefert) Schulterriemen (1) Schnalle (2) Verriegelungslasche (2) Falls Artikel fehlen, wenden Sie sich sofort an Ihren...
  • Seite 53: Tragen Der Anlage

    Gebrauch des Schulterriemens Tragen der Anlage Bringen Sie den mitgelieferten Schulterriemen (in der Länge einstellbar) an den beiden Enden der Gebrauch der Tragegriffe Anlage an, wie in der Abbildung unten gezeigt. Die Anlage beim Transportieren stets an beiden Tragegriffen halten. Schulterriemen Schnalle Wenn Sie die Anlage nur an einem Tragegriff...
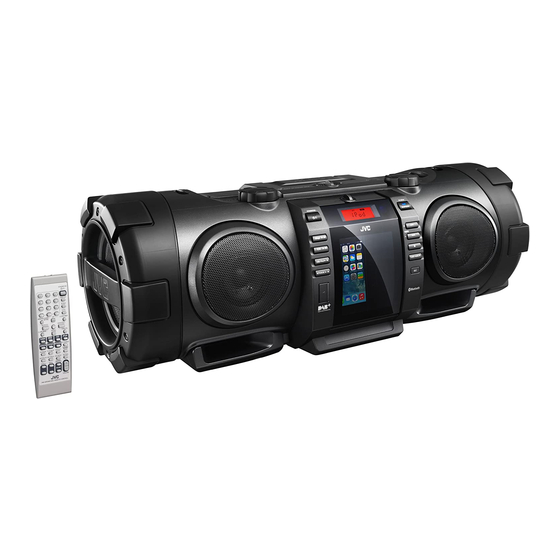
  • Seite 54: Index Der Teile Und Steuerungen

    Index der Teile und Steuerungen Vorderseite des Geräts $ % ^ & CD F-Taste G /TEMPO + –Taste iPod F-Taste H /TEMPO - –Taste STANDBY/ON D-Taste USB/iPod F-Taste Schulterriemen-Haken METRONOME F-Taste SUPER WOOFER VOLUME +/– USB-Anschluss/Abdeckung STANDBY-Anzeige Anschluss für iPod/Frontklappe Disk-Fachklappe Fernbedienungssensor BLUETOOTH-Taste...
  • Seite 55: Rückseite Des Geräts

    Rückseite des Geräts Displayfenster A.P.S. HIGH Timer-Anzeigen A (Timer), PLAY, REC AC IN-Buchse SLEEP-Anzeige AUDIO IN-Buchse A.P.S. (Automatische PHONES-Buchse Energiesparfunktion)-Anzeige MIC LEVEL -/+ CLOCK-Anzeige MIC INPUT-Steckverbinder iPod-Anzeige GUITAR INPUT-Steckverbinder UKW-Modus-Anzeigen GUITAR LEVEL -/+ STEREO, MONO DAB/FM-Teleskopantenne HIGH-Anzeige Wiederhol-Anzeigen E, EALL, EGROUP Hauptdisplay PRGM (Programm)-Anzeige...
  • Seite 56: Fernbedienung

    Die Referenzseiten sind hauptsächlich die Fernbedienung Seiten mit den Beschreibungen der jeweiligen Teile. Zifferntasten (S. 21) MENU/BLUETOOTH SETTING-Taste Multifunktionstasten (S. 15 - 25) • UP, DOWN • J , SET, I Gt.AMP MODE-Taste (S. 28) Quellentasten (S. 15 - 26) •...
  • Seite 57: Verbindungen

    Modus aktiviert und die STANDBY-Anzeige leuchtet rot. Eine geringe Menge Strom wird immer verbraucht, auch im Standby-Betrieb. VORSICHT Verwenden Sie nur das mitgelieferte JVC Netzkabel, um Störungen oder Beschädigung der Anlage zu vermeiden. Entfernen Sie alle Batterien bei Verwendung des Netzkabels.
  • Seite 58: Grundlegende Bedienungsverfahren

    Grundlegende Bedienungsverfahren Ein-/Ausschalten des Systems HINWEIS Die Uhreneinstellung wird nach etwa einer Drücken Sie [STANDBY/ON D]. Stunde wiederhergestellt, nachdem das Netzkabel abgetrennt wurde. Bei Batteriebetrieb erscheint die Uhranzeige nicht im Display, wenn die Anlage ausgeschaltet ist. Die STANDBY-Anzeige erlischt. Erste Schritte Drücken Sie die Taste erneut zum Ausschalten.
  • Seite 59 Klangmodus Automatische Energiesparfunktion Die Klangmodi sind abrufbar, um für den jeweiligen Diese Funktion schaltet das System automatisch Musikstil ein optimales Klangbild zu erzielen. aus, wenn länger als etwa 15 Minuten keine Bedienvorgänge durchgeführt werden. Drücken Sie [SOUND MODE] zum Wählen des Immer wenn Sie [A.P.S.] drücken, schaltet sich die Klangmodus.
  • Seite 60: Ipod

    Anschließen des iPod bedienen. Siehe S. 39 für kompatible iPod-Geräte. Zum Anschließen an das iPod-Dock VORSICHT JVC übernimmt keine Haftung für jegliche Verluste oder Schäden am iPod, die durch Die Frontklappe öffnen Verwendung dieser Anlage verursacht werden können. Schließen Sie den iPod nicht an oder trennen ihn ab, wenn die Anlage eingeschaltet ist.
  • Seite 61: Wiedergabe

    Zum schnellen Vorlauf/Rücklauf Wiedergabe Drücken Sie [iPod F] oder [USB/iPod F]. Halten Sie die Taste [J] oder [I] während der Wiedergabe gedrückt. Um Ihren iPod auf den Sleep-Modus zu Bei jedem Drücken der Taste wird die Wiedergabe gestartet/gestoppt. schalten Drücken Sie [USB/iPod F] , wenn der iPod am USB-Anschluss angeschlossen ist.
  • Seite 62: Shuffle-Wiedergabe

    Shuffle-Wiedergabe iPod-Menübedienung Die Tracks auf dem iPod können in einer zufälligen Drücken Sie [MENU] zum Aufrufen des Reihenfolge wiedergegeben werden. Menüs. Drücken Sie [PLAY MODE]. Bei jedem Drücken der Taste wird das vorherige Menü angezeigt. Bei jedem Drücken der Taste wird der Shuffle- Modus an-/ausgeschaltet.
  • Seite 63: Ein Bluetooth-Gerät Anhören

    Ein BLUETOOTH-Gerät anhören Sie können über das System Musik von Ihrem BLUETOOTH-Gerät anhören. Starten Sie die Wiedergabe auf dem Ziel- BLUETOOTH-Gerät. Wenn Sie Ihr Gerät zum ersten Mal anschließen, Der Ton des BLUETOOTH-Geräts wird über ist es notwendig, Ihr BLUETOOTH-Gerät und das das System ausgegeben.
  • Seite 64: Pairing (Registrierung) Anderer Bluetooth-Geräte

    Um die BLUETOOTH-Funktion des Systems ein-/auszuschalten HINWEIS Das Anschließen wird in den folgenden Fällen Während das System eingeschaltet ist automatisch abgebrochen. Die Verbindung mit dem BLUETOOTH-Gerät wird abgebrochen oder die BLUETOOTH- Funktion wird auf „OFF“ gesetzt. „BT OFF“ : Schaltet die BLUETOOTH-Funktion Das System oder das BLUETOOTH-Gerät ist des Systems aus.
  • Seite 65: Einstellung Des Systems Auf Bluetooth-Standby

    Verwendung einer Einstellung des Systems auf Fernbedienungsanwendung BLUETOOTH-Standby Sie können das System über Fernzugriff per „JVC Sie können das System per Fernbedienungsanwendung Audio Control BR1“, eine spezielle auf einem BLUETOOTH-aktivierten Android-Gerät Fernbedienungsanwendung auf einem Android- einschalten. Gerät, das mit BLUETOOTH kompatibel ist, steuern.
  • Seite 66: Wiedergabe Einer Disc/Eines Usb-Geräts

    Wiedergabe einer Disc/eines USB-Geräts Vorbereitung Wiedergabe Setzen Sie eine Disc ein oder schließen ein USB- Drücken Sie [CD F] oder [USB/iPod F]. Gerät an. oder Disc Anzeige während der Wiedergabe 10 0:45 Wiedergabezeit Aktuelle Tracknummer Wiedergabe stoppen USB-Gerät Drücken Sie [o]. USB-Speicher (nicht mitgeliefert) Zum Pausieren...
  • Seite 67: Zum Schnellen Vorlauf/Rücklauf

    So wählen Sie einen Track über die Programmwiedergabe Fernbedienung Sie können die Reihenfolge von bis zu 32 Tracks von einer Disc oder einem USB-Gerät (auch Beispiele: mehrfach gleiche Tracks) beliebig programmieren. Zum Auswählen der Nummer 5 drücken Sie 5. Zum Wählen der Nummer 15 drücken Sie +10 Drücken Sie [CD F] oder [USB/ und dann 5.
  • Seite 68: Zum Löschen Von Tracks Im Programm

    Zum Löschen von Tracks im Programm Zum Verlassen des Zufallswiedergabe-Modus Drücken Sie während der Zufallswiedergabe Drücken Sie während der gestoppten [PLAY MODE]. Programmwiedergabe [CANCEL]. Die „RANDOM“-Anzeige erlischt. Bei jedem Drücken der Taste wird der jeweils letzte Track im Programm gelöscht. Die Zufallswiedergabe wird auch aufgehoben, wenn Sie die Wiedergabe stoppen.
  • Seite 69: Dab

    Suche nach Ensembles Hören von DAB-Sender Halten Sie [UP] oder [DOWN] gedrückt. Hören von DAB/DAB+ Währen Sie die Taste gedrückt halten, wechselt der Kanal unabhängig vom Drücken Sie [TUNER] wiederholt, um die Signalstatus durch alle Ensembles. „DAB“ zu wählen. Lassen Sie die Taste beim gewünschten Fernbedienung Hauptgerät Kanal des Ensembles los.
  • Seite 70: Suchen Von Sendungen Mit Pty-Codes (Pty-Suche)

    Suchen von Sendungen mit PTY-Codes Zum Ändern der DAB-Information (PTY-Suche) Sie können ein bestimmtes Programm unter allen Bei jedem Drücken der Taste schaltet das Diensten, die durch Angabe einer PTY-Code Displayfenster wie folgt um: empfangen werden, aufsuchen. Dienstname Æ Ensemblename Æ Kanalnummer Drücken Sie [PTY SEARCH] um auf den Æ...
  • Seite 71: Ukw

    Hören von UKW-Sendungen Sender voreinstellen Drücken Sie [TUNER] wiederholt, um die Sie können bis zu 30 UKW-Festsender manuell „FM“ zu wählen. eingeben. Fernbedienung Hauptgerät Stimmen Sie einen als Festsender einzugeben gewünschten Sender ab. (Drücken Sie die Taste wiederholt) Drücken Sie [SET]. 8750 FM P-01 Wählen Sie den Sender.
  • Seite 72: Externes Gerät

    Externes Gerät Einstellen des Audio-Eingangspegels Hören von einem externen Gerät Stellen Sie den Audioeingangspegel ein, wenn es Stellen Sie den Lautstärkepegel der einen Unterschied in der Lautstärke zwischen dem Anlage auf Minimalstellung. mit der AUDIO IN-Buchse angeschlossenem externen Gerät und dem anderer Quellen gibt. Schließen Sie das externe Gerät an.
  • Seite 73: Metronom

    Metronom Verwendung der Metronom- Funktion Sie können das Gerät als Metronom verwenden. Sie können für Ihre Gitarrenübungen etc. das Tempo und den Rhythmus getrennt einstellen. Drücken Sie [METRONOME F]. Aus den Lautsprechern ertönen rhythmische Pieptöne. Bei jedem Drücken der Taste werden die Pieptöne gestartet/gestoppt.
  • Seite 74: Verbinden Eines Mikrofons/Einer Gitarre

    Verbinden eines Mikrofons/einer Gitarre Mikrofon-/Gitarrenmischung Einstellung des Tons einer Gitarre Bei Verwendung eines Mikrofons oder einer Gitarre, können Neben dem Sound-Modus des Hauptgeräts können Sie den Sie dessen/deren Klang mit einem Quellklang mischen. Ton der Gitarre auswählen. Es gibt drei verfügbare Töne, und der Ton kann entsprechend von 1 bis 3 ausgewählt werden.
  • Seite 75 Das Hauptgerät verwenden Halten Sie die [o]-Taste am Hauptgerät mindestens 2 Sekunden lang gedrückt, bis „G AMP“ angezeigt wird. Jedes Mal wenn Sie die Taste gedrückt halten, schaltet die Funktion zwischen der Lautstärkeeinstellung des Supertieftöners („SW VOL“ erscheint im Anzeigefenster) und der Einstellung des Gitarrentons um.
  • Seite 76: Aufnahme Auf Ein Usb-Gerät

    Aufnahme auf ein USB-Gerät Zur Auswahl der Aufnahmegeschwindigkeit (nur für die digitale Aufnahme) Disks aufnehmen Sie können die Aufnahmegeschwindigkeit bei der Die Aufnahme auf eine CD oder ein USB-Gerät Aufnahme einer CD mithilfe der digitalen kann entweder digital oder analog erfolgen. Aufnahmefunktion einstellen.
  • Seite 77 Zur Aufnahme einer Musik-CD mithilfe Zur Aufnahme eines Titels von einer Musik- der digitalen Aufnahme CD mithilfe der digitalen Aufnahme Sie können nur einen Titel für die Aufnahme Drücken Sie [CD F]. auswählen. Drücken Sie [o] zum Stoppen der Drücken Sie [CD F]. Wiedergabe.
  • Seite 78: Zur Aufnahme Einer Musik-Cd Mithilfe Der Analogen Aufnahme

    Zur Aufnahme einer Musik-CD mithilfe der analogen Aufnahme Andere Quellen aufnehmen Verwenden Sie die analoge Aufnahme, wenn die Sie können DAB/FM-Sendungen, ein Metronom digitale Aufnahme wegen des SCMS (S. 40) oder ein externes Gerät aufnehmen. nicht möglich ist. Eine Datei kann gemäß der Markierungseinstellung Die Aufnahme erfolgt mit normaler geteilt werden.
  • Seite 79 Zur Aufnahme von DAB/FM-Sendern Zur Aufnahme des Metronoms Drücken Sie [TUNER]. Drücken Sie [METRONOME]. Passen Sie gegebenenfalls das Tempo und Stimmen Sie einen als Festsender den Rhythmus an. (S. 27) aufzunehmen gewünschten Sender ab. Drücken Sie [REC/DELETE]. Drücken Sie [REC/DELETE]. Die Aufnahme beginnt.
  • Seite 80: Einen Track Löschen

    Einen Track löschen Ein auf einem USB-Gerät aufgenommener Track kann gelöscht werden. Schließen Sie vor dem Löschen eines Titels das USB-Gerät am USB-Steckverbinder an. Gelöschte Dateien können nicht wiederhergestellt werden. Überprüfen Sie die Dateien sorgfältig, die Sie löschen möchten. Drücken Sie die [USB/iPod F] -Taste. Drücken Sie [J] oder [I], um den Titel auszuwählen, den Sie löschen möchten, geben Sie ihn dann...
  • Seite 81: Verwendung Des Timers

    Verwendung des Timers Einstellung des Tages-Timers Einstellung des Sleep-Timers Bei Verwendung des Täglich-Timers (Wiedergabe- Das System schaltet automatisch aus, nachdem Timer) können Sie zu Ihrer Lieblingsmusik aufwachen. die von Ihnen eingestellte Ausschaltzeit abgelaufen ist. Durch Einstellung des Tages-Timers schaltet sich das System eine Minute, bevor der Tages-Timer Drücken Sie [SLEEP] wiederholt.
  • Seite 82 Um den Tages-Timer zu unterbrechen Drücken Sie [UP] oder [DOWN] , um die „Minute“ der Startzeit, die „Stunde“ und Wählen Sie nach Auswahl von „PLAY „Minute“ der Endzeit einzustellen, und TMR“ durch Ausführung der Schritte 1 bis 3 in wählen Sie die Quelle und Lautstärke aus. „Einstellung des Tages-Timers“...
  • Seite 83: Einstellung Des Aufnahme-Timers

    Einstellung des Aufnahme-Timers Drücken Sie [UP] oder [DOWN] zum Sie können den Aufnahme-Timer für DAB/FM- Einstellen der „Stunde“ der Startzeit. Sender oder ein externes Gerät einstellen. Wenn Sie die Taste gedrückt halten, schaltet die Durch Einstellung des Aufnahme-Timers schaltet Stundenstelle kontinuierlich weiter. sich das System eine Minute, bevor der Aufnahme- Wenn Sie die [UP] - oder [DOWN] -Taste Timer startet, automatisch ein.
  • Seite 84: Zum Abbruch Des Aufnahme-Timers

    Zum Abbruch des Aufnahme-Timers Wählen Sie nach der Auswahl von „REC TMR“ durch Ausführung der Schritte 1 bis 3 in „Einstellung des Aufnahme-Timers“ „REC OFF“, und drücken Sie dann [SET]. Zur Einstellung der Aufnahme-Timers mit der gleichen Einstellung Wählen Sie nach der Auswahl von „REC TMR“...
  • Seite 85: Über Disks/Dateien

    Über Disks/Dateien Kompatibler iPod Abspielbare BLUETOOTH Geräte Zum Anschluss des Geräts an dieses System Hergestellt für Version* per BLUETOOTH muss das Gerät kompatibel iPod nano (7. Generation) 1,0.2 mit dem BLUETOOTH 2.1+EDR und den A2DP- und AVRCP-Profilen sein. iPod nano (6. Generation) iPod nano (5.
  • Seite 86: Wichtig Zur Usb-Massenspeichergeräte

    USB-Gerät ab, setzen diese Anlage und das re-record pre-recorded tapes, records, or USB-Gerät zurück. discs without the consent of the owner of JVC übernimmt keine Verantwortung für copyright in the sound or video recording, jeglichen Datenverlust in einem USB- broadcast or cable programme and any Massenspeichergerät bei der Verwendung...
  • Seite 87: Sonstiges

    Warenzeichen der Bluetooth – NICHT gewaltsam abwischen. SIG, Inc., und jegliche Verwendung solcher – NICHT mit Lösungsmitteln wie Verdünner Marken durch die JVC KENWOOD Corporation oder Benzol abwischen. geschieht unter Lizenz. – NICHT flüchtige Substanzen wie etwa Android ist eine Handelsmarke von Google Inc..
  • Seite 88: Störungssuche

    Störungssuche Wenn Sie ein Problem mit Ihrer Anlage haben, iPod-Bedienverfahren gehen Sie zunächst diese Liste durch, um hier eine mögliche Lösung zu finden, bevor Sie das Gerät Es erfolgt keine Wiedergabe des iPods. zum Kundendienst einreichen. Schließen Sie das USB-Kabel korrekt an. Wenn durch die folgenden Schritte die Überprüfen Sie die Kompatibilität Ihres iPods.
  • Seite 89: Timer-Funktionen

    Disc/USB-Massenspeichergerät- Timer-Funktionen Bedienverfahren Der Sleep-Timer kann nicht eingestellt werden Der Timer oder Aufnahme-Timer läuft. Die Disc/das USB-Gerät spielt nicht ab. Schalten Sie den Timer aus. Während der Die Disc ist umgekehrt eingesetzt. Setzen Sie die Disc Timer/Aufnahme-Timer läuft, funktioniert der mit der Beschriftungsseite nach oben weisend ein.
  • Seite 90: Technische Daten

    Technische Daten Disc-Player CD-Kapazität: Signal-Rauschabstand: 85 dB Dynamikumfang: 90 dB Tuner DAB-Abstimmbereich BAND III: 174,928 MHz – 239,200 MHz UKW-Abstimmbereich: 87,50 MHz – 108,00 MHz Antenne: Teleskopantenne BLUETOOTH BLUETOOTH-Version: BLUETOOTH 4.0 + EDR zertifiziert Ausgangsleistung: 2.5 mW (MAX.), Stärken Betriebsbereich: max.
  • Seite 91 Eingangsempfindlichkeit /Impedanz (1 kHz): LEVEL 1: 500 mV /47 kK LEVEL 2: 250 mV /47 kK LEVEL 3: 125 mV /47 kK MIC/GUITAR: MIC: 200 K - 2 kK (φ6,3) GUITAR: 100 kK - 1 MK (φ6,3) Ausgangsklemme PHONES: φ3,5 32 K - 1 kK 15 mW/Kanal Ausgangsleistung bei 32 K Stromversorgung...
  • Seite 92 V GE © 2017 JVC KENWOOD Corporation...
  • Seite 93 CHAIN CD A WOOFER AMPLIFIE RV-NB100B MANUEL D’INSTRUCTIONS LVT2488-001C...
  • Seite 94 Une copie de la déclaration de conformité en ce qui concerne la directive RE 2014/53/UE peut être téléchargée à partir du site Web suivant (http://www3.jvckenwood.com/ecdoc). Par la présente, JVC déclare que ce système [RV-NB100B] est conforme aux exigences essentielles et autres dispositions pertinentes de la directive 2014/53/UE.
  • Seite 95 Préparations Attention: Ventilation Correcte Pour éviter tout risque de choc électrique et d’incendie, et pour éviter tout dommage, placez l’appareil en respectant ce qui suit: 1 Avant: Rien ne doit gêner le dégagement. 2 Flancs/Dessus/Arrière: Aucun obstacle ne doit être placé dans les zones indiquées par les dimensions dans l’illustration ci- dessous.
  • Seite 96 Ce que vous pouvez faire avec le système Lire les fichiers sur votre iPod ou Lisez les fichiers sur votre dispositif iPhone en utilisant le système BLUETOOTH en actionnant le système P.14 P.17 Lire les fichiers MP3/WMA sur un CD de musique ou un dispositif USB Faites-vous plaisir et écoutez de la P.20 musique en réglant le volume du super...
  • Seite 97 Table des matières Introduction ........2 DAB ..........23 Préparations ............3 Écoute des stations DAB ........23 Ce que vous pouvez faire avec le système ..4 FM ........... 25 Préparations ........6 Écoute des stations FM ........25 Accessoires ............
  • Seite 98: Préparations

    Préparations Télécommande Accessoires Respectez les polarités (+ et –) des piles. Vérifiez que tous les éléments suivants sont bien présents, et qu’ils sont fournis avec l’appareil. Cordon d’alimentation (1) Télécommande RM-SRVNB100A (1) R6P (SUM-3)/AA (15F) (fournie) Piles (pour la télécommande) (2) Bandoulière (1) Boucle (2) Butée (2)
  • Seite 99: Transport De L'appareil

    Utilisation de la bandoulière Transport de l’appareil Fixez la bandoulière fournie (ajustable en longueur) à chaque bout de l’appareil, comme Utilisation des poignées de transport montré sur l’illustration ci-dessous. Lorsque vous transportez l’appareil, assurez-vous bien de le porter par les deux poignées. Bandoulière Boucle Si vous transportez l’appareil avec une seule...
  • Seite 100: Index Des Pièces Et Des Commandes

    Index des pièces et des commandes Avant de l’appareil $ % ^ & Touche CD F Touche de G /TEMPO + Touche iPod F Touche de H /TEMPO - Touche STANDBY/ON D Touche USB/iPod F Crochet de la bandoulière Touche METRONOME F SUPER WOOFER VOLUME +/–...
  • Seite 101: Arrière De L'appareil

    Arrière de l’appareil Fenêtre d’affichage A.P.S. HIGH Indicateurs de minuterie A (minuterie), PLAY, REC Prise AC IN Indicateur SLEEP Prise AUDIO IN Indicateur A.P.S. (économie d’énergie Prise PHONES automatique) MIC LEVEL -/+ Indicateur CLOCK Connecteur MIC INPUT Indicateur iPod Connecteur GUITAR INPUT Indicateurs de mode FM GUITAR LEVEL -/+ STEREO, MONO...
  • Seite 102: Télécommande

    Les pages de référence sont principalement des Télécommande pages contenant des descriptions des pièces respectives. Touches numériques (p. 21) Touche MENU/BLUETOOTH SETTING Touches de commande multiple (p. 15 - • UP, DOWN • J , SET, I Touche Gt.AMP MODE (p. 28) Touches de sélection de source (p.
  • Seite 103: Connexions

    Une petite quantité d’énergie est toujours consommée, même en mode d’attente. ATTENTION Utilisez uniquement le cordon d’alimentation JVC fourni avec cet appareil pour éviter tout mauvais fonctionnement ou dégât matériel. Retirez toutes les piles quand vous utilisez le cordon d’alimentation.
  • Seite 104: Opérations De Base

    Opérations de base Mise sous/hors tension du système REMARQUE Le réglage de l’horloge est réinitialisé environ une heure Appuyez sur [STANDBY/ON D]. après que le cordon d’alimentation AC a été déconnecté. Lorsque l’alimentation est fournie par les piles, l’horloge n’apparaît pas sur l’écran d’affichage lorsque l’appareil est éteint. Pour commencer L’indicateur STANDBY s’éteint.
  • Seite 105 Mode sonore Mode économie d’énergie automatique Les modes de son peuvent être sélectionnés pour Cette fonction permet d’éteindre automatiquement le relever le type de musique lue. système si aucune opération n’est réalisée pendant 15 minutes. Appuyez sur [SOUND MODE] pour choisir le Chaque fois que vous appuyez sur [A.P.S.], la fonction mode sonore.
  • Seite 106: Ipod

    Voir p. 39 pour les dispositifs iPod compatibles. Pour le connecter à la station d’accueil pour iPod ATTENTION JVC ne peut être tenu responsable pour toute perte ou dommage à iPod résultant de l’utilisation de cet appareil. Ouvrez la porte avant NE connectez ni ne déconnectez pas iPod...
  • Seite 107: Lecture

    Pour avance/retour rapide Lecture Appuyez sur [iPod F] ou [USB/iPod F]. Maintenez appuyé [J] ou [I] pendant la lecture. Pour mettre l’iPod en mode mise en sommeil Chaque fois que vous appuyez sur la touche, la lecture démarre ou se met en pause. Appuyez et maintenez appuyée la touche Appuyez sur la touche [USB/iPod F] lorsque [iPod F] ou [USB/iPod F].
  • Seite 108: Lecture Aléatoire

    Lecture aléatoire Utilisation du menu d’iPod Vous pouvez écouter les plages sur l’iPod dans un App uyez sur [MENU] pour afficher le ordre aléatoire. menu. Appuyez sur [PLAY MODE]. Chaque fois que vous appuyez sur la touche, le menu précédent s’affiche. Chaque fois que vous appuyez sur la touche, le mode de lecture aléatoire s’active/se désactive.
  • Seite 109: Écouter Un Dispositif Bluetooth

    Écouter un dispositif BLUETOOTH Vous pouvez écouter de la musique à partir d’un dispositif BLUETOOTH via le système. Démarrez la lecture sur le dispositif Lorsque vous connectez votre dispositif pour la BLUETOOTH cible. première fois, il est nécessaire d’enregistrer Le son du dispositif BLUETOOTH est émis (appairer) votre dispositif BLUETOOTH et le par le système.
  • Seite 110: Appairage (Enregistrement) D'autres Dispositifs Bluetooth

    Pour activer/désactiver la fonction BLUETOOTH du système REMARQUE La connexion s’annule automatiquement dans les Pendant que le système est sous tension cas suivants. La connexion est annulée sur le dispositif BLUETOOTH ou la fonction BLUETOOTH est réglée sur “OFF”. “BT OFF” : Désactive la fonction BLUETOOTH Le système ou le dispositif BLUETOOTH est du système.
  • Seite 111: Réglage Du Système Sur Le Mode Veille Bluetooth

    Utiliser une application de télécommande veille BLUETOOTH Vous pouvez commander le système à distance en utilisant “JVC Audio Control BR1”, une application de Vous pouvez activer le système en utilisant télécommande spéciale pour dispositif Android l’application de télécommande sur un dispositif compatible avec BLUETOOTH.
  • Seite 112: Pour Reproduire Un Disque/Un Dispositif Usb

    Pour reproduire un disque/un dispositif USB Préparations Lecture Mettez un disque en place ou connectez un Appuyez sur [CD F] ou [USB/iPod F]. périphérique USB. Disque Affichage pendant la lecture 10 0:45 Durée de lecture Numéro de la plage actuelle Pour arrêter la lecture Périphérique USB Appuyez sur [o].
  • Seite 113: Lecture Programmée

    Pour choisir une plage en utilisant la Lecture programmée télécommande Vous pouvez programme un maximum de 32 plages Exemples: à partir d’un disque ou d’un périphérique USB dans n’importe quel ordre, et vous pouvez choisir Pour sélectionner le numéro 5, appuyez sur 5. plusieurs fois la même plage.
  • Seite 114: Lecture Aléatoire

    Pour quitter le mode de lecture aléatoire Pour supprimer des plages du programme Appuyez sur [PLAY MODE] pendant la lecture Pendant que la lecture du programme est aléatoire. arrêtée, appuyez sur [CANCEL]. L’indicateur “RANDOM” s’éteint. Chaque fois que vous appuyez sur la touche, la dernière plage du programme est effacée.
  • Seite 115: Dab

    Pour rechercher les ensembles Écoute des stations DAB Maintenir appuyé [UP] ou [DOWN]. Pour écouter une émission DAB/DAB+ Pendant que vous appuyez et maintenez enfoncé la touche, le canal change via tous Appuyez répétitivement sur [TUNER] les ensembles indépendamment de leur pour choisir “DAB”.
  • Seite 116 Pour effectuer une recherche pour les Pour modifier les informations DAB programmes utilisant les codes PTY (recherche PTY) Chaque fois que vous appuyez sur la touche, la Vous pouvez localiser un type de programme fenêtre d’affichage change comme suit: particulier parmi tous les services recevables en spécifiant un code PTY.
  • Seite 117: Écoute Des Stations Fm

    Écoute des stations FM Présélection des stations Appuyez répétitivement sur [TUNER] pour Vous pouvez prérégler un maximum de 30 stations choisir “FM”. FM manuellement. Télécommande Appareil principal Accordez la station que vous souhaitez prérégler. (Appuyez répétitivement) Appuyez sur [SET]. 8750 FM P-01 Choisissez la station.
  • Seite 118: Métronome

    Métronome Ajustement du niveau d’entrée audio Écoute d’un appareil extérieur Réglez le niveau d’entrée audio en cas de Réglez le niveau de volume de l’appareil contraste entre le volume du dispositif externe sur le minimum. connecté à la prise AUDIO IN et celui des autres sources.
  • Seite 119: Appareil Extérieur

    Appareil extérieur Utilisation de la fonction métronome Vous pouvez utiliser l’appareil en tant que métronome. Vous pouvez régler le tempo et le rythme séparément pour vous excercer à la guitare, etc. Appuyez sur [METRONOME F]. Des bips rythmiques sont émis via les haut- parleurs.
  • Seite 120: Branchement D'un Microphone/Guitare

    Branchement d’un microphone/guitare Mixage du microphone ou de la Réglage de la tonalité d’une guitare guitare En utilisant un microphone ou une guitare, vous Outre le mode son de l’appareil principal, vous pouvez mixer leur son avec une source sonore. pouvez sélectionner la tonalité...
  • Seite 121: Utilisation De L'appareil Principal

    Utilisation de l’appareil principal Maintenir appuyée la touche [o] sur l’appareil principal pendant plus de 2 secondes jusqu’à ce que “G AMP” s’affiche. Chaque fois que maintenez la touche appuyée, la fonction commute entre le réglage du volume du super haut-parleur (“SW VOL”...
  • Seite 122: Enregistrement Sur Un Périphérique Usb

    Enregistrement sur un périphérique USB Pour sélectionner la vitesse d’enregistrement (uniquement pour Enregistrement de disques l’enregistrement numérique) Vous pouvez enregistrer un CD sur un Vous pouvez régler la vitesse d’enregistrement périphérique USB de deux manières: pendant l’enregistrement d’un disque à l’aide de la enregistrement numérique ou analogique.
  • Seite 123 Pour enregistrer un disque de musique Pour enregistrer une piste à partir d’un à l’aide de l’enregistrement numérique disque de musique à l’aide de l’enregistrement numérique Appuyez sur [CD F]. Vous ne pouvez sélectionner qu’une seule piste à enregistrer. Appuyez sur [o] pour arrêter la lecture. Pour enregistrer toutes les pistes du Appuyez sur [CD F].
  • Seite 124: Enregistrement D'autres Sources

    Pour enregistrer un disque de musique Enregistrement d’autres sources à l’aide de l’enregistrement analogique Vous pouvez enregistrer une émission DAB/FM, Utilisez l’enregistrement analogique lorsque un métronome ou un appareil extérieur. l’enregistrement numérique ne peut pas être Vous pouvez diviser un fichier en fonction des effectué...
  • Seite 125 Pour enregistrer les station DAB/FM Pour enregistrer le métronome Appuyez sur [TUNER]. Appuyez sur [METRONOME]. Réglez le tempo et le rythme si nécessaire. (p. 27) Accordez la station que vous souhaitez enregistrer. Appuyez sur [REC/DELETE]. L’enregistrement démarre. Appuyez sur [REC/DELETE]. L’indicateur “REC”...
  • Seite 126: Suppression D'une Plage

    Suppression d’une plage Vous pouvez supprimer une plage enregistrée sur un périphérique USB. Avant la suppression d’une piste, connectez le dispositif USB au connecteur USB. Vous ne pouvez pas restaurer des fichiers supprimés. Vérifiez soigneusement les fichiers lors de la suppression. Appuyer sur la touche [USB/iPod F] .
  • Seite 127: Utilisation De La Minuterie

    Utilisation de la minuterie Réglage du minuteur journalier Réglage du minuteur de mise en sommeil En utilisant la minuterie quotidienne (minuterie de lecture), vous pouvez vous réveiller au son de votre L’alimentation du système s’éteint musique préférée. automatiquement après que l’heure d’arrêt que En réglant le minuteur journalier, le système se met vous avez réglée s’est écoulée.
  • Seite 128 Pour annuler le minuteur journalier Appuyez sur [UP] ou [DOWN] pour régler les “minutes” de l’heure de démarrage, l’ Après avoir sélectionné “PLAY TMR” en “heure” et “les minutes” de l’heure effectuant les étapes 1 à 3 dans “Réglage du d’arrêt, puis sélectionnez la source et le minuteur journalier”, sélectionnez “PLAY volume.
  • Seite 129: Réglage De La Minuterie D'enregistrement

    Réglage de la minuterie Appuyez sur [UP] ou [DOWN] pour régler d’enregistrement l’“heure” de démarrage. Vous pouvez paramétrer la minuterie Si vous maintenez pressée la touche, le d’enregistrement pour les stations DAB/FM ou un chiffre des heures change de façon appareil extérieur.
  • Seite 130 REMARQUE Pour retourner à l’étape précédente, appuyez sur [CANCEL]. Les touches [CLOCK/TIMER] et [SLEEP] sont désactivées lorsque la minuterie d’enregistrement fonctionne. Pour annuler la minuterie d’enregistrement Après avoir sélectionné “REC TMR” en effectuant les étapes 1 à 3 dans “Réglage de la minuterie d’enregistrement”, sélectionnez “REC OFF”, puis appuyez sur [SET].
  • Seite 131: À Propos Des Disques/Des Fichiers

    À propos des disques/des fichiers iPod compatible Dispositifs BLUETOOTH reproductibles Fabriqué pour Version* Pour connecter le dispositif à ce système en iPod nano (7ème génération) 1,0.2 utilisant BLUETOOTH, le dispositif doit être iPod nano (6ème génération) compatible avec le BLUETOOTH 2.1+EDR, le A2DP et les profils AVRCP.
  • Seite 132: Important Pour Les Périphériques Usb À Mémoire De Grande Capacité

    USB puis réinitialiser cet appareil et le droits d’auteur sans la permission du périphérique USB. propriétaire des droits. JVC ne peut être tenu responsable pour toute perte de données dans le périphérique USB à mémoire de grande capacité lors de l’utilisation de cet appareil.
  • Seite 133: Autres

    – Veillez à NE PAS l’essuyer en appuyant trop marques déposées de Bluetooth SIG, Inc. et toute fort. utilisation de ces marques par JVC KENWOOD – NE FROTTEZ PAS avec un diluant ou de la Corporation est faite sous licence.
  • Seite 134: Guide De Dépannage

    Guide de dépannage Si vous avez des problèmes avec votre système, iPod cherchez d’abord une solution dans cette liste avant d’appeler un réparateur. iPod ne peut pas lire. Connectez correctement le câble USB. Si les mesures suivantes ne solutionnent pas les problèmes : Vérifiez la compatibilité...
  • Seite 135: Opérations D'enregistrement

    Opérations des disques/périphériques Minuterie USB à mémoire de grande capacité Impossible de régler le minuteur de mise en sommeil La lecture du disque ou du périphérique USB Le minuteur ou la minuterie d’enregistrement n’est pas possible. ne fonctionne pas. Éteindre la minuterie. Le disque a été...
  • Seite 136: Spécifications

    Spécifications Lecteur de disque Capacité: Rapport signal sur bruit: 85 dB Plage dynamique: 90 dB Tuner Plage d’accord DAB BAND III: 174,928 MHz – 239,200 MHz Plage d’accord FM: 87,50 MHz – 108,00 MHz Antenne: Antenne télescopique BLUETOOTH Version BLUETOOTH : BLUETOOTH 4.0 + EDR certifié...
  • Seite 137 Sensibilité /Impédance d’entrée (1 kHz): LEVEL 1: 500 mV /47 kK LEVEL 2: 250 mV /47 kK LEVEL 3: 125 mV /47 kK MIC/GUITAR: MIC: 200 K - 2 kK (φ6,3) GUITAR: 100 kK - 1 MK (φ6,3) Prise de sortie PHONES: φ3,5 32 K - 1 kK...
  • Seite 138 V FR © 2017 JVC KENWOOD Corporation...
  • Seite 139 CD-SYSTEEM MET POWER WOOFER RV-NB100B GEBRUIKSAANWIJZING LVT2488-001C...
  • Seite 140: Automatische Energiebesparingsfunctie

    Een kopie van de “Declaration of Conformity” aangaande de RE Richtlijn 2014/53/EU kan van de volgende website worden gedownload (http://www3.jvckenwood.com/ecdoc). Hierbij verklaart JVC dat dit systeem [RV-NB100B] in overeenstemming is met de essentiële eisen en de andere relevante bepalingen van richtlijn 2014/53/EU.
  • Seite 141 Voorbereiding Let op: Zorg voor goede ventilatie Om gevaar voor brand of een elektrische schok te voorkomen, dient u bij opstelling van het apparaat op de volgende punten te letten: 1 Voorkant: Voldoende ruimte vrij houden. 2 Zijkanten/Bovenkant/Achterkant: Plaats geen voorwerpen binnen de ruimte met de in de afbeelding hieronder getoonde afmetingen. 3 Onderkant: Plaats op een horizontaal oppervlak.
  • Seite 142 Wat u kunt doen met gebruik van het systeem Afspelen van bestanden op Afspelen van bestanden op uw uw iPod of iPhone door BLUETOOTH-apparaat of door bediening van het systeem bediening van het systeem P.14 P.17 Speel MP3/WMA-bestanden af op een muziek-cd of USB-apparaat Geniet van het luisteren naar muziek door P.20...
  • Seite 143 Inhoudsopgave Introductie ........2 DAB ..........23 Voorbereiding ............. 3 Luisteren naar DAB-zenders ......23 Wat u kunt doen met gebruik van het systeem ..4 FM ........... 25 Voorbereiding ........6 Luisteren naar FM-uitzendingen ....... 25 Accessoires ............6 Voorkeur instellen van zenders ......
  • Seite 144: Voorbereiding

    Voorbereiding Afstandsbediening Accessoires Zorg dat de polen (+ en –) van de batterijen in de Controleer dat u de volgende, voor het juiste richting worden geplaatst. systeem bijgeleverde onderdelen heeft. Netsnoer (1) Afstandsbediening RM-SRVNB100A (1) Batterijen (voor de afstandsbediening) (2) R6P (SUM-3)/AA Schouderriem (1) (15F) (bijgeleverd)
  • Seite 145: Verplaatsen Van Het Systeem

    Gebruik van de schouderriem Verplaatsen van het systeem Bevestig de bijgeleverde schouderriem (lengte instelbaar) als hieronder afgebeeld aan ieder Gebruik van de draaghendels uiteinde van het systeem. Houd bij het dragen van het systeem beslist beide hendels vast. Schouderriem Gesp Indien u het systeem met slechts een hendel (bijgeleverd) draagt, raakt het andere uiteinde mogelijk de grond...
  • Seite 146: Namen Van Onderdelen En Regelaars

    Namen van onderdelen en regelaars Voorkant van het systeem $ % ^ & CD F toets G /TEMPO + toets iPod F toets H /TEMPO - toets STANDBY/ON D toets USB/iPod F toets Haak voor schouderriem METRONOME F toets SUPER WOOFER VOLUME +/– USB-aansluiting/afdekking STANDBY indicator Aansluiting voor iPod/Voorklep...
  • Seite 147: Achterkant Van Het Systeem

    Achterkant van het systeem Displayvenster A.P.S. HIGH Timerindicators A (timer), PLAY, REC AC IN aansluiting SLEEP indicator AUDIO IN aansluiting A.P.S. (automatische energiebesparing) PHONES aansluiting indicator MIC LEVEL -/+ CLOCK indicator MIC INPUT-connector iPod indicator GUITAR INPUT-connector FM-functie indicators GUITAR LEVEL -/+ STEREO, MONO Uittrekbare antenne DAB/FM-antenne HIGH indicator...
  • Seite 148: Afstandsbediening

    De referentiepagina’s zijn voornamelijk pagina’s Afstandsbediening die beschrijvingen van de betreffende onderdelen bevatten. Cijfertoetsen (pag. 21) MENU/BLUETOOTH SETTING-toets Multi-bedieningstoetsen (pag. 15 - 25) • UP, DOWN • J , SET, I Gt.AMP MODE toets (pag. 28) Brontoetsen (pag. 15 - 26) •...
  • Seite 149: Verbindingen

    LET OP Om storingen en beschadiging van het systeem te voorkomen mag uitsluitend het bij dit systeem geleverde JVC-netsnoer worden gebruikt. Verwijder alle batterijen indien u het toestel op netstroom gebruikt. Trek altijd de stekker uit het stopcontact als u weggaat of wanneer het systeem gedurende langere tijd niet wordt gebruikt.
  • Seite 150: Basisbedieningen

    Basisbedieningen In-/uitschakelen van het systeem OPMERKING De klokinstelling zal worden gereset ongeveer een uur nadat de stekker is losgekoppeld. Druk op [STANDBY/ON D]. De klok wordt niet op het display getoond terwijl het systeem is uitgeschakeld en batterijen voor de stroomtoevoer worden gebruikt. Starten De STANDBY-indicator dooft.
  • Seite 151: Display-Informatie

    Geluidsfunctie Automatische energiebesparingsfunctie U kunt een passende geluidsfunctie voor het Deze functie schakelt het Systeem automatisch uit als er spelende muziekgenre kiezen. gedurende 15 minuten geen handeling wordt uitgevoerd. Door iedere druk op [A.P.S.], wordt de Druk op [SOUND MODE] om de geluidsfunctie automatische energiebesparingsfunctie te kiezen.
  • Seite 152: Ipod

    Verbinden van een iPod Zie pag. 39 voor compatibele iPod-apparaten. Voor het aansluiten op het iPod-dock LET OP JVC is niet aansprakelijk voor verlies van data of beschadiging van de iPod ten gevolge van het gebruik van dit systeem. Openen van de voorklep Sluit een iPod niet aan en ontkoppel niet terwijl het systeem is ingeschakeld.
  • Seite 153: Weergave

    Snel voorwaarts/achterwaarts Weergave Druk op [iPod F] of [USB/iPod F]. Houd [J] of [I] ingedrukt tijdens het afspelen. Om uw iPod op de slaapstand te zetten Door iedere druk op de toets wordt de weergave gestart/gepauzeerd. Houd [iPod F] of [USB/iPod F] Druk op [USB/iPod F] wanneer de iPod is ingedrukt.
  • Seite 154: Willekeurige Weergave

    Willekeurige weergave Menubediening voor iPod U kunt de fragmenten op een iPod in een Druk op [MENU] om het menu op te willekeurige volgorde afspelen. roepen. Druk op [PLAY MODE]. Door iedere druk op de toets verandert het display als volgt: Door iedere druk op de toets wordt de willekeurige weergavefunctie afwisselend geactiveerd/ geannuleerd.
  • Seite 155: Luisteren Naar Een Bluetooth-Apparaat

    Luisteren naar een BLUETOOTH-apparaat U kunt naar muziek luisteren vanaf uw BLUETOOTH-apparaat via het systeem. Start het afspelen op het desbetreffende BLUETOOTH-apparaat. Wanneer u uw apparaat voor de eerste keer aansluit, is het noodzakelijk om uw BLUETOOTH- Het geluid van het BLUETOOTH-apparaat apparaat en het systeem te registreren (koppelen).
  • Seite 156: Koppelen (Registreren) Van Andere Bluetooth-Apparaten

    Voor het in-/uitschakelen van de BLUETOOTH-functie van het systeem OPMERKING De verbinding wordt automatisch geannuleerd in de volgende gevallen. Wanneer het systeem is ingeschakeld De verbinding wordt geannuleerd op het BLUETOOTH-apparaat of de BLUETOOTH-functie wordt ingesteld op ”OFF”. ”BT OFF” : Schakelt de BLUETOOTH-functie Het systeem of het BLUETOOTH-apparaat wordt van het systeem uit.
  • Seite 157: Het Systeem Instellen Op Bluetooth-Stand-By

    Het systeem instellen op Een afstandsbedieningsapplicatie gebruiken BLUETOOTH-stand-by U kunt het systeem op afstand bedienen met behulp van ”JVC Audio Control BR1”, een speciale U kunt het systeem inschakelen met behulp van de afstandbedieningsapplicatie op een Android- afstandsbedieningsapplicatie op een BLUETOOTH- apparaat die compatibel is met BLUETOOTH.
  • Seite 158: Afspelen Van Een Disc/Usb-Apparaat

    Afspelen van een disc/USB-apparaat Voorbereiding Weergave Plaats een disc of sluit USB-apparatuur aan. Druk op [CD F] of [USB/iPod F]. Disc Display tijdens weergave 10 0:45 Nummer van Weergavetijd huidige fragment Stoppen van de weergave USB-apparatuur Druk op [o]. USB-geheugen (niet bijgeleverd) Onderbreken Druk op [CD F] of [USB/iPod F].
  • Seite 159: Geprogrammeerde Weergave

    Kiezen van een nummer met de Geprogrammeerde weergave afstandsbediening U kunt maximaal 32 fragmenten van een disc of USB-apparatuur in de gewenste volgorde en Voorbeelden: tevens eenzelfde fragment meerdere malen Om nummer 5 te selecteren, drukt u op 5. programmeren. Voor het kiezen van nummer 15, drukt u op +10 Druk op [CD F] of [USB/iPod F].
  • Seite 160: Willekeurige Weergave

    Wissen van fragmenten in het programma Uitschakelen van willekeurige weergave Druk tijdens willekeurige weergave op [PLAY MODE]. Druk wanneer de geprogrammeerde Het ”RANDOM”-indicator dooft. weergave is gestopt op [CANCEL]. Willekeurige weergave wordt tevens Door iedere druk op de toets, wordt het laatste geannuleerd wanneer u de weergave stopt.
  • Seite 161: Dab

    Opzoeken van ensembles Luisteren naar DAB-zenders Houd [UP] of [DOWN] ingedrukt. Luisteren naar DAB/DAB+ Terwijl u de toets ingedrukt houdt, wordt op een kanaal met een ander ensemble Druk herhaaldelijk op [TUNER] om ”DAB” afgestemd, ongeacht de signaalstatus. te kiezen. Laat de toets los wanneer het gewenste Afstandsbediening Hoofdtoestel...
  • Seite 162 Programma’s opzoeken met PTY-codes Veranderen van DAB-informatie (PTY-zoeken) U kunt uit alle ontvangbare services een bepaald Door iedere druk op de toets verandert de soort programma opzoeken door de gewenste helderheid van het displayvenster als volgt: PTY-code in te voeren. Servicenaam Æ...
  • Seite 163: Luisteren Naar Fm-Uitzendingen

    Luisteren naar FM-uitzendingen Voorkeur instellen van zenders Druk herhaaldelijk op [TUNER] om ”FM” te U kunt maximaal 30 FM-zenders handmatig kiezen. vastleggen. Afstandsbediening Hoofdtoestel Stem op een vast te leggen zender af. Druk op [SET]. (Druk herhaaldelijk op) 8750 FM P-01 Kies de zender.
  • Seite 164: Externe Apparatuur

    Externe apparatuur Instellen van het audio-ingangsniveau Luisteren naar een externe apparatuur Regel het ingangsniveau van de audio wanneer er een contrast is tussen het volume van het externe apparaat dat is aangesloten op de AUDIO IN- Stel het volumeniveau van het systeem in stekker en dat van andere bronnen.
  • Seite 165: Metronoom

    Metronoom Gebruik van de metronoomfunctie U kunt het systeem als een metronoom gebruiken. U kunt het tempo en ritme afzonderlijk voor het gitaarspelen, etc. instellen. Druk op [METRONOME F]. De ritme-pieptonen worden via de luidsprekers uitgestuurd. Door iedere druk op de toets worden de pieptonen gestart/gepauzeerd.
  • Seite 166: Verbinden Van Een Microfoon/Gitaar

    Verbinden van een microfoon/gitaar Mengen van microfoon/gitaar Aanpassen van de klank van een gitaar U kunt het geluid van een microfoon of gitaar met het geluid van een bron mengen. Behalve het geluid van het apparaat, kunt u ook de klank van de gitaar selecteren.
  • Seite 167 Met het hoofdtoestel Houd de [o] toets op het apparaat voor meer dan 2 seconden ingedrukt totdat ”G AMP” wordt weergegeven. Iedere keer dat u de toets ingedrukt houdt, schakelt de functie of wel naar het volume van de super luidspreker (”SW VOL” verschijnt op het display venster), ofwel naar de gitaar klankregelaar.
  • Seite 168: Opname Op Een Usb-Apparaat

    Opname op een USB-apparaat Voor het selecteren van de opname snelheid (alleen voor digitaal opnemen) Opname van discs U kunt de opname snelheid bij het opnemen van U kunt een CD digitaal en analoog op een USB- een disk instellen met gebruikmaking van de apparaat opnemen.
  • Seite 169 Voor het opnemen van een muziek disc, Voor het opnemen van één muziek waarbij gebruik wordt gemaakt van een nummer van een muziek cd, terwijl u digitale opname. gebruik maakt van digitaal opnemen. U kunt alleen één muziek nummer selecteren om Druk op [CD F].
  • Seite 170: Opname Van Andere Bronnen

    Voor het opnemen van een muziek cd, terwijl Opname van andere bronnen u gebruik maakt van analoog opnemen U kunt een DAB/FM-uitzending, metronoom of Gebruik analoog opnemen wanneer digitaal extern apparaat opnemen. opnemen niet uitgevoerd kan worden vanwege U kunt een bestand splitsen in overeenstemming SCMS (pag.
  • Seite 171 Opname van DAB/FM-zenders Opname van de metronoom Druk op [TUNER]. Druk op [METRONOME]. Stel het tempo en ritme indien nodig in. Stem af op de zender die u wilt opnemen. (pag. 27) Druk op [REC/DELETE]. Druk op [REC/DELETE]. Hoofdtoestel Afstandsbediening De opname start.
  • Seite 172: Wissen Van Een Fragment

    Wissen van een fragment U kunt een op een USB-apparaat opgenomen fragment wissen. Voor het wissen van een muziek nummer, moet het USB-apparaat op op de USB connector aangesloten worden. U kunt gewiste bestanden niet herstellen. Controleer zorgvuldig de bestanden die u wilt wissen.
  • Seite 173: Gebruik Van De Timer

    Gebruik van de timer De slaaptimer instellen Instellen van de dagelijkse timer De stroom van het systeem schakelt automatisch U kunt de dagelijkse timer (weergavetimer) bijvoorbeeld uit nadat de door u ingestelde uitschakeltijd is als wekker met uw favoriete muziek gebruiken. verstreken.
  • Seite 174 Om de dagelijkse timer te annuleren Druk op [UP] of [DOWN] om de ”minuut” van de starttijd te regelen, het ”uur” en Na het selecteren van ”PLAY TMR” door het de ”minuut ” van de eindtijd en selecteer uitvoeren van stap 1 tot 3 in ”De dagelijkse de bron en het volume.
  • Seite 175: Instellen Van De Opnametimer

    Instellen van de opnametimer Druk op [UP] of [DOWN] om het ”uur” van U kunt de opnametimer voor DAB/FM-zenders of de starttijd re regelen. een extern apparaat instellen. De uuraanduiding verandert voortdurend Wanneer u de opname tijdklok instelt, start het wanneer u de toets even ingedrukt houdt.
  • Seite 176 Om de opname tijdklok te annuleren Na het selecteren van ”REC TMR” door het uitvoeren van stap 1 tot 3 in ” de opname tijdklok instellen”, selecteer ”REC OFF” en druk vervolgens op [SET]. Voor het instellen van de opname tijdklok met dezelfde instelling Na het selecteren van ”REC TMR”...
  • Seite 177: Over Discs/Bestanden

    Over discs/bestanden Geschikte iPod Afspeelbare BLUETOOTH- apparaten Geschikt voor Versie* Om het apparaat op dit systeem aan te sluiten iPod nano (7e generatie) 1,0.2 via BLUETOOTH moet het apparaat compatibel iPod nano (6e generatie) zijn met de BLUETOOTH 2.1+EDR en de A2DP- en AVRCP-profielen.
  • Seite 178: Belangrijk Voor Usb-Opslagapparatuur

    Ontkoppel in dat geval de USB-apparatuur en opgenomen software, bijvoorbeeld normale stel dit systeem en de USB-apparatuur terug. CD’s, kunnen worden gemaakt. JVC is niet aansprakelijk voor het verlies van data in de USB-opslagapparatuur tijdens of door het gebruik van dit systeem.
  • Seite 179: Overige

    Bluetooth – Zorg dat rubber of plastic NIET te lang contact SIG, Inc. en JVC KENWOOD Corporation met het systeem maakt. gebruikt deze onder licentie. Android is een handelsmerk van Google Inc..
  • Seite 180: Oplossen Van Problemen

    Oplossen van problemen Bediening voor iPod Controleer de volgende lijst alvorens voor reparatie op te bellen indien u een probleem met uw systeem heeft. Geen weergave van iPod. Sluit de USB-kabel juist aan. Als de volgende maatregelen de problemen niet verhelpen: Controleer de compatibiliteit van uw iPod.
  • Seite 181: Bediening Voor De Radio

    Bediening voor disc/USB-opslagapparatuur Gebruik van de timer Niet in staat de slaaptimer in te stellen Geen weergave van de disc/USB-apparatuur. De opname tijdklok werkt. Schakel de tijdklok De disc is verkeerd om geplaatst. Plaats de uit. Wanneer de opname tijdklok is disc met het label boven.
  • Seite 182: Technische Gegevens

    Technische gegevens Discspeler CD-capaciteit: Signaal-tot-ruis verhouding: 85 dB Dynamisch bereik: 90 dB Tuner DAB-afstembereik BAND III: 174,928 MHz - 239,200 MHz FM-afstembereik: 87,50 MHz – 108,00 MHz Antenne: Uittrekbare antenne BLUETOOTH BLUETOOTH-versie: BLUETOOTH 4.0 + EDR-gecertificeerd Uitgangsvermogen: 2.5 mW (MAX.), vermogen Gebruiksgebied: max.
  • Seite 183 Ingangsgevoeligheid /Impedantie (1 kHz): LEVEL 1: 500 mV /47 kK LEVEL 2: 250 mV /47 kK LEVEL 3: 125 mV /47 kK MIC/GUITAR: MIC: 200 K - 2 kK (φ6,3) GUITAR: 100 kK - 1 MK (φ6,3) Uitgangsaansluiting PHONES: φ3,5 32 K - 1 kK 15 mW/kanaal uitgang naar 32 K Vermogentoevoer...
  • Seite 184 V NL © 2017 JVC KENWOOD Corporation...
  • Seite 185 SISTEMA POWERED WOOFER CD RV-NB100B ISTRUZIONI LVT2488-001C...
  • Seite 186: Introduzione

    La dichiarazione di conformità alla direttiva sugli apparecchi radio 2014/53/UE è scaricabile dal sito (http://www3.jvckenwood.com/ecdoc). Con la presente JVC dichiara che il modello [RV-NB100B] è conforme ai requisiti essenziali e alle altre disposizioni pertinenti della direttiva 2014/53/UE. AVVERTENZE IMPORTANTI SUI PRODOTTI LASER 1.
  • Seite 187: Preparazione

    Preparazione Attenzione: Adequata di Ventilazione Per evitare il rischio di folgorazioni ed incendi e proteggere il lettore da danni, installarla nel modo seguente: 1 Anteriore: Nessun ostacolo, spazio libero. 2 Lati/Superiore/Posperiore: Le zone indicate dalle dimensioni riportate nella figura che segue non devono essere in alcun modo ostruite.
  • Seite 188: Cosa Si Può Fare Con Il Sistema

    Cosa si può fare con il sistema Riprodurre i file sul proprio iPod Riprodurre i file sul proprio dispositivo o iPhone azionando il sistema BLUETOOTH usando il sistema Pag. 14 Pag. 17 Riproduzione di file MP3/WMA su un CD musicale o un dispositivo USB Ascoltate al meglio la musica regolando Pag.
  • Seite 189 Indice Introduzione ........2 DAB ..........23 Preparazione ............3 Ascolto delle stazioni DAB ........ 23 Cosa si può fare con il sistema ......4 FM ........... 25 Preparazione ........6 Ascolto delle stazioni FM ........25 Accessori ............6 Preimpostazione delle stazioni ......
  • Seite 190: Preparazione

    Preparazione Telecomando Accessori Le polarità delle batterie (+ e –) devono essere Verificare l’avvenuta fornitura delle seguenti correttamente orientate: parti che costituiscono il sistema: Cavo di alimentazione (1) Telecomando RM-SRVNB100A (1) Batterie (per telecomando) (2) R6P (SUM-3)/AA Cinghia da spalla (1) (15F) (in dotazione) Fibbia (2) Fermo (2)
  • Seite 191: Trasporto Dell'apparecchio

    Uso della cinghia da spalla Trasporto dell’apparecchio Come mostra la figura, fissare a ciascuna estremità del sistema la cinghia da spalla fornita in dotazione Uso delle maniglie di trasporto (regolabile in lunghezza): Per trasportare l’apparecchio è raccomandabile afferrarlo per entrambe le maniglie. Cinghia da spalla Fibbia (in dotazione)
  • Seite 192: Indice Dei Componenti E Comandi

    Indice dei componenti e comandi Lato anteriore del sistema $ % ^ & Tasto CD F Tasto G /TEMPO + Tasto iPod F Tasto H /TEMPO - Tasto STANDBY/ON D Tasto USB/iPod F Gancio per cinghia a tracolla Tasto METRONOME F SUPER WOOFER VOLUME +/–...
  • Seite 193: Lato Posteriore Del Sistema

    Lato posteriore del sistema Finestra del display A.P.S. HIGH Indicatori dei timer A (timer), PLAY, REC Presa AC IN Indicatore SLEEP Presa AUDIO IN A.P.S. (indicatore di spegnimento Presa PHONES automatico) MIC LEVEL -/+ Indicatore CLOCK Connettore MIC INPUT Indicatore dell’iPod Connettore GUITAR INPUT Indicatori della modalità...
  • Seite 194: Telecomando

    Le pagine di riferimento sono principalmente Telecomando pagine contenenti descrizioni dei rispettivi componenti. Tasti numerici (pag. 21) Pulsante MENU/BLUETOOTH SETTING Tasti multicontrollo (pag. 15 - 25) • UP, DOWN • J , SET, I Tasto Gt.AMP MODE (pag. 28) Tasti di selezione sorgente (pag. 15 - 26) •...
  • Seite 195: Collegamenti

    AVVERTENZA Per evitare malfunzionamenti o danneggiamenti all’apparecchio si raccomanda di usare esclusivamente il cavo di alimentazione fornito da JVC. In caso di alimentazione di rete rimuovere tutte le batterie. Assicuratevi di scollegare il cavo di alimentazione dalla presa quando uscite di casa o quando l’apparecchio non viene usato per un...
  • Seite 196: Operazioni Di Base

    Operazioni di base Accensione/spegnimento del sistema NOTA L’impostazione orologio verrà azzerata circa Premere [STANDBY/ON D]. un’ora dopo che il cavo di alimentazione CA è stato scollegato. Quando l’apparecchio è alimentato con le batterie, al suo spegnimento l’orologio non rimane visualizzato sul display. L’indicatore STANDBY si spegne.
  • Seite 197: Modalità Audio

    Modalità audio Modo automatico di risparmio energetico Per migliorare il tipo di suono in fase di riproduzione Questa funzione spegne automaticamente il sistema se non è possibile selezionarne il modo: viene eseguita alcuna operazione per circa 15 minuti. Ogni volta che si preme il tasto [A.P.S.] la funzione Premere [SOUND MODE] per selezionare la automatica di risparmio energetico si attiva o disattiva.
  • Seite 198: Ipod

    Vedere pag. 39 per dispositivi compatibili con l’iPod. Per collegare il dock iPod AVVERTENZA JVC non è responsabile di qualsivoglia perdita di dati o danneggiamento subiti dall’iPod durante Aprire lo sportello frontale il suo uso. Non si deve collegare o scollegare l’iPod mentre l’apparecchio è...
  • Seite 199: Riproduzione

    Per avanzare o retrocedere Riproduzione velocemente Premere [iPod F] o [USB/iPod F]. Premere e tenere premuto [J] o [I] durante la riproduzione. Ad ogni pressione del tasto si avvia o sospende la Per mettere l’iPod in modalità riproduzione. autospegnimento Premere [USB/iPod F] quando l’iPod è collegato al connettore USB.
  • Seite 200: Riprodurre In Ordine Casuale

    Riprodurre in ordine casuale Uso del menù dell’iPod Le tracce dell’iPod sono riproducibili in ordine Premere [MENU] per visualizzare il menu. casuale. Ad ogni pressione del tasto appare il menu Premere [[PLAY MODE]]. precedente. Ad ogni pressione del tasto il modo di riproduzione in ordine casuale si attiva o disattiva.
  • Seite 201: Ascolto Di Un Dispositivo Bluetooth

    Ascolto di un dispositivo BLUETOOTH È possibile ascoltare la musica dal dispositivo BLUETOOTH tramite il sistema. Avviare la riproduzione sul dispositivo Quando si collega il proprio dispositivo per la prima BLUETOOTH di destinazione. volta, è necessario registrare (accoppiare) il L’audio del dispositivo BLUETOOTH viene proprio dispositivo BLUETOOTH e il sistema.
  • Seite 202: Accoppiamento (Registrazione) Di Altri Dispositivi Bluetooth

    Per attivare/disattivare la funzione BLUETOOTH del sistema NOTA Il collegamento viene annullato automaticamente Quando il sistema è attivato nei seguenti casi. Il collegamento è annullato sul dispositivo BLUETOOTH o la funzione BLUETOOTH è impostata su “OFF”. “BT OFF” : Disattiva la funzione BLUETOOTH Il sistema o il dispositivo BLUETOOTH è...
  • Seite 203: Impostazione Del Sistema Su Standby Bluetooth

    Uso di un’applicazione standby BLUETOOTH telecomando È possibile accendere il sistema utilizzando È possibile controllare il sistema in remoto usando “JVC l’applicazione telecomando su un dispositivo Android Audio Control BR1”, una speciale applicazione che supporta BLUETOOTH. telecomando su un dispositivo Android compatibile con BLUETOOTH.
  • Seite 204: Riproduzione Di Un Disco/Dispositivo Usb

    Riproduzione di un disco/dispositivo USB Preparazione Riproduzione Inserire un disco oppure collegare l’unità USB. Premere [CD F] o [USB/iPod F]. Disco oppure Visualizzazioni durante la riproduzione 10 0:45 Numero traccia Tempo di attuale riproduzione Per interrompere la riproduzione Unità USB Premere [o].
  • Seite 205: Riproduzione Programmata

    Per selezionare una traccia con il telecomando Riproduzione programmata Esempi: È possibile programmare in qualsiasi ordine fino a Per selezionare il numero 5, premere 5. 32 tracce del disco e dell’unità USB, compresi le medesime tracce. Per selezionare il numero 15, premere +10 e quindi 5. Per selezionare il numero 20, premere +10 e quindi 10.
  • Seite 206: Riproduzione Casuale

    Per uscire dalla modalità di riproduzione casuale Per cancellare le tracce dal programma Durante la riproduzione in ordine casuale A riproduzione ferma premere [CANCEL]. premere [PLAY MODE]. Ad ogni pressione del tasto si cancella l’ultima L’indicatore “RANDOM” si spegne. traccia del programma. La riproduzione in ordine casuale si annulla Tutti i contenuti programmati possono essere altresì...
  • Seite 207: Dab

    Per ricercare gruppi Ascolto delle stazioni DAB Premere e tenere premuto [UP] o [DOWN]. Per ascoltare le stazioni DAB/DAB+ Mentre lo si tiene premuto, il canale si aggiorna in tutti i gruppi di servizi a Premere ripetutamente [TUNER] per prescindere dalla condizione del segnale. selezionare “DAB”.
  • Seite 208: Regolazione Dell'antenna

    Come ricercare i programmi con i codici Per selezionare le informazioni DAB da PTY (funzione PTY Search) visualizzare Specificando un codice PTY, tra tutti i servizi ricevibili è possibile individuare un tipo specifico di Ogniqualvolta si preme il tasto, la finestra del programma.
  • Seite 209: Ascolto Delle Stazioni Fm

    Ascolto delle stazioni FM Preimpostazione delle stazioni Premere ripetutamente [TUNER] per È possibile predefinire manualmente fino a 30 selezionare “FM”. stazioni FM. Telecomando Unità principale Sintonizzare l’unità sulla stazione che si desidera memorizzare. (Premere ripetutamente) Premere [[SET]]. 8750 FM P-01 Selezionare la stazione.
  • Seite 210: Apparecchio Esterno

    Apparecchio esterno Regolazione del livello di ingresso audio Ascolto dell’apparecchio esterno Regolare il livello ingresso audio quando è Regolare il volume dell’apparecchio al presente un contrasto tra il volume del dispositivo minimo. esterno collegato alla presa jack AUDIO IN e quello di altre sorgenti.
  • Seite 211: Metronomo

    Metronomo Uso della funzione metronomo L’apparecchio è altresì utilizzabile come metronomo. Ad esempio è possibile impostare separatamente il tempo e il ritmo per praticare con la chitarra. Premere [METRONOME F]. I diffusori emettono segnali acustici ritmici. Ad ogni pressione del tasto i segnali si arrestano o riprendono.
  • Seite 212: Collegamento Di Un Microfono O Una Chitarra

    Collegamento di un microfono o una chitarra Miscelazione del suono di un Regolazione della tonalità di una microfono o di una chitarra chitarra Se all’unità si collega un microfono o una chitarra Oltre alla modalità audio dell’unità principale, è se ne può miscelare il suono con quello della possibile selezionare la tonalità...
  • Seite 213: Uso Dell'unità Principale

    Uso dell’unità principale Premere e tenere premuto il pulsante [o] sull’unità principale per più di 2 secondi finché “G AMP” viene visualizzato. Ogni volta che si preme e si tiene premuto il pulsante, la funzione passa dalla regolazione del volume del super woofer (“SW VOL”...
  • Seite 214: Registrazione In Un'unità Usb

    Registrazione in un’unità USB Per selezionare la velocità di registrazione (solo per la registrazione digitale) Registrazione dei dischi È possibile impostare la velocità di registrazione La registrazione dei CD nell’unità USB può essere quando si registra un disco utilizzando la funzione eseguita in modo digitale o analogico.
  • Seite 215 Per registrare un disco musicale Per registrare un brano da un disco musicale utilizzando la registrazione digitale utilizzando la registrazione digitale È possibile selezionare solo un brano da registrare. Premere [CD F]. Premere [CD F]. Premere [o] per interrompere la riproduzione. Per registrare tutti i brani sul disco, saltare Premere [J], [I] per il passaggio 3 e procedere al passaggio 4.
  • Seite 216: Registrazione Di Altre Sorgenti

    Per registrare un disco musicale Registrazione di altre sorgenti utilizzando la registrazione analogica Con il sistema è altresì possibile registrare trasmissioni DAB/FM, il metronomo o il suono di un Utilizzare la registrazione analogica quando non è apparecchio esterno. possibile eseguire la registrazione digitale a causa di SCMS (pag.
  • Seite 217 Per registrare le stazioni DAB/FM Per registrare il metronomo Premere [[TUNER]]. Premere [[METRONOME]]. Se necessario, regolare il tempo e il ritmo. Sintonizzare la stazione che si desidera (pag. 27) registrare. Premere [[REC/DELETE]]. Premere [[REC/DELETE]]. Si avvia la registrazione. Unità principale Telecomando Durante la registrazione l’indicatore “REC”...
  • Seite 218: Per Cancellare Una Traccia

    Per cancellare una traccia È possibile cancellare le tracce registrate nell’unità USB. Prima di eliminare un brano, collegare il dispositivo USB al connettore USB. Non è possibile ripristinare i file cancellati. Controllare attentamente i file quando vengono eliminati. Premere il pulsante [USB/iPod F] . Premere [J] o [I] per selezionare il brano da eliminare, quindi avviare la riproduzione o mettere in...
  • Seite 219: Uso Del Timer

    Uso del timer Impostazione del timer Impostazione del timer giornaliero dell’autospegnimento Utilizzando il timer giornaliero (timer di riproduzione), è possibile svegliarsi ascoltando la musica preferita. L’alimentazione del sistema si spegne automaticamente dopo che il tempo di spegnimento impostato è scaduto. Impostando il timer giornaliero, il sistema si accende automaticamente un minuto prima che inizi il timer giornaliero.
  • Seite 220 Per annullare il timer giornaliero Premere [UP] o [DOWN] per regolare il “minuto” dell’ora di avvio, l’“ora” e il Dopo aver selezionato “PLAY TMR” eseguendo i “minuto ” dell’ora di conclusione e passaggi da 1 a 3 nelle impostazioni“ il timer selezionare la sorgente e il volume.
  • Seite 221: Impostazione Del Timer Di Registrazione

    Impostazione del timer di registrazione Premere [UP] o [DOWN] per regolare l’ È possibile usare il timer di registrazione anche con “ora” di avvio. le stazioni DAB/FM di un apparecchio esterno. Per cambiare in continuazione la cifra Impostando il timer di registrazione, il sistema si dell’ora occorre tenere premuto il tasto.
  • Seite 222 Per annullare il timer di registrazione Dopo aver selezionato “REC TMR” eseguendo i passaggi da 1 a 3 in “Impostazione del timer di registrazione”, selezionare “REC OFF” e premere [SET]. Per impostare il timer di registrazione con la stessa impostazione Dopo aver selezionato “REC TMR”...
  • Seite 223: Informazioni Sui Dischi/File

    Informazioni sui dischi/file Tipi di iPod compatibili Dispositivi BLUETOOTH riproducibili Compatibile con Versione* Per collegare il dispositivo a questo sistema via iPod touch (7° generazione) 1,0.2 BLUETOOTH, il dispositivo deve essere iPod nano (6° generazione) compatibile con BLUETOOTH 2.1+EDR e con i profili A2DP e AVRCP.
  • Seite 224: Note Importanti Sull'unità Usb Di Memoria Di Massa

    In tal caso si suggerisce di scollegare il sistema e di resettare sia questo sia l’apparecchio. JVC non accetta alcuna responsabilità per l’eventuale perdita di dati che potrebbe verificarsi nell’unità USB di memoria di massa durante l’utilizzo del sistema.
  • Seite 225: Altri

    – NON lasciare plastica o gomma a contatto con fabbrica registrati di Bluetooth SIG, Inc. e l’uso di le superfici dell’unità per lungo tempo. tali marchi fatto da JVC KENWOOD Corporation è concesso in licenza. Android è un marchio di fabbrica di Google Inc..
  • Seite 226: Localizzazione Dei Guasti

    Localizzazione dei guasti Operazioni con l’iPod In caso di problemi con il sistema, prima di rivolgersi all’assistenza tecnica controllare se l’elenco presente contiene la soluzione al È impossibile riprodurre i file dell’iPod. problema. Collegare correttamente il cavo USB. Se le seguenti operazioni non risolvono i Verificare la compatibilità...
  • Seite 227: Operazioni Con Il Timer

    Operazioni con i dischi e le unità USB di Operazioni con il timer memoria di massa Impossibile impostare il timer dell’autospegnimento Non si riesce ad ottenere la riproduzione del È in funzione il timer o il timer di registrazione. disco o dell’unità USB. Disattivare il timer.
  • Seite 228: Specifiche

    Specifiche Lettore di dischi Capacità di CD: Rapporto segnale/interferenza: 85 dB Gamma dinamica: 90 dB Sintonizzatore Gamma di sintonizzazione DAB BAND III: 174,928 MHz - 239,200 MHz Gamma di sintonizzazione FM: 87,50 MHz – 108,00 MHz Antenna: Antenna telescopica BLUETOOTH Versione BLUETOOTH: BLUETOOTH 4.0 + EDR certificato Potenza uscita:...
  • Seite 229 Sensibilità d’ingresso /impedenza (1 kHz): LEVEL 1: 500 mV /47 kK LEVEL 2: 250 mV /47 kK LEVEL 3: 125 mV /47 kK MIC/GUITAR: MIC: 200 K - 2 kK (φ6,3) GUITAR: 100 kK - 1 MK (φ6,3) Terminale di uscita PHONES: φ3,5 32 K - 1 kK...
  • Seite 230 Promemoria...
  • Seite 231 Promemoria...
  • Seite 232 V EN, GE, FR, NL, IT © 2017 JVC KENWOOD Corporation...

Inhaltsverzeichnis