Herunterladen Inhalt Inhalt Diese Seite drucken

Werbung

Verfügbare Sprachen
  • DE

Verfügbare Sprachen

  • DEUTSCH, seite 3
Hama GmbH & Co KG
D-86651 Monheim/Germany
www.hama.com
All listed brands are trademarks of the corresponding companies. Errors and omissions excepted,
and subject to technical changes. Our general terms of delivery and payment are applied.

Werbung

Inhaltsverzeichnis
loading

Inhaltszusammenfassung für Hama 90914

  • Seite 1 Hama GmbH & Co KG D-86651 Monheim/Germany www.hama.com All listed brands are trademarks of the corresponding companies. Errors and omissions excepted, and subject to technical changes. Our general terms of delivery and payment are applied.
  • Seite 2 D I G I T A L P H O T O 8" Digitaler Bilderrahmen »Basic« Digital Photo Frame Cadre photo numérique 00090914...
  • Seite 3 Stand der Dokumentation 04/2008 Vielen Dank, dass Sie sich für einen digitalen Bilderrah- Sicherheitshinweise: men aus dem Hause Hama entschieden haben. Bitte • Setzen Sie das Gerät keinen starken Erschütterungen lesen Sie vor der ersten Inbetriebnahme und Benutzung aus und vermeiden Sie Stoß oder Fall.
  • Seite 4 • Bitte beachten Sie die im Anhang technischen Daten Funktionsüberblick: im Bezug auf die Multimedia-Kompatibilität beim • hochaufl ösendes 8"-TFT-LC-Display (20,32 cm) im Anschluss von USB-Geräten, bzw. bei der 4:3 Format Wiedergabe von Fotos, Musik, Videos oder Filmen. • integriertes Kartenlesegerät für SD/SDHC/MMC/ •...
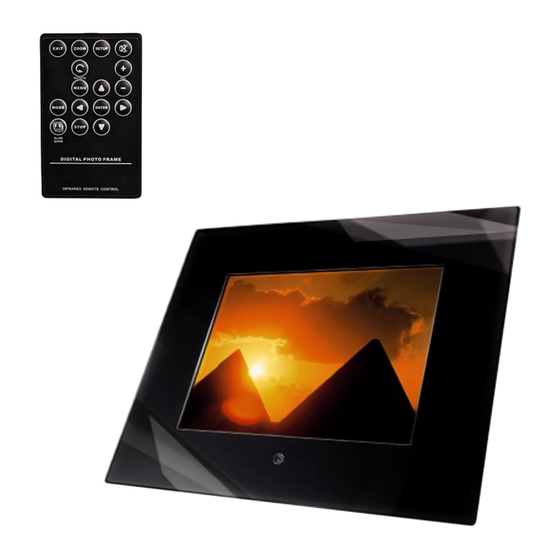
  • Seite 5 Aufbau des digitalen Bilderrahmens und der Fernbedienung: Funktionen der Fernbedienung: Setup Zoom Beenden Drehen Nach oben Menü Nach links Modus Auswählen / Ausführen Diavortrag Nach unten Stopp „ON”-Taste: Zum Ein- bzw. Ausschalten des Dreht das Foto um 90 ° digitalen Bilderrahmens „MENÜ”-Taste (=„M”): Mit dieser Taste gelangen Sie in den Bildauswahlmodus Vergrößert das Foto...
  • Seite 6 g Operating Instruction Wandmontage: An der Rückseite des digit. Bilderrahmens befi nden sich Montagelöcher, mit denen der Bilderrahmen mithilfe pas- sender Schrauben an der Wand befestigt werden kann. Bildbetrachtung: Legen Sie eine Speicherkarte ein und schalten Sie den digit. Bilderrahmen ein. Nach einigen Sekunden erscheint der Startbildschirm.
  • Seite 7 Speicherkarte vorhanden sind, können Reinigung des Gerätes ein weiches, fusselfreies Tuch diese mit den Pfeiltasten (auf der Fernbedienung oder (z.B. Hama Art.-Nr. 51076, bzw. 51077 u.ä.). Bei stärkeren auf der Oberseite des digit. Bilderrahmens) selektiert Verschmutzungen feuchten Sie das Tuch sehr leicht an.
  • Seite 8: Fehlersuche

    g Operating Instruction FEHLERSUCHE: Beim Anschluss von USB-Endgeräten werden diese Der Bilderrahmen lässt sich nicht einschalten: nicht angezeigt. Ursache: Problem in der Stromversorgung des Ursache: inkompatibles USB-Protokoll Bilderrahmens. Nicht alle Geräte unterstützen die USB-Kommunikation Prüfen Sie, ob der Stecker des Netzadapters korrekt in gleicher Weise.
  • Seite 9 Operating Instructions Operating instructions Issue of documentation: April 2008 Thank you for choosing a Hama digital picture frame. Safety Notes: Please read the complete operating instructions • Do not expose the player to heavy vibrations and do carefully before using the device for the fi rst time.
  • Seite 10 g Operating Instruction • Please note that that files that are displayed or played • 8" high-resolution TFT-LCD display (20.32 cm) in on the digital picture frame may be subject to 4:3 format copyright laws from third parties. All liability claims •...
  • Seite 11 d Bedienungsanleitung Structure of the digital picture frame and the remote control: Remote Control Functions: Setup Zoom Exit Rotate Menu Left Mode Select / Execute Slide Show Down Stop „ON“ button: for switching the digital picture frame Press to Rotate the photo 90 degree on or off „MENU“...
  • Seite 12 g Operating Instruction There are installation holes on the rear of the digital picture frame to attach it to the wall using suitable screws. Picture viewing: Insert a memory card and switch on the digital picture frame. The start screen appears after a few seconds. The preset mode of the digital picture frame displays the photos on the memory card.
  • Seite 13 Occasional care and cleaning of the device ensure a For convenient browsing of the images available. If long service life. Use a soft, lint-free cloth (e.g. Hama different fi le directories/folders are available on the item no. 51076 or 51077 , etc.) to clean the device.
  • Seite 14: Troubleshooting

    g Operating Instruction TROUBLESHOOTING: Data on a memory card can not be accessed. Cause: incompatible memory card or incorrect data The picture frame can not be switched on: media format Cause: Problem with the electrical supply of the picture There are some types of memory cards/media that are screen.
  • Seite 15 Consignes de sécurité : Nous vous remercions d’avoir choisi un cadre photo • Protégez l’appareil des secousses violentes et évitez numérique de Hama. Veuillez lire attentivement le tout choc ou toute chute. présent mode d‘emploi avant sa première utilisation et •...
  • Seite 16 g Operating Instruction • En cas de défaut constaté sur votre cadre photo Aperçu des fonctions : numérique, veuillez vous adresser à votre revendeur • Ecran haute résolution TFT-LCD de 8" (20,32 cm) au spécialisé. format 4:3 • Veuillez noter les caractéristiques techniques en •...
  • Seite 17 d Bedienungsanleitung Structure du cadre photo numérique et de la télécommande : Fonctionnement de la télécommande : Confi guration Zoom Quitter Rotation Menu En haut A gauche Mode Sélectionner / exécuter Diaporama En bas Arrêt Touche « ON » : pour mettre le cadre photo numérique sous ou hors tension Appuyez sur la touche afi...
  • Seite 18 g Operating Instruction Installation murale : Des perçages de fi xation sont disponibles sur la face arrière du cadre photo numérique afi n de vous permettre de la fi xer au mur à l’aide de vis. Visualisation d’images : Insérez une carte mémoire dans le cadre photo numérique. L’écran de démarrage apparaît quelques secondes plus tard.
  • Seite 19 fl échées (de la télécommande ou celles de (par exemple l’article de Hama réf. 51076 ou 51077). la partie supérieure du cadre photo numérique) et de En cas de saletés tenaces, humidifi ez légèrement le les ouvrir à...
  • Seite 20: Recherche Des Pannes

    g Operating Instruction RECHERCHE DES PANNES : Les appareils USB ne sont pas affi chés après avoir été Vous n’arrivez pas à mettre le cadre photo numérique connectés : sous tension Cause : protocole USB incompatible Cause : problème d’alimentation du cadre photo. Tous les appareils ne prennent pas le système de Vérifi...
  • Seite 21: Instrucciones De Uso

    Utilice para ello un paño suave de cabo por el fabricante. microfibra (p. ej., art. n° de Hama: 51076 y 51077), o un paño de limpieza especial para pantallas LCD. No Las informaciones y el software incluidos en esta utilice nunca limpiadores fuertes o que contengan documentación pueden verse sometidos a cambios...
  • Seite 22 g Operating Instruction • Observe los datos técnicos que se indican en el Sinopsis del funcionamiento: anexo en cuanto a la compatibilidad de multimedia • Pantalla TFT-LCD de 8" (20,32 cm) de alta resolución cuando se conectan dispositivos USB, o en cuanto a en formato 4:3 la reproducción de fotos, música, vídeos o películas.
  • Seite 23 d Bedienungsanleitung Estructura del marco digital y del mando a distancia: Funciones del mando a distancia: Setup Zoom Finalizar Girar Menú Hacia arriba Hacia la Modo Seleccionar/ Ejecutar Sesión de Hacia abajo diapositivas Stop Tecla ON: Encendido y apagado del marco digital Gira la foto 90°...
  • Seite 24 g Operating Instruction Montaje en la pared: En el lado posterior del marco digital se encuentran agujeros de montaje con los que se puede montar el marco digital en la pared con ayuda de los tornillos adecuados. Visualización de imágenes: Coloque una tarjeta de memoria y encienda el marco digital.
  • Seite 25 (p. ej., art. n° a distancia o de la parte superior del marco digital) y de Hama: 51076 ó 51077 o similar). Si la suciedad es abrir con la tecla “ENTER” (“E”). El explorador muestra fuerte, humedezca el paño sólo muy levemente.
  • Seite 26: Búsqueda De Fallos

    g Operating Instruction BÚSQUEDA DE FALLOS: No se puede acceder a datos de la tarjeta de memoria. Causa: Tarjeta de memoria incompatible o formato No se puede encender el marco digital: incorrecto del medio de datos Existen algunos tipos de tarjetas/medios de memoria Causa: Problema en la alimentación de corriente del que son incompatibles con el marco digital.
  • Seite 27: Gebruiksaanwijzing

    Stand van de documentatie 04/2008 Hartelijk dank dat u voor de aanschaf van een Veiligheidsinstructies: digitale fotolijst van Hama heeft gekozen. Lees de • Stel het toestel niet bloot aan zware schokken en gebruiksaanwijzing volledig en goed door voordat u voorkom stoten of vallen.
  • Seite 28 g Operating Instruction • Houd rekening met de technische gegevens in de Functieoverzicht appendix over de compatibiliteit met multimedia bij de • 8"-TFT-LC-display (20,32 cm) met hoge resolutie in aansluiting van USB-apparatuur, resp. bij de 4:3 formaat weergave van foto´s, muziek, video´s of fi lms. •...
  • Seite 29 d Bedienungsanleitung Opbouw van de digitale fotolijst en de afstandsbediening: Functies van de afstandsbediening: Setup Zoom Beëindigen Draaien Naar boven Menu Naar links Modus Selecteren / uitvoeren Slideshow Naar (diavoorstelling) onderen Stopp “ON“-knop: voor het in- en uitschakelen Indrukken om de foto 90 graden te van de digit.
  • Seite 30 g Operating Instruction Wandmontage: Aan de achterzijde van de digit. fotolijst bevinden zich montagegaten waarmee de fotolijst met passende schroeven aan de wand kan worden bevestigd. Bekijken van foto´s: Plaats een geheugenkaart in de fotolijst en schakel het toestel in. Na een paar seconden verschijnt het startscherm. De vooringestelde modus van de digit.
  • Seite 31 (bijv. aan de bovenzijde van de digit. fotolijst) geselecteerd Hama art.-nr. 51076 of 51077 o.i.d.). Bij hardnekkiger en met de knop “ENTER“ (“E“) geopend worden. De vuil maakt u de doek iets vochtig. Maar gebruik...
  • Seite 32: Opsporen Van Storingen

    g Operating Instruction OPSPOREN VAN STORINGEN: USB-eindapparatuur wordt bij het aansluiten ervan niet De fotolijst kan niet worden ingeschakeld: weergegeven Oorzaak: probleem in de stroomvoorziening van de Oorzaak: incompatibel USB-protocol fotolijst. Niet alle apparaten ondersteunen de USB- Controleer of de stekker van de voedingsadapter communicatie op dezelfde manier.
  • Seite 33: Istruzioni Per L'uso

    Pulitelo solo quando necessario. originale concediamo la garanzia del costruttore. Utilizzate un panno in microfi bra morbido (ad es. Hama articolo 51076 e 51077) oppure i panni di pulizia speciali per display LCD. Non utilizzate mai detergenti aggressivi o alcolici.
  • Seite 34 g Operating Instruction • Osservate attentamente i dati tecnici allegati in Schema delle funzioni: merito alla compatibilità multimediale per l‘attacco • display LCD TFT da 8" ad alta risoluzione (20,32 cm) di apparecchi USB ovvero per la riproduzione di in formato 4:3 foto, musica, video o fi...
  • Seite 35 d Bedienungsanleitung Struttura della cornice digitale e del telecomando: Funzioni del telecomando Set up Zoom Esci Ruota In alto Menu A sinistra Modo Seleziona / Esegui Dia show In basso Stop Tasto „ON”: Per accendere o spegnere la cornice digitale. Ruota la foto di 90°...
  • Seite 36 g Operating Instruction Montaggio a parete: Sul retro della cornice digitale si trovano i fori di montaggio attraverso cui la cornice può essere fi ssata alla parete con le viti idonee. Visualizzazione delle immagini: Inserite una memory card e accendete la cornice digitale. Dopo alcuni secondi appare la schermata iniziale. Nella modalità...
  • Seite 37 Per sfogliare comodamente le immagini. Se nella prolungano la durata. Utilizzate un panno in microfi bra memory card selezionata sono disponibili diverse morbido e senza pelucchi (ad es. Hama articolo 51076 directory/cartelle di fi le, queste possono essere o 51077). In caso di sporco persistente, inumidite selezionate mediante i tasti freccia (sul telecomando leggermente il panno.
  • Seite 38: Ricerca Guasti

    g Operating Instruction RICERCA GUASTI: Quando si collega un terminale USB, questo non viene La cornice digitale non si accende: visualizzato. Causa: problema all’alimentazione elettrica della Causa: protocollo USB incompatibile cornice digitale. Non tutti gli apparecchi supportano la comunicazione Verifi cate che la spina dell’alimentatore sia inserita USB allo stesso modo.
  • Seite 39: Instrukcja Obsługi

    Czyść go tylko w razie potrzeby. Aby to jako producenta oryginalnego produktu. zrobić, użyj miękkiej szmatki z mikrofibry (np. produkt Hama nr 51076 i 51077) lub specjalnej szmatki do czyszczenia wyświetlaczy LCD. Nigdy nie używaj środków czyszczących, które zawierają alkohol.
  • Seite 40 g Operating Instruction Opis urządzenia • Pamiętaj, że pliki, które są wyświetlane lub odtwarzane • Wysokiej jakości wyświetlacz 8" - TFT-LCD (20,32 cm) w ramce cyfrowej mogą być przedmiotem praw autorskich osób trzecich. Odpowiedzialność za w formacie 4:3 wszystkie roszczenia wynikające z tego tytułu ponosi •...
  • Seite 41 d Bedienungsanleitung Opis przycisków ramki oraz pilota Pilot Setup - przycisk setup Zoom - powiększenie EXIT - Zakończ Obrót Menu - w górę wejście do w lewo menu Mode – Enter - tryb pracy zatwierdzenie wyboru Slide Show w dół Stop - w prawo zatrzymanie...
  • Seite 42 g Operating Instruction Montaż na ścianie Z tyłu ramki znajdują się otwory montażowe. Otwory służą do powieszenia ramki na ścianie. Oglądanie zdjęć Kartę pamięci włożyć do ramki cyfrowej. Po kilku sek. na ekranie pojawi się ekran startowy. Ustawiony tryb podglądu zdjęcia pokaże zdjęcia zapisane na karcie.
  • Seite 43 Do czyszczenia używać miękkiej, niestrzępiącej się szmatki (np. produkt Wyszukiwarka zdjęć Hama nr 51076 lub 51077). W przypadku mocnych Aby komfortowo przeszukiwać pliki ze zdjęciami zabrudzeń należy szmatkę bardzo delikatnie zwilżyć. (zakładając że na karcie została stworzona struktura Do czyszczenia nie używać...
  • Seite 44 g Operating Instruction Dźwięk jest niewyraźny Zbyt wysoko ustawiona głośność. Proszę wyregulować głośność. Przy podłączeniu do komputera jako czytnik kart pamięci nie pokazują się napędy Możliwy powód: niekompatybilny protokół USB. Nie wszystkie urządzenia kompatybilne są z protokołem USB w jednakowym stopniu. W wątpliwym przypadku należy sprawdzić...
  • Seite 45 d Bedienungsanleitung d Hinweis zum Umweltschutz: q Wskazówki dotyczące ochrony środowiska: Ab dem Zeitpunkt der Umsetzung der europäischen Richtlinien 2002/96/EG und 2006/66/EG in Od czasu wprowadzenia europejskiej dyrektywy 2002/96/EU i 2006/66/EG do prawa narodowego nationales Recht gilt folgendes: obowiązują następujące ustalenia: Elektrische und elektronische Geräte sowie Batterien dürfen nicht mit dem Hausmüll entsorgt Urządzeń...
  • Seite 46 g Operating Instruction Specyfi kacja informacyjno techniczna – urządzenie klasy A q Informationstechnische Einrichtung Class A Warnung! Dies ist eine Einrichtung der Klasse A. Diese Ein- UWAGA! Urządzenie klasy A. Urządzenie może powodować zakłócenia w obrębie mieszkania. W takim wypadku użytkownik richtung kann im Wohnbereich Funkstörungen verursachen.

Inhaltsverzeichnis