Crivit Z31981 Montageanleitung
Quicklinks
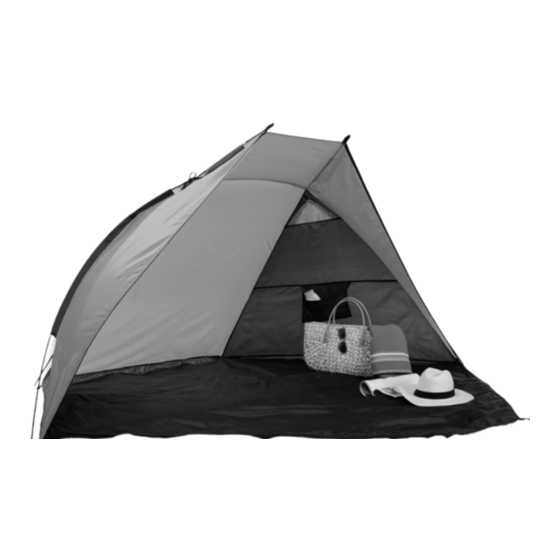
BEACH SHELTER
BEACH SHELTER
RANTATELTTA
Assembly and safety advice
Asennus- ja turvaohjeet
STRANDTÄLT
STRANDTELT
Monterings- och säkerhetsanvisningar
Montage- og sikkerhedsanvisninger
STRANDMUSCHEL
Montage- und Sicherheitshinweise
IAN 55933
G
H
117 cm
270 cm
225 cm
2250 mm ( L )
55933_cri_Strandmuschel_GB_IE_FI.indd 1
A
Beach Shelter
J
S andy surfaces reduce the stability of the
beach shelter. Please ensure that the surface
provides a firm hold for the pegs.
Proper Use
Q
J
N ever knock the pegs into the ground with
force! If necessary, the guy lines should only
This product is intended for use as protection against
be extended with the help of a loop and the
the wind and sun. The material of the beach shelter
peg positioned in a different location.
is not watertight over a prolonged period. It should
J
T he intactness of all connection points and the
not therefore be used in the rain. The product is not
guy lines should be checked regularly, as
intended for commercial use.
should the firmness of the pegs in the ground.
J
I f the beach shelter is erected in the wrong
order, this may cause damage to the beach
Description of parts
Q
shelter. All liability is excluded in such cases.
and features
m CAUTION! DANGER OF POISONING
AND DAMAGE TO PROPERTY! Do not
Pole ø 0.7 cm, approx. 365 cm (L)
light any fires within the product and keep it
1
Pole ø 0.7 cm, approx. 185 cm (L)
away from sources of heat.
2
Tarpaulin
J
I t is not recommended to take away any sewn
3
Guy line
label.
4
(2 x approx. 250 cm, 2 x approx. 170 cm)
J
P lease familiarise yourself with the local fire
Peg
protection regulations.
5
Carrying bag
6
Take note of the effects of the weather
and climate
Safety advice
J
P lease ensure that the beach shelter is not too
taut when it is erected, as otherwise it will not
KEEP INSTRUCTIONS IN A SAFE PLACE.
be able to adapt to changing weather condi-
SUBMIT ALL DOCUMENTS TO A THIRD PARTY
tions and may be damaged.
J
IF DISTRIBUTING THE PRODUCT.
Z ips are wearing parts and do not fall under
the guarantee conditions.
m CAUTION! RISK OF INJURY! Ensure that
J
D o not use any insect spray in or on the beach
all parts are undamaged and have been
shelter.
J
assembled appropriately. Risk of injury exists if
S mall leaks on the seams can be repaired with
assembled incorrectly. Damaged parts can
a seam spray and impregnation spray can be
effect safety and function.
used for the beach shelter skin.
m CAUTION! Do not leave children unattended.
The product is not a climbing frame or toy.
Q
Assembly
Make sure that nobody climbs or leans on the
product, particularly children. The product
Q
Selecting a Pitch
could become imbalanced and tip up. This
may result in injury and/or damage.
m CAUTION! RISK OF INJURY! Never under
The ground should be flat, clean and free of une-
any circumstances assemble the product in a
venness. Remove any pointed or sharp-edged objects
strong wind.
beforehand (e.g. stones, twigs etc.).
J
S elect a piece of land that is as flat and firm as
j
possible to erect your beach shelter.
W hen selecting the site to erect the beach shelter,
please remember that you require space for the
guy lines
4
in addition to the base area for the
B
C
D
beach shelter. You should also ensure that there
is also enough space to walk around the beach
shelter and that there are no tripping hazards.
Erecting the Beach Shelter
Q
j
A ssemble the product in accordance with
illustrations A to H.
Packing up the Beach Shelter
Q
j
P lease ensure that the beach shelter is completely
dry before you pack it together. Otherwise
stains and damage to the fabric may result.
j
T he pegs
and the other individual parts
5
have to be packed separately into the pockets
provided. Otherwise the pegs might damage
the tarpaulin.
Cleaning
Q
j
F or cleaning and the removal of any stains you
should only use a cleaning agent which is spe-
cifically designated for use with this product.
j
R emove any dirt from the product with a soft
sponge and clean water.
j
A llow all parts to dry thoroughly before you
pack the product up again. This will prevent the
formation of moulds, odours and discolouration.
Disposal
Q
The packaging is made entirely of recy-
clable materials, which you may dispose
at local recycling facilities.
Contact your local refuse disposal authority for
more details of how to dispose of your worn-out
product.
GB/IE
E
F
Rantateltta
J
Ä lä lyö maakiiloja koskaan väkisin maahan!
Mahdollista jännitettä voi löysätä lenkillä ja
sijoittaa maakiila toiseen paikkaan.
Käyttötarkoitus
Q
J
T arkasta säännöllisesti kaikkien yhdyskohtien
vahingoittumattomuus ja kokeile narujen jännite
Tämä tuote on tarkoitettu suojaamaan tuulelta ja
sekä maakiilojen varma pitävyys.
auringolta. Rantasimpukan materiaali ei ole kestä-
J
V äärässä järjestyksessä koottu teltta voi vaurioi-
västi vedenpitävä. Sitä ei siksi tulisi käyttää sateessa.
tua. Emme ota minkäänlaista vastuuta siitä.
Tuote ei ole tarkoitettu ammattimaiseen käyttöön.
m VAROITUS! MYRKYTYSVAARA JA
AINEELLISEN VAHINGON VAARA! Älä
sytytä tulta tuotteen sisällä. Pidä tuote loitolla
Osaluettelo
Q
lämmönlähteistä.
J
Ä lä poista kiinniommeltuja etikettejä, tyyppi- tai
Keppi ø 0,7 cm, n. 365 cm (P)
ohjekilpiä.
1
Keppi ø 0,7 cm, n. 185 cm (P)
J
T utustu myös paikkakunnan palontorjuntamää-
2
Telttakangas
räyksiin.
3
Kiristysnaru (2 x n. 250 cm, 2 x n. 170 cm)
4
Maakiila
Huomioi sääolosuhteet ja sään
5
Kantopussi
vaikutukset
6
J
Ä lä pystyttäessäsi pingota rantasimpukkaa lii-
kaa, koska se ei silloin voi sopeutua vaihteleviin
Turvaohjeet
sääolosuhteisiin ja voi vaurioitua.
J
V etoketjut ovat kuluvia osia eivätkä kuulu takuun
piiriin.
SÄILYTÄ NÄMÄ OHJEET HUOLELLISESTI. ANNA
J
Ä lä käytä hyönteissprayta rantasimpukassa tai
KAIKKI TÄTÄ TUOTETTA KOSKEVAT PAPERIT
sen lähellä.
AINA TUOTTEEN MUKANA ETEENPÄIN.
J
S aumojen pienet epätiiviit kohdat voidaan pai-
m VAROITUS! LOUKKAANTUMISVAARA!
kata saumasprayllä. Teltan seinään voidaan
Varmista että, kaikki osat ovat vahingoitumatto-
käyttää impregnointispraytä.
mia ja asianmukaisesti asennettu. Ei asianmu-
kainen asennus merkitsee loukkaantumisvaaraa.
Asennus
Q
Vanhingoittuneet osat voivat vaikuttaa turvalli-
suuteen ja toimintaan.
Pystytyspaikan valinta
m VAROITUS! Älä jätä lapsia koskaan ilman
Q
valvontaa! Tuote ei ole kiipeilyteline eikä leikki-
kalu! Varmista, ettei kukaan (erityisesti lapset)
Maapohjan tulisi olla tasainen, puhdas ja siinä ei
kiipeä tuotteen päälle tai nojaudu sitä vasten.
saisi olla epätasaisuuksia. Poista siitä ennen pysty-
Tuote saattaa menettää tasapainonsa ja kaa-
tystä terävät ja teräväreunaiset esineet (esim. kivet,
tua. Seurauksena saattaa olla loukkaantuminen
oksat jne.).
ja / tai esinevahinko.
j
m VAROITUS! LOUKKAANTUMISVAARA!
O ta pystytyspaikkaa valitessasi huomioon, että
Älä missään nimessä asenna tai käytä tuotetta
rantasimpukan pohjan vaativan tilan lisäksi tulisi
kovassa tuulessa.
tilaa jäädä vielä kiristysnaruille
J
V alitse teltan paikaksi mahdollisimman kiinteä,
edelleen, että rantasimpukan ympärille jää tar-
tasainen paikka.
peeksi kulkutilaa eikä sinne synny kompastus-
J
H iekkainen maa heikentää teltan tukevuutta.
loukkuja.
Etsi teltalle sellainen paikka, johon maakiilat
voi kiinnittää tukevasti maahan.
GB/IE
4
. Varmistaudu
FI
11.12.13 08:16

Verwandte Anleitungen für Crivit Z31981


Inhaltszusammenfassung für Crivit Z31981
- Seite 1 BEACH SHELTER BEACH SHELTER RANTATELTTA Assembly and safety advice Asennus- ja turvaohjeet STRANDTÄLT STRANDTELT Monterings- och säkerhetsanvisningar Montage- og sikkerhedsanvisninger STRANDMUSCHEL Montage- und Sicherheitshinweise IAN 55933 Beach Shelter Rantateltta J S andy surfaces reduce the stability of the beach shelter. You should also ensure that there J Ä...
- Seite 2 Schimmel, Geruch und Verfärbungen vor. D-74167 Neckarsulm Spielgerät! Stellen Sie sicher, dass Personen, det werden. insbesondere Kinder nicht auf das Produkt Model-No.: Z31981 Entsorgung klettern bzw. sich nicht am Produkt anlehnen. Version: 01 / 2014 Montage Das Produkt könnte aus dem Gleichgewicht kommen und umkippen.