ARRI M 18 Bedienungsanleitung
Vorschau ausblenden
Andere Handbücher für ARRI M 18:
- Kurzanleitung (6 Seiten) ,
- Bedienungsanleitung (12 Seiten) ,
- Bedienungsanleitung (10 Seiten)
Werbung
Quicklinks
Kurzanleitung
Short Instructions
Stand: 07 / 2009
Status: 07 / 2009
ARRI M 18
ARRI AS 18
Arnold & Richter Cine Technik GmbH & Co. Betriebs KG
D-83071 Stephanskirchen
Germany
Kontaktinformationen unter WWW.ARRI.COM
For contact information visit WWW.ARRI.COM
Ident.No. L5.37689.0
Werbung

Verwandte Anleitungen für ARRI ARRI M 18


Inhaltszusammenfassung für ARRI ARRI M 18
- Seite 1 Kurzanleitung Short Instructions Stand: 07 / 2009 Status: 07 / 2009 ARRI M 18 ARRI AS 18 Arnold & Richter Cine Technik GmbH & Co. Betriebs KG D-83071 Stephanskirchen Germany Kontaktinformationen unter WWW.ARRI.COM For contact information visit WWW.ARRI.COM Ident.No. L5.37689.0...
- Seite 2 Allgemeine Hinweise: Notes: ARRI M 18 and AS 18 lampheads are intended for professional Die ARRI-Scheinwerfer M 18 und AS 18 sind für den studio and location applications and may only be operated by professionellen Einsatz im Studio und bei Außenaufnahmen qualified persons.
- Seite 3 50Nm / 37 foot pounds of Den Stativzapfen (1) und das Distanzstück (1a) auf die torque. Bohrung im Haltebügel aufsetzen, Schraube mit Scheibe und (For questions see ARRI Service Locations, p. 6 or www.ARRI.com). Federring eindrehen und mit Drehmomentschlüssel auf 50Nm Stativzapfen / spigot festziehen.
- Seite 4 "Lampenwechsel / Einsetzen der Lampe"). Anschluss des Vorschaltgerätes Connecting the Ballast Verwenden Sie ausschließlich ARRI-Vorschaltgeräte! Only use ARRI ballasts! Otherwise a safe operation of your Nur so kann ein sicherer Betrieb Ihres ARRI-Scheinwerfers ARRI lamphead cannot be guaranteed. gewährleistet werden.
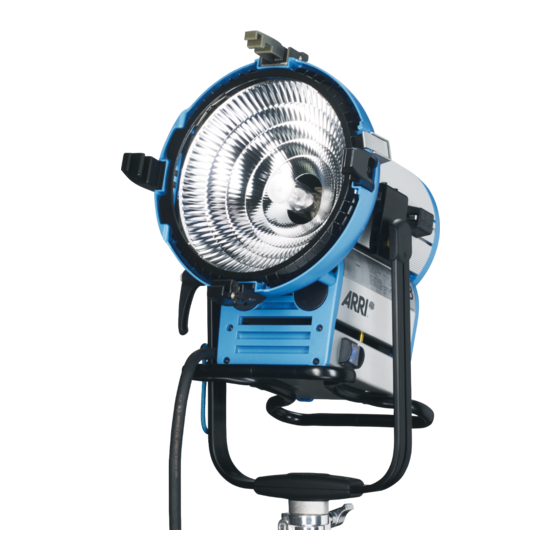
- Seite 5 Weitere Besonderheiten der M 18 / AS 18 Scheinerwerfer Further Special Features of M 18 / AS 18 Lampheads Doppelschutzglas (beide UV-beschichtet) (15) für Double protection glass (both UV coated) (15) for ideal lighting optimale Lichtausbringung. performance. Lampenfassung (27) passend für G38 -Lampensockel. Lamp holder (27) suitable for G38 lamp socket.
-
Seite 6: Pflegehinweise
Please also read our leaflet "Operating Your ARRI Lampheads "Sicherheitsmerkblatt: ARRI-Scheinwerfer"; L5.40731.D Safely"; L5.40731.E. For any techical questions please contact our International Lighting Product Support at LPS@ARRI.COM or our local ARRI Service Centers. Internet: WWW.ARRI.COM Technische Änderungen vorbehalten! Design and specifications subject to change without notice!