Herunterladen Inhalt Inhalt Diese Seite drucken

Werbung

Verfügbare Sprachen
  • DE

Verfügbare Sprachen

  • DEUTSCH, seite 10
NO
Brukerveiledning
GB
Installation manual
SE
Installationsanvisning
FI
Asennusohje
DE
Montageanleitung
FR
Manuel d'installation
Art.no: FP-PRA00-100
Last updated: 12.04.2018
Test Report No: SPFR 20012-20B1
2
4
6
8
10
14
Praha / Praha high
!kg

Werbung

Inhaltsverzeichnis
loading

Inhaltszusammenfassung für Nordpeis Praha

  • Seite 1 Brukerveiledning Installation manual Installationsanvisning Asennusohje Montageanleitung Manuel d’installation Praha / Praha high Art.no: FP-PRA00-100 Last updated: 12.04.2018 Test Report No: SPFR 20012-20B1...
  • Seite 2: Viktige Sikkerhetsregler

    Det kan i hvor ildstedet er montert. Nordpeis AS er ikke ansvarlig så fall føre til overoppheting, som igjen kan føre til for feilmontering av ildstedet.
  • Seite 3 Gulvplate: Installasjon av ildsteder må i tillegg være i henhold til Sørg for å følge lokale lover og regler vedrørende det enkelte lands lover og regler. Nordpeis AS står ikke tildekking av brennbart gulv. ansvarlig for feilmontering av ildstedet. Måltegninger (FIG 1 Praha = mm) Vi tar forbehold om trykkfeil og endringer.
  • Seite 4: Viktiga Säkerhetsvarningar

    Kunden ansvarar för att på omgivande material. följa bestämmelserna som gäller i landet/regionen där eldstaden installeras. Nordpeis AS tar inget 2. Läs bruksanvisningen innan användning, och följ alla ansvar för felaktig installation. anvisningar.
  • Seite 5 Installationen av insatsen måste utföras i enlighet med monteringsanvisningarna för friskluftstillförseln. de lagar och bestämmelser som gäller i landet där den installeras. Nordpeis AS tar inget ansvar för felaktigt Säkerhetsavstånd (FIG 2, FIG 2A) installerade insatser. Kontrollera att säkerhetsavstånden är uppfyllda.
  • Seite 6: Important Safety Precautions

    2. Before use, please carefully read the user manual with in the country/region where the fireplace and follow the instructions. is installed. Nordpeis AS is not responsible for incorrect installation. 3. Integrated or defined convection openings may never be reduced or partially obstructed. This may...
  • Seite 7 (See FIG Praha =AIR). Seal off the gap We accept no liability for typographical errors and between the fresh air hose and the concrete with a changes.
  • Seite 8: Yleistä Tietoa

    Asiakas on velvollinen 2. Lue käyttöohje huolellisesti ennen käyttöä ja huolehtimaan siitä, että takan asennuspaikan noudata ohjeita. määräyksiä noudatetaan. Nordpeis AS ei vastaa virheellisestä asennuksesta. 3. Kiinteitä tai määriteltyjä kiertoilma-aukkoja ei saa koskaan pienentää tai peittää edes Tärkeää tarkastettavaa osittain.
  • Seite 9 HUOMAA! Palamisilmasarja voidaan liittää Tummaan marmoriin syntyneet naarmut voi värittää tuotteeseen ainoastaan esileikatuista kohdista (ks. lyijykynällä. Tuotteita kivipinnan käsittelyyn saat kivialan KUVA 1a, Praha = ILMA). Sulje palamisilmaputken ja ammattilaisliikkeistä. betonin välinen rako palamattomalla tiivistysaineella (esim. Rockwool). Noudata asennusohjeita oman turvallisuutesi vuoksi.
  • Seite 10: Wichtige Sicherheitshinweise

    Installation der Feuerstätte selbst verantwortlich. Die Bedienungsanleitung und befolgen Sie die Aufbau – und Bedienungsanleitung ist zu beachten. Anweisungen. Nordpeis / Northstar haftet nicht für unsachgemäße Installation oder unsachgemäßen Betrieb. 3. Integrierte oder anders hergestellte Konvektionsöff Bitte halten Sie sich an die länderspezifischen, nungen dürfen niemals reduziert oder teilweise über...
  • Seite 11 Vorschriften. mit Spachtelmasse zu füllen, um ein Schwinden der Füllmasse zu vermeiden. Anschließend mit einem Nordpeis AS / Northstar übernehmen für falsch montierte oder verändert montierte Kaminanlagen keine Verantwortung, feuchten Schwamm oder einer Kelle glätten und nach Haftung und / oder Gewährleistung.
  • Seite 12 Während des Anheizens sollte der Aufstellraum gut ist DIN EN 13384-1 bzw. DIN EN 13384-2 anzuwenden. belüftet werden. Ein schnelles Durchlaufen Der Raumheizer Praha ist eine Zeitbrand-Feuerstätte. der Anheizphase ist wichtig, da bei Bedienungsfehlern höhere Emissionswerte auftreten können. Sobald Verbrennungsluft das Anzündmaterial gut angebrannt ist, wird weiterer...
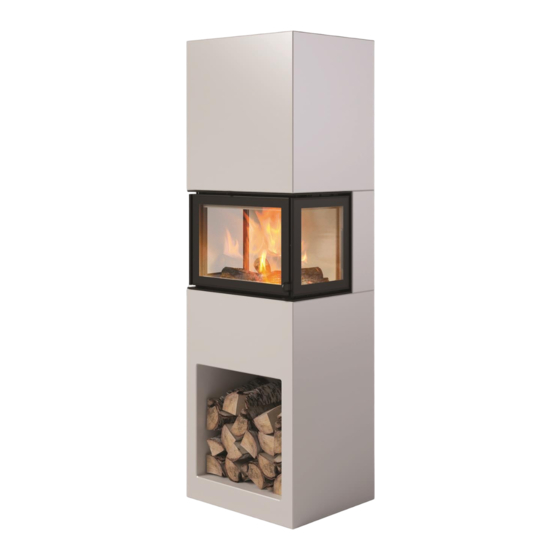
  • Seite 13 Möbel aufgestellt werden. Dieser Abstand kann auf 40 Mindestgröße der Hitzeschutzwand cm verringert werden, wenn zwischen Feuerstätte und Praha verfügt über eine integrierte Hitzeschutzwand brennbaren Bauteilen ein beidseitig belüftetes und kann direkt vor eine brennbare Wand montiert Strahlschutzblech aufgestellt wird.
  • Seite 14: Consignes De Sécurité Importantes

    / votre 3. Les ouvertures de convection intégrées ou désignées pays. Nordpeis (Northstar) ne saurait en aucun cas être tenu responsable de l’installation. ne doivent jamais être totalement ou partiellement obstruées.
  • Seite 15 Nordpeis AS ne saurait être tenu responsable d’un montage défectueux d’un insert ou d’un poêle. Nordpeis se réserve le droit de modifier, à tout moment et sans préavis, les caractéristiques techniques et dimensionnelles deses produits. NB! Voir le manuel d’installation séparé pour le...
  • Seite 16 Du trenger følgende verktøy You need the following tools SE Du behöver följande verktyg FI Tarvitset seuraavia työkaluja DE Folgende Werkzeuge sind notwendig. Vous avez besoin des outils suivants 10 mm 13 mm 17 mm...
  • Seite 17 FIG 1a - Praha / N-20U=mm...
  • Seite 18 FIG 1b - Praha high / N-20U=mm...
  • Seite 19 Praha ; Praha high / N-20U = Air / Chimney connection = mm FIG 1B Revision note: Revision b Created Name: Praha K.Kości Checked Nordpeis AS Gjellebekkstubben 11 Approved N-3420 LIIERSKOGEN, Norwey Praha...
  • Seite 20 Praha/ N-20U FIG 2 =Firewall/ Hitzenschutzwand / Mur parfeu / Parete non combustibile =Combustible material / Brennbarem Material / Matières combustibles/ Parete combustibile >700 mm 90 ⁰ >1000 >1000 mm >400 >700 mm 0 mm...
  • Seite 21 Praha / N-20U FIG 3 CO-PRA00-010 x1 CO-PRA00-020 x1 Praha / N-20U FIG 4 Air (*) Ø 80 (*) Air / Luft / Ilma...
  • Seite 22 Praha / N-20U FIG 4b ⁰ ⁰ FIG: 5, 5a, 8 FIG: 5b, 5c, 8a Se egen monteringsanvisning for innsatsen / See separate instruction for the insert Se egen monteringsanvisning för insatsen / Voir le manuel d’installation séparé pour le foyer...
  • Seite 23 Praha / N-20U FIG 5 17 mm 13 mm Praha / N-20U FIG 5a 13 mm...
  • Seite 24 Praha / N-20U FIG 5b 13 mm Praha / N-20U FIG 5c 13 mm...
  • Seite 25 Praha / N-20U FIG 6 CO-PRA00-030 x1 Praha / N-20U FIG 7 22-LIS00-020 x2 21-50001-018 x8 21-30004-016 x8...
  • Seite 26 Schienen in den Langlöchern zu verschieben. Les équerres doivent être vissées sur l’habillage de manière lâche de façon à pouvoir ajuster l’habillage en alignant les trois pièces. Praha / N-20U FIG 8 CO-PRA00-01B x2...
  • Seite 27 Praha / N-20U FIG 8a CO-PRA00-01B x2 FIG 9 +/- 3 mm 16 mm...
  • Seite 28 Praha / N-20U FIG 10 Praha / N-20U FIG 10a...
  • Seite 29 Praha / N-20U FIG 11 22-PRA00-050 FIG 11a 22-PRA00-060 x1 21-40009-013 x2...
  • Seite 30 Praha / N-20U FIG 12 CO-PRA00-040 Praha / N-20U FIG 13 x3 A 21-50001-018 x6 x3 B 21-30004-016 x6...
  • Seite 31 FIG 13a +/- 3 mm +/- 0 mm FIG 14 10 mm Stram til alle mutterne tilhørende stålprofilen. Start fra bunnen A og B x3 A Spänn alla muttrarna till stålprofilen. Starta från botten A & B Kiristä kaikki kiinnitysruuvit. Aloita alimmista - kohdat A&B.
  • Seite 32 Praha / N-20U FIG 15 22-PRA00-010 x1 Praha / N-20U FIG 15b 236 mm >...
  • Seite 33 Praha high / N-20U FIG 16 Praha high / N-20U FIG 16b 236 mm >...
  • Seite 34 Praha high / N-20U FIG 17 Praha high / N-20U FIG 18...
  • Seite 35 Praha; Praha high / N-20U FIG 19 FIG Z...
  • Seite 36 Double allocation is acceptable / Enspricht folgenden Standards: Prüfbericht Nr : Complies with / Test report / Art 15a B-VG RRF- SPFR- 20012-20B1 LRV of Switzerland BlmSchV Level 1, 2 NS 3058 / 3059 Nordpeis AS, Gjellebekkstubben 11, N-3420 LIERSKOGEN, Norway www.nordpeis.no...

Diese Anleitung auch für:

Praha high

Inhaltsverzeichnis