Inhaltsverzeichnis
Werbung
Verfügbare Sprachen
Verfügbare Sprachen
Quicklinks
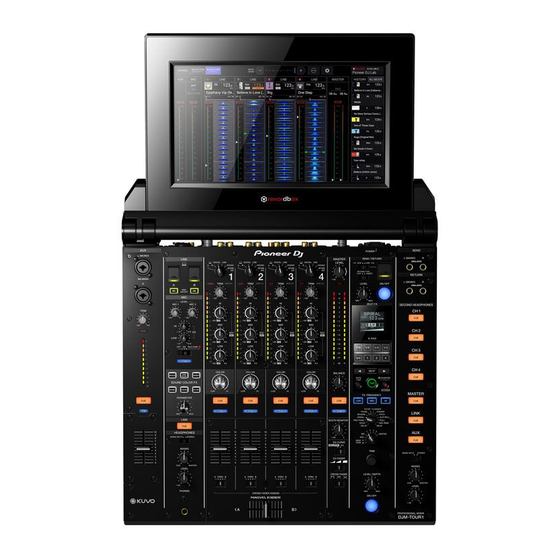
DJM-TOUR1
http://pioneerdj.com/support/
http://rekordbox.com/
http://kuvo.com/
The Pioneer DJ site shown above offers FAQs, information on software, and various other types of information
and services to allow you to use your product in greater comfort.
For various types of information and services regarding rekordbox™, see the Pioneer DJ website above.
For various types of information and services regarding KUVO, see the Pioneer DJ website above.
Le site Pioneer DJ indiqué ci-dessus propose une FAQ, des informations sur le logiciel et divers types
d'informations et de services qui permettent une utilisation plus confortable de ce produit.
Pour les différents types d'informations et de services concernant rekordbox™, consultez le site Pioneer DJ
ci-dessus.
Pour les différents types d'informations et de services concernant KUVO, consultez le site Pioneer DJ
ci-dessus.
Die oben angegebene Pioneer DJ-Website enthält häufig gestellte Fragen, Informationen über Software und
andere wichtige Informationen und Dienste, die Ihnen helfen, Ihr Produkt optimal zu verwenden.
Weitere Informationen und Dienste bezüglich rekordbox™ finden Sie auf der oben angegebenen Pioneer
DJ-Website.
Weitere Informationen und Dienste bezüglich KUVO finden Sie auf der oben angegebenen Pioneer
DJ-Website.
Il sito Pioneer DJ indicato qui sopra offre una sezione FAQ, informazioni sul software ed informazioni e servizi
di vario tipo, per permettere un uso più confortevole dei nostri prodotti.
Per quanto riguarda vari tipi di informazione e servizi riguardanti rekordbox™, vedere il sito Pioneer DJ
menzionato qui sopra.
Per quanto riguarda vari tipi di informazione e servizi riguardanti KUVO, vedere il sito Pioneer DJ menzionato
qui sopra.
Operating Instructions (Quick Start Guide)
Mode d'emploi (Guide de démarrage rapide)
Bedienungsanleitung (Kurzanleitung)
Istruzioni per l'uso (Guida di avvio veloce)
DJ MIXER
TABLE DE MIXAGE
DJ-MISCHPULT
MIXER PER DJ
Werbung
Kapitel
Inhaltsverzeichnis
Fehlerbehebung

Verwandte Anleitungen für Pioneer DJM-TOUR1


Inhaltszusammenfassung für Pioneer DJM-TOUR1
- Seite 1 Weitere Informationen und Dienste bezüglich KUVO finden Sie auf der oben angegebenen Pioneer DJ-Website. Il sito Pioneer DJ indicato qui sopra offre una sezione FAQ, informazioni sul software ed informazioni e servizi di vario tipo, per permettere un uso più confortevole dei nostri prodotti.
- Seite 2 CAUTION CAUTION TO PREVENT THE RISK OF ELECTRIC SHOCK, DO NOT The POWER switch on this unit will not completely REMOVE COVER (OR BACK). NO USER-SERVICEABLE shut off all power from the AC outlet. Since the power PARTS INSIDE. REFER SERVICING TO QUALIFIED cord serves as the main disconnect device for the SERVICE PERSONNEL.
- Seite 3 (2) this device must accept any interference received, including interference that may cause undesired operation. Product Name: DJ MIXER Model Number: DJM-TOUR1 Responsible Party Name: PIONEER ELECTRONICS (USA) INC. SERVICE SUPPORT DIVISION Address: 1925 E. DOMINGUEZ ST. LONG BEACH, CA 90810-1003, U.S.A. Phone: 1-800-421-1404 URL: http://www.pioneerelectronics.com...
-
Seite 4: Inhaltsverzeichnis
Thank you for buying this Pioneer DJ product. Be sure to read this manual and the Operating Instructions that is avail- able on the Pioneer DJ site. Both contain important information that you should understand before using this product. In particular, be sure to read “IMPORTANT SAFETY INSTRUCTIONS.”... -
Seite 5: Acquiring This Unit's Operating Instructions
Pioneer DJ site below. http://www.pioneerdj.com/ 2 Click [Support]. 3 Click the [FIND TUTORIALS & MANUALS] icon. 4 Click the [DJM-TOUR1] icon in the [MIXER] category. 5 Click on the required language on the download page. Preparing the software About the driver software This driver software is an exclusive driver for outputting audio signals from a computer. -
Seite 6: Part Names And Functions
Part names and functions Rear panel, front panel PHONES LINK WORD CLOCK INTERNET EXTENSION 75Ω OFF ON BOOTH DIGITAL OUT DIGITAL IN MASTER1 MASTER2 REC OUT AES/EBU 1 Kensington security slot 9 INTERNET terminal Connect to a router, etc. that is connected to the Internet. Used when 2 POWER button (page 13 ) connecting with the KUVO system. - Seite 7 Be careful not to accidentally insert the power cord of another unit. e LINK CH terminal (page 11 ) Connect to the LINK terminal of a DJ player of Pioneer DJ (PRO DJ LINK). f BOOTH terminals (page 12 ) These are output terminals for a booth monitor.
-
Seite 8: Control Panel
Control Panel SEND / RETURN SEND / RETURN SEND L (MONO) L (MONO) SEND / RETURN MASTER UNBALANCE DIGITAL LINE DIGITAL LINE DIGITAL LINE LEVEL DIGITAL LINE PHONO PHONO PHONO PHONO RETURN RETURN RETURN RETURN SEND / RETURN RETURN BALANCE L (MONO) TRIM TRIM... - Seite 9 9 TILTABLE DISPLAY u BALANCE control For details on how to use the TILTABLE DISPLAY, see the operating Adjusts the left/right balance of the sound output from the instructions. [MASTER1] terminals, etc. a PHONES terminal (page 13 ) v BOOTH MONITOR control (page 13 ) Connect headphones here.
- Seite 10 Q SEND terminals (page 12 ) Connect to the input terminal of an external effector. When [L (MONO)] only is connected, monaural audio is output. R RETURN terminals (page 12 ) Connect to the output terminal of an external effector. When the [L (MONO)] channel only is connected, the [L (MONO)] channel input is simultaneously input to the [R] channel.
-
Seite 11: Connections
Connections Be sure to turn off the power and unplug the power cord from the power outlet whenever making or changing connections. Connect the power cord after all the connections between devices have been completed. Be sure to use the included power cord. Refer to the operating instructions for the component to be connected. -
Seite 12: Connecting Output Terminals
1 Do not push or pull hard on a USB port cover. It could be damaged. 2 When connecting a mobile device, use the cable supplied with the device. For information on compatible mobile devices, see the Pioneer DJ site below. http://pioneerdj.com/support/... -
Seite 13: Operation
Operation Basic Operation 3 Turn the [MIC1 LEVEL] control or [MIC2 LEVEL] control. Adjust the level of the sound output from the [MIC] channel. Outputting sound ! Pay attention that rotating to the extreme right position outputs a very loud sound. 1 Press [POWER] button. -
Seite 14: Additional Information
Sometimes the problem may lie in another component. Inspect the other components and electrical appliances being used. If the problem cannot be rectified, ask your nearest Pioneer authorized service center or your dealer to carry out repair work. ! This unit may not operate properly due to static electricity or other external influences. In such cases, normal operation may be restored by unplug- ging the power cord then plugging it back in. -
Seite 15: Specifications
! The specifications and design of this product are subject to change Total harmonic distortion (LINE — MASTER1) ........0.005 % without notice. Standard input level / Input impedance © 2016 Pioneer DJ Corporation. All rights reserved. PHONO................–52 dBu/47 kΩ LINE .................. –12 dBu/47 kΩ MIC1, MIC2 ................ –52 dBu/8 kΩ... -
Seite 16: Milieu De Fonctionnement
Si vous souhaitez vous débarrasser de cet appareil, ne le mettez pas à la poubelle avec vos ordures ménagères. Il existe un système de collecte séparé pour les appareils électroniques usagés, qui doivent être récupérés, traités et recyclés conformément à la législation. Les habitants des états membres de l’UE, de Suisse et de Norvège peuvent retourner gratuitement leurs appareils électroniques usagés aux centres de collecte agréés ou à... - Seite 17 Comment lire ce manuel Merci d’avoir acheté ce produit Pioneer DJ. Veillez à lire ce manuel et le mode d’emploi disponible sur le site Pioneer DJ. Ces deux documents contiennent des informations importantes que vous devez comprendre avant d’utiliser ce produit.
-
Seite 18: Informations Préliminaires
Informations préliminaires Caractéristiques 4 Cliquez sur l’icône [DJM-TOUR1] dans la catégorie [MIXER]. Cet appareil est une table de mixage pour DJ professionnels, offrant 5 Cliquez sur [Drivers], puis téléchargez le pilote le plus une grande variété de fonctions et la résistance et maniabilité exigées pour le travail dans les discothèques et boîtes de nuit mais également... -
Seite 19: Noms Et Fonctions Des Éléments
Noms et fonctions des éléments Panneau arrière, panneau avant PHONES INTERNET LINK WORD CLOCK EXTENSION 75Ω OFF ON MASTER1 MASTER2 REC OUT BOOTH DIGITAL OUT DIGITAL IN AES/EBU 1 Fente de sécurité Kensington 9 Prise INTERNET Raccordez à un routeur, etc. connecté à Internet. Utilisée lors de la 2 Touche POWER (page 12 ) connexion avec le système KUVO. - Seite 20 Veillez à ne pas insérer accidentellement le cordon d’alimenta- tion d’un autre appareil. e Prise LINK CH (page 10 ) Raccordez à la prise LINK d’un lecteur DJ de Pioneer DJ (PRO DJ LINK). f Prises BOOTH (page 11 ) Ce sont des prises de sortie pour la surveillance en cabine.
-
Seite 21: Panneau De Commande
Panneau de commande SEND / RETURN SEND / RETURN SEND L (MONO) L (MONO) MASTER SEND / RETURN UNBALANCE DIGITAL LINE DIGITAL LINE DIGITAL LINE DIGITAL LINE LEVEL PHONO PHONO PHONO PHONO RETURN RETURN RETURN RETURN SEND / RETURN RETURN BALANCE L (MONO) CLIP... - Seite 22 8 Touche de déverrouillage du TILTABLE DISPLAY u Commande BALANCE Débloque le verrou lorsque le TILTABLE DISPLAY est fermé. Ajuste la balance gauche/droite du son présent à la sortie des prises [MASTER1], etc. 9 TILTABLE DISPLAY v Commande BOOTH MONITOR (page 12 ) Pour en savoir plus sur l’utilisation du TILTABLE DISPLAY, repor- tez-vous au mode d’emploi.
- Seite 23 P Touche ON/OFF de l’effet calé sur le tempo Active et désactive BEAT FX. Q Prises SEND (page 11 ) Raccordez à la prise d’entrée d’un générateur d’effets externe. Lorsque seulement [L (MONO)] est raccordé, le son monaural est émis. R Prises RETURN (page 11 ) À...
-
Seite 24: Raccordements
Raccordements Veillez à toujours éteindre les appareils et à débrancher le cordon d’alimentation de la prise secteur avant de raccorder un appareil ou de changer les liaisons. Lorsque tous les appareils ont été raccordés, vous pouvez brancher le cordon d’alimentation. Veillez à... -
Seite 25: Raccordement Des Prises De Sortie
1 Ne poussez pas ou ne tirez pas avec force sur un cache de port USB. Il pourrait être endommagé. 2 Lorsque vous connectez un dispositif portable, utilisez le câble fourni avec l’appareil. Pour en savoir plus sur les dispositifs portables compatibles, consultez le site Pioneer DJ ci-dessous. http://pioneerdj.com/support/... -
Seite 26: Fonctionnement
Fonctionnement Opérations de base 3 Tournez la commande [MIC1 LEVEL] ou la commande [MIC2 LEVEL]. Ajustez le niveau du son provenant du canal [MIC]. ! Attention, car une rotation jusqu’à la position extrême droite produit Restitution du son un son très fort. 1 Appuyez sur la touche [POWER]. -
Seite 27: Informations Supplémentaires
Parfois, le problème peut provenir d’un autre composant. Examinez les autres composants et les appareils électriques utilisés. Si le problème ne peut pas être résolu, contactez votre service après-vente agréé Pioneer ou votre revendeur pour une réparation. ! Cet appareil peut ne pas fonctionner correctement à cause de l’électricité statique ou d’autres influences externes. Le cas échéant, le fonctionne- ment normal peut être rétabli en débranchant, puis rebranchant le cordon d’alimentation. -
Seite 28: Spécifications
Distorsion harmonique totale (LINE — MASTER1) ......0,005 % avis préalable, dans un souci d’amélioration. Niveau d’entrée standard / Impédance d’entrée © 2016 Pioneer DJ Corporation. Tous droits de reproduction et de tra- PHONO................–52 dBu/47 kΩ duction réservés. LINE .................. –12 dBu/47 kΩ... -
Seite 30: Betriebsumgebung
Mischen Sie dieses Produkt, wenn Sie es entsorgen wollen, nicht mit gewöhnlichen Haushaltsabfällen. Es gibt ein getrenntes Sammelsystem für gebrauchte elektronische Produkte, über das die richtige Behandlung, Rückgewinnung und Wiederverwertung gemäß der bestehenden Gesetzgebung gewährleistet wird. Privathaushalte in den Mitgliedsstaaten der EU, in der Schweiz und in Norwegen können ihre gebrauchten elektronischen Produkte an vorgesehenen Sammeleinrichtungen kostenfrei zurückgeben oder aber an einen Händler zurückgeben (wenn sie ein ähnliches neues Produkt kaufen). -
Seite 31: Zum Lesen Dieser Anleitung
Zum Lesen dieser Anleitung Vielen Dank, dass Sie sich für dieses Pioneer DJ-Produkt entschieden haben. Lesen Sie bitte unbedingt dieses Handbuch und die auf der Pioneer DJ-Website erhältliche Bedienungsanleitung. Beide enthalten wichtige Informationen, die Sie vor der Verwendung dieses Produkts verstehen sollten. -
Seite 32: Vor Der Inbetriebnahme
3 Klicken Sie auf das [FIND SOFTWARE & FIRMWARE UPDATES]-Symbol. Bei diesem Gerät handelt es sich um einen Mixer für professionelle 4 Klicken Sie auf das [DJM-TOUR1]-Symbol in der DJs, der sich durch seine große Funktionsvielfalt, seine Haltbarkeit und seine Benutzerfreundlichkeit auszeichnet und sich somit nicht nur [MIXER]-Kategorie. -
Seite 33: Bezeichnungen Und Funktionen Der Komponenten
Bezeichnungen und Funktionen der Komponenten Rückseite, Vorderseite PHONES LINK WORD CLOCK INTERNET EXTENSION 75Ω OFF ON MASTER1 MASTER2 REC OUT BOOTH DIGITAL OUT DIGITAL IN AES/EBU 1 Kensington-Diebstahlsicherung 6 SIGNAL GND-Buchse (Seite 10 ) Hier wird der Massedraht eines Plattenspielers angeschlossen. 2 POWER-Taste (Seite 12 ) Dadurch wird Rauschen beim angeschlossenem Plattenspieler Schalten Sie die Stromversorgung dieses Geräts ein und aus. -
Seite 34: Word Clock
Stecken Sie nicht versehentlich das Netzkabel eines anderen Geräts ein. e LINK CH-Buchse (Seite 10 ) Zum Anschluss an die LINK-Buchse eines DJ-Players von Pioneer DJ (PRO DJ LINK). f BOOTH-Buchsen (Seite 11 ) Dies sind Ausgangsbuchsen für einen Kabinenmonitor. -
Seite 35: Bedienpult
Bedienpult SEND / RETURN SEND / RETURN SEND L (MONO) L (MONO) MASTER SEND / RETURN UNBALANCE DIGITAL LINE DIGITAL LINE DIGITAL LINE DIGITAL LINE LEVEL PHONO PHONO PHONO PHONO RETURN RETURN RETURN RETURN SEND / RETURN RETURN BALANCE L (MONO) CLIP TRIM DECK 3/C... - Seite 36 8 TILTABLE DISPLAY-Entriegelungstaste t Master-Pegelanzeige (Seite 12 ) Zum Lösen der Sperre, die bei geschlossenem TILTABLE DISPLAY Zeigt den Audiopegelausgang von den Buchsen [MASTER1] und aktiviert ist. [MASTER2] an. 9 TILTABLE DISPLAY u BALANCE-Regler Entnehmen Sie Einzelheiten zur Verwendung des TILTABLE Stellt die Links/Rechts-Balance der Soundausgabe von den Buchsen DISPLAYS der Bedienungsanleitung.
- Seite 37 O LEVEL/DEPTH-Regler Stellt die quantitativen Parameter von BEAT FX ein. P Beat-Effekt-ON/OFF-Taste Schaltet BEAT FX ein und aus. Q SEND-Buchsen (Seite 11 ) Zum Anschluss an den Eingang eines externen Effektors. Wenn nur [L (MONO)] angeschlossen ist, wird Mono-Ton ausgegeben. R RETURN-Buchsen (Seite 11 ) Schließen Sie an die Ausgangsbuchse eines externen Effektors an.
-
Seite 38: Anschlüsse
Anschlüsse Schalten Sie die Stromversorgung aus und ziehen Sie das Netzkabel aus der Netzsteckdose, bevor Sie Geräte anschließen oder die Anschlüsse ändern. Schließen Sie das Netzkabel an, nachdem alle Anschlüsse zwischen den Geräten vorgenommen wurden. Verwenden Sie immer das mitgelieferte Netzkabel. Beachten Sie die Bedienungsanleitung der angeschlossenen Komponente. -
Seite 39: Anschließen Der Ausgangsbuchsen
1 Drücken oder ziehen Sie nicht zu kräftig an der USB-Anschlussabdeckung. Sie könnte beschädigt werden. 2 Verwenden Sie für den Anschluss eines Mobilgeräts das mit dem Gerät gelieferte Kabel. Informationen zu kompatiblen Mobilgeräten finden Sie auf der Pioneer DJ Website unten. http://pioneerdj.com/support/... -
Seite 40: Bedienung
Bedienung ! Der TALK OVER-Modus kann auf den normalen Modus oder erweiter- Grundlegender Betrieb ten Modus umgeschaltet werden. Entnehmen Sie Einzelheiten zum Ändern des Modus der Bedienungsanleitung. Tonausgabe 3 Drehen Sie den [MIC1 LEVEL]- oder [MIC2 LEVEL]-Regler. 1 Drücken Sie die Taste [POWER]. Stellen Sie den Pegel des Soundausgangs vom Kanal [MIC] ein. -
Seite 41: Zusätzliche Informationen
Manchmal wird das Problem auch durch ein externes Gerät verursacht. Überprüfen Sie die anderen verwendeten Komponenten und elektrischen Geräte. Wenn Sie das Problem nicht beheben können, wenden Sie sich an die nächste Pioneer-Kundendienststelle oder an Ihren Händler zum Ausführen der Reparaturarbeit. -
Seite 42: Technische Daten
! Änderungen der technischen Daten und das Design dieses Geräts Gesamtklirrfaktor (LINE — MASTER1) ..........0,005 % ohne vorherige Ankündigung bleiben vorbehalten. Standard-Eingangspegel / Eingangsimpedanz © 2016 Pioneer DJ Corporation. Alle Rechte vorbehalten. PHONO................–52 dBu/47 kΩ LINE .................. –12 dBu/47 kΩ MIC1, MIC2 ................ –52 dBu/8 kΩ... -
Seite 44: Condizioni Ambientali Di Funzionamento
Se si vuole eliminare questo prodotto, non gettarlo insieme ai rifiuti domestici. Esiste un sistema di raccolta differenziata in conformità alle leggi che richiedono appositi trattamenti, recupero e riciclo. I privati cittadini dei paesi membri dell’UE, di Svizzera e Norvegia, possono restituire senza alcun costo i loro prodotti elettronici usati ad appositi servizi di raccolta o a un rivenditore (se si desidera acquistarne uno simile). - Seite 45 Indice Come leggere questo manuale Vi ringraziamo per avere acquistato questo prodotto Pioneer DJ. Leggere questo manuale e le istruzioni operative presenti sul sito Pioneer DJ. Entrambi contengono importanti informazioni che è neces- sario comprendere prima di usare il prodotto.
-
Seite 46: Prima Di Cominciare
Prima di cominciare Caratteristiche 4 Fare clic sull’icona [DJM-TOUR1] nella categoria [MIXER]. Questa unità è un mixer per DJ professionisti, che offre la varietà delle 5 Dopo aver fatto clic su [Drivers], scaricare il software funzioni, la lunga durata e la funzionalità necessarie per esibizioni non solo in discoteche e nightclub, ma anche in grandi festival musicali del driver più... -
Seite 47: Nome Delle Varie Parti E Funzioni
Nome delle varie parti e funzioni Pannello posteriore, pannello anteriore PHONES LINK WORD CLOCK INTERNET EXTENSION 75Ω OFF ON MASTER1 MASTER2 REC OUT BOOTH DIGITAL OUT DIGITAL IN AES/EBU 1 Slot di sicurezza Kensington 9 Terminale INTERNET Collegare a un router, ecc. collegato a Internet. Utilizzato per il colle- 2 Pulsante POWER (pagina 12 ) gamento al sistema KUVO. - Seite 48 Fare attenzione a non collegare accidentalmente il cavo di alimentazione di un’altra unità. e Terminale LINK CH (pagina 10 ) Collegare al terminale LINK di un lettore DJ prodotto da Pioneer DJ (PRO DJ LINK). f Terminali BOOTH (pagina 11 ) Questi sono terminali di uscita per un monitor da cabina.
-
Seite 49: Pannello Di Controllo
Pannello di controllo SEND / RETURN SEND / RETURN SEND L (MONO) L (MONO) MASTER SEND / RETURN UNBALANCE DIGITAL LINE DIGITAL LINE DIGITAL LINE DIGITAL LINE LEVEL PHONO PHONO PHONO PHONO RETURN RETURN RETURN RETURN SEND / RETURN RETURN BALANCE L (MONO) CLIP... - Seite 50 8 Pulsante di sblocco del TILTABLE DISPLAY t Indicatore del livello principale (pagina 12 ) Rilascia il blocco che viene attivato quando si chiude il TILTABLE Visualizzano il livello di uscita audio dei terminali [MASTER1] e DISPLAY. [MASTER2]. 9 TILTABLE DISPLAY u Controllo BALANCE Per dettagli sull’uso del TILTABLE DISPLAY, vedere le Istruzioni Regolano il bilanciamento di sinistra/destra del suono emesso dai...
- Seite 51 O Controllo LEVEL/DEPTH Regola il parametro quantitativo di BEAT FX. P Pulsante ON/OFF degli effetti delle battute Attiva e disattiva la funzione BEAT FX. Q Terminali SEND (pagina 11 ) Collegare al terminale di ingresso di un’unità effetti esterna. Se viene collegato solo il terminale [L (MONO)], verrà...
-
Seite 52: Collegamento Dei Terminali Di Ingresso
Collegamenti Prima di fare o modificare collegamenti, non mancare di spegnere l’apparecchio e di scollegare il cavo di alimentazione. Collegare il cavo di alimentazione dopo che tutti i collegamenti fra dispositivi sono stati fatti. Usare solo il cavo di alimentazione accluso. Consultare le istruzioni per l’uso del componente da collegare. -
Seite 53: Collegamento Dei Terminali Di Uscita
1 Non spingere o tirare con forza le coperture delle porte USB. Altrimenti, potrebbero subire danni. 2 Quando si collega un dispositivo mobile, utilizzare il cavo fornito in dotazione con il dispositivo. Per informazioni sui dispositivi mobili compatibili, visitare il sito Web di Pioneer DJ in basso. http://pioneerdj.com/support/... -
Seite 54: Uso Di Base
Impiego ! Tenere presente che scegliendo la posizione più a destra si produce Uso di base un volume estremamente alto. 4 Vengono ricevuti segnali audio dal microfono. Emissione di suono 1 Premere il pulsante [POWER]. L’audio viene emesso dal terminale Accendere questa unità. -
Seite 55: Informazioni Aggiuntive
A volte il problema risiede in un altro componente. Controllare tutti i componenti ed apparecchi elettronici usati. Se il problema non può venire eliminato, chiedere assistenza tecnica al più vicino centro assistenza o rivenditore autorizzato Pioneer. ! Questa unità potrebbe non funzionare correttamente per via di elettricità statica o altre influenze esterne. In questi casi, il funzionamento normale può... -
Seite 56: Dati Tecnici
! I dati tecnici ed il design di questo prodotto sono soggetti a modifi- Distorsione armonica complessiva (LINE — MASTER1) ....0,005 % che senza preavviso. Livello/impedenza di ingresso standard © 2016 Pioneer DJ Corporation. Tutti i diritti riservati. PHONO................–52 dBu/47 kΩ LINE .................. –12 dBu/47 kΩ MIC1, MIC2 ................ –52 dBu/8 kΩ... - Seite 60 © 2016 Pioneer DJ Corporation. All rights reserved. © 2016 Pioneer DJ Corporation. Tous droits de reproduction et de traduction réservés. PIONEER ELECTRONICS (THAILAND) CO., LTD. 17th Fl., KPN Tower, 719 Rama 9 Road, Bangkapi, Huaykwang, Bangkok 10310 6F, Yokohama i-Mark Place, 4-4-5 Minatomirai, Nishi-ku, Yokohama, Kanagawa 220-0012 JAPAN TEL: +66-2-717-0777 PIONEER TECHNOLOGY (MALAYSIA) SDN.