Inhaltsverzeichnis
Werbung
Verfügbare Sprachen
Verfügbare Sprachen
Quicklinks
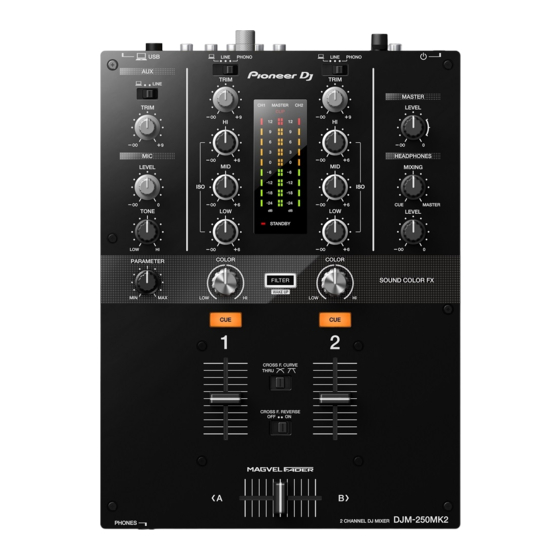
DJM-250MK2
http://pioneerdj.com/support/
http://rekordbox.com/
The Pioneer DJ site shown above offers FAQs, information on software, and various other types of information
and services to allow you to use your product in greater comfort.
Le site Pioneer DJ indiqué ci-dessus propose une FAQ, des informations sur le logiciel et divers types
d'informations et de services qui permettent une utilisation plus confortable de ce produit.
Die oben angegebene Pioneer DJ-Website enthält häufig gestellte Fragen, Informationen über Software und
andere wichtige Informationen und Dienste, die Ihnen helfen, Ihr Produkt optimal zu verwenden.
Il sito Pioneer DJ indicato qui sopra offre una sezione FAQ, informazioni sul software ed informazioni e servizi
di vario tipo, per permettere un uso più confortevole dei nostri prodotti.
Op bovengenoemde Pioneer DJ website vindt u FAQ's, informatie over software, en andere informatie en
diensten voor nog meer gebruiksgemak van uw product.
El sitio de asistencia Pioneer DJ mostrado arriba ofrece las preguntas frecuentes, información del software y
varios otros tipos de información y servicios que le permitirán usar su producto con mayor confort.
O site de suporte da Pioneer DJ mostrado acima oferece FAQs, informações sobre o software e outros tipos
de informações e serviços para permitir utilizar o produto com um maior conforto.
На
а а
а
а
а
а
Operating Instructions (Quick Start Guide)
Mode d'emploi (Guide de démarrage rapide)
Bedienungsanleitung (Kurzanleitung)
Istruzioni per l'uso (Guida di avvio veloce)
Handleiding (Snelstartgids)
Manual de instrucciones (Guía de inicio rápido)
Manual de instruções (Guia de início rápido)
И
Pioneer DJ
а
, а а
а
а
а а
(К а
DJ MIXER
TABLE DE MIXAGE
DJ-MISCHPULT
MIXER PER DJ
DJ MENGPANEEL
MESA DE MEZCLAS DJ
MESA DE MISTURA PARA DJ
DJ
а
а
а а а
а
а
.
,
,
а
)
Werbung
Kapitel
Inhaltsverzeichnis
Fehlerbehebung

Verwandte Anleitungen für Pioneer DJM-250MK2


Inhaltszusammenfassung für Pioneer DJM-250MK2
- Seite 1 Informationen und Dienste, die Ihnen helfen, Ihr Produkt optimal zu verwenden. Il sito Pioneer DJ indicato qui sopra offre una sezione FAQ, informazioni sul software ed informazioni e servizi di vario tipo, per permettere un uso più confortevole dei nostri prodotti.
-
Seite 26: Betriebsumgebung
Vielen Dank, dass Sie sich für dieses Pioneer DJ-Produkt entschieden haben. Bitte lesen Sie diese Bedienungsanleitung gründlich durch, um sich mit derBedienung des Geräts vertraut zu machen. Nachdem Sie die Bedienungsanleitung gelesen haben, legen Sie sie griffbereit zum Nachschlagen ab. - Seite 27 Vielen Dank, dass Sie sich für dieses Pioneer-DJ-Produkt entschieden haben. Lesen Sie unbedingt diese Anleitung und die Bedienungsanleitung, die Sie auf der Pioneer DJ-Website finden. Beide Dokumente enthalten wichtige Informationen, die Sie verstehen sollten, bevor Sie dieses Produkt benutzen. Lesen Sie insbesondere „WICHTIGE SICHERHEITSANWEISUNGEN“.
-
Seite 28: Vor Der Inbetriebnahme
Dieses Gerät ist ein 2-Kanal-DJ-Mixer. Es ist das Neueste aus der DJM- Verschiedene Informationen können auch als Dateien im PDF-Format Serie von Pioneer DJ, dem Weltstandard der Disko- und Clubszene. Das verfügbar sein. Gerät ist mit einer eingebauten Soundkarte ausgestattet, so dass Sie Adobe®... -
Seite 29: Bezeichnungen Und Funktionen Der Komponenten
Bezeichnungen und Funktionen der Komponenten Rückseite 1 Kabelhaken 5 MASTER1-Ausgangsbuchsen (Seite 9) Führen Sie das Netzkabel des Netzteils um den Haken, um ein Schließen Sie Ihre Geräte wie z. B. einen Aktivlautsprecher oder versehentliches Abziehen von diesem Gerät zu vermeiden. einen Endstufenverstärker an der analogen Eingangsbuchse an. -
Seite 30: Bedienpult
Bedienpult 1 PHONES-Anschluss (Seite 9) 4 MIC LEVEL-Regler (Seite 10) Zum Anschließen eines Kopfhörers. Stellen Sie hier die Ausgangslautstärke vom Mikrofon ein. Dieses Gerät unterstützt 1/4-Zoll-Stereo-Klinkenstecker und 5 AUX TRIM-Regler 3,5-mm-Stereo-Miniklinkenstecker. Stellen Sie hier die Lautstärke vom AUX-Eingang ein. 2 PARAMETER-Regler 6 Eingangswahlschalter (Seite 10) Stellen Sie hier den SOUND COLOR FX-Parameter ein. - Seite 31 7 TRIM-Regler (Seite 10) Stellen Sie hier die Lautstärken von den einzelnen Kanälen ein. 8 ISO (HI, MID, LOW)-Regler (Seite 10) Stellen Sie hier die Soundqualität von den verschiedenen Kanälen ein. 9 Master-Pegel-Anzeige (Seite 10) Zeigt die Lautstärke vom MASTER-Ausgang an. Bei zu hoher Lautstärke blinkt die [CLIP]-Anzeige.
-
Seite 32: Anschlüsse
! Verbinden Sie dieses Gerät über ein USB-Kabel direkt mit dem Computer. ! Verwenden Sie USB-Kabel, die dem USB 2.0 Standard entsprechen. ! USB-Hubs können nicht verwendet werden. Anschließen der Eingangsbuchsen Plattenspieler Plattenspieler Mikrofon Rückseite Computer DJ Player von Pioneer DJ Netzteil Zur Netzsteckdose Sampler usw. von Pioneer DJ... -
Seite 33: Anschließen Der Ausgangsbuchsen
Anschließen der Ausgangsbuchsen Frontplatte Rückseite Endstufenverstärker 1 Kopfhörer Aktivlautsprecher 1 1 Achten Sie darauf, die [MASTER1]-Ausgangsbuchsen nur für symmetrischen Ausgabe zu verwenden. Verbindung mit unsymmetrischer Eingabe (wie RCA) mit einem XLR/RCA-Wandlerkabel (oder Wandleradapter) kann die Klangqualität verringern und/oder Rauschen verursachen. Für Verbindung mit unsymmetrischer Eingabe (wie RCA) verwenden Sie die [MASTER2]-Ausgangsbuchsen. -
Seite 34: Bedienung
Bedienung Grundlegende Bedienung Einstellen der Faderkurve Betätigen Sie den [CROSS F.CURVE (THRU, Tonausgabe Wahlschalter. — [THRU]: Stellen Sie diese Option ein, wenn der Crossfader nicht 1 Drücken Sie den -Schalter. verwendet wird. — [ ]: Die Kurve steigt langsam an. Schalten Sie das Gerät ein. -
Seite 35: Zusätzliche Informationen
Störungssuche ! Wenn Sie den Eindruck haben, dass eine Störung dieses Geräts vorliegt, überprüfen Sie bitte die folgenden Punkte und unter [FAQ] für das [DJM-250MK2] auf der Pioneer DJ-Website. http://pioneerdj.com/support/ Prüfen Sie auch die angeschlossenen Geräte. Wenn das Problem nicht behoben werden kann, bitten Sie Ihr nächstgelegenes autorisiertes Pioneer-Kundendienstzentrum oder Ihren Händler, Reparaturarbeiten durchzuführen. -
Seite 36: Ändern Der Einstellungen
Leistungsaufnahme (Standby) ............. 0,5 W eingetragene Markenzeichen Allgemein – Hauptgerät ! Pioneer DJ ist eine Marke von PIONEER CORPORATION und wird Leistungsaufnahme ..........12 V Gleichstrom, 600 mA Gewicht des Hauptgeräts ..............3,0 kg unter Lizenz verwendet. rekordbox ist eine Marke oder eingetragene Max.