Inhaltsverzeichnis
Werbung
Verfügbare Sprachen
Verfügbare Sprachen
Werbung
Kapitel
Inhaltsverzeichnis
Fehlerbehebung

Verwandte Anleitungen für Megasat Caravanman 65 / 85 Premium


Inhaltszusammenfassung für Megasat Caravanman 65 / 85 Premium
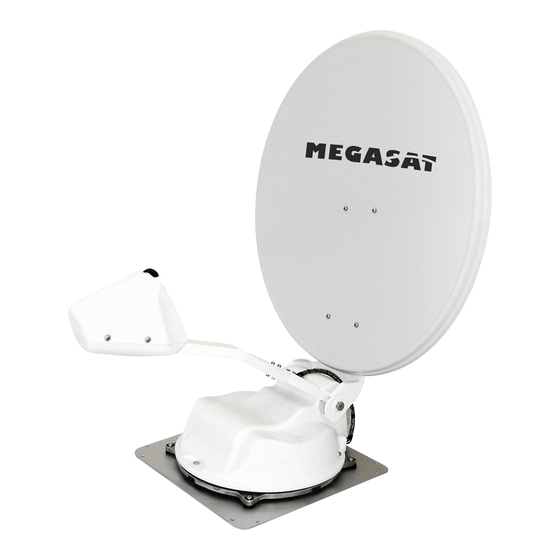
- Seite 1 Caravanman 65 / 85 Premium Caravanman 85 Professional / GPS Bedienungsanleitung...
-
Seite 2: Inhaltsverzeichnis
Inhaltsverzeichnis 1. Einführung 1.1 Sicherheitshinweise ................03 1.2 Kurzbeschreibung ..................03 1.3 Lieferumfang ....................03 1.4 Systemkomponenten ................04 2. Installation 2.1 Installation auf dem Dach ..............05 2.2 Klebeanleitung ................... 06 2.3 Installation der Dachdurchführung ..........07 2.4 Installation im Innenbereich ............. 08 2.5 Montage des Spiegels ................ -
Seite 3: Einführung
1. Einführung 1.1 Sicherheitshinweise Vorsicht: Unsachgemäße Handhabung kann zu schweren Schäden an die- sem Gerät führen. Die Verantwortlichen können auch für daraus resultierende weitere Schäden am Gerät verantwortlich gemacht werden. Hinweis: Lesen Sie das Benutzerhandbuch sorgfältig durch bevor Sie mit der Installation beginnen. -
Seite 4: Systemkomponenten
1. Einführung 1.4 Systemkomponenten Öffnen Sie die Box und entnehmen Sie das Steuergerät, die Anschlusskabel und das Ver- packungsmaterial. Heben Sie die Motoreinheit gerade nach oben aus der Verpackung. Achten Sie beim Hinstellen darauf, dass die Kabel die an der Antenne angebracht sind nicht unter der Grundplatte liegen, um Beschädigungen zu vermeiden. -
Seite 5: Installation
2. Installation 2.1 Installation auf dem Dach Grundsätzlich empfehlen wir den Einbau durch Ihren Fachhändler oder eine Fachwerk- statt vornehmen zu lassen! Achtung: Beachten Sie bitte auch, dass sich durch die Antenne die Fahrzeug- höhe entsprechend ändert! Bitte halten Sie sich unbedingt an die einzelnen Punkte der Montageanweisung! Allgemeines: Sorgen Sie für einen geeigneten Arbeitsplatz, eine Garage/Halle ist besser als ein Platz im... -
Seite 6: Klebeanleitung
2. Installation 5. Rauen Sie die gezeichnete Fläche mit Schleifpapier (120er Körnung) leicht an und säubern Sie die Fläche erneut mit dem Reiniger (ACHTUNG: Flächen anschließend nicht mehr berühren) und lassen Sie den Reiniger ca. 10 Minuten ablüften. 2.2 Klebeanleitung 1. -
Seite 7: Installation Der Dachdurchführung
2. Installation 2.3 Installation der Dachdurchführung 1. Sofern Sie keine Möglichkeit haben, das Ka- Die Dachdurchführung wird wie die bel durch eine vorhandene Dachdurchfüh- Antenne selbst auf das Fahrzeug- rung zu verlegen, suchen Sie eine geeignete dach geklebt. Stelle (am besten im Windschatten hinter der Antenne) auf dem Fahrzeugdach für die Montage der Dachdurchführung, um das Eindringen von Feuchtigkeit (z.B. -
Seite 8: Installation Im Innenbereich
2. Installation 2.4 Installation im Innenbereich 1. Das Steuerkabel und das Koaxialkabel wird im Inneren des Fahrzeuges verlegt. WICHTIG: das Steuerkabel darf hierbei nicht gekürzt werden. 2. Vergewissern Sie sich bei der Wahl des Standortes für das Staeuergerät und den Sat-Receiver, dass beide Geräte an einem trockenen und geschützten Ort stehen. -
Seite 9: Anschlussdiagramm
2. Installation 2.6 Anschlussdiagramm Zündungsplus Der Caravanman fährt automatisch in den eingeklappten Zustand, sobald der Zünd- schlüssel gedreht wird. Diese Funktion steht nur zur Verfügung, wenn das Steuergerät ausgeschaltet und Kabel angeklemmt sind. Im Display des Steuergerätes wird „IGNITION“ angezeigt. Zweiter Anschluss nur bei Caravanman 85 (+) (-) -
Seite 10: Das Steuergerät
3. Das Steuergerät 3.1 Frontansicht Ein / Aus Schalter LCD Display Satellitenauswahl SEARCH POWER SD MEMORY SLOT STOW Einschub für SD Karte Antenne einfahren 3.2 Rückansicht Receiver Antenne RS 232 12V DC In 123456 Dip Schalter Steuerkabel 12V DC Out 3.3 Standardeinstellung der Dip Schalter Sollten sich die Dip Schalter nicht in dieser Position befinden, kann die Antenneneinheit nicht automatisch nach einem Satelliten suchen. -
Seite 11: Satellitenübertragung
4. Satellitenübertragung Wahl des Standortes Direct Broadcast Service (DBS) strahlt Audio, Video und Daten über den Satelliten aus, der sich in 35.000 km Höhe über der Erde befindet. Mit einer Empfangsstation wie die Antenne und einem Satelliten Receiver werden die Signale vom Satelliten empfangen und verar- beitet. -
Seite 12: Inbetriebnahme Und Bedienung
5. Inbetriebnahme und Bedienung 1. Schalten Sie das Steuergerät ein. Im Display erscheint die aktuelle Firmwareversion. 2. Sobald Sie die SEARCH Taste auf dem Steuergerät drücken, startet der Suchvorgang der Antenneneinheit. Im Display erscheint der eingestellte Satellit (Standardsuche = Astra 19,2° Ost) und die Anzeige beginnt zu blinken. Während dieser Zeit (ca. 5 sek.) können Sie den Satellit mit Hilfe der SEARCH und STOW Taste ändern. -
Seite 13: Skew Einstellungswerte Für Europäische Hauptstädte
6. Skew Einstellungswerte Skew Einstellungswerte für europäische Hauptstädte Folgende Einstellungen müssen Sie nur beim Caravan- 0° man 65/85 Premium (ohne Auto Skew) vornehmen. Signale in vertikaler (rot) und horizontaler (blau) Linie ha- ben einen Versatz von genau 90º zueinander. Durch die unterschiedliche Position der Satelliten, abhängig von Ih- +90°... -
Seite 14: Fehlerbehebung
7. Fehlerbehebung Kein Satellitensignal Objekte wie Bäume, Brücken und große Häuser, die sich im Einfallswinkel des Satelli- ten befinden, führen zu einem Verlust des Signals. Wenn das Satellitensignal durch schwere Wetterbedingungen verloren geht, wird das laufende Programm des Receivers beendet (das Bild wird einfrieren, bzw. verschwin- den). -
Seite 15: Fehlermeldungen Des Steuergerätes
7. Fehlerbehebung Notbedienung: Bei einer Störung der Antenne, können Sie durch ändern der DIP Schalter auf der Rückseite des Gerätes, die Antenane manuell steuern. hoch runter Cycle Test Die Antenne simuliert einen Suchvorgang. Manueller Modus (Elevation) Die Antenne kann über die SEARCH und STOW Taste gesteuert werden. -
Seite 16: Ausleuchtzone
8. Ausleuchtzone Caravanman 65 Caravanman 85 Hinweis: In den Randgebieten der Ausleuchtzone kann es zu Empfangsstörungen kommen. DEUTSCH... -
Seite 17: Montageabmessungen
9. Montageabmessungen Caravanman 65 Fahrtrichtung Max. Schwenkradius 82 cm 71 cm Drehpunkt 39 cm 125 cm Caravanman 85 Fahrtrichtung Max. Schwenkradius 99 cm 88 cm Drehpunkt 39 cm 165 cm DEUTSCH... -
Seite 18: Aktualisierung Der Firmware
10. Aktualisierung der Firmware Wenn die Frequenz, auf der die Antenne den Satelliten idendifiziert, abgeschaltet wird, muss ein Firmwareupdate des Steuergerätes durchgeführt werden. Die aktuelle Firmware Version des Steuergerätes können Sie in den ersten 3 Sekunden nach dem Einschalten im unteren Bereich des Displays ablesen. Bitte erkundigen Sie sich auf unserer Homepage nach der aktuellsten Firmware Version. -
Seite 19: Updatevorgang
10. Aktualisierung der Firmware Updatevorgang: 1. Stecken Sie die SD Karte in den Slot auf der Vorderseite des Steuergerätes. 2. Schalten Sie das Steuergerät ein. 3. Folgendes erscheint im Display: SD CARD DETECTED WRITING SOFTWARE 4. Nachdem die Software kopiert wurde, erscheint folgende Meldung: LOAD COMPLETE 5. -
Seite 20: Technische Daten
11. Technische Daten 65 Premium 85 Premium 85 Professional 85 Professional GPS Antennen Typ Off-Set-Spiegel Anzahl der Teilnehmer LNB Typ Universal Single LNB Universal Twin LNB Frequenzband Ku Band Frequenzbereich 10.7 GHz bis 12.75 GHz LNB Verstärkung 37 dBi 39 dBi Empfangsleistung 46 dBW 44 dBW... -
Seite 21: Konformitätsinformation
Nutzen Sie für eine Reklamation unser Serviceformular. Dieses können Sie auf unserer Homepage www.megasat.tv downloaden. Konformitätsinformation Hiermit erklärt die Firma Megasat Werke GmbH, dass sich folgendes Gerät in Überein- stimmung mit den grundlegenden Anforderungen und den übrigen einschlägigen Be- stimmungen der Richtlinie EC EMC Directive 2004/108/EC befindet: Megasat Caravanman 65 Premium (Artikel-Nr. - Seite 22 Status: 3.3 (November 2016) // Technische Änderungen, Druckfehler und Irrtümer vorbehalten. Megasat Werke GmbH | Industriestraße 4a | D-97618 Niederlauer | www.megasat.tv | info@megasat.tv...
- Seite 23 Caravanman 65 / 85 Premium Caravanman 85 Professional / GPS User manual...
- Seite 24 Contents 1. Introduction 1.1 Safety Information ................... 03 1.2 Short description ..................03 1.3 Delivery ......................03 1.4 System Components................04 2. Installation 2.1 Installation on the roof ................05 2.2 Gluing instructions .................. 06 2.3 Installing the roof outlet ..............07 2.4 Installation indoors ..................
-
Seite 25: Introduction
1. Introduction 1.1 Safety Information Caution – Improper handling by unqualified personnel can cause serious da- mage to this equipment. Unqualified personnel who tamper with this equip- ment may be held liable for any resultant damage to the equipment. Note – Before you begin, carefully read each of the procedures in this manual. If you have not performed similar operations on comparable equipment, do not attempt to perform these procedures. -
Seite 26: System Components
1. Einführung 1.4 System components Open box and remove the control unit, cables and packing material. Lift the antenna straight up out of the box. Never place the system upside down!. When you lay down the antenne, pmake sure that the cable attached to the antenna not be below the base plate to prevent damages. -
Seite 27: Installation
2. Installation 2.1 Installation on the roof Basically, we recommend that you leave the installation to make by your dealer or workshop! Warning: Please also note that the antenna height of the vehicle will change accordingly! Please strictly adhere to the various points in the installation instructions! General Information: Provide a suitable working environment, a garage/warehouse is better than open air. -
Seite 28: Gluing Instructions
2. Installation 5. Roughen the drawn areas and feet with sandpaper (120 grit) to easily and thoroughly clean the surface again with cleaner (WARNING: then no longer touch areas) and let the clean dry for about 10 minutes. 2.2 Gluing instructions 1. - Seite 29 2. Installation 2.3 Installation of the roof outlet 1. If you have no way to feed the cable through The Roof outlet taped as the anten- an existing Roof outlet, seek a suitable place na itself on the vehicle roof. (best in the slipstream behind the antenna) on the roof for the installation of the Roof outlet to prevent ingress of moisture (eg rain...
-
Seite 30: Installation Indoors
2. Installation 2.4 Installation indoors 1. The control cable and coaxial cable is routed inside the vehicle. IMPORTANT: The control cable must not be shortened. 2. Make sure when you choosing a location for the control unit and the set-top box that both devices are in a dry and a protected place. -
Seite 31: Connection Diagram
2. Installation 2.6 Connection diagram Ignition positive The Caravanman automatically moves to the folded state when the ignition key is turned. This function is only available when the controller is turned off and cables are connected. The control unit displayed „IGNITION“. Second connection only at Caravanman 85 (+) (-) -
Seite 32: The Control Unit
3. The Control unit 3.1 Front view On / Off switch LCD display Select Satellite SEARCH POWER SD MEMORY SLOT STOW Slot for SD Card Antenne retraction 3.2 Rear view Set-top box Antenna RS 232 12V DC In 123456 Dip switch Control cable 12V DC Out 3.3 Default setting for the dip switch... -
Seite 33: Satellite Transmission
4. Satellite transmission Choice of location Direct Broadcast Service (DBS) satellites broadcast audio, video and data information from satellites located 22.000 miles in space. A receiving station, such as the antenna, should include a dish and satellite receiver to receive the signals and process them for use by the consumer audio and video equipment. -
Seite 34: Startup And Operation
5. Startup and operation 1. Turn on the control unit. The current firmware version will be displayed. 2. When you press the SEARCH button on the control unit the search process of the antenna unit starts. The adjusted satellite (Astra standard search = 19.2 ° East) appears in the display and the display starts flashing. -
Seite 35: Skew Setting Values
6. Skew Setting values Skew setting values for European capitals The following settings are only for the Caravanman 0° 65 / 85 Premium (without AutoSkew). Signals in the vertical (red) and horizontal (blue) line have an offset of exactly 90° to each other. Due to the different position of the satellites, depending on your location, it is +90°... -
Seite 36: Troubleshooting
7. Troubleshooting No Signal Objects such as trees, bridges, and large buildings, which are located in the angle of the satellite will lead to a loss of the signal. If the satellite signal is lost through severe weather conditions, the current program of the receiver is stopped (the image freeze, or disappear). - Seite 37 7. Troubleshooting Emergency operation: A failure in the antenna, you can change the DIP switch on the back of the unit, control the Antenane manually. down Cycle Test The antenna simulates the search. Manueller Modus (Elevation) The antenna can be controlled via the SEARCH and STOW button.
-
Seite 38: Footprint
8. Footprint Caravanman 65 Caravanman 85 Note: In the outlying areas of the footprint there may be interference. ENGLISH... -
Seite 39: Mounting Dimensions
9. Mounting Dimensions Caravanman 65 Driving direction max. radius 82 cm 71 cm Rotation 39 cm 125 cm Caravanman 85 Driving direction max. radius 99 cm 88 cm Rotation 39 cm 165 cm ENGLISH... -
Seite 40: Firmware Update
10. Firmware update When the frequency is switched off, on which the antenna idendifiziert the satellite, you must update the firmware of the control unit. The current firmware version of the control unit, you can read on the bottom of the screen in the first 3 seconds after switching on. -
Seite 41: Update Process
10. Firmware update Update process: 1. Insert the SD card into the slot on the front side of the control unit. 2. Turn on the controller. 3. The following will appear in the display: SD CARD DETECTED WRITING SOFTWARE 4. After the software is copied, the following message appears: LOAD COMPLETE 5. -
Seite 42: Specifications
11. Specifications 65 Premium 85 Premium 85 Professional 85 Professional GPS Antenna type Off-Set-dish User LNB type Universal Single LNB Universal Twin LNB Frequency band Ku Band Frequency range 10.7 GHz bis 12.75 GHz LNB gain 37 dBi 39 dBi Received power 46 dBW 44 dBW... -
Seite 43: Conformity Information
Please use our service form for a complaint. You can download this on our website www.megasat.tv. Conformity information Hereby declare the company Megasat Werke GmbH that the following devices is in compliance with the essential requirements and other relevant provisions of Directive Council EC EMC Directive 2004/108/EC: Megasat Caravanman 65 Premium (Article-No. - Seite 44 Status: 3.3 (November 2016) // Technical changes, misprint and errors reserved. Megasat Werke GmbH | Industriestraße 4a | D-97618 Niederlauer | www.megasat.tv | info@megasat.tv...
- Seite 45 Caravanman 65 / 85 Premium Caravanman 85 Professional / GPS Mode d‘emploi...
- Seite 46 Sommaire 1. Introduction 1.1 Consignes de sécurité ................03 1.2 Brève description ..................03 1.3 Volume de livraison ................. 03 1.4 Composants de système ..............04 2. Installation 2.1 Installaion sur le toit ................05 2.2 Instruction de collage ................06 2.3 Installation de la traversée de toit ..........
-
Seite 47: Introduction
1. Introduction 1.1 Consignes de sécurité Attention: Une mauvaise manipulation peut endommager cet appareil gra- vement. Les responsables peuvent également être tenu responsables pour au- tres dégâts qui sont le résultat de cette mauvaise manipulation. Remarque: Veuillez lire soigneusement le manuel d’utilisation avant de com- mencer l’installation. -
Seite 48: Composants De Système
1. Introduction 1.4 Composants de système Ouvrez le carton et prenez l’appareil de commande, les câbles de raccordement ainsi que le matériau d’emballage. Retirez l’unité de commande de l’emballage vers le haut. En déposant l’appareil de commande veuillez faire attention que les câbles raccordés à l’antenne ne se trouvent pas sous la plaque de montage afin d’éviter des dégâts. -
Seite 49: Installation
2. Installation 2.1 Installation sur le toit En principe, nous recommandons un montage par votre revendeur ou par un atelier spécialisé! Attention: Veuillez prendre en considération que l’antenne change la hauteur du véhicule. Veuillez observer absolument les points de l’instruction de montage! En général: Veuillez assurer un lieu de travail approprié, une garage/salle est meilleure comme un lieu en plein air. -
Seite 50: Instruction De Collage
2. Installation 5. Meulez faiblement la surface marquée avec un papier émeri (grain de 120) et nettoyez de nouveau la surface avec le nettoyant (ATTENTION : ensuite, ne touchez pas la surfa- ce). Laissez aérer le nettoyant pour env. 10 minutes. 2.2 Instruction de collage 1. -
Seite 51: Installation De La Traversée De Toit
2. Installation 2.3 Installation de la traverse de toit 1. S’il n’y a aucune possibilité de poser le câb- La traversée de toit est collée sur le le à travers d’une traversée de toit existante, toit du véhicule comme l’antenne. veuillez chercher une position approprié... -
Seite 52: Installation Dans L'intérieur
2. Installation 2.4 Installation dans l’intérieur 1. Le câble de commande et le câble coaxial sont posés dans l’intérieur du véhicule. IMPORTANT: Le câble de commande ne doit pas être écourté. 2. Lors de choix de l’emplacement pour l’appareil de commande et le récepteur satellite, assurez-vous que les deux appareils sont placés à... -
Seite 53: Schéma De Raccordement
2. Installation 2.6 Schéma de raccordement Allumage + Le Caravanman change automatiquement en position repliée quand la clé de contact est tournée. Cette fonction est seulement disponible si l’appareil de commande est éteint et les câbles sont raccordés. Le mot « IGNITION » est affiché sur l’écran de l’appareil de commande. -
Seite 54: Vue De L'avant
3. L’appreil de commande 3.1 Vue de l’avant Commutateur Ecran LCD Sélection d’un satelite SEARCH POWER SD MEMORY SLOT STOW Entrée pour une Fermer l‘antenne carte SD 3.2 Vue de l’arrière Récepteur Antenne RS 232 12V DC In 123456 Interrupteur DIP Câble de commande 12V DC Out 3.3 Réglage par défaut des interrupteurs DIP... -
Seite 55: Diffusion Par Satellite
4. Diffusion par satellite Wahl des Standortes Direct Broadcast Service (DBS) diffuse des fichiers audio, vidéos et données par satellite qui se trouve 35.000 km au-dessus de la terre. Les signaux du satellite sont reçus et traités par un poste récepteur comme l’antenne et un récepteur satellite. Le système demande une vue nette du satellite pour profiter au maximum de la réception des signaux. -
Seite 56: Mise En Service Et Commande
5. Mise en service et commande 1. Allumez l’appareil de commande. La version actuelle du firmware est affichée sur l’écran. 2. Dès que vous appuyez sur la touche SEARCH de l’appareil de commande, la recherche de l’unité de l’antenne commence. Le satellite réglé est affiché sur l’écran (recherche standard = Astra 19,2°... -
Seite 57: Valeurs De Réglage Skew
6. Valeurs de réglage Skew Valeurs de réglage Skew pour les capitals européennes Les réglages suivants doivent seulement être effectués con- 0° cernant le Caravanman 65/85 Premium (sans auto Skew). Les signaux sur la ligne verticale (rouge) et horizontale (bleu) ont un déport d’exact 90° entre eux. En raison des positions différentes des satellites, dépendant de votre +90°... -
Seite 58: Dépannage
7. Dépannage Aucun signal satellite Des obstacles comme des arbres, des ponts et grands bâtiment, qui se trouvent dans l’angle d’incidence du satellite, induisent une perte du signal. Si le signal du satellite est perdu à cause des conditions climatiques, le programme actuel du récepteur est arrêté... - Seite 59 7. Dépannage Commande d’urgence: Lors d’une perturbation de l’antenne, vous pouvez commander l’antenne manuellement par un changement de l’interrupteur DIP à l’arrière de l’appareil. haut Cycle Test L’antenne simule une recherche. Mode manuel (Elevation) L’antenne peut être commandée par la touche STOW. Mode manuel (Azimuth) L’antenne peut être commandée par les touches SEARCH et STOW.
-
Seite 60: Zone De Couverture
8. Zone de couverture Caravanman 65 Zone de couverture Caravanman 85 Zone de couverture Remarque: Dans les zones périphériques de la zone de couverture, des perturbations de la réception peuvent se produire FRANÇAIS... - Seite 61 9. Montageabmessungen Caravanman 65 Sens de la marche Angle de rotation 82 cm maximal 71 cm Pivot 39 cm 125 cm Caravanman 85 Sens de la marche Angle de rotation maximal 99 cm 88 cm Pivot 39 cm 165 cm FRANÇAIS...
-
Seite 62: Actualisation Du Firmware
10. Actualisation du firmware Si la fréquence avec laquelle l’antenne identifie le satellite est mise hors tension, vous devez actualiser le firmware de l’appareil de commande. Vous pouvez lire la version actuelle du firmware de l’appareil de commande dans les premières 3 seconde après la mise en marche dans la partie inférieure de l’écran. - Seite 63 10. Actualisation du firmware Actualisation: 1. Insérez la carte SD dans le slot à l’avant de l’appareil de commande. 2. Allumez l’appareil de commande. 3. Le suivant est affiché sur l’écran: SD CARD DETECTED WRITING SOFTWARE 4. Après le logiciel était copié le message suivant est affiché: LOAD COMPLETE 5.
-
Seite 64: Spécifications Techniques
11. Spécifications techniques 65 Premium 85 Premium 85 Professional 85 Professional GPS Type d'antenne Parabole offset Nombre de participants Type LNB Universal Single LNB Universal Twin LNB Bande de fréquence Bande Ku Gamme de fréquence 10.7 GHz bis 12.75 GHz Amplification du LNB 37 dBi 39 dBi... - Seite 65 Prenez de la forme de services de plainte. Cela peut être téléchargé à partir de notre page d‘accueil www.megasat.tv. Informations conformité Par la présente, l’entreprise Megasat Werke GmbH déclare que l’appareil suivant est en conformité avec les exigences essentielles et les dispositions pertinentes de la directive EC EMC Directive 2004/ 108/EC: Megasat Caravanman 65 Premium (Numéro d’article 1500119)
- Seite 68 Status: 3.3 (Novembre 2016) // Sous réserve de modifications techniques, de fautes d’impression et d’ e rreurs. Megasat Werke GmbH | Industriestraße 4a | D-97618 Niederlauer | www.megasat.tv | info@megasat.tv...