Herunterladen Inhalt Inhalt Diese Seite drucken

Werbung

Verfügbare Sprachen
  • DE

Verfügbare Sprachen

  • DEUTSCH, seite 15
Welcome:
Dear user, thank you for purchasing this product.
Much investment in time and effort has gone into its development, and it is our hope that it
will give you many years of trouble-free service.
Safety Notice:
1.
Do not drop, puncture or disassemble the camera; otherwise the warranty will be voided.
2.
Avoid all contact with water, and dry hands before using.
3.
Do not expose the camera to high temperature or leave it in direct sunlight. Doing so may
damage the camera.
4.
Use the camera with care. Avoid pressing hard on the camera body.
5.
For your own safety, avoid using the camera when there is a storm or lightning.
6.
Do not use batteries of different specifications. Doing so may lead to the potential for serious
damage.
7.
Remove the battery during long periods between usage, as a deteriorated battery may affect
the functionality of the camera.
8.
Remove the battery if it shows signs of leaking or distortion.
9.
Use only the accessories supplied by the manufacturer.
10. Keep the camera out of the reach of infants.
11. Risk of explosion if battery is replaced by an incorrect type.
12. Dispose of used batteries according to the instructions.
FCC Compliance Statement:
This device complies with Part 15 of the FCC Rules. Operation is
subjected to the following two conditions: (1) this device may not cause
harmful interference, and (2) this device must accept any interference
received, including interference that may cause undesired operation.
This equipment has been tested and found to comply with limits for a
Class B digital device, pursuant to Part 15 of the FCC rules. These limits
are designed to provide reasonable protection against harmful interference
in residential installations. This equipment generates, uses, and can radiate radio frequency
energy, and if not installed and used in accordance with the instructions, may cause harmful
interference to radio communications.
However, there is no guarantee that interference will not occur in a particular installation. If this
equipment does cause interference to radio or television equipment reception, which can be
determined by turning the equipment off and on, the user is encouraged to try to correct the
interference by one or more of the following measures:
-
Reorient or relocate the receiving antenna.
-
Move the equipment away from the receiver.
-
Plug the equipment into an outlet on a circuit different from that to which the receiver is
connected.
-
Consult the dealer or an experienced radio/television technician for additional suggestions.
You are cautioned that any change or modifications to the equipment not expressly approved by
the party responsible for compliance could void your authority to operate such equipment.
If the time arises to throw away your product,
please recycle all the components possible.
Batteries and rechargeable batteries are not to
be disposed in your domestic waste! Please
recycle them at your local recycling point.
Together we can help to protect the
environment.
i

Werbung

Inhaltsverzeichnis
loading

Inhaltszusammenfassung für AIPTEK 3D-iS2

  • Seite 1 Welcome: Dear user, thank you for purchasing this product. Much investment in time and effort has gone into its development, and it is our hope that it will give you many years of trouble-free service. Safety Notice: Do not drop, puncture or disassemble the camera; otherwise the warranty will be voided. Avoid all contact with water, and dry hands before using.
  • Seite 2 Extra notice regarding 3D viewing: To view 3D display and receive 3D effects well, the viewer should be positioned to face the center of the screen at around 30 cm (12 in) distance and not having a steep viewing angle. Viewing in 3D mode may cause dizziness or even perceptive after effects, disorientation, and eye strain.
  • Seite 3: Getting Started

    Getting started Product overview 1. Shutter button 2. Power button 3. Microphone 4. Left lens - for 3D capture 5. Flash 6. Self-timer indicator 7. Right lens - for 2D and 3D capture 8. Battery cover 9. Power indicator 10. Record button 11.
  • Seite 4: Charging The Battery

    Loading the battery / Using a memory card 1. Pull the battery cover, then it will open automatically. 2. Place the battery into the compartment. Align the + and - metallic ends carefully. Note that the + and - metallic contacts must be aligned with the corresponding contacts in the compartment.
  • Seite 5: Setting Language

    Powering On or Off 1. Power on: Press the POWER button to turn on the camera, and the power indicator lights green. 2. Power off: Press and hold the POWER button until the power indicator is extinguished. If the camera cannot be powered on, please check the followings: 1) The battery is correctly loaded.
  • Seite 6: Basic Operations

    Basic Operations Press this button ( ) to switch 2D/3D mode. Also, the image showing on the LCD screen will become 2D/3D. Pressing this button in playback can change the 2D or 3D files store in your camera or memory card. Please note that 3D files cannot be recorded/viewed/deleted in 2D mode, and vice versa.
  • Seite 7 Playback File type 2: : video : picture Current file/Total files File type 1: : 2D file Battery life : 3D file Storage: Highlight frame : internal : memory card Press OK to display in full screen Press Shutter to return to preview screen 1.
  • Seite 8: Deleting Files

    Deleting files Press Playback button ( ) to enter playback mode and use the Joystick to select the file which you want to delete. Press the Delete button ( ) and there are 3 available options: Option Description Delete the selected file. Exit menu without deleting the file.
  • Seite 9: Menu Items

    Menu items Item Option Description 3 mega-pixels Resolution 5 mega-pixels 12MP 12 mega-pixels The flash is disabled. Flash Auto The flash enables when ambient light is insufficient. Strobe The flash is forced on in every shot. Auto Turn on the night shot.
  • Seite 10 Item Option Description Icon Enable or disable the icons shown on the display. Start Image Enable or disable the startup image. The camera will automatically turn off after a short period of Auto Off time. The camera stays on. Format This function will format the internal memory/memory card.
  • Seite 11 File management on PC Connect the USB port of the camera to your PC/Notebook by USB to mini-USB cable. Power on the camera and the power indicator lights green. The camera will turn to a removable disk on the PC, then you can read all files stored in the camera. Copy your normal 2D files into the 2D (DCIM\101DIR2D) folder in your memory card.
  • Seite 12 Appendix Battery life / Capacity table Still picture (without flash) Video clip Number of shots Recording time Battery Life (minute) Table * The unit is set to 3D mode. Note: This table is for your reference only. The actual battery life depends on your battery quality and recharge level.
  • Seite 13: Troubleshooting

    Troubleshooting Problem Possible cause Solution I output 3D video/photo Your TV/display is 2D Covert the 3D video/photo into red/cyan format. Then playback to my home and therefore does play and output the converted file on your 2D HDTV. But the 3D not support the HDTV/display.
  • Seite 14: Specifications

    Specifications Image Sensor 5 Mega-pixels CMOS (2592 x 1944) Camera: 3M, 5M, 12M Resolution Camcorder: HD 720p 30f (1280 x 720) JPEG, MP4 (H.264) File Format 3D content format: Side by Side Video Frame Rate Up to 30 frames per second Internal Memory External Memory SD card slot (Up to 32GB SDHC)
  • Seite 15: Sicherheitshinweise

    Willkommen: Sehr geehrter Benutzer, vielen Dank für den Kauf dieses Produktes. In die Entwicklung dieses Geräts wurde viel Zeit und Mühe investiert, und wir hoffen, es wird Ihnen viele Jahre störungsfreien Betrieb und Freude bescheren. Sicherheitshinweise: Lassen Sie die Kamera nicht fallen und beschädigen und zerlegen Sie die Kamera nicht, andernfalls erlischt die Gewährleistung.
  • Seite 16: Spezialhinweis In Bezug Auf 3D-Ansicht

    Spezialhinweis in Bezug auf 3D-Ansicht: Zur Ansicht des 3D-Bildschirms und Wahrnehmung des 3D-Effektes sollte sich der Betrachter mit Gesicht zur Mitte des Bildschirms in einer Entfernung von ungefähr 30 cm (12 in) stellen und keinen steilen Betrachtungswinkel haben. Die Ansicht im 3D-Modus kann zu Benommenheit oder sogar Wahrnehmungsnachwirkungen, Orientierungslosigkeit und Augenschmerzen führen.
  • Seite 17: Erste Schritte

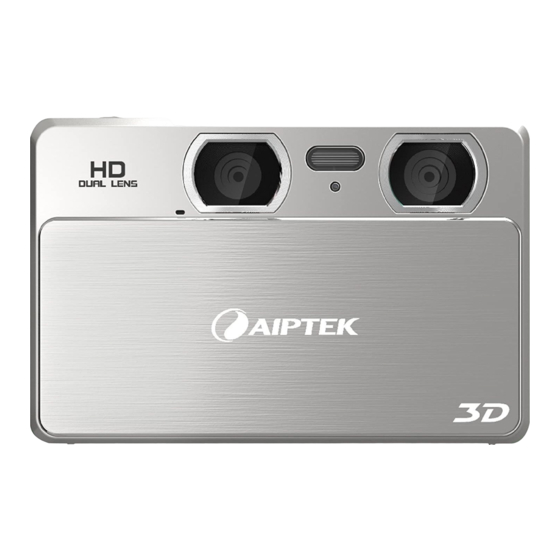
    Erste Schritte Produktübersicht 1. Auslöser 2. Ein/Aus-Taste 3. Mikrofon 4. Linkes Objektiv - für 3D-Aufnahme 5. Blitzlicht 6. Selbstauslöser-Anzeige 7. Rechtes Objektiv - für 2D- und 3D-Aufnahme 8. Batteriefachabdeckung 9. Stromanzeige 10. Aufnahmetaste 11. 2D/3D Umschalttaste 12. 2D/3D LCD-Monitor 13. 5-Wege Joystick 14.
  • Seite 18: Laden Des Akkus / Verwenden Einer Speicherkarte

    Laden des Akkus / Verwenden einer Speicherkarte 1. Ziehen Sie an der Batteriefachabdeckung. Sie wird sich daraufhin automatisch öffnen. 2. Legen Sie den Akku in das Batteriefach ein. Achten Sie auf die Ausrichtung der + und - Metallkontakte. Beachten Sie, dass die + und - Metallkontakte an den entsprechenden Kontakten im Batteriefach ausgerichtet werden müssen.
  • Seite 19: Sprache Einstellen

    Ein/Ausschalten 1. Einschalten: Drücken Sie auf die EIN/AUS-Taste, um die Kamera einzuschalten. Die Stromanzeige wird grün leuchten. 2. Ausschalten: Drücken Sie etwas länger auf die EIN/AUS-Taste, bis die Stromanzeige erlischt. Wenn sich die Kamera nicht einschalten lässt, prüfen Sie bitte Folgendes: 1) Der Akku ist eingelegt.
  • Seite 20: Grundlegende Bedienung

    Grundlegende Bedienung Drücken Sie auf diese Taste ( ), um zwischen den 2D/3D-Modi umzuschalten. Das Bild auf dem LCD-Display wird ebenfalls 2D/3D. Ein Drücken dieser Taste während der Wiedergabe kann die auf Ihrer Kamera oder Speicherkarte gespeicherten 2D- oder 3D-Dateien ändern. Bitte beachten Sie, dass 3D-Dateien im 2D-Modus nicht aufgenommen/angezeigt/gelöscht werden können und umgekehrt.
  • Seite 21 Wiedergabe Dateityp 2: : Video : Foto Aktuelle Datei/Gesamte Dateien Dateityp 1: : 2D-Datei Batteriestatus : 3D-Datei Speicher: Rahmen : intern markieren : Speicherkarte Drücken Sie zur Anzeige im Vollbild auf OK. Drücken Sie auf den Auslöser, um zur vorherigen Anzeige zurückzugehen 1.
  • Seite 22: Dateien Löschen

    Dateien löschen Drücken Sie auf die Wiedergabetaste ( ) zum Aufruf des Wiedergabemodus und verwenden Sie den Joystick zur Auswahl der Datei, die Sie löschen möchten. Drücken Sie auf die Löschen-Taste ( ) zur Auswahl aus 3 Optionen: Option Beschreibung Löscht die ausgewählte Datei.
  • Seite 23 Menüpunkte Komponente Option Beschreibung 3 Megapixel Bildauflösung 5 Megapixel 12MP 12 Megapixel Der Blitz ist deaktiviert. Auto Der Blitz wird automatisch ausgelöst, wenn die Blitz Umgebungsbeleuchtung zu schwach ist. Der Blitz wird bei jeder Aufnahme ausgelöst. Auto Nachtmodus eingeschaltet. Nachtaufnahme Nachtmodus ausgeschaltet.
  • Seite 24 Komponente Option Beschreibung Zeigt nur Fotos in der Diaschau im Bilder Wiedergabemodus an. Schaltet die Systemtöne ein. Signalton Schaltet die Systemtöne aus. 50Hz Stellt die Frequenz auf 50Hz oder 60Hz ein. Weitere Frequenz Einzelheiten finden Sie in der Tabelle „Frequenz“. 60Hz Aktiviert oder deaktiviert Anzeigesymbole auf dem Symbole...
  • Seite 25: Dateiverwaltung Auf Dem Pc

    Dateiverwaltung auf dem PC Verbinden Sie den USB-Port der Kamera über das USB-zu-Mini-USB Kabel mit einem USB-Port eines PC/Notebooks. Schalten Sie die Kamera ein. Die Stromanzeige wird grün leuchten. Die Kamera wird auf dem PC zu einem Wechseldatenträger. So können anschließend alle auf der Kamera gespeicherten Dateien anzeigen.
  • Seite 26: Akkulaufzeit- / Kapazitätstabelle

    Anhang Akkulaufzeit- / Kapazitätstabelle Foto (ohne Blitz) Videoclip Anzahl an Aufnahmen Aufnahmezeit Akkulaufzeittabelle: (Minuten) * Das Gerät befindet sich im 3D-Modus. Hinweis: Diese Tabelle dient nur als Referenz. Die tatsächliche Akkulaufzeit hängt von der Qualität des Akkus und dem Ladestand ab. Speicher Videoclip (720p) Foto...
  • Seite 27: Fehlerbehebung

    Fehlerbehebung Problem Mögliche Ursache Lösung Ich gebe Konvertieren Sie die 3D-Videos/Fotos in das 3D-Videos/Fotos auf Ihr TV-Gerät/Monitor ist ein Rot/Blau-Format. Geben Sie die konvertierten meinem HDTV-Gerät 2D-Modell und unterstützt Dateien anschließend auf Ihrem 2D wieder. Aber der daher keine 3D-Dateien. HDTV-Gerät/Monitor wieder.
  • Seite 28 Technische Daten Bildsensor 5 Megapixel CMOS (2592 x 1944) Kamera: 3M, 5M, 12M Auflösung Camcorder: HD 720p 30f (1280 x 720) JPEG, MP4 (H.264) Dateiformat 3D-Inhaltsformat: Seite-an-Seite Videobildrate Bis zu 30 Frames pro Sekunde Interner Speicher K.A. Externer Speicher SD-Kartensteckplatz (bis zu 32GB SDHC) 3D/2D Aufnahme Ja, umschaltbar LCD-Display...
  • Seite 29: Notice De Sécurité

    Bienvenue : Cher utilisateur, nous vous remercions pour l’achat de ce produit. Un grand investissement en temps et en efforts a été apporté pour son développement, et nous espérons qu’il vous apportera de nombreuses années de service sans soucis. Notice de sécurité : Ne pas faire tomber, percer ou démonter le caméscope;...
  • Seite 30 Avis supplémentaire concernant le visionnement d’images en 3D : Pour regarder l’écran 3D et recevoir ainsi des effets 3D, le spectateur devrait être positionné en face du centre de l’écran à environ 30 cm (12 in) de distance et de ne pas avoir un angle de visée abrupte.
  • Seite 31: Mise En Route

    Mise en route Vue d’ensemble du produit 1. Touche d’obturateur 2. Bouton de marche/arrêt 3. Microphone 4. Objectif de gauche - pour la prise de vue en 3D 5. Flash 6. Témoin du retardateur 7. Objectif de droite - pour la prise de vue en 2D et en 3D 8.
  • Seite 32: Charger La Batterie

    Insérer la batterie / Utiliser une carte mémoire 1. Tirez le couvercle du logement de la batterie dans le sens indiqué par la flèche, le couvercle va s’ouvrir automatiquement. 2. Insérez la batterie dans son logement. Veuillez bien respecter le positionnement des bornes + et -.
  • Seite 33: Réglage De La Langue

    Mettre en marche ou arrêter 1. Mise sous tension : Appuyez sur le bouton POWER (Marche/Arrêt) pour allumer l’appareil photo, le témoin d’alimentation s’éclairera en vert. 2. Mise hors tension : Appuyer sur et tenir le bouton POWER (Marche/Arrêt) jusqu'à ce que l'indicateur de puissance s'éteigne.
  • Seite 34: Utilisation De Base

    Utilisation de base Appuyez sur ce bouton ( ) pour passer du mode 2D au mode 3D et vice versa. Ainsi l’image affichée sur l’écran LCD sera en 2D ou en 3D. Appuyez sur ce bouton en mode lecture permet de passer de la vue des fichiers 2D à...
  • Seite 35 Lecture Type 2 de fichier : : film : image Fichier courant/Nombre total de fichier Type 1 de fichier : : fichier 2D Témoin de charge de la : fichier 3D batterie Stockage : fichier : interne sélectionnée : carte mémoire Appuyez sur OK pour afficher en plein écran...
  • Seite 36: Supprimer Des Fichiers

    Supprimer des fichiers Appuyez sur le bouton Playback (Lecture) ( ) pour entrer dans le mode lecture et utilisez les touches du curseurs pour sélectionner le fichier que vous voulez supprimer. Appuyez sur le bouton Delete (Supprimer) ( ), il y a 3 options possibles : Option Description Yes (Oui)
  • Seite 37: Éléments Du Menu

    Éléments du menu Élément Option Description 3 mégapixels Résolution photo 5 mégapixels 12MP 12 mégapixels Arrêt Le flash est désactivé. Auto Le flash est activé lorsque la lumière ambiante Flash est insuffisante. Marche Le flash est forcé pour chaque prise de vue. Auto Active le mode Nuit.
  • Seite 38 Élément Option Description Seules les photos seront affichées dans le Photo diaporama. Marche Active le son d’avertissement. Arrêt Désactive le son d’avertissement. 50Hz Règle la fréquence de scintillement à 50Hz ou Fréquence 60Hz. Voir le tableau des fréquences de 60Hz scintillement pour plus de détails.
  • Seite 39 Gestion des fichiers sur votre ordinateur Connectez le port USB de l’appareil photo à votre PC/Ordinateur portable avec le câble USB/mini USB. Allumez l’appareil photo et le témoin d’alimentation s’éclairera en vert. L’appareil photo est reconnu comme un disque amovible par le PC, vous pouvez alors lire tous les fichiers stockés dans l’appareil photo.
  • Seite 40 Annexe Autonomie de la batterie / Capacité de la carte mémoire Photo (sans flash) Film Nombre de photos Temps Autonomie d’enregistrement de la (minute) batterie * Basé sur des photo prises en mode 3D. Note : ce tableau est uniquement pour votre référence. L’autonomie de la batterie dépend de la qualité...
  • Seite 41: Dépannage

    Dépannage Problème Cause possible Solution Votre TV/écran est Je veux lire des uniquement 2D et Convertissez les films/photos 3D dans le format films/photos 3D sur ma par conséquence ne rouge/cyan. Vous pourrez alors afficher les fichiers TV HD mais l’effet 3D permet pas convertis sur votre TV HD/écran 2D et profiter de ne fonctionne pas.
  • Seite 42 Spécifications Capteur 5 Megapixels CMOS (2592 x 1944) Appareil photo : 3M, 5M, 12M Résolution Caméra : HD 720p 30f (1280 x 720) JPEG, MP4 (H.264) Format de fichier Format des fichiers 3D : Side by Side Nombre d’image par Jusqu’à...
  • Seite 43: Dichiarazione Di Conformità Fcc

    Benvenuti: Gentile Utente, grazie per aver acquistato questo prodotto. Abbiamo investito molto tempo ed energie in questo progetto e speriamo che vi procuri molti anni di servizio senza problemi. Avviso per la sicurezza: Non far cadere, forare o smontare la videocamera; altrimenti si annullerà la garanzia. Evitare il contatto con l’acqua ed asciugarsi le mani prima dell’uso.
  • Seite 44 Ulteriori avvisi sulla visione in 3D: Per guardare un display 3D e ricevere bene gli effetti 3D, lo spettatore dovrebbe essere posizionato di fronte al centro dello schermo a circa 30 cm (12 in) di distanza e non dovrebbe avere un angolo di visione inclinato. Guardare immagini in modalità...
  • Seite 45: Panoramica Del Prodotto

    Preparazione Panoramica del prodotto 1. Pulsante otturatore 2. Pulsante di accensione 3. Microfono 4. Lente sinistra - per ripresa 5. Flash 6. Timer auto-scatto 7. Lente destra – per riprese in 2D 3D 8. Coperchio scomparto batterie 9. Indicatore di energia 10.
  • Seite 46: Caricare La Batteria

    Inserire la batteria / Utilizare una memory card 1. Spingere il coperchio dello scomparto batterie, che si aprirà automaticamente. 2. Posizionare la batteria nello scomparto. Far combaciare i segni + e – e le estremità metalliche con attenzione. Prestare attenzione affinché i segni + e – e i contatti metallici siano combacino perfettamente con i contatti corrispondenti nello scomparto.
  • Seite 47 Accendere o Spegnere 1. Accensione: Premere il pulsante POWER (Accensione) per accendere la videocamera, e l’indicatore di energia si illuminerà di verde. 2. Spegnimento: Tenere premuto il tasto POWER (Accensione) fino a quando l'indicatore di accensione non è spento. Se la videocamera non può essere accesa, controllare che: 1) La batteria sia stata caricata correttamente.
  • Seite 48: Operazioni Di Base

    Operazioni di base Premere questo pulsante ( ) per passare dalla modalità 2D alla modalità 3D. Anche l’immagine visualizzata sullo schermo LCD diventerà in 2D/3D. Premendo questo pulsante durante la riproduzione, i file 2D o 3D possono essere salvati nella videocamera o sulla memory card.
  • Seite 49 Riproduzione File tipo 2: : video : immagine File attuale/File totali File tipo 1: : file 2D Vita batteria : file 3D Immagazzinamento Cornice evidenza : interno : memory card Premere OK per visualizzare in full screen Premere il pulsante Shutter (scatto) per tornare alla schermata di anteprima 1.
  • Seite 50: Cancellare I File

    Cancellare i file Premere il pulsante Playback (Riproduzione) ( ) per accedere alla modalità riproduzione e usare il Joystick per selezionare il file che si desidera cancellare. Premere il pulsante Delete (Cancella) ( ) e ci sono 3 opzioni disponibili: Opzione Descrizione Yes (Si)
  • Seite 51 Voci del Menù Voce Opzione Descrizione 3 mega-pixel Risoluz. 5 mega-pixel 12MP 12 mega-pixel Disattivo Il flash non è attivo. Automatico Il flash si attiva quando la luce dell’ambiente è Flash insufficiente. Attivo Il flash viene fatto attivare ad ogni scatto. Automatico Attiva la modalità...
  • Seite 52 Voce Opzione Descrizione 50Hz Imposta la frequenza del flash a 50Hz o 60Hz. Consultare Frequenza la “Tabella Flash” per ulteriori dettagli. 60Hz Attivo Icona Attiva o disattiva le icone visualizzate sul display. Disattivo Attivo Avvia video Attiva o disattiva schermo power-on. Disattivo La videocamera si spegnerà...
  • Seite 53 Gestione file su PC Collegare la porta USB della videocamera al PC/Notebook con il mini-cavo USB. Accendere la videocamera e l’indicatore di potenza si illuminerà di verde. La videocamera diventerà un disco rimuovibile del PC, dunque sarà possibile leggere tutti i file salvati nella videocamera. Copiare i normali file 2D nella cartella 2D (DCIM\101DIR2D) della memory card.
  • Seite 54 Appendice Vita della Batteria / Tabella della capacità Immagini ferme Video clip (senza flash) Tabella Vita Numero di scatti Tempo di registrazione Batteria (minuti) * L’unità è impostata sulla modalità 3D. Nota: Questa tabella è da intendersi unicamente come riferimento. La reale vita della batteria dipende dalla qualità...
  • Seite 55: Risoluzione Dei Problemi

    Risoluzione dei Problemi Problema Possibile causa Soluzione Riproduco video/foto in Lo schermo della TV Convertire il video/la foto 3D in formato rosso/ciano. 3D sulla mia HDTV. Ma è a 2D e quindi non Quindi riprodurre i file convertiti sulla HDTV a 2D. l’effetto 3D non supporta il formato Indossare occhiali rosso/ciano.
  • Seite 56 Specifiche Sensore di Immagine 5 Mega-pixel CMOS (2592 x 1944) Videocamera: 3M, 5M, 12M Risoluzione Videocamera registratore: HD 720p 30f (1280 x 720) JPEG, MP4 (H.264) Formato File Contenuti in formato 3D: Side by Side Frequenza delle Fino a 30 immagini al secondo immagini Memoria interna Memoria Esterna...
  • Seite 57: Aviso De Seguridad

    Bienvenido: Estimado usuario: gracias por haber adquirido este producto. Hemos invertido mucho tiempo y esfuerzo en su desarrollo y esperamos que pueda disfrutar del producto durante muchos años sin ningún tipo de problema. Aviso de seguridad: No deje caer, perfore ni desmonte la cámara; si lo hace, la garantía quedará invalidada. Evite que entre en contacto con el agua y séquese las manos antes de utilizar el producto.
  • Seite 58 Aviso importante respecto a la visión en 3D: Para ver la pantalla en 3D y recibir adecuadamente los efectos 3D, el espectador debe situarse frente al centro de la pantalla, a unos 30 cm (12 in), sin tener ángulos abruptos. La visión en 3D puede provocar mareos o incluso efectos secundarios, como desorientación y vista cansada.
  • Seite 59: Visión General Del Producto

    Comenzar Visión general del producto 1. Disparador 2. Power 3. Micrófono 4. Lente izquierda - para captura en 3D 5. Flash 6. Indicador temporizador 7. Lente derecha - para captura 2D y 3D 8. Tapa de la batería 9. Indicador de encendido 10.
  • Seite 60: Cargar La Batería

    Cargar la batería / Usar una tarjeta de memoria 1. Empuje la tapa de la batería, se abrirá automáticamente. 2. Coloque la batería en el compartimento. Alinee los extremos metálicos + y – con cuidado. Tenga en cuenta que los extremos metálicos + y – se deben alinear con los contactos correspondientes en el compartimento.
  • Seite 61 Encender o Apagar 1. Encender: Pulse el botón POWER (Encendido) para encender la cámara y los indicadores luminosos se pondrán en verde. 2. Apagar: Mantenga pulsado el botón POWER (Encendido) hasta que se apague el indicador Power. Si no puede encender la cámara, compruebe que: 1) La batería está...
  • Seite 62: Operaciones Básicas

    Operaciones Básicas Pulse este botón ( ) para activar el modo 2D/3D. La imagen mostrada en la pantalla LCD también será en 2D/3D. Si pulsa este botón en reproducción puede cambiar los archivos 2D o 3D almacenados en la cámara o en la tarjeta de memoria.
  • Seite 63 Reproducir Tipo de archivo 2: : video : imagen Archivo actual/Archivos totales Tipo de archivo 1: : archivo 2D Batería : archivo 3D Almacenamiento: Frame destacado : interno : tarjeta de memoria Pulse OK para mostrar en pantalla completa Pulse Shutter (disparador) para obtener una vista preliminary en la pantalla 1.
  • Seite 64: Borrar Archivos

    Borrar Archivos Pulse el botón Playback (Reproducir) ( ) para entrar en el modo reproducción y utilice le Joystick para seleccionar el archivo que quiere borrar. Pulse el botón Delete (Borrar) ( ) y encontrará 3 opciones disponibles: Opción Descripción Yes (Si) Borra el archivo seleccionado No (No)
  • Seite 65 Ítems del menú Ítem Opción Descripción 3 mega-píxeles Resolución 5 mega-píxeles 12MP 12 mega-píxeles Apagar El flash está deshabilitado. Flash Automático El flash se enciende si la luz es insuficiente. Encender El flash se enciende en cada disparo. Automático Activa el modo nocturno. Foto noche Apagar Desactiva el modo nocturno.
  • Seite 66 Ítem Opción Descripción Foto Solo se mostrarán las fotos en el modo reproducción. Encender Enciende el sonido del sistema. Pitido Apagar Apaga el sonido del sistema. 50Hz Ajusta la frecuencia de oscilación a 50Hz o 60Hz. Frecuencia Consulte la “Tabla de Oscilación” para más detalles. 60Hz Encender Habilita o deshabilita los iconos mostrados en la...
  • Seite 67 Gestión de archivos en el PC Conecte el Puerto USB de la cámara al puerto USB del PC/Notebook mediante el cable de USB a mini-USB. Encienda la cámara y los indicadores luminosos se pondrán verdes. La cámara se convertirá en un disco extraíble en el PC y podrá leer todos los archivos almacenados en la cámara.
  • Seite 68 Apéndice Batería / Tabla de capacidad Imagen Sin movimiento Clip de Video (Sin flash) Tabla de Duración Número de disparos Tiempo de grabación de la (en minutos) Batería * La medida se refiere a modo 3D. Nota: Esta tabla solo ofrece cantidades orientativas. La duración real de la batería depende de la calidad de la misma y del nivel de recarga.
  • Seite 69: Solución De Problemas

    Solución de problemas Problema Causa posible Solución Reproduzco video/foto Su TV/pantalla es 2D Convierta los videos/fotos en 3D en formato en 3D en mi HDTV. y no soporta el rojo/cian. Reproduzca y saque los archivos Pero el efecto 3D no formato de los convertidos a su HDTV/pantalla 2D.
  • Seite 70 Especificaciones Sensor de Imagen 5 Mega-píxeles CMOS (2592 x 1944) Cámara: 3M, 5M, 12M Resolución Videocámara: HD 720p 30f (1280 x 720) JPEG, MP4 (H.264) Formato de Archivo Contenido de formato 3D: Lado a Lado Rango de Frame de Hasta 30 frames por segundo Video Memoria Interna Memoria Externa...
  • Seite 71: Aviso De Segurança

    Bem-Vindo: Caro utilizador, agradecemos-lhe pela compra deste produto. Muito investimento de tempo e esforço foram colocados no seu desenvolvimento, e esperamos que ele lhe proporcione muitos anos de serviço sem problemas. Aviso de Segurança: Não deixe cair, não fure e não desmonte a câmara, pois caso contrário a garantia perderá a sua validade.
  • Seite 72 Aviso adicional com respeito à visualização em 3D: Para visualizar a exibição em 3D e receber bem os efeitos em 3D, o telespectador deve estar posicionado de frente ao centro do ecrã a aproximadamente 30 cm (12 in) de distância e não deve ter um ângulo de visualização inclinado.
  • Seite 73: Vista Geral Do Produto

    Inicialização Vista Geral do Produto 1. Botão do Obturador 2. Interruptor 3. Microfone 4. Lente esquerda - para captura em 3D 5. Flash 6. Indicador do temporizador automático 7. Lente direita - para captura em 2D e 3D 8. Tampa da bateria 9.
  • Seite 74: Carregamento Da Bateria

    Carregamento da bateria / Utilizar um cartão de memória 1. Puxe a tampa da bateria, em seguida ela se abrirá automaticamente. 2. Coloque a bateria dentro do compartimento. Alinhe as extremidades metálicas + e - cuidadosamente. Note que os contactos metálicos + e - devem estar alinhados com os contactos correspondentes no compartimento.
  • Seite 75 Ligar ou Desligar 1. Ligar: Prima o botão POWER (Interruptor) para ligar a câmara, e o indicador de energia se acenderá em verde. 2. Desligar: Prima e mantenha premido o botão POWER (Interruptor) até que o indicador de energia esteja apagado. Se a câmara não puder ser ligada, verifique o seguinte para saber se: 1) A bateria está...
  • Seite 76: Operações Básicas

    Operações Básicas Prima este botão ( ) para comutar ao modo 2D/3D. Também, a exibição da imagem no ecrã LCD se tornará 2D/3D. Ao premir este botão na reprodução pode mudar os ficheiros 2D ou 3D armazenados na sua câmara ou cartão de memória.
  • Seite 77 Reprodução Tipo de ficheiro 2: : vídeo : imagem Ficheiro actual/Total de ficheiros Tipo de ficheiro 1: : Ficheiro 2D Vida da bateria : Ficheiro 3D Armazenamento: Realçar moldura : interno : cartão de memória Premir OK para exibir em ecrã inteiro Prima Obturador para retornar ao ecrã...
  • Seite 78 Exclusão de ficheiros Prima o botão Playback (Reproduzir) ( ) para entrar no modo de reprodução e utilize o Joystick para seleccionar o ficheiro que deseja excluir. Prima o botão Delete (Excluir) ( ) e haverão 3 opções disponíveis: Opção Descrição Exclui o ficheiro seleccionado.
  • Seite 79: Itens Do Menu

    Itens do Menu Item Opção Descrição 3 mega-pixéis Resolução 5 mega-pixéis 12MP 12 mega-pixéis Desligado O flash está desactivado. Auto O flash se activa quando a luz ambiental for Flash insuficiente. Ligado O flash está activado em toda fotografia. Auto Activa o modo nocturno.
  • Seite 80 Item Opção Descrição Somente fotografias serão exibidas no Slide Show Foto no modo de reprodução. Ligado Activar o som do sistema. Desligado Desactivar o som do sistema. 50Hz Configurar a freqüência de cintilação para 50Hz ou Cintilação 60Hz. Veja a “Tabela de Cintilação” para obter 60Hz maiores detalhes.
  • Seite 81 Gerenciamento de ficheiro no PC Ligue a porta USB da câmara ao seu PC/Computador Portátil através do USB ao cabo mini-USB. Ligue a câmara e o indicador de energia se acenderá em verde. A câmara se tornará em um disco removível no PC, em seguida poderá ler todos os ficheiros armazenados na câmara.
  • Seite 82 Apêndice Vida da bateria / Tabela de capacidade Imagem Fixa (sem flash) Clipe de vídeo Tabela de Número de disparos Tempo de gravação Vida da (minuto) Bateria * A unidade está configurada ao modo 3D. Nota: Esta tabela é somente para a sua referência. A vida da bateria actual depende da qualidade da sua bateria e nível de recarregamento.
  • Seite 83: Resolução De Problemas

    Resolução de Problemas Problema Possível causa Solução Reproduzi Converta o vídeo/fotografia 3D ao formato Sua TV/monitor é 2D vídeo/fotografia 3D ao vermelho/ciano. Em seguida reproduza e emita o e por isso não meu HDTV de casa. ficheiro convertido na sua HDTV/monitor 2D. Você suporta o formato Mas o efeito 3D não precisará...
  • Seite 84 Especificações Sensor de Imagem CMOS de 5 Mega-pixéis (2592 x 1944) Câmara: 3M, 5M, 12M Resolução Câmara de Vídeo: HD 720p 30f (1280 x 720) JPEG, MP4 (H.264) Formato de Ficheiro Formato do conteúdo 3D: Lado a Lado Velocidade de Quadros Até...
  • Seite 85 Ho geldiniz: Sayın kullanıcımız, bu ürünü satın aldı ınız için te ekkür ederiz. Geli tirilmesi için bir hayli zaman ve yatırım harcanmı olan bu ürünün size yıllarca sorunsuz olarak hizmet edece ini umarız. Güvenlik Uyarısı: Kamerayı dü ürmeyin, delmeyin ya da demonte etmeyin; aksi halde garanti geçersiz sayılacaktır.
  • Seite 86 3D görüntüleme ile ilgili ayrıca bildirimler: 3D görüntüleri izleyebilmek ve 3D efektleri alabilmek için izleyici ekrandan yakla ık 30 cm (12 in) uzaklıkta ekranın ortasına bakmalı ve dik bir izleme açısına sahip olmamalıdır. 3D modunda izleme ba dönmesi ve geç algılama etkileri, uyum sorunu ve göz yorgunlu una neden olabilir.
  • Seite 87 Ba larken Ürüne genel bakı 1. Deklan ör dü mesi 2. Güç dü mesi 3. Mikrofon 4. Sol mercek - 3D çekim için 5. Fla 6. Zamanlayıcı göstergesi 7. Sa mercek - 2D ve 3D çekim için 8. Batarya kapa ı 9.
  • Seite 88 Bataryanın takılması / Bellek kartı kullanılması 1. Batarya kapa ını çekin, otomatik olarak açılacaktır. 2. Bataryayı batarya bölmesine yerle tirin. + ve - metal uçlarını dikkatli biçimde hizalayın. + ve - metal uçlar bölme içinde kar ılık gelen uçlarla hizalanmalıdır. Batarya kapa ını...
  • Seite 89 Açma / Kapatma 1. Güç açık: Foto raf makinesini açmak için POWER (GÜÇ) dü mesine basın; güç göstergesi ye il renkte yanar. 2. Güç kapalı: POWER (GÜÇ) dü mesine basın ve güç göstergesi sönene kadar basılı tutun. Foto raf makinesi açılmıyorsa, lütfen a a ıdaki kontrolleri gerçekle tirin: 1) Batarya do ru ekilde takılmı...
  • Seite 90 Temel lemler 2D/3D modlar arasında geçi yapmak için bu dü meye basın ( ). Ayrıca LCD ekranda gösterilen görüntü de 2D/3D olarak de i tirilecektir. Oynatma esnasında bu dü meye basılarak foto raf makinenizde veya bellek kartınızda depolanan 2D veya 3D dosyaları de i tirebilirsiniz.
  • Seite 91 Oynatma Dosya tipi 2: : video : resim Geçerli dosya/Toplam dosya Dosya tipi 1: : 2D dosya Batarya ömrü : 3D dosya Depolama: Vurgulama çerçevesi : dahili : bellek kartı Tam ekranda görüntülemek için OK dü mesine Önizleme ekranına dönmek basın için Deklan öre basın 1.
  • Seite 92 Dosya silme Oynatma moduna girmek için Play (Oynat) dü mesine ( ) basın ve silmek istedi iniz dosyayı seçmek için kumanda çubu unu kullanın. Delete (Sil) dü mesine ( ) basın; üç seçenek mevcuttur: Seçenek Açıklama Yes (Evet) Seçili dosyayı sil. No (Hayır) Dosyayı...
  • Seite 93 Menü ö eleri Ö e Seçenek Açıklama 3 mega-piksel Resim 5 mega-piksel çözünürlü ü 12MP 12 mega-piksel Kapalı Fla kapalı. Fla ı ı ı Otomatik Ortam ı ı ı yetersiz oldu unda fla yanar. Açık Fla her çekimde yanar. Otomatik Gece modunu açar.
  • Seite 94 Ö e Seçenek Açıklama 60Hz fazla bilgi için bkz. “I ık tablosu”. Açık Ekranda gösterilen simgeleri etkinle tirir veya devre dı ı Simge bırakır. Kapalı Açık Ba langıç Güç açma ekranını etkinle tirin veya devre dı ı bırakın. film Kapalı Foto raf makinesi kısa bir süre sonra otomatik olarak Açık kapanacaktır.
  • Seite 95 Bilgisayarda dosya yönetimi Foto raf makinesinin USB ba lantı noktasını mini-USB kablosunu kullanarak bilgisayarınızın/dizüstü bilgisayarınızın USB ba lantı noktasına ba layın. Foto raf makinesini açın; güç göstergesi ye il renkte yanar. Foto raf makinesi bilgisayarda bir çıkarılabilir disk gibi görüntülenir, foto raf makinesinde depolanan tüm dosyaları okuyabilirsiniz.
  • Seite 96 Batarya ömür / Kapasite tablosu Hareketsiz resim (fla sız) Video klip Batarya Çekim sayısı Kayıt süresi (dakika) Ömür Tablosu * Ünite 3D moduna ayarlıdır. Not: Bu tablo sadece referans amaçlıdır. Gerçek batarya ömrü bataryanızın kalitesine ve arj düzeyine ba lı olarak de i ir. Video klip (720p) Hareketsiz resim Bellek (SD/SDHC)
  • Seite 97: Sorun Giderme

    Sorun Giderme Sorun Olası neden Çözüm 3D video/foto raf TV’niz/ekranınız 3D videoyu/foto rafı kırmızı/mavi formata dosyasını evimdeki 2D’dir ve bu nedenle dönü türün. Ardından dönü türülen dosyayı oynatın HDTV’me gönderdim. 3D dosya biçimini ve 2D HDTV’ye/ekranınıza gönderin. Ayrıca Fakat 3D efekt desteklemez.
  • Seite 98 Teknik Özellikler Görüntü Sensörü 5 Mega-piksel-CMOS (2592 x 1944) Foto raf Makinesi: 3M, 5M, 12M Çözünürlük Video kayıt: HD 720p 30f (1280 x 720) JPEG, MP4 (H.264) Dosya Biçimi 3D içerik formatı: Yan yana Video Karesi Hızı Saniyede 30 kareye kadar Dahili Bellek Harici Bellek SD kart yuvası...
  • Seite 99 (FCC) (FCC)
  • Seite 100 (perceptive after effects) (Parallax Barrier) (LCD)
  • Seite 101 11. 2D/3D 12. 2D/3D LCD USB/HDMI...
  • Seite 102 SD/SDHC...
  • Seite 104 2D/3D 2D/3D 2D 3D 2D/3D...
  • Seite 105 2D/3D 2D 3D...
  • Seite 106 (3D 2D)
  • Seite 107 12MP -2 ~ +2 (10 ) 50Hz 60Hz...
  • Seite 108 50Hz 50Hz 50Hz 50Hz 50Hz 50Hz 50Hz 50Hz 60Hz 60Hz 50Hz 50/60Hz 60Hz 50Hz...
  • Seite 109 2D (DCIM\101DIR2D) (DCIM\100DIR3D) HDTV HDTV HDMI HDMI HDTV HDMI HDTV HDMI HDMI HDTV 2D HDTV 2D HDTV (TotalMedia HD Cam) 3D DCIM\101DIR2D HDTV...
  • Seite 110 (720p) (SD/SDHC) 1400 2800 5600 16GB 11200 ± 30%)
  • Seite 111 2D HDTV/ HDTV 3D HDTV/ HDTV Nvidia 3D TotalMedia HDCam Nvidia 3D Nvidia 3D Nvidia 3D Stereoscopic Player 50Hz 60Hz 3D HDTV/...
  • Seite 112 CMOS (2592 x 1944) HD 720p 30f (1280 x 720) JPEG, MP4 (H.264) 32GB SDHC 3D/2D 3D TFT F2.8 1 ~ 1/2000 (±2 EV IGBT / 3 / 5 HDTV (HDMI USB 2.0 NP40 700mAh 103.9 x 68.5 x 21.4...
  • Seite 114 30cm (12 in) (LCD)
  • Seite 115 11. 2D/3D 12. 2D/3D LCD 13. 5- USB/HDMI...
  • Seite 116 SD/SDHC...
  • Seite 117 POWER ( POWER (...
  • Seite 118 2D/3D 2D/3D 2D 3D 2D/3D ( 3D / ( ) Shutter ( 1m~4m (3ft~13ft) Record ( / ( ) Record (...
  • Seite 119 Playback Playback ( 2D/3D 2D 3D Shutter ( Shutter (...
  • Seite 120 Playback ( Delete ( (3D 2D)
  • Seite 121 12MP -2 ~ +2 (10 ) All ( 50Hz 60Hz...
  • Seite 122 50Hz 50Hz 50Hz 50Hz 50Hz 50Hz 50Hz 50Hz 60Hz 60Hz 50Hz 50/60Hz 60Hz 50Hz...
  • Seite 123 2D (DCIM\101DIR2D) 3D (DCIM\100DIR3D) HDTV HDTV HDMI HDMI HDTV HDMI HDTV HDMI HDMI “Playback”( HDTV 2D HDTV 3D 2D HDTV (TotalMedia HD Cam) 3D “DCIM\101DIR2D” HDTV...
  • Seite 124 (720p) (SD/SDHC) (min.) (500 1400 2800 5600 16GB 11200 ± 30%)
  • Seite 125 2D HDTV/ HDTV 3D HDTV/ side-by-side ( HDTV 3D PC/ “Nvidia 3D” TotalMedia HDCam “Nvidia 3D” side-by-side ( “Nvidia 3D” ) 3D “Nvidia 3D ” “Stereoscopic Player ( )” 50Hz 60Hz 3D HDTV/...
  • Seite 126 CMOS (2592 x 1944) 3M, 5M, 12M HD 720p 30f (1280 x 720) JPEG, MP4 (H.264) 32GB SDHC) 3D/2D 2.4” 3D TFT 1 m ~ F2.8 1 ~ 1/2000 (±2 EV IGBT / 3 / 5 TV ( HDTV (HDMI USB 2.0 NP40 700mAh (LxHxD)
  • Seite 127 . (1) , (2)
  • Seite 128 30 cm (12 in) Parallax Barrier “Parallax Barrier” 3D . Parallax barrier (LCD) parallax barrier...
  • Seite 129 - 3D - 2D 11. 2D/3D 12. 2D/3D LCD 13. 5- 16. Mini USB/HDMI...
  • Seite 130 – – 3. SD/SDHC mini-USB 2. PC USB to mini-USB mini USB PC /...
  • Seite 131 2. ” Language ( )” : 2D : 3D...
  • Seite 132 2D/3D . LCD 2D/3D . 3D . 2D/3D “Parallax Barrier” 3D . parallax barrier . 3D ). 3D 1m~4m (3ft~13ft)
  • Seite 133 : 2D : 3D 2D/3D...
  • Seite 134 Yes ( ) All ( 2D).
  • Seite 135 3 mega-pixels 5 mega-pixels 12MP 12 mega-pixels -2 ~ +2 . (10 Beep 50Hz 50Hz 60Hz 60Hz , “ ”...
  • Seite 136 50Hz 50Hz 50Hz 50Hz 50Hz 50Hz 50Hz 50Hz 60Hz 60Hz 50Hz 50/60Hz 60Hz 50Hz...
  • Seite 137 USB to mini-USB . PC 2D (DCIM\101DIR2D) . 2D (DCIM\100DIR3D) HDTV 1. HDTV 2. HDMI HDMI-in HDTV 3. HDMI HDTV , HDMI HDMI “ ” HDTV HDTV 2D “side-by-side” 2D HDTV (TotalMedia HD Cam) “DCIM\101DIR2D” HDTV...
  • Seite 138 (720p) (SD/SDHC) ( .) (5 mega-pixels) 1400 2800 5600 16GB 11200 ± 30%).
  • Seite 139 HDTV 2D HDTV/ 3D HDTV/ 3D HDTV “side-by-side” 3D PC/ “Nvidia 3D” TotalMedia HDCam “Nvidia 3D” “side-by-side” 3D “Nvidia 3D” “Nvidia 3D kit” 3) 3D “Stereoscopic Player” “side-by-side” 3D 50Hz 60Hz HDTV/...
  • Seite 140 5 Mega-pixels CMOS (2592 x 1944) : 3M, 5M, 12M : HD 720p 30f (1280 x 720) JPEG, MP4 (H.264) : Side by Side 32GB SDHC) 3D/2D Yes, 2.4” 3D TFT 1 m ~ F2.8 1 ~ 1/2000 (±2 EV IGBT / 3 / 5 HDTV (HDMI...
  • Seite 141 Part 15 Class B...
  • Seite 142 1. 3D 30cm (12 2. 3D “Parallax Barrier” 3D (LCD)
  • Seite 143 - 3D - 2D 11. 2D/3D 12. 2D/3D LCD 13. 5 USB/HDMI...
  • Seite 144 + – 3. SD/SDHC mini-USB 2. PC...
  • Seite 145 POWER ( POWER (...
  • Seite 146 2D/3D 2D/3D 2D/3D “Parallax Barrier ( )” 3D / ( ) 2. Shutter ( 1m 4m (3ft 13ft) 1. Record ( / ( ) 3. Record (...
  • Seite 147 1. Playback ( 2D/3D / ( )
  • Seite 148 Playback ( Delete ( Yes ( No ( All (...
  • Seite 149 12MP 1200 -2 ~ +2 (10 ) 50Hz 50Hz 60Hz “ 60Hz ”...
  • Seite 150 50Hz 50Hz 50Hz 50Hz 50Hz 50Hz 50Hz 50Hz 60Hz 60Hz 50Hz 50/60Hz 60Hz 50Hz...
  • Seite 151 2D (DCIM\101DIR2D) 3D (DCIM\100DIR3D) HDTV 1. HDTV 2. HDMI HDMI HDTV 3. HDMI 5. HDTV HDMI HDMI “Playback” HDTV 2D HDTV HDTV 3D (TotalMedia HD Cam) DCIM\101DIR2D” HDTV...
  • Seite 152 (SD/SDHC) (720p) ( ) 1400 2800 5600 16GB 11200 +-30%)
  • Seite 153 HDTV HDTV/ 3D HDTV 3D HDTV/ (1) 3D PC/ Nvidia 3D” TotalMedia HDCam Nvidia3D" (2) PC/ Nvidia 3D” Nvidia 3D " (3) “Stereoscopic Player” 50Hz 60Hz HDTV/...
  • Seite 154 CMOS (2592 x 1944) 3M, 5M, 12M HD 720p 30f (1280 x 720) JPEG, MP4 (H.264) 32GB SDHC) 3D/2D 2.4” 3D TFT 3D 1 m ~ F2.8 1 ~ 1/2000 (±2 EV IGBT / 3 / 5 HDTV (HDMI USB 2.0 NP40 700mAh (LxHxD) 103.9 x 68.5 x 21.4 mm...
  • Seite 156 " "...
  • Seite 157 ) " Shutter " ) " Power " – – ) " Record " ) " Playback " ) " Delete " USB/HDMI...
  • Seite 158 SD/SDHC...
  • Seite 159 ) " POWER " ) " POWER " " " ) " Menu "...
  • Seite 160 " " ) " " " ) Record " ) " Record "...
  • Seite 161 ) " " " Playback " ) " 2D/3D " ) " Shutter " ) " Shutter "...
  • Seite 162 ) " Playback " ) " Delete "...
  • Seite 163 -2 ~ +2 " "...
  • Seite 165 (DCIM\101DIR2D) (DCIM\100DIR3D) HDTV HDTV HDTV HDMI HDMI HDMI HDMI HDMI HDTV ." " HDTV HDTV " " HDTV TotalMedia HD Cam HDTV " DCIM\101DIR2D "...
  • Seite 166 SD/SDHC 1400 2800 5600 11200 ±...
  • Seite 167 HDTV HDTV HDTV " " HDTV " Nvidia 3D " " Nvidia 3D " TotalMedia HDCam " " Nvidia 3D " " Nvidia 3D " " " Stereoscopic Player " " " HDTV...
  • Seite 168 1944 × 2592 CMOS HD 720p 30f (1280 x 720) JPEG, MP4 (H.264) SDHC × 1 m ~ F2.8 2000 × ±2 EV IGBT 5 / 3 / HDMI HDTV USB 2.0 NP40 21.4 × 68.5 × 103.9 × ×...
  • Seite 169 82-906-90010...

Inhaltsverzeichnis