Herunterladen Inhalt Inhalt Diese Seite drucken

Werbung

Verfügbare Sprachen
  • DE

Verfügbare Sprachen

  • DEUTSCH, seite 5
Quick Start Guide
To support the green concept, we print only this quick guide. Please refer to the
electronic manual in the accessory CD for more operational instructions.
Do not throw the appliance away with the normal household waste at the end of its life, but
hand it in at an official collection point for recycling. By doing this you will help to preserve the
environment.
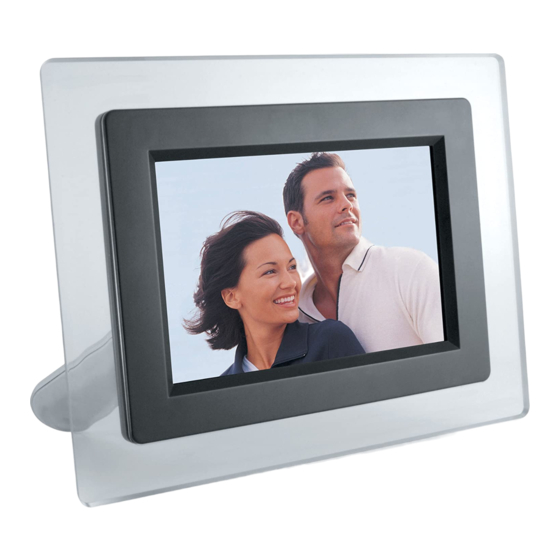
1) Photo frame parts
Front Frame
Decoration Board
ESC Button
Up Button
Right Button
Down Button
Power Indicator
USB Port
DC Power Jack
SD/SDHC/MMC Card Slot
LCD Panel
Venting Openings
Left Button
Enter Button
Power Button
Stand


Werbung

Inhaltsverzeichnis
loading

Inhaltszusammenfassung für AIPTEK RAFFAELLO

  • Seite 1 Quick Start Guide To support the green concept, we print only this quick guide. Please refer to the electronic manual in the accessory CD for more operational instructions. Do not throw the appliance away with the normal household waste at the end of its life, but hand it in at an official collection point for recycling.
  • Seite 2: Attaching The Stand

    2) Attaching the stand Insert the front end of the stand into the slot on the back frame as indicated. Push the stand upward ( ) until the stand is properly locked. To detach the stand, push the stand downward ( until it is removed.
  • Seite 3 5) The Favorite function Select this item to start playing your favorite pictures saved in the “Favorite” folder (internal memory). Note that when the photo frame stays idle for over 5 minutes after powered on, this function will automatically start and a slideshow will take place.
  • Seite 4 8) Buttons usage Button Location Function 1) Move up the cursor at the menu. Up Button 2) Rotate picture clockwise while viewing. 1) Move down the cursor at the menu. Down Button 2) Rotate picture counter-clockwise while viewing. 1) Move the cursor to the left at the menu. Left Button 2) Back to upper-level folder while in file list.
  • Seite 5 Start Zur Unterstützung des Umweltschutzes drucken wir nur diese Kurzanleitung. Weitere Anweisungen zur Bedienung finden Sie im elektronischen Handbuch auf der Zubehör-CD. Geben Sie das Gerät am Ende der Lebensdauer nicht in den normalen Hausmüll. Bringen Sie es zum Recycling zu einer offiziellen Sammelstelle. Auf diese Weise helfen Sie die Umwelt zu schonen.
  • Seite 6: Standfuß Anstecken

    2) Standfuß anstecken Stecken Sie die runde Seite des Standfußes in den Schlitz auf der Rahmen-Rückseite ein, wie in der Zeichnung beschrieben. Schieben Sie den Standfuß aufwärts ( ) bis der Standfuß richtig sitzt. Um den Standfuß zu lösen, schieben Sie den Standfuß abwärts ( ) bis er entfernt ist.
  • Seite 7 5) Favorite- Funktion Wählen Sie diese Funktion, um die im “Favorite” Ordner (interner Speicher) gespeicherten Bilder abzuspielen. Wenn der Bilderrahmen nach dem Einschalten länger als 5 Minuten untätig bleibt, wird die Diashow automatisch gestartet. Sie können immer den ESC Knopf drücken, um zu unterbrechen und zurück zur Hauptmenü...
  • Seite 8: Knopf-Anwendung

    8) Knopf-Anwendung Knopf Ortung Funktion 1.) Cursor im Menü aufwärts bewegen. Hoch Knopf 2.) Bei Betrachtung das Bild im Uhrzeigersinn drehen. 1.) Curser im Menü abwärts bewegen. 2.) Bei Betrachtung das Bild gegen den Uhrzeigersinn Herunter Knopf drehen. 1.) Curser im Menü nach links bewegen. 2.) In der Datei-Funktion (File Manager) in der Links Knopf übergeordneten Ordner wechseln.
  • Seite 9 Démarrage Pour protéger l’environnement, nous n’imprimons que ce guide rapide. Veuillez vous référer au manuel électronique du CD accessoire pour davantage d’instructions sur l’utilisation. Ne pas jeter cet appareil avec les détritus ménagers à la fin de sa vie mais apportez-le à un centre officiel de recyclage.
  • Seite 10 2) Fixer le support Insérer l’extrémité avant du support dans la fente sur le cadre arrière comme indiqué. Appuyer sur le support vers le haut ( ) jusqu’à ce qu’il soit adéquatement verrouillé. Pour détacher le support, appuyer vers le bas ( ) jusqu’à...
  • Seite 11 5) La fonction Favoris Sélectionner cette fonction pour commencer à lire vos images favorites sauvegardées dans le dossier “Favoris” (mémoire interne). Notez que lorsque le cadre photo reste inactif pendant plus de 5 minutes après l’allumage, cette fonction démarre automatiquement et un diaporama est lancé. Vous pouvez toujours presser sur le bouton ESC pour interrompre et retourner dans l’interface principale.
  • Seite 12 8) Usage des boutons Bouton Location Fonction 1) Déplacer le curseur vers le haut dans le menu. Bouton haut 2) Faire pivoter l’image dans le sens horaire lors de la visualisation. 1) Déplacer le curseur vers le bas dans le menu. Bouton bas 2) Faire pivoter dans le sens antihoraire lors de la visualisation.
  • Seite 13: Come Cominciare

    Come cominciare Per dimostrare il nostro impegno a favore dell’ambiente stampiamo solo questa guida rapida. Consultare il manuale in formato elettronico presente nel CD in dotazione per avere maggiori informazioni sul funzionamento. Non gettare via l’apparecchio insieme ai rifiuti normali della casa, quando finisce la sua durata, ma consegnarlo ad un punto di raccolta collettivo per il riciclaggio.
  • Seite 14: Selezione Della Funzione

    2) Attacco del supporto o Piede di sostegno Inserire il capo frontale del supporto nello slot del retro della cornice come indicato. Spingere il supporto verso l’alto ( ) fino a che è debitamente bloccato. Per staccare il supporto, spingere il supporto verso il basso ( fino a quando viene rimosso.
  • Seite 15 5) Funzione Preferite Selezionare questa voce per cominciare ad eseguire le foto preferite salvate nella cartella “Preferite” (memoria interna). Notare che quando la cornice di foto rimane inattiva per oltre 5 minuti dopo essere stata accesa, questa funzione automaticamente comincia e avviene una proiezione continuata. Potete sempre premere il Pulsante ESC per interrompere e ritornare all’interfaccia principale.
  • Seite 16 8) Uso dei pulsanti Pulsante Posizione Funzione 1) Sposta in su il cursore nel menu. Pulsante Su 2) Ruota la foto in senso orario mentre si visualizza. 1) Sposta in giù il cursore nel menu. Pulsante giù 2) Ruota la foto in senso antiorario mentre si visualizza. 1) Sposta il cursore verso il menu della sinistra.
  • Seite 17 Inicio En apoyo a los esfuerzos para conservar el medioambiente, imprimimos solamente esta guía rápida. Por favor, consulte el manual electrónico en el CD accesorio para más instrucciones operacionales. Cuando el aparato termine de ser usable, no lo bote con otras materias domésticas, en cambio, lo deje en un lugar indicado para reciclar para preservar el ambiente.
  • Seite 18 2) Pegado de la base o Pie de apoyo Inserte la punta frontal de la base en la ranura en el marco trasero como indicado. Empuje la base hacia arriba ( ) hasta que la base quede enganchada debidamente. Para despegar la base, empuje la base hacia abajo ( ) hasta que sea removida.
  • Seite 19 5) La función Favorito Seleccione este elemento para iniciar reproduciendo sus fotos favoritas guardadas en la carpeta “Favorita” (memoria interna). Nótese que cuando el marco para fotos queda inactivo por más de 5 minutos luego del prendido, esta función sóla inicia un espectáculo de diapositivas. Ud puede siempre presionar ESC para interrumpir y volver a la interfase principal.
  • Seite 20 8) Uso de los botones Botón Localización Función 1) Mover el cursor hacia arriba en el menú. Botón Arriba 2) Girar la foto en el sentido del reloj para visualizar. 1) Mover el cursor hacia abajo en el menú. Botón abajo 2) Girar la foto en el sentido contrario del reloj para visualizar.
  • Seite 21 Om te beginnen Om het groene milieuconcept te ondersteunen, hebben wij alleen deze snelgids gedrukt. Raadpleegt de elektronische handleiding op de bijgeleverde cd voor meer instructies over het gebruik. Elektrisch en elektronisch apparatuur kunnen materialen bevatten, die schadelijk zijn voor het milieu and de gezondheid, en moeten daarom ingeleverd worden bij een gespecialiseerde afvalverwerkingsinstallatie of teruggebracht worden naar uw leverancier, zodat de juiste recycling kan plaatsvinden.
  • Seite 22 2) Het bevestigen van de voet Plaats de voorste kant van de voet in de sleuf op de achterkant van de lijst, zoals aangegeven. Druk de voet naar boven ) tot de voet volledig vast zit. Om de voet los te maken, dient u de voet naar beneden ( ) te duwen.
  • Seite 23 5) De functie Favorite (Favorieten) Selecteer deze functie om uw favoriete afbeeldingen, die zich in de map “Favorite” (van het intern geheugen) bevinden, weer te geven. Indien de fotolijst na het aanzetten 5 minuten inactief blijft, zal deze functie automatisch van start gaan en zal er een diavoorstelling van uw favoriete foto’s weergegeven worden.
  • Seite 24 8) Gebruik van de knoppen Knop Locatie Functie 1) Verplaatst de cursor omhoog in het menu. Knop omhoog 2) Draait de afbeelding met de klok mee tijdens de weergave. 1) Verplaatst de cursor omlaag in het menu. Knop omlaag 2) Draait de afbeelding tegen de klok in tijdens de weergave.
  • Seite 25 Início Por forma a apoiar as questões ambientais, imprimimos apenas este guia de consulta rápida. Por favor consulte o manual electrónico no CD acessório para mais informações relativas à utilização. Quando o aparelho termine de ser usável, não dispor-lhe com outras matérias domésticas, deixar-lhe em um lugar indicado para reciclar para preservar o ambiente.
  • Seite 26 2) Fixação da base o Apoio Inserir a ponta frontal da base na ranhura no quadro traseiro como indicado. Empurrar a base acima ( até a base quede ligada devidamente. Para desligar a base, empurrar a base abaixo ( ) até seja movida. 3) Selecionar funções Ligar o quadro para fotos e o interface principal aparecerá...
  • Seite 27 5) A função Favorito Selecione este elemento para iniciar reproduzindo suas fotos favoritas guardadas na dobradeira “Favorita” (memória interna). Notar-se que quando o marco para fotos queda inativo por mais de 5 minutos logo do ligado, esta função somente inicia para uma exibição de diapositivas. Você pode sempre pressionar ESC para interrumper e tornar ao interface principal.
  • Seite 28 8) Uso dos botões Botão Localização Função 1) Mover o cursor acima do menu. Botão Acima 2) Tornar a foto no sentido do relógio para visualizar. 1) Mover o cursor abaixo do menu. Botão abaixo 2) Tornar a foto no sentido contrário do relógio para visualizar.
  • Seite 29 Na początek Ponieważ popieramy ideę oszczędzania zasobów naturalnych, w wersji drukowanej przekazujemy wyłącznie tę instrukcję. Dalsze instrukcje działania można uzyskać w podręczniku elektronicznym na pomocniczym dysku CD. Nie należy wyrzucać tego urządzenia po zakończeniu jego żywotności z normalnymi śmieciami domowymi, ale należy przekazać je do oficjalnego punktu zbiórki w celu recyklingu. Pomoże to w ochronie środowiska naturalnego.
  • Seite 30: Wybór Funkcji

    2) Mocowanie statywu Włóż przedni koniec statywu do gniazda z tyłu ramki tak jak to pokazano. Wyciągaj statyw do góry ( ) dopóki nie będzie prawidłowo zablokowany. Aby odłączyć statyw, naciskaj go w dół ( ) dopóki się nie odłączy od ramki. 3) Wybór funkcji Włącz ramkę...
  • Seite 31: Funkcja Ulubione

    5) Funkcja Ulubione Wybierz tą funkcję aby zacząć pokaz zdjęć zapisanych w katalogu „Ulubione” (pamięć wewnętrzna). Zwróć uwagę na to, że jeśli ramka pozostanie w stanie bezczynności przez więcej niż 5 minut po jej włączeniu, funkcja ta włączy się automatycznie, i rozpocznie się pokaz slajdów. Aby przerwać i wrócić do głównego menu, naciśnij przycisk ESC.
  • Seite 32: Funkcje Przycisków

    8) Funkcje przycisków Przycisk Położenie Funkcja 1) W menu - przesuń kursor do góry. Do gory 2) W czasie oglądania - obróć zdjęcie w prawo. 1) W menu - przesuń kursor w dół. W dół 2) W czasie oglądania - obróć zdjęcie w lewo. 1) W menu - przesuń...

Inhaltsverzeichnis