Hama 118569 Bedienungsanleitung
Inhaltsverzeichnis
Verfügbare Sprachen
Verfügbare Sprachen
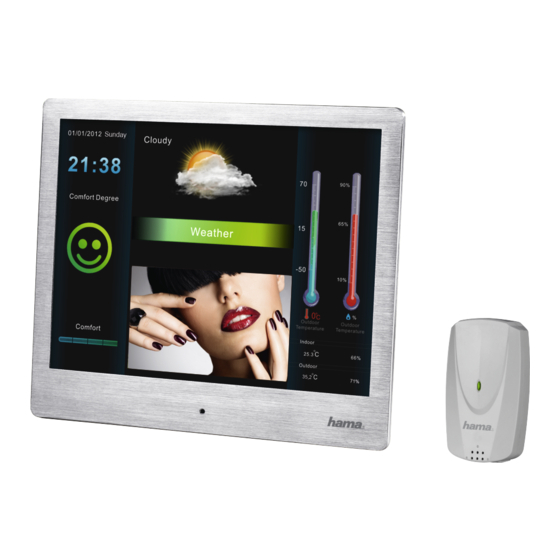
Digital Photo Frame with Weather Station
Digitaler Bilderrahmen mit Wetterstation
118569
095282
00118569
00095282
Operating Instructions
Bedienungsanleitung
Mode d'emploi
Instrucciones de uso
Istruzioni per l'uso
Gebruiksaanwijzing
Instrukcja obsługi
Használati útmutató
Návod k použití
Návod na použitie
Manual de instruções
Manual de utilizare
GB
D
F
E
I
NL
PL
H
CZ
SK
P
RO
Kapitel
Inhaltsverzeichnis
Fehlerbehebung

Verwandte Anleitungen für Hama 118569


Inhaltszusammenfassung für Hama 118569
- Seite 1 00118569 00095282 Digital Photo Frame with Weather Station Digitaler Bilderrahmen mit Wetterstation Operating Instructions Bedienungsanleitung Mode d‘emploi Instrucciones de uso 118569 095282 Istruzioni per l‘uso Gebruiksaanwijzing Instrukcja obsługi Használati útmutató Návod k použití Návod na použitie Manual de instruções Manual de utilizare...
- Seite 26 Inhaltsverzeichnis Einführung........28 Reinigung und Pflege ....... 44 Vorwort..........28 Sicherheitshinweise........44 Urheberrecht..........28 Reinigung ..........44 Warnhinweise ........28 Fehlerbehebung........ 44 Bestimmungsgemäße Verwendung ..29 Sicherheitshinweise........44 Haftungsbeschränkung ......29 Fehlerursachen und -behebung....45 Sicherheitshinweise......30 Entsorgung ........46 Aufbau und Funktion ....... 31 Gerät entsorgen ........46 Digitaler Bilderrahmen (Rückansicht) ..31 Batterien entsorgen .......46 Fernbedienung........32 Entsorgung der Verpackung ....46...
-
Seite 27: Einführung
Vorwort Sehr geehrte Kundin, sehr geehrter Kunde, mit dem Kauf dieses digitalen Bilderrahmens haben Sie sich für ein Qualitätsprodukt von Hama entschieden, welches hinsichtlich Technik und Funktionalität dem modernsten Entwicklungsstandard entspricht. Lesen Sie die hier enthaltenen Informationen, damit Sie mit Ihrem Gerät schnell vertraut werden und seine Funktionen in vollem Umfang nutzen können. -
Seite 28: Bestimmungsgemäße Verwendung
Bestimmungsgemäße Verwendung Dieses Gerät ist nur zum privaten Gebrauch in geschlossenen Räumen zum Anzeigen von Fotos bestimmt. Eine andere oder darüber hinausgehende Benutzung gilt als nicht bestimmungsgemäß. Warnung Gefahr durch nicht bestimmungsgemäße Verwendung! Von dem Gerät können bei nicht bestimmungsgemäßer Verwendung und/oder andersartiger Nutzung Gefahren ausgehen. -
Seite 29: Sicherheitshinweise
Sicherheitshinweise • Kontrollieren Sie das Gerät vor der Verwendung auf äußere sichtbare Schäden. Nehmen Sie ein beschädigtes Gerät nicht in Betrieb. • Schützen Sie das Gerät vor Feuchtigkeit und dem Eindringen von Flüssigkeiten bzw. Gegenständen. Bei Kontakt mit Flüssigkeit sofort den Netzadapter von der Stromversorgung trennen. -
Seite 30: Aufbau Und Funktion
Aufbau und Funktion Digitaler Bilderrahmen (Rückansicht) Steuerungstaste Aufwärts / 1 SD/SDHC/MMC zur nächste Datei wechseln Anschlussbuchse für 2 Links - Steuerungstaste Temperatur-Innensensor 3 Rechts - Steuerungstaste 3 USB Typ A (Host) Anschlussbuchse für 4 Play/Pause/OK/ENTER - Taste Netzadapter Steuerungstaste Abwärts / zur letzte Datei wechseln Exit / Zurück - Taste MENU = 2x... -
Seite 31: Fernbedienung
Fernbedienung 1 POWER On/Off 2 SETUP Zurück zur Systemeinstellung Photo gegen den Uhrzeiger- 3 ROTATE sinn drehen. 4 Aufwärts 5 ZOOM Bild Zoom - Funktion 6 Links Vorheriges Photo betrachten Bestätigungs-Taste; Play/pause ENTER - Taste im Abspielmodus 8 Rechts Nächstes Photo betrachten Slide Startet die Photo Slideshow Show... -
Seite 32: Lieferumfang Und Transportinspektion
Lieferumfang und Transportinspektion Das Gerät wird standardmässig mit folgenden Komponenten geliefert: • Digitaler Bilderrahmen • Netzadapter • Fernbedienung • Temp.-Innensensor • Temp.-Außensensor • Bedienungsanleitung Hinweis Prüfen Sie die Lieferung auf Vollständigkeit und auf sichtbare Schäden. Melden Sie eine unvollständige oder beschädigte Lieferung umgehend Ihrem Lieferanten/Händler. Bedienung und Betrieb Die Menüführung Das Gerät ist mit einer benutzerfreundlichen Menüführung ausgestattet. -
Seite 33: Systemeinstellungen
Hinweis Wenn Sie im Hauptmenü bleiben und zu keiner anderen Funktion wechseln, öffnet das Gerät automatisch nach ca. 30 Sek. das Wetter-Menü. Aufgrund dieser Funktion ist ein Abspielen einer Foto-Slideshow nach dem Einschalten des Gerätes nicht möglich. Systemeinstellungen Um in das Setupmenü zu gelangen, drücken Sie nun die [SETUP]-Taste auf ihrer Fernbedienung, oder bewegen Sie sich mit den [◄][►]-Tasten auf der Rückseite des Gerätes oder der Fernbedienung auf den Menüpunkt... - Seite 34 Folgende Einstellungen können Sie hier vornehmen: Hier können Sie zwischen zwei Anzeigemodi Anzeigemodus wählen Bild - Anzeige Bild zum Bildschirm ausrichten Wählen Sie die Zeitdauer aus, mit dem die Foto - Intervall Photos ablaufen sollen (5sec/15sec/30sec/ Einstellungen 1min/5min/15min) Diashow Funktionsmenü zum Einstellen der Wiederhol- Wiederholen schleife (Zufällig oder in Reihenfolge) Funktionsmenü...
-
Seite 35: Funktionen
Funktionen Foto Das Gerät startet automatisch mit der Photo-Diashow sobald Sie ein Speichermedium eingelegt haben. Bei nicht eingelegtem Speichermedium, startet das Gerät mit den abgespeicherten Daten des internen Speichers. Sie können auch wie folgt im Photo Menü navigieren • Drücken Sie mit den [◄][►][▲][▼]-Tasten auf ihrem Gerät oder der Fernbedienung auf das Symbol und drücken Sie die [OK]-Taste •... -
Seite 36: Wetter
Hinweis Wenn Sie im Hauptmenü bleiben und zu keiner anderen Funktion wechseln, öffnet das Gerät automatisch nach ca. 30 Sek. das Wetter-Menü. Aufgrund dieser Funktion ist ein Abspielen einer Foto-Slideshow nach dem Einschalten des Gerätes nicht möglich. Wetter Drücken Sie mit den [◄][►][▲][▼]-Tasten auf ihrem Gerät oder der Fernbedienung auf das Symbol und drücken Sie die [OK]-Taste um folgende Menüebene zu öffnen: Datum / Wochentag Innen-Luftfeuchtigkeits-Anzeige... -
Seite 37: Wettervorhersage Und Symbole
Hinweis • Nachdem Einschalten startet das Gerät zuerst immer mit dem Hauptmenü, nach ca. 30 Sek. wechselt das Gerät automatisch in das Wetter-Menü. • Die Uhrzeit, sowie die Datums- und Wochentagsanzeige, wird nicht über Funk aktualisiert. Unter „Datum-Einstellung“ ist es Ihnen möglich die aktuellen Kalenderdaten und die Uhrzeit einzustellen. -
Seite 38: Wetter-Indikator
Wetter-Indikator Der Wetter-Indikator zeigt durch die Symbole die Luftfeuchtigkeit und den Wohlfühlfaktor in der Umgebung wie folgt an: Luftfeuchtigkeit zwischen 40%~70% zeigt "Komfort" Luftfeuchtigkeit größer 70% zeigt "Nass" Luftfeuchtigkeit weniger 40% zeigt "Trocken" Hinweis • Die Prognosegüte der auf dem allgemeinen Luftdruck beruhenden Wettervorhersage liegt bei etwa 70%. -
Seite 39: Einrichten Der Wetterstation Am Digitalen Bilderrahmen
Einrichten der Wetterstation am digitalen Bilderrahmen • Schliessen Sie den Innensensor in die dafür vorgesehene Steckerbuchse auf der Rückseite des Gerätes an • Herstellen einer Verbindung des Außensensors mit dem Hauptgerät Das Hauptgerät, der Innensensor, empfängt vom Außensensor automatisch Daten über die Außentemperatur, sobald Sie die Batterien eingelegt haben. Das Batteriefach befindet sich auf der Rückseite des Außensensors. - Seite 40 Achtung Der Außensensor darf nicht in oder unter Wasser aufgestellt bzw. angebracht werden. Wählen Sie einen vor Regen geschützten Aufstellort ohne direkte Sonneneinstrahlung. Der maximale Übertragungsbereich zwischen dem Außensensor und der Wetterstation Innen beträgt ca. 12 m (ca. 60 m im offenen Gelände). Wir empfehlen die Montage an einer Nordwand ihres Gebäudes.
- Seite 41 Datei Drücken Sie mit den [◄][►][▲][▼] auf ihrem Gerät oder der Fernbedienung auf das Symbol und drücken Sie die [OK]-Taste um folgende Menüebene zu öffnen: Hinweis • Im Menü bewegen Sie sich mit den [▲][▼]-Tasten und wählen die gewünschte Datei aus, mit der [OK]-Taste bestätigen Sie ihre Auswahl und die Datei/Foto wird angezeigt.
- Seite 42 Kalender Drücken Sie mit den [◄][►][▲][▼] auf ihrem Gerät oder der Fernbedienung auf das Symbol und drücken Sie die [OK]-Taste. Das Gerät zeigt standardmäßig folgende Kalenderanzeige: Hinweis Bei einem eingelegten Speichermedium werden die darauf abgespeicherten Bilder nacheinander abgespielt (Slideshow). Durch drücken der [OK]-Taste auf ihrer Fernbedienung können Sie auch in eine klassische Uhranzeige wechseln: Hinweis Die Uhrzeit sowie die Datums- und Wochentagsanzeige wird nicht über Funk aktualisiert.
-
Seite 43: Reinigung Und Pflege
Reinigung und Pflege In diesem Kapitel erhalten Sie wichtige Hinweise zur Reinigung und Pflege des Gerätes. Sicherheitshinweise Achtung Beschädigung des Gerätes durch Feuchtigkeit! • Stellen Sie sicher, dass bei der Reinigung keine Feuchtigkeit in das Gerät eindringt, um eine irreparable Beschädigung des Gerätes zu vermeiden. Reinigung Das Display des Gerätes befindet sich hinter einem Schutzglas. -
Seite 44: Fehlerursachen Und -Behebung
Fehlerursachen und -behebung Die nachfolgende Tabelle hilft bei der Lokalisierung und Behebung kleinerer Störungen: Fehler Mögliche Ursache Behebung Gerät ist ausgeschaltet Schalten Sie das Gerät ein. Stellen Sie sicher, dass der Netz- Netzadapter nicht korrekt adapter in der Steckdose steckt angeschlossen und am Gerät angeschlossen ist. -
Seite 45: Entsorgung
Hinweis Wenn Sie mit den vorstehend genannten Schritten das Problem nicht lösen können, wenden Sie sich bitte an den Kundendienst. Entsorgung Gerät entsorgen Werfen Sie das Gerät keinesfalls in den normalen Hausmüll. Dieses Produkt unterliegt der europäischen Richtlinie 2002/96/EC-WEEE (Waste Electrical and Electronic Equipment). -
Seite 46: Anhang
Anhang Technische Daten Allgemein 118569 Stromversorgung Eingang 100-240 V AC / 50/60 Hz / 0,3 A Max Stromversorgung Ausgang 5 V DC / 1.5 A Leistungsaufnahme < 5,2 W 220 x 54 x 184 mm (mit Standfuss) Abmessungen (L x B x H) -
Seite 47: Unterstützte Dateiformate
Fernbedienung Batterie Knopfzelle (CR 2025) Unterstützte Dateiformate JPG, JPEG bis zu 48 Megapixel Temperatursensor Batterie Typ AAA (LR03), 1,5 V... -
Seite 48: Menüstruktur Des Dpf
Menüstruktur des DPF Foto Foto-Slideshow Auswahl eines Speichermediums Wetter Außen-/Innentemperatur Wettervorhersage Datum/Uhrzeit Wetter-Indikator Komfort-Anzeige Kalender Kalender mit Foto-Slideshow Klassische Uhranzeige Einstellungen Foto-Einstellungen Anzeigemodus Anzeigeformat Dauer der Dia-Slideshow Slideshow wiederholen Übergangseffekte Datum-Einstellungen Anzeigemodus Datum Uhrmodus Uhrzeit Uhrzeit anzeigen Temperatur anzeigen Systemeinstellungen Sprache Helligkeit Kontrast... -
Seite 49: Supportinformationen
Supportinformationen Bei defekten Produkten wenden Sie sich bitte an Ihren Händler oder der Hama Produktberatung: Support Hotline – Hama Produktberatung (Deutsch / Englisch): Tel. +49 (0) 9091 / 502 – 115 Fax. +49 (0) 9091 / 502 – 272 e-mail: mailto:produktberatung@hama.de Weitere Produktinformationen finden Sie im Internet unter www.hama.com... - Seite 290 F Français [French] La société Hama GmbH & Co. KG certifie que cet appareil est conforme aux exigences de base et aux dispositions de la directive 1999/5/ en vigueur. Vous trouverez la déclaration de conformité à la directive R&TTE 99/5/CE sur www.hama.de.