Werbung
Quicklinks
EN
Instruction manual
SAFETY INSTRUCTIONS
• By ignoring the safety instructions the manufacturer can not be hold
responsible for the damage.
• If the supply cord is damaged, it must be replaced by the manufacturer,
Instruction Manual
Instrukcje użytkowania
its service agent or similarly qualified persons in order to avoid a hazard.
EN
PL
• Never move the appliance by pulling the cord and make sure the cord
Gebruiksaanwijzing
Istruzioni per l'uso
can not become entangled.
NL
IT
• To completely disconnect the power input, the AC/DC adaptor of the
Mode d'emploi
Bruksanvisning
apparatus should be disconnected from the mains, as the disconnected
FR
SV
device is the AC/DC adaptor of apparatus.
Bedienungsanleitung
Návod na použití
• To protect yourself against an electric shock, do not immerse the cord,
DE
CS
plug or appliance in the water or any other liquid.
• EXCLAMATION POINT - within an equilateral triangle, is used to indicate
Manual de instrucciones
Návod na použitie
ES
SK
that a specific component shall be replaced only by the component
specified in that documentation for safety reason.
Manual de Instruções
PT
• LIGHTNING FLASH WITH ARROWHEAD SYMBOL - within an equilateral
triangle, is intended to alert the user to the presence of uninsulated
dangerous voltage within the products enclosure that may be of
sufficient magnitude to constitute a risk of electric shock to persons.
CONTROL PANEL
1. - / Prev
2. + / Next
3. Memory button
4. On/Off button
5. Volume - / alarm mode button
6. Volume +/ clock set button
7. Function button
8. Play/ pair button
9. Snooze/ dimmer button
USE
Clock setting
• Make sure the unit is in standby mode, press and hold the "clock set" button,
the display starts flashing.
• Use the "previous/next" button to select the desired setting, confirm with
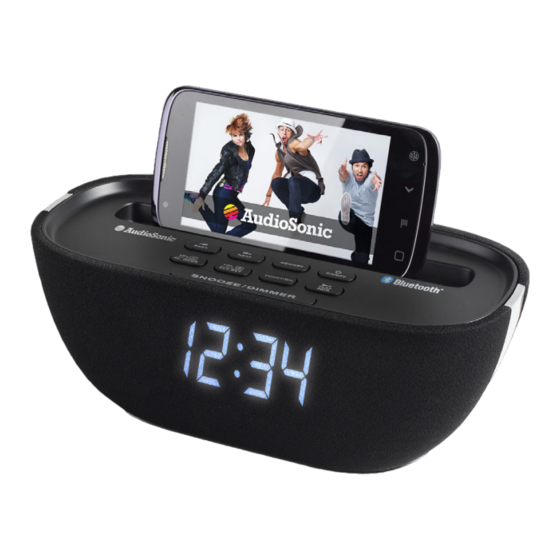
Clock radio
the "clock set" button.
Alarm setting
• Make sure the unit is in standby mode, press and hold the "al. mode" button,
CL-1462
Bluetooth® - USB charging port
the display starts flashing.
• Use the "previous/next" button to select the desired setting, confirm with
the "al. mode" button.
• To activate the alarm, make sure the unit is in standby mode, press the
"al. mode" button once or twice, you can choose the desired alarm source
PARTS DESCRIPTION
/
ONDERDELENBESCHRIJVING
/
DESCRIPTION DES
(buzzer(bb) or radio (FM)). When the desired source appears on the display,
PIÈCES
/
TEILEBESCHREIBUNG
/
DESCRIPCIÓN DE LAS PIEZAS
/
just wait for a few seconds, the display will turn back to the time mode and
DESCRIÇÃO DOS COMPONENTES
/
OPIS CZĘŚCI
/
DESCRIZIONE DELLE PARTI
/
the alarm is set. If the alarm is set, "AL." is displayed.
BESKRIVNING AV DELAR
/
POPIS SOUČÁSTÍ
/
POPIS SÚČASTÍ
Bluetooth®
• Switch to the "Bluetooth®" mode by pressing the "function" button
repeatedly.
• Search with your external audio device for "CL-1462" and connect, if asked
for a passcode, enter "0000". The Bluetooth® led will illuminate continuously
if paired successfully.
• If an device paired before, the unit will pair automatically when the unit is in
Bluetooth® mode.
1
2
3
4
FM radio
• Switch to the "radio" mode by pressing the "function" button repeatedly.
• Use the "previous/ next" buttons to fine tune the radio station.
• Press the and hold the "mem" button, select the desired channel by using
5
8
the "previous/ next" buttons, and store the radio station by pressing the
"mem" button again.
6
7
• To recall a saved radio station, press the "mem" button once and switch
between the saved stations with the "previous/ next" buttons.
9
Aux input
• Connect the aux in jack on the unit and to an external audio source, for
example, DVD player with an RCA cable.
• Switch to the "aux" mode by pressing the "function" button repeatedly.
• Use the native controls on the connected audio device to start playing
music through the connected the unit.
USB charging port
Connect the device you would like to charge to the USB charging port at the
back of the unit, your device will be charged even during playback.
Snooze/dimmer button
• Press to activate the snooze function when the alarm sounds, the alarm will
then automatically come on again after 9 minutes.
• Press in standby modes will dim the display light by pressing it once,
pressing it twice, the display will go out completely.
GUARANTEE
• This product is guaranteed for 24 months granted. Your warranty is valid if
the product is used in accordance to the instructions and for the purpose
for which it was created. In addition, the original purchase (invoice, sales
slip or receipt) is to be submitted with the date of purchase, the name of the
retailer and the item number of the product.
• For the detailed warranty conditions, please refer to our service website:
www.service.tristar.eu
GUIDELINES FOR PROTECTION OF THE ENVIRONMENT
This appliance should not be put into the domestic garbage at the end
of its durability, but must be offered at a central point for the recycling
of electric and electronic domestic appliances. This symbol on the appliance,
instruction manual and packaging puts your attention to this important issue.
The materials used in this appliance can be recycled. By recycling of used
domestic appliances you contribute an important push to the protection of
our environment. Ask your local authorities for information regarding the point
of recollection.
SUPPORT
You can find all available information and spare parts at service.tristar.eu!
This product is in compliance with the essential requirements and other
relevant provisions of the R&TTE directive 1999/5/EC.
service.tristar.eu
Tristar Europe B.V. | Jules Verneweg 87
5015 BH Tilburg | The Netherlands
NL
Gebruiksaanwijzing
FR
Mode d'emploi
VEILIGHEIDSVOORSCHRIFTEN
INSTRUCTIONS DE SÉCURITÉ IMPORTANTES
• Als de veiligheidsinstructies niet worden opgevolgd, kan de fabrikant
• Le fabricant ne sera pas tenu responsable de tous dommages si les
niet verantwoordelijk worden gesteld voor schade die daar eventueel
consignes de sécurité ne sont pas respectées.
het gevolg van is.
• Si le cordon d'alimentation est endommagé, il doit être remplacé par
• Als het snoer beschadigd is, moet het worden vervangen door de
le fabricant, son service après-vente ou des techniciens similairement
fabrikant zelf, de dealer of erkend technicus om brandgevaar te
agréés afin d'éviter un danger.
voorkomen.
• Ne jamais déplacer l'appareil en tirant sur le cordon et veillez à ce que
• Verplaats het apparaat nooit door aan het snoer te trekken en zorg
ce dernier ne devienne pas entortillé.
ervoor dat het snoer nergens in verstrikt kan raken.
• Pour débrancher complètement l'alimentation, débranchez
• Om de voeding volledig uit te schakelen, moet de stekker van de AC/
l'adaptateur CA/CC du secteur, car l'adaptateur sert à débrancher
DC-adapter uit het stopcontact worden verwijderd, omdat de AC/DC-
l'appareil.
adapter het apparaat van stroom voorziet.
• Ne pas immerger le cordon, la prise ou l'appareil dans de l'eau ou autre
• Dompel het snoer, de stekker en/of het apparaat nooit in het water of een
liquide afin de vous éviter un choc électrique.
andere vloeistof, dit om u te beschermen tegen een elektrische schok.
• LE POINT D'EXCLAMATION dans un triangle équilatéral est utilisé pour
• UITROEPTEKEN - in een gelijkbenige driehoek wordt gebruikt om aan
indiquer qu'un composant spécifique peut uniquement être remplacé
te geven dat een specifiek onderdeel om veiligheidsredenen alleen
par le composant spécifié dans cette documentation pour une raison
vervangen kan worden door het onderdeel dat in de documentatie
de sécurité.
gespecificeerd is.
• L'ÉCLAIR AVEC SYMBOLE DE FLÈCHE dans un triangle équilatéral est
• LICHTFLITS MET PIJLSYMBOOL - in een gelijkbenige driehoek wordt
destiné à avertir l'utilisateur de la présence de tension dangereuse non-
bedoeld als waarschuwing voor de aanwezigheid van ongeïsoleerde
isolée à l'intérieur du boîtier du produit qui peut être de magnitude
gevaarlijke voltage in de productbehuizing, die sterk genoeg is om een
suffisante à constituer un risque de choc électrique aux personnes.
gevaar te vormen voor mensen op een elektrische schok.
PANNEAU DE COMMANDE
BEDIENINGSPANEEL
1. - / Préc.
1. - / Vorige
2. + / Suivant
2. + / Volgende
3. Bouton Mémoire
3. Geheugentoets
4. Touche Marche/Arrêt
4. Aan/uit toets
5. Bouton Volume - / mode alarme
5. Volume -/alarmmodus-toets
6. Bouton Volume + / réglage de l'horloge
6. Volume +/klok instellen-toets
7. Bouton Fonction
7. Functie-knop
8. Bouton Lecture/appairage
8. Afspelen/koppelen-toets
9. Bouton Rappel d'alarme/variateur
9. Sluimer/dimmer-toets
UTILISATION
GEBRUIK
Réglage de l'horloge
Klok instellen
• Vérifiez que l'appareil est en mode veille, maintenez enfoncé le bouton
• Zorg ervoor dat het apparaat in de stand-bymodus is geschakeld, druk op
« Réglage de l'horloge », puis l'affichage clignote.
en houd de "Klok instellen"-toets ingedrukt, het scherm begint te knipperen.
• Sélectionnez un réglage grâce au bouton « Précédent/suivant », puis
• Gebruik de "Vorige/Volgende"-toets om de gewenste instelling te selecteren
confirmez grâce au bouton « Réglage de l'horloge ».
en bevestig met de "Klok instellen"-toets.
Réglage de l'alarme
Alarm instellen
• Vérifiez que l'appareil est en mode veille, maintenez enfoncé le bouton
• Zorg ervoor dat het apparaat in de stand-bymodus is geschakeld, druk op
« Mode alarme », puis l'affichage clignote.
en houd de "Al. modus"-toets ingedrukt, het scherm begint te knipperen.
• Sélectionnez un réglage grâce au bouton « Précédent/suivant », puis
• Gebruik de "Vorige/Volgende"-toets om de gewenste instelling te selecteren
confirmez grâce au bouton « Mode alarme ».
en bevestig met de "Al. modus"-toets.
• Pour activer l'alarme, vérifiez que l'appareil est en mode veille, appuyez une
• Om het alarm te activeren, zorg ervoor dat het apparaat in de stand-
ou deux fois sur le bouton « Mode alarme » pour choisir une source d'alarme
bymodus is geschakeld, druk eenmaal of tweemaal op de "Al. modus"-toets,
(sonnerie (bb) ou radio (FM)). Lorsque la source voulue s'affiche, attendez
u kunt de gewenste alarmbron (zoemer (bb) of radio (FM)) kiezen. Wanneer
quelques secondes pour que l'alarme se règle, puis l'appareil ré-affichera le
de gewenste bron op de display verschijnt, wacht gewoon een paar
mode d'horloge. Si l'alarme est réglée, « AL. » s'affiche.
seconden, de display zal naar de tijdweergave terugkeren en het alarm is
Bluetooth®
ingesteld. Als het alarm is ingesteld, wordt "AL. " weergegeven.
• Passez en mode « Bluetooth® » en appuyant plusieurs fois sur le bouton
Bluetooth®
« Fonction ».
• Schakel naar de Bluetooth®-modus door herhaaldelijk op de "Functie"-toets
• Votre lecteur externe s'appelle « CL-1462 », recherchez-le et connectez-
te drukken.
vous-y. Si un mot de passe est demandé, saisissez « 0000 ». La LED
• Zoek met uw extern audio-apparaat naar "CL-1462" en maak verbinding,
Bluetooth® s'allume si l'appairage est réussi.
voer "0000" in als om een wachtwoord wordt gevraagd. De Bluetooth®-LED
• Si un appareil a déjà été appairé, l'appareil s'y appairera automatiquement
zal constant branden wanneer met succes is gekoppeld.
lorsque l'appareil est en mode Bluetooth®.
• Als een apparaat eerder werd gekoppeld, zal het apparaat automatisch
Radio FM
koppelen wanneer het in de Bluetooth®-modus is geschakeld.
• Passez en mode « Radio » en appuyant plusieurs fois sur le bouton
FM-radio
« Fonction ».
• Schakel naar de radiomodus door herhaaldelijk op de "Functie"-toets te drukken.
• Syntonisez la station de radio grâce au bouton « Précédent/suivant ».
• Gebruik de "Vorige/Volgende"-toetsen om de radiozender fijn af te stemmen.
• Maintenez enfoncé le bouton « Mémoire », sélectionnez une station grâce
• Druk op en houd de "Geheugen"-toets ingedrukt, selecteer het gewenste
au bouton « Précédent/suivant », puis mémorisez la station de radio en
kanaal met behulp van de "Vorige/Volgende"-toetsen en sla de radiozender
rappuyant sur le bouton « Mémoire ».
op door nogmaals op de "Geheugen"-toets te drukken.
• Pour charger une station de radio mémorisée, appuyez une fois sur le
• Om een opgeslagen zender op te roepen, druk eenmaal op de "Geheugen"-
bouton « Mémoire » et changez de station grâce au bouton « Précédent/
toets en schakel met de "Vorige/Volgende"-toetsen tussen de opgeslagen
suivant ».
stations.
Entrée auxiliaire
Aux-ingang
• Branchez la fiche d'entrée auxiliaire « Aux In » sur l'appareil et au lecteur
• Sluit een externe audiobron aan op de AUX IN-aansluiting op het apparaat,
externe, par exemple un lecteur DVD avec un câble RCA.
bijvoorbeeld een DVD-speler met een RCA-kabel.
• Passez en mode « Aux. » en appuyant plusieurs fois sur le bouton
• Schakel naar de AUX-modus door herhaaldelijk op de "Functie"-toets te
« Fonction ».
drukken.
• Utilisez les boutons du lecteur externe branché pour lire de la musique via
• Gebruik de bedieningsknoppen op het aangesloten audioapparaat om het
l'appareil branché.
afspelen van muziek via het aangesloten apparaat te starten.
Port USB
USB-oplaadpoort
• Branchez l'appareil à charger sur le port USB à l'arrière de l'appareil, ainsi
Sluit het apparaat dat u wilt opladen aan op de USB-oplaadpoort aan de
votre appareil se chargera pendant la lecture.
achterkant van het apparaat, het apparaat zal zelfs tijdens het afspelen worden
• Bouton Rappel d'alarme/variateur
opgeladen.
• Appuyez pour activer la fonction de rappel d'alarme lorsque l'alarme sonne,
l'alarme se re-déclenchera automatiquement au bout de 9 minutes.
Sluimer/dimmer-toets
• Appuyez une fois en mode veille pour changer la luminosité de l'écran.
• Druk erop om de sluimerfunctie te activeren wanneer het alarm klinkt, het
Appuyez dessus deux fois pour éteindre l'écran.
alarm zal dan na 9 minuten automatisch opnieuw afgaan.
• Druk in de stand-bymodus eenmaal erop om de achtergrondverlichting van
GARANTIE
de display te dimmen, druk tweemaal erop om de display volledig uit te
schakelen.
• Ce produit est garanti pour une période de 24 mois. Votre garantie est
valable si le produit est utilisé selon les instructions et pour l'usage auquel
GARANTIEVOORWAARDEN
il est destiné. De plus, la preuve d'achat d'origine (facture, reçu ou ticket de
caisse) doit être présentée, montrant la date d'achat, le nom du détaillant et
• Op dit product wordt een garantie van 24 maanden verleend. Uw garantie
le numéro d'article du produit.
is geldig wanneer het product is gebruikt in overeenstemming met de
• Pour connaître les conditions de garantie détaillées, veuillez consulter notre
gebruiksaanwijzing en voor het doel waarvoor het gemaakt is. Tevens
site Internet de service : www.service.tristar.eu
dient de originele aankoopbon (factuur, kassabon of kwitantie) overlegd
te worden met daarop de aankoopdatum, de naam van de retailer en het
DIRECTIVES POUR LA PROTECTION DE L'ENVIRONNEMENT
artikelnummer van het product.
• Voor uitgebreide garantievoorwaarden verwijzen wij u naar onze
Cet appareil ne doit pas être jeté aux ordures ménagères à la fin de sa
servicewebsite: www.service.tristar.eu
durée de vie, mais doit être rendu à un centre de recyclage d'appareils
ménagers électriques et électroniques. Ce symbole sur l'appareil, La notice
AANWIJZINGEN TER BESCHERMING VAN HET MILIEU
d'emploi et l'emballage attirent votre attention sur ce sujet important. Com-
posants utilisés dans cet appareil sont recyclables. En recyclant les appareils
Dit product mag aan het einde van zijn levensduur niet bij het normale
ménagers. Usagés, vous contribuez à un apport important à la protection de
huisafval worden gedeponeerd, maar dient bij een speciaal inza-
notre. Environnement. Adressez vous aux autorités locales pour des renseigne-
melpunt voor het hergebruik van elektrische en elektronische apparaten te
ments concernant le centre de Recyclage
worden aangeboden. Het symbool op het artikel, de gebruiksaanwijzing en de
verpakking attendeert u hierop. De gebruikte grondstoffen zijn geschikt voor
SUPPORT
hergebruik. Met het hergebruik van gebruikte apparaten of grondstoffen le-
vert u een belangrijke bijdrage aan de bescherming van ons milieu. Informeer
Toutes les informations et les pièces détachées sont disponibles sur service.tristar.eu !
bij uw lokale overheid naar het bedoelde inzamelpunt.
Ce produit est conforme aux conditions essentielles et aux autres disposi-
tions pertinentes de la directive R&TTE 1999/5/CE.
ONDERSTEUNING
Vind alle beschikbare informatie en onderdelen op service.tristar.eu!
Dit product voldoet aan de basiseisen en andere relevante bepalingen
van de R&TTE richtlijn 1999/5/EG.
DE
Bedienungsanleitung
ES
Manual de usuario
WICHTIGE SICHERHEITSVORKEHRUNGEN
PRECAUCIONES IMPORTANTES
• Beim Ignorieren der Sicherheitshinweise kann der Hersteller nicht für
• Si ignora las instrucciones de seguridad, eximirá al fabricante de toda
Schäden haftbar gemacht werden.
responsabilidad por posibles daños.
• Wenn das Stromkabel beschädigt ist, muss es vom Hersteller,
• Si el cable de alimentación está dañado, para evitar peligros,
Kundendienst oder ähnlich qualifizierten Personen ersetzt werden, um
corresponde al fabricante, a su representante o a una persona de
Gefahren zu vermeiden.
cualificación similar su reemplazo.
• Bewegen Sie das Gerät niemals, indem Sie am Kabel ziehen, und achten
• No mueva el aparato tirando del cable y asegúrese de que el cable no
Sie darauf, dass das Kabel nicht verwickelt wird.
se enrolle.
• Um das AC/DC Netzteil komplett von der Stromversorgung zu trennen,
• Para desconectar completamente la entrada de electricidad, el
sollte der Netzstecker gezogen werden, weil das abgeklemmte Gerät
adaptador CA/CC del aparato debe estar desconectado de la toma de
das AC/DC Netzteil des Geräts ist.
pared y también del propio aparato.
• Um sich vor einem Stromschlag zu schützen, tauchen Sie das Kabel, den
• Como medida de protección contra las descargas eléctricas, no sumerja
Stecker oder das Gerät niemals in Wasser oder eine andere Flüssigkeit.
el cable, el enchufe o el aparato en agua o cualquier otro líquido.
• Das AUSRUFUNGSZEICHEN im gleichseitigen Dreieck weist darauf
• SIGNO DE EXCLAMACION - dentro de un triángulo equilátero, se
hin, dass bestimmte Komponenten aus Sicherheitsgründen nur durch
utiliza para indicar que un componente específico debe sustituirse
Komponenten ersetzt werden dürfen, wie in der Dokumentation
únicamente por el componente indicado en la documentación por
spezifiziert.
razones de seguridad.
• Der BLITZ im gleichseitigen Dreieck weist auf gefährliche
• SÍMBOLO DEL RAYO CON UNA FLECHA - dentro de un triángulo
Hochspannung im Gerät hin, die zu Stromschlag führen kann.
equilátero, indica al usuario que la caja del sistema puede contener una
tensión sin aislar de magnitud suficiente para constituir un riesgo de
BEDIENFELD
descarga eléctrica.
1. - / Vorheriger
PANEL DE CONTROL
2. + / Nächster
3. Speichertaste
1. – / Anterior
4. Ein/Aus Taste.
2. + / Siguiente
5. Taste Lautstärke - / Alarmmodus
3. Botón memoria
6. Taste Lautstärke +/ Uhreneinstellung
4. Botón de encendido y apagado
7. Funktionstaste
5. Botón modo alarma/Volumen -
8. Play-/ Pair-Taste
6. Botón configuración reloj / Volumen +
9. Schlummer-/Dimmertaste
7. Botón Función
8. Botón Reproducir/Sincronizar
ANWENDUNG
9. Botón atenuar luz/ repetir alarma
Uhreneinstellung
USO
• Stellen Sie sicher, dass das Gerät im Standby-Modus ist, dann drücken und
halten Sie die Taste "Uhreneinstellung", dann beginnt das Display zu blinken.
Configuración del reloj
• Verwenden Sie die Taste "vorherige/nächste", um die gewünschte
• Asegúrese de que la unidad está en modo pausa, presione y mantenga
Einstellung auszuwählen. Bestätigen Sie mit der Taste "Uhreneinstellung".
presionado el botón "configurar reloj", la pantalla comenzará a parpadear.
• Utilice el botón "anterior/siguiente" para seleccionar la configuración
Alarmeinstellung
deseada, confirme con el botón "configurar reloj".
• Stellen Sie sicher, dass das Gerät im Standby-Modus ist, dann drücken und
halten Sie die Taste "Alarmmodus", dann beginnt das Display zu blinken.
Configuración de la alarma
• Verwenden Sie die "Vor-/Zurück"-Taste, um die gewünschte Einstellung
• Asegúrese de que la unidad está en modo pausa, presione y mantenga
auszuwählen. Bestätigen Sie mit der Taste "Alarmmodus".
presionado el botón "modo al. " , la pantalla comenzará a parpadear.
• Um den Alarm zu aktivieren, stellen Sie sicher, dass das Gerät im Standby-
• Utilice el botón "anterior/siguiente" para seleccionar la configuración
Modus ist, drücken Sie die Taste "Alarmmodus" einmal oder zweimal. So
deseada, confirme con el botón "modo al".
können Sie die gewünschte Alarmquelle (Summer (bb) oder Radio (FM)
• Para activar la alarma, asegúrese de que la unidad esté en modo pausa,
auswählen. Wenn die gewünschte Quelle auf dem Display erscheint, warten
presione el botón "modo al. " Una vez o dos veces, puede seleccionar la
Sie einige Sekunden, dann kehrt das Display in den Zeitmodus zurück und
fuente deseada para la alarma (´timbre (bb) o radio (FM)). Cuando aparezca
der Alarm ist eingestellt. Wenn der Alarm eingestellt ist, wird "Al." angezeigt.
en la pantalla la fuente deseada, espere unos segundos, la pantalla volverá
al modo de tiempo y se configura la alarma. Si la alarma está configurada, se
Bluetooth®
muestra "AL." en la pantalla.
• Schalten Sie durch wiederholtes Drücken der Funktionstaste in den
"Bluetooth®"-Modus.
Bluetooth®
• Suchen Sie mit Ihrem externen Audiogerät nach "CL-1462" und verbinden
• Cambie al modo "Bluetooth®" presionando el botón de "función"
Sie sich. Wenn Sie nach einem Passcode gefragt werden, geben Sie "0000"
repetidamente.
ein. Bei einer erfolgreichen Paarung leuchtet die Bluetooth®-LED dauerhaft.
• Busque con su dispositivo de audio externo "CL-1462" y conecte, si
• Wenn zuvor ein Gerät gepaart wurde, paart sich das Gerät automatisch,
se le pide un código, introduzca "0000". El led Bluetooth® se iluminará
wenn es im Bluetooth®-Modus ist.
continuadamente si la sincronización se realiza con éxito.
• Si había un dispositivo sincronizado con anterioridad, la unidad se
FM-Radio
sincronizará automáticamente cuando está en modo Bluetooth®.
• Schalten Sie durch wiederholtes Drücken der Funktionstaste in den "Radio"-
Modus.
Radio FM
• Verwenden Sie die "Vor-/Zurück"-Taste, um eine Feineinstellung des
• Cambie al modo "radio" presionando el botón de "función" repetidamente.
Radiosenders vorzunehmen.
• Utilice los botones "anterior/siguiente" para sintonizar la emisora de radio.
• Drücken und halten Sie die "mem"-Taste (Speichertaste), wählen Sie den
• Presione y mantenga presionado el botón "mem", seleccione el canal
gewünschten Sender mithilfe der "Vor-/Zurück"-Taste aus und speichern Sie
deseado usando los botones "anterior/siguiente" y guarde la emisora de
den Radiosender durch erneutes Drücken der "mem"-Taste.
radio presionando de nuevo el botón "mem".
• Um einen gespeicherten Radiosender aufzurufen, drücken Sie die "mem"-
• Para recuperar una emisora de radio seleccionada, presione una vez el
Taste einmal und wählen Sie mit der "Vor-/Zurück"-Taste zwischen den
botón "mem" y cambie entre las emisoras guardadas usando los botones
gespeicherten Sendern.
"anterior/siguiente".
Aux-Eingang
Entrada auxiliar
• Verbinden Sie die Aux-in-Buchse am Gerät mit einer externen Audioquelle,
• Conecte la clavija de entrada auxiliar en la unidad y en la fuente externa de
z.B. einem DVD-Player oder einem RCA-Kabel.
audio, por ejemplo, reproductor DVD con cable RCA.
• Schalten Sie durch wiederholtes Drücken der Funktionstaste in den "Aux"-Modus.
• Cambie al modo "aux" presionando el botón de "función" repetidamente.
• Verwenden Sie die originalen Bedientasten des angeschlossenen
• Utilice los controles nativos en el dispositivo de audio conectado para
Audiogeräts, um das Abspielen der Musik durch das angeschlossene Gerät
comenzar a reproducir música por medio de la unidad conectada.
zu starten.
Puerto de carga USB
USB-Ladeport
Conecte el dispositivo que desea cargar al puerto de carga USB en la parte
Schließen Sie das Gerät, das Sie laden möchten, an den USB-Ladeport des
trasera de la unidad, su dispositivo se cargará incluso durante la reproducción.
Geräts an, Ihr Gerät wird dann sogar während des Abspielens geladen.
Botón atenuar luz/ repetir alarma
Schlummer-/Dimmertaste
• Presione para activar la función de repetición de alarma cuando suene la
• Drücken Sie die Taste, um die Schlummerfunktion zu aktivieren, wenn der
alarma, la alarma sonará repetidamente cada 9 minutos.
Alarm ertönt, der Alarm ertönt dann erneut nach 9 Minuten.
• Presionar el botón en modo espera atenuará la luz de fondo de la pantalla, si
• Wenn Sie diese Taste im Standby-Modus drücken, wird durch einmaliges
lo presiona dos veces, la pantalla se apagará del todo.
Drücken die Displaybeleuchtung gedimmt, bei zweimaligem Drücken
erlischt das Display vollständig.
GARANTÍA
• Este producto cuenta con 24 meses de garantía. Su garantía es válida si el
GARANTIE
producto se utilizan de acuerdo con las instrucciones y el propósito para
• Dieses Produkt wird eine Garantie für 24 Monate gewährt. Ihre Garantie
el que se creó. Además, debe enviarse un justificante de la compra original
gilt, wenn das Gerät entsprechend der Bedienungsanleitung für seinen
(factura, tíquet o recibo) en el que aparezca la fecha de la compra, el nombre
Bestimmungszweck benutzt wird. Im Garantiefall reichen Sie bitte die
del vendedor y el número de artículo del producto.
Kaufquittung ein, aus welcher das Kaufdatum, der Name des Fachhändlers
• Para más detalles sobre las condiciones de la garantía, consulte la página
und die Gerätenummer hervorgehen müssen.
web de servicio: www.service.tristar.eu
• Detaillierte Garantiebedingungen finden Sie auf unserer Website:
www.service.tristar.eu
NORMAS DE PROTECCIÓN DEL MEDIOAMBIENTE
Este aparato no se debe desechar con los residuos domésticos cuando
UMWELTSCHUTZRICHTLINIEN
finalice su durabilidad, sino que se debe ofrecer a un centro de reciclaje
Dieses Gerät darf am Ende seiner Lebensdauer nicht im Hausmüll
de aparatos eléctricos y electrónicos domésticos. Este símbolo en el aparato,
entsorgt werden, sondern muss an einer zentralen Sammelstelle für das
manual de instrucciones y embalaje le avisa de este aspecto importante.
Recycling von elektrischen und elektronischen Haushaltsgeräten abgegeben
El los materiales utilizados en este aparato se pueden reciclar. Mediante el
werden. Dieses Symbol auf dem Gerät, der Bedienungsanweisung und der
reciclaje de electrodomésticos, usted contribuye a fomentar la protección del
Verpackung lenkt Ihre Aufmerksamkeit auf diesen wichtigen Fakt. Das bei
medioambiente. Consulte a sus autoridades locales para obtener información
diesem Gerät verwendete Material kann recycled werden. Durch das Recyclen
acerca del punto de recogida.
gebrauchter Haushaltgeräte leisten Sie einen wichtigen Beitrag zum Umwelt-
schutz. Fragen Sie Ihre örtliche Behörde nach Informationen bezüglich einer
SOPORTE
Sammelstelle.
Puede encontrar toda la información disponible, así como piezas de repuesto,
en service.tristar.eu!
SUPPORT
Este producto cumple con los requisitos esenciales y con el resto de
Sie finden alle erhältlichen Informationen und Ersatzteile auf service.tristar.eu
indicaciones relevantes de la directiva R&TTE 1999/5/CE.
Dieses Produkt entspricht den grundlegenden Anforderungen und ande-
ren relevanten Bestimmungen der R&TTE Richtlinie 1999/5/EG.
Werbung

Verwandte Anleitungen für Audiosonic CL-1462 bluetooth dock


Inhaltszusammenfassung für Audiosonic CL-1462 bluetooth dock
- Seite 1 Instruction manual Gebruiksaanwijzing Mode d'emploi Bedienungsanleitung Manual de usuario SAFETY INSTRUCTIONS VEILIGHEIDSVOORSCHRIFTEN INSTRUCTIONS DE SÉCURITÉ IMPORTANTES WICHTIGE SICHERHEITSVORKEHRUNGEN PRECAUCIONES IMPORTANTES • By ignoring the safety instructions the manufacturer can not be hold • Als de veiligheidsinstructies niet worden opgevolgd, kan de fabrikant •...
- Seite 2 Manual de utilizador Instrukcja obsługi Manuale utente Bruksanvisning Návod na použití Návod na použitie CUIDADOS IMPORTANTES INSTRUKCJE DOTYCZĄCE BEZPIECZEŃSTWA ISTRUZIONI IMPORTANTI PER LA SICUREZZA VIKTIGA SÄKERHETSINSTRUKTIONER BEZPEČNOSTNÍ POKYNY BEZPEČNOSTNÉ POKYNY • Se não seguir as instruções de segurança, o fabricante não pode ser •...