Herunterladen Inhalt Inhalt Diese Seite drucken

Werbung

Verfügbare Sprachen
  • DE

Verfügbare Sprachen

  • DEUTSCH, seite 17
Model No. CL-1484
INSTRUCTION MANUAL
GEBRUIKERSHANDLEIDING
BEDIENUNGSANLEITUNG
MODE D'EMPLOI
MANUAL DE INSTRUCCIONES
MANUAL DE INSTRUÇÕES
INSTRUKCJE OBSŁUGI

Werbung

Inhaltsverzeichnis
loading

Inhaltszusammenfassung für Audiosonic CL-1484

  • Seite 1 Model No. CL-1484 INSTRUCTION MANUAL GEBRUIKERSHANDLEIDING BEDIENUNGSANLEITUNG MODE D’EMPLOI MANUAL DE INSTRUCCIONES MANUAL DE INSTRUÇÕES INSTRUKCJE OBSŁUGI...
  • Seite 2 ENGLISH Instruction Manual Location of controls 1. ALARM 1 ON / OFF button 2. ALARM SET button 3. << / YEAR–MONTH–DAY button 4. >> / DST button 5. MODE button 6. ALARM 2 ON / OFF button 7. VOLUME knob 8.
  • Seite 3 Power connection Plug the AC POWER CORD (22) to a household outlet AC source. This unit is equipped with a battery backup system, it requires a 3V CR2032 (fl at) lithium battery (not included). Insert the battery in the BATTERY COMPARTMENT (24), making certain that the positive and negative (+ and -) battery terminals are attached to the corresponding terminals on the plate in the battery compartment.
  • Seite 4 Select alarm weekday mode as follows 1-5 Monday to Friday 1-7 Whole week 6-7 Saturday and Sunday 1-1 One day of the week Action (during data adjustment): Press << / YEAR-MONTH-DAY button (3) to adjust data backward. Press >> / DST button (4) to adjust data forward. Keep depress <<...
  • Seite 5 Change display content Press the << / YEAR-MONTH-DAY button (3) to switch to display the Year/Month/ Day, after 5 seconds timeout the display will switch back to time automatically. Sleep function When the radio is turned on, press the SNOOZE / SLEEP / NAP button (13) to turn on the sleep mode.
  • Seite 6 Radio operation Press the ON / OFF button (12) to turn the radio on. Set the AM/FM BAND switch (11) to the desired waveband. Select the station by using the TUNING knob (8). Turn the VOLUME knob (7) to adjust volume as required. Press the ON / OFF button (12) again to turn the radio off.
  • Seite 7 Alarm battery back-up system This clock radio includes a alarm battery back-up circuit that can wake you up even if the power is ‘off’ at the selected wake up time. The clock display will be off and the radio will not operate, but a separate mini-buzzer will turn ‘on’ automatically to wake you up, even if you had selected the ‘wake to radio’...
  • Seite 8 CAUTION Danger of explosion if battery is incorrectly replaced. Replace only with the same or equivalent type battery. Batteries shall not be exposed to excessive heat such as sunshine, fi re or the like. Attention should be drawn to the environmental aspects of battery disposal. GB-7...
  • Seite 9: Gebruikershandleiding

    DUTCH Gebruikershandleiding Plaats van de bedieningsinstrumenten 1. ALARM 1 ON / OFF knop 2. ALARM SET knop 3. << / YEAR–MONTH–DAY knop 4. >> / DST knop 5. MODE knop 6. ALARM 2 ON / OFF knop 7. VOLUME knop 8.
  • Seite 10 Stroomaansluiting Stop de STEKKER (22) in het stopcontact. Dit apparaat is uitgerust met een batterij back-up systeem, welke een 3V CR2032 (platte) lithium batterij vereist (niet inbegrepen). Plaats de batterij in het BATTERIJVAK (24) en zorg ervoor dat de positieve en negatieve (+ en -) accupolen worden bevestigd aan de overeenkomstige accupolen op de plaat in het batterijvak.
  • Seite 11: Snooze Function

    Normale modus → AL.1 Uur → AL.1 Minuut → AL.1 Weekalarm → AL.2 Uur → AL.2 Minuut → AL 2 Weekalarm → Normale modus Maak bij het instellen van het weekalarm een keuze uit de volgende opties 1-5 Maandag tot vrijdag 1-7 Hele week 6-7 Zaterdag en zondag 1-1 Een dag van de week...
  • Seite 12 Stel de DISPLAY LIGHT DIMMER LOW / HIGH / AUTO OFF schakelaar (21) in op de AUTO OFF positie (het display schakelt na 15 seconden automatisch uit). Wanneer het alarm afgaat, zal het display automatisch weer inschakelen. Druk op de SNOOZE / SLEEP / NAP knop (13) om de snooze functie in te schakelen, het alarm en de display worden weer uitgeschakeld.
  • Seite 13 Display light dimmer Wanneer de radio niet in gebruik is, stel de DISPLAY LIGHT DIMMER LOW / HIGH / AUTO OFF schakelaar (21) in op de AUTO OFF positie (het display schakelt na 15 seconden automatisch uit). Druk op een willekeurige knop om de display weer in te schakelen.
  • Seite 14 Projection unit Focus instelling: om de helderheid / focus van de PROJECTION UNIT (17) aan te passen, gebruik de SCHERPSTELLING VOOR PROJECTION UNIT (18) totdat de geprojecteerde tijd duidelijk wordt weergegeven op het plafond of de muur. Om het geprojecteerde beeld 180° te draaien, druk op de PROJECTION TIME 180°...
  • Seite 15 WAARSCHUWING 1. Er mogen geen voorwerpen met een open vlam, zoals aangestoken kaarsen, op het apparaat worden geplaatst. 2. Plaats het product niet in gesloten boekenkasten of rekken zonder voldoende ventilatie. 3. Als de stekker wordt gebruikt om het apparaat uit te zetten, moet de stekker goed bereikbaar zijn.
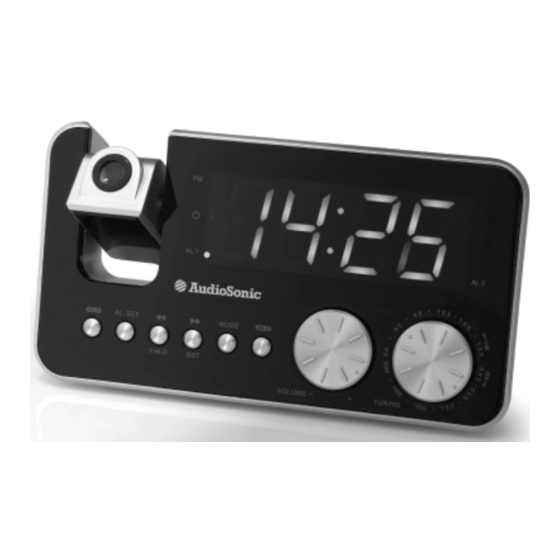
  • Seite 16 GERMAN Bedienungsanleitung Beschreibung 1. ALARM 1 EIN / AUS Taste 2. ALARM EINSTELLUNGS-Taste 3. << / JAHR-MONAT-TAG Taste 4. >> / ZEITUMSTELLUNG Taste 5. MODUS Taste 6. ALARM 2 EIN / AUS Taste 7. LAUTSTÄRKE-Regler 8. ABSTIMM-Knopf 9. LED DISPLAY 10.
  • Seite 17 ZEIT Anzeige PM Anzeige STANDBY Anzeige ALARM 2 Anzeige ALARM 1 Anzeige Netzanschluss Das AC NETZKABEL (22) mit einer AC Steckdose verbinden. Dieses Gerät ist mit einem Batterie-Reservesystem ausgestattet, dazu ist eine 3 V CR2032 (fl ache) Lithiumbatterie (nicht im Lieferumfang enthalten) erforderlich. Die Batterie in das BATTERIEFACH (24) einlegen und sicherstellen, dass die Plus- und Minuspole (+ und -) der Batterie mit den entsprechenden Polen auf der Platte im Batteriefach übereinstimmen.
  • Seite 18: Alarm Ein- / Ausschalten

    B. Alarm 1 und Alarm 2 einstellen Im Normalmodus die ALARM EINSTELLUNG Taste (2) drücken und mehr als 2 Sekunden gedrückt halten, um den Alarmeinstellungsmodus aufzurufen, nach Aufrufen des Einstellungsmodus die ALARM EINSTELLUNG Taste (2) drücken, um den Moduszyklus folgendermaßen zu ändern: Normalmodus →...
  • Seite 19 Alarmdauer und Schlummerfunktion A. Alarmdauer Der Summer- oder Radioalarm wird 30 Minuten ertönen, wenn keine Tasten gedrückt werden, dann wird er automatisch angehalten und am nächsten Tag um die gleiche Zeit wieder aktiviert. B. Schlummerfunktion Beim Drücken der SCHLUMMER / SCHLAF / HALBSCHLAF Taste (13) während des Alarms wird die Schlummerfunktion aktiviert, Summer- oder Radioalarm wird gestoppt.
  • Seite 20: Display Beleuchtungsdimmer

    Halbschlaffunktion (Countdown-Timer) Bei ausgeschaltetem Radio die SCHLUMMER / SCHLAF / HALBSCHLAF Taste (13) drücken, um den Halbschlafmodus einzuschalten, die Halbschlafzeit blinkt 10 Sekunden, wenn während dieser 10 Sekunden die SCHLUMMER / SCHLAF / HALBSCHLAF Taste (13) gedrückt wird, kann die Dauer von 90 Min - 10 Min geändert werden.
  • Seite 21: Projektionseinheit

    Technische Daten Frequenz : AM 540 - 1600 kHz FM 88 - 108 MHz Batteriereserve : 1 x 3 V CR2032 (fl ache) Lithiumbatterie (nicht im Lieferumfang enthalten) Stromversorgung : AC 230 V ~ 50 Hz, 5 W Zurückstellen Die RÜCKSTELL Taste (20) befi ndet sich auf der Rückseite des Geräts. Mit einem Kugelschreiber auf die RÜCKSTELL Taste (20) drücken, wenn die Batterien gewechselt werden oder wenn das Gerät nicht erwartungsgemäß...
  • Seite 22 WARNUNG 1. Auf das Gerät dürfen keine offenen Flammen, wie z.B. angezündete Kerzen, gestellt werden. 2. Das Produkt nicht in geschlossene Bücherschränke oder Regale ohne einwandfreie Belüftung stellen. 3. Der Netzstecker dient als Abschaltvorrichtung, die Abschaltvorrichtung muss immer betriebsbereit sein. 4.
  • Seite 23 VORSICHT Explosionsgefahr, wenn die Batterie nicht korrekt gewechselt wird. Nur durch den selben oder gleichwertigen Batterietyp ersetzen. Batterien dürfen keiner übermäßigen Hitze, wie z.B. Sonnenschein, Feuer oder ähnlichem ausgesetzt werden. Der Umweltschutz sollte bei der Batterieentsorgung besonders beachtet werden. DE-8...
  • Seite 24 FRENCH Manuel Utilisateur Description 1. Touche ALARME 1 MARCHE / ARRET 2. Touche REGLAGE ALARME 3. Touche << / ANNEE-MOIS-JOUR 4. Touche >> / DST 5. Touche MODE 6. Touche ALARME 2 MARCHE / ARRET 7. Molette DE VOLUME 8. Molette DE REGLAGE DE FREQUENCE 9.
  • Seite 25: Affichage Led

    AFFICHAGE LED HEURE Témoin Après Midi Témoin VEILLE Témoin ALARME 2 Témoin ALARME 1 Connexion électrique Brancher le CORDON ALIMENTATION CA (22) dans une prise électrique. Cet appareil est équipé d’un système de secours qui fonctionne avec une pile lithium 3V CR2032 (plate) (non incluse).
  • Seite 26 B. Réglage alarme 1 et alarme 2 Appuyer sur la touche REGLAGE ALARME (2) en mode normal et gardez-la enfoncée pendant 2 secondes pour passer en mode réglage alarme. Une fois dans ce mode, appuyer sur la touche REGLAGE ALARME (2) pour accéder alternativement aux modes suivants : Mode Normal →...
  • Seite 27: Fonction Répétition

    B. Fonction répétition Pendant l’alarme, appuyer sur la touche REPETITION / SOMMEIL / SIESTE (13) pour mettre la fonction répétition en marche et la sonnerie ou la radio s’arrêtera. La durée de silence avant répétition est de 9 minutes La répétition continuera à moins que la touche MARCHE/ARRET (12) ne soit activée pour mettre fi...
  • Seite 28 Fonction sieste (compte à rebours) Lorsque la radio est éteinte, appuyer sur la touche REPETITION / SOMMEIL / SIESTE (13) pour enclencher le mode SIESTE, la durée de la sieste va clignoter pendant 10 secondes. Appuyer sur le touche REPETITION / SOMMEIL / SIESTE (13) pour choisir une durée comprise entre 90 min - 10 min.
  • Seite 29 Spécifications Fréquence : AM 530 - 1600 kHz FM 88 - 108 MHz Pile : 1 x 3V CR2032 (plate) pile lithium (non incluse) Source d’alimentation : CA230V ~ 50Hz, 5W Remise à zéro La touche de REMISE à ZERO (20) est située à l’arrière de l’appareil. Utiliser un stylo à...
  • Seite 30 AVERTISSEMENT 1. Ne placer aucune source de fl ammes, telles que des bougies allumées sur cet appareil. 2. Ne pas placer ce produit dans une bibliothèque ou une étagère fermées sans ventilation adéquate. 3. La prise de courant est la seule source de déconnexion électrique et doit de ce fait rester accessible constamment.
  • Seite 31 SPANISH Manual de instrucciones Descripción 1. Botón ENCENDER / APAGAR ALARMA 1 2. Botón CONFIGURACIÓN DE ALARMA 3. Botón << / AÑO-MES-DÍA 4. Botón >> / DST 5. Botón MODO 6. Botón ENCENDER / APAGAR ALARMA 2 7. Rueda de VOLUMEN 8.
  • Seite 32: Pantalla Led

    PANTALLA LED Indicador de HORA Indicador de PM Indicador de STANDBY Indicador de ALARMA 2 Indicador de ALARMA 1 Conexión de corriente Conecte el CABLE DE ALIMENTACIÓN (22) a una toma de corriente CA. Esta unidad está equipada con un sistema de reserva de batería, que requiere una batería de litio CR2032 (plana) de 3V (no incluida).
  • Seite 33 Modo normal → Hora AL.1 → Min. AL.1 → Alarma días de diario AL.1 → Hora AL.2 → Min. AL.2 → Alarma días de diario AL.2 → Modo normal Seleccione el modo de alarma en días de diario como se indica a continuación De lunes a viernes Toda la semana...
  • Seite 34 B. Función de repetición de alarma Cuando esté sonando la alarma, pulse el botón REPETICIÓN DE ALARMA / APAGADO AUTOMÁTICO / CABEZADA (13) activará la función de repetición de alarma, y la alarma por zumbador o por radio se detendrá momentáneamente.
  • Seite 35 Función siesta (temporizador de cuenta atrás) Al apagar la radio, pulse el botón REPETICIÓN DE ALARMA / APAGADO AUTOMÁTICO / CABEZADA (13) para activar el modo de Cabezada. La hora de Cabezada parpadeará durante 10 segundos; durante ese tiempo, pulse el botón REPETICIÓN DE ALARMA / APAGADO AUTOMÁTICO / CABEZADA (13) de nuevo para cambiar la duración de 90 a 10 minutos.
  • Seite 36 Especificaciones Frecuencia: AM 540 - 1600 kHz FM 88 - 108 MHz Reserva de batería: 1 batería de litio CR2032 (plana) de 3V (no incluida) Fuente de alimentación: AC230V ~ 50Hz, 5W Reinicio El botón REINICIO (20) está ubicado en la parte posterior de la unidad. Utilice un bolígrafo con punta redonda para presionar el botón REINICIO (20) cuando desee cambiar las baterías, o cuando la unidad no funcione del modo esperado.
  • Seite 37 ADVERTENCIA 1. No coloque encima del aparato objetos que emitan llamas (por ej.: velas encendidas). 2. No coloque el aparato en librerías o estanterías cerradas sin una ventilación adecuada. 3. Si se utiliza el enchufe de corriente como dispositivo de desconexión, este dispositivo debe estar siempre listo para usarse.
  • Seite 38 PORTUGUESE Manual de instruções Descrição 1. Botão ALARME 1 LIGAR / DESLIGAR 2. Botão DEFINIR ALARME 3. Botão ANO-MÊS-DIA << / 4. Botão >> / DST 5. BOTÃO MODO 6. Botão ALARME 2 LIGAR / DESLIGAR 7. Interruptor VOLUME 8. Interruptor de SINTONIZAÇÃO 9.
  • Seite 39 ECRÃ LED Indicador HORA Indicador PM Indicador STANDBY Indicador ALARME 2 Indicador ALARME 1 Ligação da alimentação Insira a fi cha do CABO DE ALIMENTAÇÃO AC (22) numa tomada AC do electrodoméstico. A unidade está equipada com um sistema de pilha de reserva e necessita de uma pilha de lítio (normal) de 3V CR2032 (não incluída).
  • Seite 40 B. Definição do alarme 1 e do alarme 2 Pressione o botão DEFINIR ALARME (2) no modo normal e mantenha-o pressionado durante 2 segundos para entrar no modo de defi nição do alarme e depois de entrar no modo de defi nição, pressione o botão DEFINIR ALARME (2) para alterar o ciclo do modo como o seguinte: Modo normal →...
  • Seite 41: Função Snooze

    Duração do alarme e função snooze A. Duração do alarme O alarme com som ou o alarme com rádio continuarão a tocar durante 30 minutos se nenhuma tecla for pressionada, depois parará automaticamente e aguardará pela hora do alarme no dia seguinte. B.
  • Seite 42 Função nap (temporizador com contagem decrescente) Quando desligar o rádio, pressione o botão SNOOZE / SLEEP / NAP (13) para ligar o modo NAP, a hora continuará a piscar durante 10 segundos, durante 10 segundos se pressionar o botão SNOOZE / SLEEP / NAP (13) pode alterar a duração de 90 min - 10 min.
  • Seite 43 Especificações Frequência: AM 540 - 1600 kHz FM 88 - 108 MHz Pilha de reserva: Uma pilha de lítio de 3V CR2032 (plana) (não incluída) Fonte de alimentação: AC230V ~ 50Hz, 5W Reiniciar O botão REINICIAR (20) está situado na parte de trás da unidade. Utilize uma caneta para pressionar o botão REINICIAR (20) sempre que queira trocar as pilhas, ou quando a unidade não estiver a funcionar conforme o esperado.
  • Seite 44 AVISO 1. Não devem ser colocadas sobre o aparelho fontes de chama aberta, como por exemplo, velas acesas. 2. Não coloque o produto estantes ou prateleiras fechadas sem uma ventilação correcta. 3. A tomada de alimentação é utilizada como aparelho para desligar, este deve permanecer em funcionamento prontamente.
  • Seite 45 POLISH PL-1...
  • Seite 46 PL-2...
  • Seite 47 PL-3...
  • Seite 48 PL-4...
  • Seite 49 PL-5...
  • Seite 50 PL-6...
  • Seite 51 PL-7...

Inhaltsverzeichnis