Inhaltsverzeichnis
Werbung
Verfügbare Sprachen
Verfügbare Sprachen
Quicklinks
Werbung
Inhaltsverzeichnis

Verwandte Anleitungen für Audiosonic IP-7


Inhaltszusammenfassung für Audiosonic IP-7
- Seite 1 Model No. IP-7...
- Seite 2 Instruction Manual CAUTION RISK OF ELECTRIC SHOCK DO NOT OPEN The lightning flash WARNING: To reduce the risk The exclamation point within the triangle is a a n d a r r o w h e a d of electric shock, do not warnin g sig n ale rtin g within the triangle remove cover (or back).
-
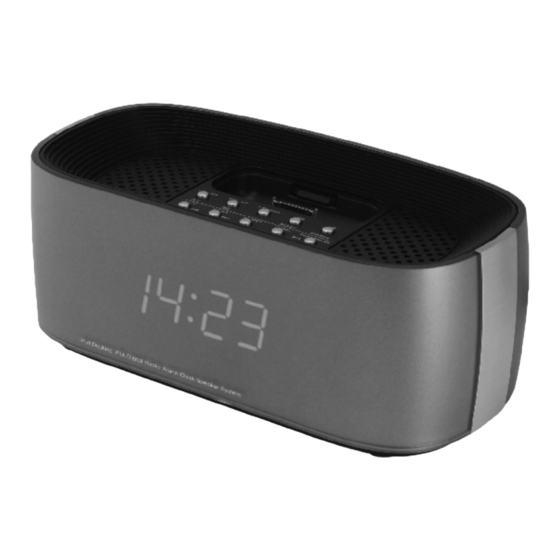
Seite 3: Location Of Controls
FRONT VIEW: TOP VIEW: 11 12 13 14 15 BACK VIEW: Location of controls 1. SPEAKER 10. ON/OFF KEY 2. BLUE BACKLIT DISPLAY 11. SKIP (-) /SEARCH (-) KEY 3. BACK-UP BATTERY COMPARTMENT 12. SKIP (+) /SEARCH (+) KEY (BOTTOM OF UNIT) 13. -
Seite 4: Power Supply
Power supply Ac operation (external ac-dc power adaptor) - This set is equipped with a "dc-jack" capable of accepting ac-adaptors with a rating of dc = 7.5v, 1.5a, and with a plug with the following polarities as shown (center positive): - Please use only the supplied ac-adaptor to operate the unit. - Seite 5 Dock adapters Choose the dock adapter that fits your iPod. Your iPod fits snugly into the correct adapter. THE NUMBER SHOWS WHICH iPod FITS For other iPod models: If there is no dock adapter for your model of iPod included, you can also use the dock adapter which was included in the box with your iPod itself.
-
Seite 6: Alarm Function
How to set correct time Switch unit to "stand-by" mode (display light = dimmed) Press & hold “FUNC./CL-SET” key for 3 seconds display shows hour or hour (flashing) Press “SKIP- / SEARCH-“ or “SKIP+ /SEARCH+” key to select 12-hour or 24-hour clock display system & press “FUNC./CL-SET” key to confirm your selection Press “SKIP- / SEARCH-“... -
Seite 7: "Alarm" Time Setting
"Alarm" time setting 1. Press the “ON/OFF” key to put the set into "standby" mode (blue light dimmed). 2. Press and hold “AL-SET/AL-MODE” key until the display will now show: 00 00 HOUR (FLASHING) 3. Press “SKIP- /SEARCH-“ and “SKIP+ /SEARCH+”... - Seite 8 9. To deactivate the alarm, press & release the “AL-SET/AL-MODE” key. The alarm symbol "al" disappears from the display. 10. To activate the alarm again, repeat the procedure of "alarm time setting" as described. IMPORTANT If the alarm is set as wake to iPod, you will need to connect the iPod properly as described. Otherwise, the buzzer alarm will sound at the set time if the iPod has not be connected.
- Seite 9 Manual frequency adjustment (scan mode) - Press (and immediately release) the “SKIP- /SEARCH-“ and “SKIP+ /SEARCH+” keys to “scan” (manually adjust) the radio frequency “up” or “down” by 1-step at a time. - The radio digital display will indicate the exact frequency at each step’s position. - When a desired frequency or station is reached.
-
Seite 10: Specifications
IMPORTANT Please note that when connecting a iPod video, the error message “the currently attached accessory is not supported by this iPod.” Will be displayed as there is no video input/output. However, all audio functions will operate normally as outlined above. IMPORTANT When docking certain models of the iPhone you might get a message indicating the iPhone is not operating with the device. - Seite 11 WARNING 1. No flame sources, such as lighted candles, should be placed on the apparatus. 2. Do not place the product in closed bookcases or racks without proper ventilation. 3. The mains plug is used as the disconnect device, the disconnect device shall remain readily operable.
-
Seite 12: Gebruikershandleiding
Gebruikershandleiding WAARSCHUWING GEVAAR VOOR ELECTRISCHE SCHOK NIET OPENEN De bliksemflits en pijl WAARSCHUWING: Om het risico Het uitroepteken binnen binnen de driehoek de drie hoek is een van een elektrische schok te verminderen, mag u het deksel (of waarschuwingsteken dat v o r m e n e e n de achterkant) niet verwijderen. - Seite 13 VOORAANZICHT: VAN BOVENAF: 11 12 13 14 15 ACHTERAANZICHT: Plaats van de bedieningsinstrumenten 1. SPEAKER 11. OVERSLAAN ( - ) /ZOEK (-) TOETS 2. BLAUWE DISPLAYVERLICHTING 12. OVERSLAAN ( + ) / ZOEK (+) TOETS 3. VAK VOOR BACKUP BATTERIJEN 13.
- Seite 14 Stroomvoorziening Voeding met netspanning (externe stroomadapter) - Dit apparaat is voorzien van een "gelijkstroomaansluiting" voor gelijkstroomadapters van 7.5v gelijkstroom, 1,5amp en met een stekker met de volgende polariteiten zoals afgebeeld (centrum positief): - Gebruik alleen de bijgeleverde wisselstroomadapter. Het gebruik van andere adapters kan schade toebrengen aan het apparaat of slecht functioneren veroorzaken.
- Seite 15 Dock-adapters Kies de dock-adapter die bij uw iPod past. Uw iPod past keurig in de juiste adapter. HET HUMMER GEEFT AAN WELKE iPOD PAST iPod touch iPod nano 1e generatie 5e generatie 2e generatie (video camera) 8GB 16GB iPod nano iPod classic 4e generatie (video) 80GB 120GB 160GB...
- Seite 16 Hoe stelt u de juiste tijd in Zet het apparaat in de "stand-by" modus (displayverlichting = gedimd) Druk op de “FUNC./CL-SET” toets & houd deze 3 seconden ingedrukt. Het display toont uur of uur (knipperend) Druk op “OVERSLAAN- /ZOEK-“ of “OVERSLAAN+ /ZOEK+”...
- Seite 17 Instelling "wektijd" 1. Druk op de ”ON/OFF” toets om het apparaat op stand-by te zetten (blauwe licht gedimd). 2. Houd de “AL-SET/AL-MODE” toets ingedrukt totdat het display nu laat zien: 00 00 UUR (KNIPPEREND) 3. Druk op de “OVERSLAAN- /ZOEK-“ en “OVERSLAAN+ /ZOEK+”...
-
Seite 18: Automatische Uitschakel Slaapfunctie
7. Het apparaat schakelt nu automatisch op "aan" op de wektijd die u heeft gekozen, zolang de wekfunctie actief is. 8. Om het apparaat uit te zetten nadat het automatisch is ingeschakeld, drukt u eenvoudig eenmaal op de “ON/OFF” toets. Hierdoor wordt het apparaat uitgeschakeld maar de wekinstelling wordt niet verwijderd, en het apparaat zal de volgende dag automatisch weer aangaan op precies dezelfde vooraf ingestelde tijd. - Seite 19 Bediening van de radio - Druk eenmaal de “ON/OFF”-toets in om het apparaat aan te zetten. - Druk herhaaldelijk op de “FUNC./CL-SET”-toets tot het display "FM" toont. - Schuif de FM draadantenne uit en stel deze in om de beste ontvangst te krijgen. - Gebruik de “ST/MO”-toets om de gewenste modus te kiezen (stereo/ mono).
- Seite 20 - Om tijdens het afspelen vooruit of achteruit iets over te slaan, drukt u even de “OVERSLAAN- /ZOEK-“ of “OVERSLAAN+ /ZOEK+” toets in om naar keuze één nummer voor- of achteruit te springen. - Om tijdens het afspelen snel vooruit of achteruit te gaan, houdt u de “OVERSLAAN- /ZOEK-“...
- Seite 21 Specificaties Voeding: Gelijkstroom 7,5v, 1,5a via ingebouwde DC-plug externe netspanningadapter 110v-240V ~ 50/60Hz Energieverbruik: 10 Watt Speaker: Speaker 2" x 2 Frequentiebereik: FM 88 – 108 MHz WAARSCHUWING 1. Er mogen geen voorwerpen met een open vlam, zoals aangestoken kaarsen, op het apparaat worden geplaatst.
- Seite 22 Bedienungsanleitung VORSICHT STROMSCHLAGGEFAHR NICHT ÖFFNEN D e r B l i t z i m WARNUNG: Zur Verm eidung Das Ausrufungszeichen von Stromschlag öffnen Sie das gleichseitigen Dreieck im gleichseitigen Dreieck Gerätegehäuse nicht. Es befinden w e i s t a u f w i c h ti g e weist auf gefährliche sich keine vom Verb raucher I n fo rm a ti o n e n h i n .
-
Seite 23: Lage Der Bedienelemente
VORDERANSICHT: DRAUFSICHT: 11 12 13 14 15 RÜCKANSICHT: Lage der Bedienelemente 1. LAUTSPRECHER 10. EIN/AUS 2. DISPLAY MIT BLAUER 11. SKIP (-) /RÜCKLAUF HINTERGRUNDBELEUCHTUNG 12. SKIP (+) /VORLAUF 3. BATTERIEFACH FÜR GANGRESERVE 13. ALARMEINSTELLUNG/ALARMMODUS (UNTERSEITE) 14. FUNKTIONSUMSCHALTER/UHRZEIT 4. DOCK EINSTELLEN 5. -
Seite 24: Batterien Zur Gangreserve
Spannungsversorgung Netzbetrieb (über Netzteil) - Das Gerät hat einen Netzteileingang für dc 7,5 v, 1,5 a mit Pluspol in der Mitte des Steckers (Siehe Abbildung). - Bitte benutzen Sie ausschließlich das mitgelieferte Netzteil. Die Benützung fremder Netzteile kann zu Fehlfunktionen und Schäden führen. - Schließen Sie den Netzteilstecker auf der Rückseite des Geräts an. - Seite 25 Dock-Adapter Wählen Sie den richtigen Dock-Adapter für Ihren iPod. Ihr iPod passt genau in den entsprechenden Adapter. NUMMER ZEIGT AN, FÜR WELCHEN iPod DER ADAPTER PASST oder iPod touch iPod nano 1st generation 5th generation 2nd generation (video camera) 8GB 16GB oder iPod nano iPod classic...
- Seite 26 Uhrzeit einstellen: Schalten Sie das gerät in den Stand-by-Modus (Hintergrundbeleuchtung aus) Halten Sie “FUNC./CL-SET” für 3 Sekunden gedrückt, im Display blinkt oder Drücken Sie “SKIP (-) /RÜCKLAUF“ oder “SKIP (+) /VORLAUF“ zum umschalten zwischen dem 12- und 24-stundenmodus, dann drücken Sie “FUNC./CL-SET”...
- Seite 27 3. Drücken “SKIP (-) /RÜCKLAUF“ oder "SKIP (+) /VORLAUF“ um die stunden der Weckzeit einzustellen, dann drücken Sie “AL-SET/AL-MODE“ zur Bestätigung. Das Display zeigt nun: 8 00 MINUTEN (BLINKEN) 4. Drücken Sie “SKIP (-) /RÜCKLAUF“ oder “SKIP (+) /VORLAUF“ um die Minuten der Weckzeit einzustellen, dann drücken Sie “AL-SET/AL-MODE“...
-
Seite 28: Elektronischer Lautstärkeregler
Schlummerfunktion - Der Alarm kann vorübergehend für 9 Minuten unterbrochen werden. Drücken sie einmal „snooze/ dimmer“. - Nach 9 Minuten wird der Alarm wiederholt. - Dieser Vorgang kann insgesamt für 90 Minuten wiederholt werden. Automatische Ausschaltung Sleeptimer - Das Gerät ist mit einem Sleeptimer ausgestattet, der das Gerät automatisch nach einem voreingestellten Zeitraum ausschaltet. -
Seite 29: Aux-Eingang
- Zum aufrufen eines Senderspeichers drücken sie “SKIP (-) /RÜCKLAUF“ oder “ SKIP (+) /VORLAUF“. - Zum löschen eines Senderspeichers überschreiben sie ihn mit einem neuen Sender. iPod - Schalten sie das Gerät und den iPod ein. - Schließen sie den iPod an, wie zuvor beschrieben. - Drücken sie mehrmals “FUNC./CL-SET”... - Seite 30 Spezifikationen Stromquelle: DC 7,5V, 1,5 a über Netzteileingang Netzteil 110V-240V ~ 50/60 Hz Leistungsaufnahme: 10 Watt Lautsprecher: 2 x 2" Frequenzbereich: UKW 88 – 108 MHz WARNUNG 1. Auf das Gerät dürfen keine offenen Flammen, wie z.B. angezündete Kerzen, gestellt werden. 2.
- Seite 31 Mode d’emploi DANGER RISQUE DE CHOC ELECTRIQUE NE PAS OUVRIR ATTENTION : afin d’éviter le L’éclair et la fl èche Le point d’exclamation pointée dans le triangle risque de choc électrique, ne dans le triangle est un représentent un symbole pas retirer le cache (ou l’arrière).
-
Seite 32: Emplacement Des Commandes
VUE DE FACE VUE DE HAUT 11 12 13 14 15 VUE ARRIERE Emplacement des commandes 1. BAFFLE 10. TOUCHE MARCHE/ARRET 2. RETROECLAIRAGE BLEU DE L’ECRAN 11. TOUCHE SAUTER /RECHERCHE (-) 3. COMPARTIMENT DES BATTERIES DE 12. TOUCHE SAUTER /RECHERCHE (+) SECOURS (BAS DE L’APPAREIL) 13. -
Seite 33: Alimentation Électrique
Alimentation électrique Utilisation ca (transformateur externe ca-cc) - Cet appareil est équipe d’une prise cc pouvant accueillir des transformateur ca avec une tension de 7,5v cc 1.5a munis d’une prise. Ayant les polarités suivantes telles indiquées (milieu positif): - Veuillez utiliser uniquement le transformateur ca fourni pour le fonctionnement de l’appareil. L’utilisation d’autres transformateurs peut endommager l’appareil ou provoquer un mauvais fonctionnement. - Seite 34 Adaptateurs pour station d’accueil Sélectionnez l’adaptateur de la station d’accueil correspondant à votre iPod. Votre iPod convient parfaitement à l’adaptateur correspondant. Le numéro indique I’iPod correspondant iPod touch iPod nano 1ére generation 5éme generation 2éme generation (video camera) 8Go 16Go iPod nano iPod classic 4éme generation (video)
- Seite 35 Réglage de la bonne heure: Mettre l’appareil en mode ‘veille’ (éclairage d’écran = attenue) Maintenir la touche “FUNC./CL-SET” enfoncée pendant 3 secondes pour faire apparaitre l’affichage heure ou heure (clignotante) Appuyez sur la touche “SAUTER (-) /RECHERCHE (-)“ ou “SAUTER (+) /RECHERCHE (+)“...
- Seite 36 Réglage de l'heure d’alarme 1. Appuyez sur la touche “MARCHE/ARRET“ pour mettre l’appareil en mode ‘veille’. (éclairage bleu attenue). 2. Maintenir la “AL-SET/AL-MODE“ jusqu'a ce que cet écran apparaisse 00 00 HEURE (CLIGNOTANTE) 3. Appuyez sur la touche “SAUTER (-) /RECHERCHE (-)“...
- Seite 37 7. L’appareil se mettra automatiquement en ‘marche’ a l’heure d’alarme de votre choix, a condition que la fonction d’alarme soit ‘activée’. 8. Pour éteindre l’appareil âpres qu’il se soit automatiquement mis en route appuyez simplement une fois sur la touche “MARCHE/ARRET“. Cela arrêtera l’appareil, mais n’effacera pas les réglages de l’’alarme, l’appareil s’allumera a nouveau automatiquement le jour suivant a la même heure prédéfinie.
- Seite 38 Fonctionnement de la radio - Appuyez une fois sur la touche ‘’MARCHE/ARRET“ pour allumer l’appareil. - Appuyez plusieurs fois sur la touche “FUNC./CL-SET” jusqu'a ce que l’écran affiche ‘FM’. - Dépliez et ajustez le fil de l’antenne FM pour obtenir la meilleure réception. - Utilisez la touche “ST/MO“...
- Seite 39 - A tout moment pendant la lecture. Appuyez sur la touche “PLAY/PAUSE ” pour interrompre la lecture. Appuyez sur la touche “PLAY/PAUSE ” pour recommencer la lecture de la même chanson et position. - A tout moment pendant la lecture, appuyez et relâchez les touches “SAUTER (-) /RECHERCHE (-)“...
- Seite 40 Spécifications Alimentation électrique: Cc 7.5v, 1.5a par la prise intégrée ‘in DC’ Adaptateur externe tension ca-cc 110v- 240v ~ 50/60Hz Consommation d’énergie : 10 Watt Baffle: Baffle 2" x 2 Gamme de Fréquence: FM 88 – 108 MHz AVERTISSEMENT 1. Ne placer aucune source de flammes, telles que des bougies allumées sur cet appareil. 2.
- Seite 41 Manual de instrucciones PRECAUCIÓN DESCARGA ELECTRICA NO LO ABRA El rayo dentro de un ATENCIÓN: Para reducir l El signo de exclamación triángulo es una señal riesgo de descarga eléctrica, dentro del triángulo es una señal de aviso acerca no quite la tapa (o parte de aviso acerca de un de la importancia de las trasera).
-
Seite 42: Ubicación De Los Controles
VISTA FRONTAL: VISTA SUPERIOR: 11 12 13 14 15 VISTA POSTERIOR: Ubicación de los controles 1. ALTAVOZ 10. TECLA ENCENDIDO/APAGADO 2. PANTALLA CON LUZ DE FONDO AZUL 11. TECLA SALTAR (-) / BUSCAR (-) 3. COMPARTIMENTO DE BATERÍA DE 12. TECLA SALTAR (+) / BUSCAR (+) APOYO (FONDO DE LA UNIDAD) 13. -
Seite 43: Fuente De Alimentación
Fuente de alimentación Funcionamiento con ca (adaptador externo de alimentación ca-cc - Este equipo incorpora una “clavija de cc” que puede aceptar adaptadores de ca de valor nominal cc = 7,5v, 1,5a, y con un enchufe con las polaridades que se muestran (positivo en el centro): - Por favor, utilice únicamente el adaptador de ca suministrado para hacer funcionar la unidad. - Seite 44 Adaptadores de estación Elija el adaptador de estación que se ajuste a su iPod. Su iPod se ajusta adecuadamente al adaptador correcto. EL NÜMERO MUESTRA QUÉ iPod SE AJUSTA iPod touch iPod nano 1ª generación 5ª generación 2ª generación (videocámera) 8GB 16GB iPod nano iPod clásico...
- Seite 45 Como establecer la hora: Ponga la unidad en modo "espera" (luz de pantalla = atenuada) Presione y mantenga la tecla “FUNC./AJUSTE-RELOJ” durante 3 segundos, la pantalla muestra hora o hora (parpadeando) Presione la tecla “SALTAR- /BUSCAR-“ o ”SALTAR+ /BUSCAR+” para seleccionar un sistema de visualización de reloj de 12 horas o 24 horas y presione la tecla “FUNC./AJUSTE-RELOJ”...
- Seite 46 Parámetros de hora de "alarma" 1. Presione la tecla “ENCENDIDO/APAGADO” para ponerse en el modo "espera" (luz azul atenuada). 2. Presione y mantenga la tecla “AJUSTE-AL/MODO-AL” hasta que la pantalla muestre: 00 00 HORA (PARPADEANDO) 3. Presione la tecla “SALTAR- /BUSCAR-“...
- Seite 47 7. El equipo se encenderá automáticamente a la hora de despertar que se haya elegido, siempre y cuando la función de alarma esté “activa”. 8. Para apagar la unidad después de que se haya encendido automáticamente, simplemente presione una vez la tecla “ENCENDIDO/APAGADO”. Esto apagará el equipo pero no borrará...
- Seite 48 Funcionamiento de la radio - Presione una vez la tecla "ENCENDIDO/APAGADO" para encender la unidad. - Presione la tecla “FUNC./AJUSTE- RELOJ” de manera repetida hasta que la pantalla muestre "FM. - Extienda y ajuste la antena fm para obtener la mejor recepción. - Utilice la tecla “ST/MO”...
- Seite 49 - En cualquier momento durante la reproducción, presione y suelte las teclas “SALTAR- /BUSCAR-“ y “SALTAR+ /BUSCAR+” para saltar hacia delante o hacia atrás una canción según se desee. - En cualquier momento durante la reproducción, presiona y mantenga las teclas “SALTAR- /BUSCAR-“...
-
Seite 50: Especificaciones
Especificaciones Fuente de alimentación: DC 7,5v, 1,5a por conector cc incorporado external AC-DC power adaptor 110V-240V ~ 50/60Hz Consumo de energía: 10 Watt Altavoz: Altavoz 2" x 2 Rango de frecuencia: FM 88 – 108 MHz ADVERTENCIA 1. No coloque encima del aparato objetos que emitan llamas (por ej.: velas encendidas). 2. -
Seite 51: Manual De Instruções
Manual de instruções WAARSCHUWING RISCO DE CHOQUE ELÉCTRICO NÃO ABRIR O símbolo do raio com AVISO: para reduzir o risco de O ponto de exclamação a seta na ponta é um choque eléctrico, não remova a no in terio r de um co bert ura (ou a tra se ira ). - Seite 52 VISTA FRONTAL: VISTA SUPERIOR: 11 12 13 14 15 VISTA TRASEIRA: Localizaçaõ dos controlos 1. COLUNAS 10. TECLA LIGAR/DESLIGAR 2. VISOR COM FUNDO AZUL 11. TECLA SALTAR (-) /PROCURAR (-) 3. COMPARTIMENTO DAS PILHAS 12. TECLA SALTAR (+) /PROCURAR (+) DE BACKUP (FUNDO DO APARELHO) 13.
-
Seite 53: Fornecimento De Energia
Fornecimento de energia Funcionamento com ac (adaptador externo de energia AC-DC) - este conjunto está equipado com entrada para adaptadores ac com tensão de dc = 7,5 v, 1,5 a e com ficha utilize com as polaridades apresentadas (centro positivo): - Utilize apenas o adaptador ac fornecido para fazer funcionar o aparelho. - Seite 54 Adaptadores de doca Seleccione um adaptador de doca compatível com o seu iPod. O seu iPod encaixará correctamente no adaptador correcto. O NÚMERO MOSTRA QUAL O iPod COMPATÍVEL iPod touch iPod nano 1ª geração 5ª geração 2ª geração (câmara de vídeo) 8GB 16GB iPod nano iPod clássico...
- Seite 55 Como definir a hora correcta: Coloque o aparelho em "modo de espera" (luz do visor = reduzida) Prima e segure a tecla “FUNÇÃO/DEFINIR-REL” durante 3 segundos, o visor apresentará hora de ou hora de (a piscar) Prima “SALTAR- /PROCURAR-“ ou “SALTAR+ /PROCURAR+”...
- Seite 56 Definição das horas do "alarme" 1. Prima a tecla “LIGAR/DESLIGAR” para colocar o aparelho em modo de "espera" (luz azul reduzida). 2. Prima e segure a tecla “DEFINIR-AL/MODO-AL" até o visor apresentar: 00 00 HORAS (A PISCAR) 3. Prima “SALTAR- / PROCURAR-“...
- Seite 57 8. Para desligar o aparelho após ter-se ligado automaticamente, prima apenas a tecla “LIGAR/DESLIGAR” uma vez. Isto irá desligar automaticamente o aparelho, mas sem apagar as definições do alarme. Desta forma, o aparelho irá ligar-se automaticamente de novo no dia seguinte exactamente à mesma hora predefinida. 9.
- Seite 58 Funcionamento do rádio - Prima a tecla "LIGAR/DESLIGAR" uma vez para ligar o aparelho. - Prima a tecla “FUNÇÃO/DEFINIR-REL” repetidamente até o visor apresentar "FM". - Estique e ajuste o fio da antena FM para obter a melhor recepção. - Utilize a tecla “ST/MO” para seleccionar o modo pretendido (estéreo/ mono). em alguns casos, em que a recepção é...
- Seite 59 - A qualquer momento durante a reprodução, prima e liberte as teclas “SALTAR- PROCURAR-“ e SALTAR+ / PROCURAR+” para saltar uma música para a frente ou para trás, conforme pretendido. - A qualquer momento durante a reprodução, prima e segure as teclas “SALTAR- PROCURAR-“...
- Seite 60 Especificações técnicas Botão de alimentação: DC 7,5 v, 1,5 a através de entrada integrada DC e adaptador externo AC-DC de 110V-240V ~ 50/60Hz Consumo de energia: 10 Watt Colunas: 2 x colunas 2" Resposta de frequência: FM 88 – 108 MHz AVISO 1.
- Seite 61 Instrukcje obs³ugi UWAGA ZAGRO¯ENIE PORA¯ENIEM PR¥DEM ELEKTRYCZNYM NIE OTWIERAÆ Symbol pioruna ze W y k r z y k ni k na t l e UWAGA: Celem zmniejszenia zagro¿enia pora¿eniem pr¹dem elektrycznym nie strza³k¹ na tle trójk¹ta trójk¹ta oznacza, ¿e w nale¿y zdejmowaæ...
- Seite 62 WIDOK Z PRZODU: WIDOK Z GÓRY: 11 12 13 14 15 WIDOK Z BOKU: Rozmieszczenie kontrolek 1. G£OŒNIK 10. PRZYCISK W£./WY£. 2. WYŒWIETLACZ PODŒWIETLANY 11. PRZYCISK POMINIÊCIA /WYSZUKIWANIA (-) NA NIEBIESKO 12. PRZYCISK POMINIÊCIA /WYSZUKIWANIA (+) 3. KOMORA NA BATERIE ZAPASOWE 13.
- Seite 63 Zasilanie Zasilanie pr¹dem zmiennym (zewnêtrzny zasilacz pr¹du zmiennego – pr¹du sta³ego) - Urz¹dzenie wyposa¿one jest w gniazdo zasilania pr¹dem sta³ym, a do zasilania mo¿na zastosowaæ zasilacz o napiêciu 7,5v 1,5a, o polaryzacji wskazanej na ilustracji (plus na œrodkowym z³¹czu): - Do zasilania prosimy stosowaæ wy³¹cznie zasilacz wchodz¹cy w sk³ad kompletu. Korzystanie z innego rodzaju zasilaczy mo¿e byæ...
- Seite 64 Z³¹cza dokuj¹ce Nale¿y dobraæ z³¹cze dokuj¹ce, które wspó³pracuje z Pañstwa IPodem. Pañstwa IPod jest œciœle dopasowany do odpowiedniego z³¹cza. TEN NUMER WSKAZUJE, Z KTÓRYM MODELEM IPoda Z£¥CZE WSPÓ£PRACUJE iPod touch iPod nano 1-szej generacji 5-tej generacji 2-giej generacji (kamera video) 8GB 16GB iPod nano iPod classic...
- Seite 65 Sposób ustawienia aktualnej godziny: Prze³¹czyæ urz¹dzenie w tryb czuwania (œwiat³o wyœwietlacza = przyciemnione) Nacisn¹æ i przytrzymaæ przycisk “FUNC./CL-SET” przez 3 sekundy. Na wyœwietlaczu pojawi¹ siê godzin, lub godziny (b³yskaj¹c) Nacisn¹æ przycisk “POMINIÊCIA /WYSZUKIWANIA (-)” lub ”POMINIÊCIA /WYSZUKIWANIA (+)” aby wybraæ format 12-godzinny lub 24-godzinny, po czym nacisn¹æ...
- Seite 66 Ustawianie czasu w³¹czenia budzika 1. Nacisn¹æ przycisk "W£./WY£." i w ten sposób prze³¹czyæ urz¹dzenie w tryb czuwania (niebieskie podœwietlenie jest przyciemnione). 2. Nacisn¹æ i przytrzymaæ przycisk “AL-SET/AL-MODE” do chwili, gdy na wyœwietlaczu pojawi¹ siê cyfry: 00 00 GODZINA (B£YSKAJ¥C) 3. Naciskaj¹c przycisk “POMINIÊCIA /WYSZUKIWANIA (-)”i ”POMINIÊCIA WYSZUKIWANIA (+)”...
-
Seite 67: Funkcja Drzemki
7. Urz¹dzenie samoczynnie siê w³¹czy o ustalonym przez pañstwa czasie, o ile funkcja budzika jest „aktywna”. 8. Chc¹c wy³¹czyæ urz¹dzenie po jego samoczynnym uruchomieniu wystarczy nacisn¹æ przycisk “W£./WY£.”, co spowoduje wy³¹czenie urz¹dzenia, lecz nie wykasuje ustawieñ budzika. Dziêki temu urz¹dzenie w³¹czy siê samoczynnie kolejnego dnia o tej samej porze. 9. - Seite 68 Obs³uga radioodbiornika - Nacisn¹æ przycisk ”W£./WY£.”, co spowoduje w³¹czenie urz¹dzenia. - Kilkakrotnie nacisn¹æ przycisk “FUNC./CL-SET” do chwili, gdy na wyœwietlaczu pojawi siê komunikat „FM”. - Rozwin¹æ i ustawiæ przewód antenowy, co zapewni mo¿liwie najlepsz¹ jakoœæ odbioru. - Korzystaj¹c z przycisku ”ST/MO” wybraæ ¿¹dany rodzaj tryb odbioru (stereo/ mono). W pewnych sytuacjach, gdy jakoœæ...
- Seite 69 - Podczas odtwarzania mo¿na w dowolnej chwili nacisn¹æ przycisk “POMINIÊCIA /WYSZUKIWANIA (-)” i ”POMINIÊCIA /WYSZUKIWANIA (+)” co spowoduje przeskok do kolejnego lub poprzedniego utworu. - Podczas odtwarzania mo¿na w dowolnej chwili nacisn¹æ i przytrzymaæ “POMINIÊCIA /WYSZUKIWANIA (-)” i ”POMINIÊCIA /WYSZUKIWANIA (+)” , co spowoduje szybkie przewijanie w przód lub w ty³...
- Seite 70 Specyfikacje ród³o zasilania: Pr¹d sta³y 7,5v, 1,5a przez wbudowane gniazdo zasilania pr¹dem sta³ym zewnêtrzny zasilacz pr¹du zmiennego-pr¹du sta³ego 110V-240V ~ 50/60Hz Pobór mocy: 10 Watt G³oœnik: G³oœnik 2-calowy x 2 Zakres czêstotliwoœci: FM 88 - 108 MHz OSTRZE¯ENIE 1. Na urz¹dzeniu nie nale¿y stawiaæ Ÿróde³ otwartego ognia, jak zapalone œwiece. 2.