Preface Congratulations on purchasing the i² Control-37 master USB controller keyboard. It is one of the finest products of its kind, made after extensive research into what customers require from a MIDI Controller. When using your i² Control-37 in conjunction with a computer and appropriate music software, you will be able to discover the wonderful world of Computer Music, with a set of complete musical instruments from your sound card or workstation.
Table of contens Preface ........................2 Table of contens ......................3 IMPORTANT SECURE INFORMATONS ..............4 Main Feature.......................5 USING MIDI AND USB ....................6 Using USB ........................7 Using the MIDI Functions....................7 Default Setting of the i² Control-37................8 Overall Diagram Preview ....................9 Modulation Wheel .......................9 Pitch Bend Wheel .......................9 Octave knobs......................10 Data Entry Knob .......................10...
IMPORTANT SECURE INFORMATONS Please read the following secure instructions first! Very Important!! 1. Never use the keyboard in the near of water like a swimming pool, bathtub or wet environment like a basement, in rain or similar. 2. Never use the keyboard in the near of heating elements like a radiator or similar, also high temperatures or direct sunbeam should be avoid.
Main Feature • The i² Control-37 MIDI master controller keyboard provides 37 dynamic Piano keys, but no support for Aftertouch • Pitch and modulation wheels for controlling sound • One tree digit 7-segment display for displaying data • data entry poti with touchfunction for editmode •...
USING MIDI AND USB Something you should know before using the midi functions! MIDI is the acronym for Musical Instrument Digital Interface, which makes all digital musical instruments equipped with this standardised interface capable of exchanging their MIDI data or “talk to each other”. To explain how MIDI works on your instrument in more detail, the following illustrations will outline the MIDI functions of the i²...
Using USB The keyboard does not need any driver for Windows 2000, Windows XP, Windows Vista or Mac OS-X 10.3.8. You only need to connect and power on the keyboard. Your computer will automatically install the needed driver. After this, you can start making music.
Default Setting of the i² Control-37 The i² Control-37 will always select the following values for their parameters when the power is turned on. *Transmit MIDI Channel no. 1. *Default Octave will be from C2 (36) to C5 (72) *Default Aftertouch value will be 0 *Default Velocity value will be 0 *Default Reverb Depth value will be 64 *Default Pan Pot value will be 64...
Overall Diagram Preview Operation panel 1 = Modulation Wheel 4 = Display 7 = Parameter & Tenkeys 2 = Pitch Wheel 5 = Data Entry Knob 3 = Oktave/ Bank Select Knobs 6 = Controller Knobs Modulation Wheel It is very common to use the modulation wheel to change the intensity of effects: mainly Vibrato (pitch change), Tremolo (Change the volume), and Modulation (change the tone).
change the Pitch Bend range. To bend the pitch up, please move the wheel away from you. To bend the pitch down, please move the wheel towards you. Octave knobs By pressing the Octave key, you will shift the active keyboard range one octave higher, or lower.
2) press CC No.(will be shown in display) 3) choose 7 on numeric keypad; 4) press enter key to specify Control Change as 7; 5) the display shows “---“ 6) press CC DATA.(will be shown in display) 7) Press number key 1, 2, and 3, then press enter key to specify value 123 then press Data Entry knob to finish this action.
Seite 12
For selecting a presetbank press Data-Entry knob, then the Bank up or down button to incrase or decrase the banknumber you want to choose, then press Enter. Now you can use the new bank, with 12 new controller settings. For setting a presetbank, please see part Assignment of the 12 Real-time Controllers!
Rear Panel 1. USB jack This jack allows you to connect the keyboard with your computer. 2. Sustain jack This jack allows you to connect an optional Sustain Footswitch to the keyboard. 3. MIDI OUT jacks This standard MIDI jacks are used to transmit MIDI data by computer or by playing on the keyboard of i²...
Seite 14
5. Power Switsch The 3-way power switch turns the keyboard's power to external powersupply/ Battery to power off or to power by USB. 6. Power jack This jack is used to supply the keyboard with power by external 9V power adaptor if the keyboard is not connected by USB and/or no batterys inside.
TROUBLE SHOOTING If anything doesn’t work . . . Please check following points: Midi conection fault . . . Do you have installed your midi drivers from your soundcard? Look at START --> Settings --> Systemcontrol --> Multimedia --> Tab Midi for installed midi drivers.
Seite 16
If you connect the keyboardto the computer by USB, it should be recognized. You can hear a short sound and the computer shows the name of the keyboard. If this not happens, there should maybe a technical problem. You can see in the device manager if the keyboard is recognised! Look at „Start Settings System control...
Seite 17
You can write an e-mail to our hotline and we try to help you. Info@Miditech.de Please have a look on our FAQ page first; maybe your problem is listed. We will answer you in normaly in 10 workdays. If not please try again, because we have good spamfilter...
Einleitung Wir bedanken uns für den Kauf des i² Control-37 MIDI-Keyboards. In Verbindung mit einem PC und der Musiksoftware ist Ihr i² Control-37 ein komplettes Heim- Tonstudio mit Echtzeit Reglern für Klangeinstellungen oder generellem Parameter Editieren. Diese Anleitung soll Ihnen helfen, sich mit den vielseitigen Möglichkeiten des i² Control-37 vertraut zu machen.
Inhalt Einleitung ........................23 Inhalt .........................24 Wichtige Sicherheitshinweise! ..................25 Ihr Instrument......................26 Benutzen von Midi und USB ..................27 Benutzung des USB Anschlusses ................27 Benutzung der MIDI-Funktionen ................28 Allgemeine Bedienung ....................30 Bedienelemente......................30 Modulationsrad ......................30 Pitch Bend Rad......................30 Oktav-Tasten ......................31 Data Entry Drehregler mit Tastfunktion..............31 MIDI Channel Gruppe ....................31 Transpose-Gruppe....................31 Reset Taste ......................31...
Wichtige Sicherheitshinweise! Bitte lesen Sie die folgenden Sicherheitshinweise genau durch!! 1. Benutzen Sie das Keyboard niemals in der Nähe von Wasser wie z.b. einem Schwimmbecken oder einer Badewanne oder in feuchten Umgebungen wie einem Keller, Regen oder ähnlichem. 2. Benutzen Sie das Keyboard niemals in der Nähe von Heizkörpern oder Heizgeräten oder heißen Temperaturen.
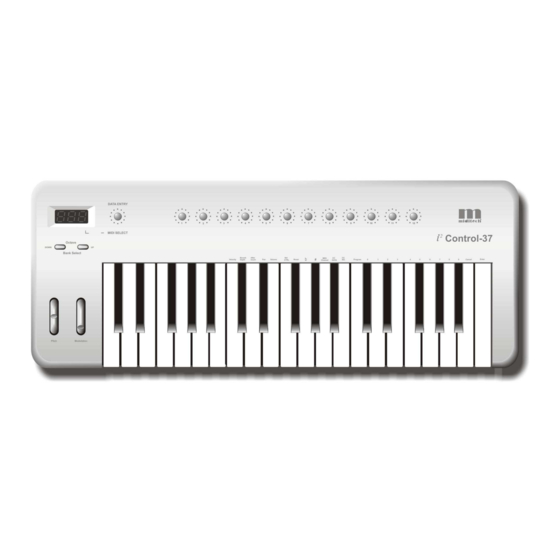
Ihr Instrument • Das i² Control-37 hat 37 anschlagsdynamische Pianotasten, es unterstüzt aber keinen Aftertouch • Das Control-37 hat ein Pitch und ein Modulationsrad um den Sound zu verändern. • Es besitzt eine dreistelliges 7-Segment Anzeige • Es hat einen Dateneingabe Regler (Data Entry) mit Tastfunktion um den Editmode aufzurufen.
Benutzen von Midi und USB Was Sie über Midi wissen sollten MIDI ist die Abkürzung für Musical Instrument Digital Interface, und ist der Standard für den Datenaustausch zwischen Musikinstrumenten, die mit dem MIDI-Anschluß ausgestattet sind. Um Ihnen die MIDI-Funktionen Ihres Control-37 näher zu erläutern, folgen Sie bitte den nachfolgenden Erklärungen.
Benutzung der MIDI-Funktionen Zur Übertragung der MIDI Daten von Ihrem Keyboard zu einem anderen professionellen MIDI Instrument kaufen Sie bitte ein Standard MIDI Kabel, und verbinden dieses mit dem Control-37 MIDI-OUT Anschluß und dem MIDI-IN Anschluß des anderen Instruments. Vergewissern Sie sich, daß der MIDI-Sendekanal Ihres Control- 37 mit dem MIDI-Empfangskanal des anderen Instruments übereinstimmt.
Seite 29
Werkseinstellungen des i² Control-37 Beim Einschalten des Control-37 sind die folgenden Parameter eingestellt: *Sende MIDI Kanal Nr. 1 *Oktavbelegung von C2(36) to C5(72) *After Touch Wert auf 0 *Velocity Wert auf 0 *Halltiefe Wert auf 64 *Panorama Wert auf 64 *Lautstärke Wert auf 127 *CC Data Wert auf 0 *CC Nr.
Allgemeine Bedienung Bedienelemente 1 = Modulations Rad 4 = Display 7 = Parameter & Zehnertasten 2 = Pitch Bend Rad 5 = Data Entry Knopf 3 = Oktaven/ Bankwahl Knöpfe 6 = Controllerknöpfe Modulationsrad Meistens wird das Modulationsrad zur Veränderung der Intensität von Effekten genutzt, wie z.B.
Oktav-Tasten Durch drücken der Oktav-Tasten erhöhen oder erniedrigen Sie die ausgegebenen Noten in ihrer Oktavlage. Wenn Sie den Bereich um 2 Oktaven senken wollen, gehen Sie wie folgt vor: Drücken Sie die Oktave Down Taste 2-mal. Data Entry Drehregler mit Tastfunktion Dieser Drehregler erlaubt Ihnen die Veränderung von Parametern wie Lautstärke, Velocity, Chorus, Reverb(Hall), Panorama und Aftertouch.
4. Drücken Sie die Entertaste zum festlegen des Controller 7 5. Das Display zeigt kurz „---„ 6. Drücken Sie die CC-DATA Taste 7. Drücken Sie die Nummerntasten 1, 2 und 3 8. Drücken Sie die Entertaste, um den Wert 123 fest zu legen und beenden Sie die Eingabe durch erneutes Drücken den Data Entry Drehregler.
Seite 33
Anwählen einer Speicherbank Es gibt 15 Preset Bänke mit vordefinierten Kontrollerbelegungen (Midikanal und Midicontrollernummer). Alle diese Einstellungen werden in einem EE-Prom gespeichert, damit im Falle eines Batteriewechsels oder auch im ausgeschalteten Zustand die eingestellten Daten nicht verloren gehen. Im Anhang finden Sie eine Tabelle mit den eingestellten Werkseinstellungen die Sie beliebig verändern können.
Rückansicht 1. USB Anschluss Mit diesem Anschluss können Sie das Keyboard mit Ihrem Computer verbinden. 2. Sustain Anschluß Hier können Sie ein optionales Sustain/ Haltepedal anschließen. 3. MIDI-OUT Anschluß Über diesen MIDI-Anschluß senden Sie Daten von dem Computer oder der Tastatur des Control-37 an ein anderes MIDI-Instrument (z.B.
Problembehebung Wenn es mal nicht geht . . . dann Überprüfen Sie folgende Anweisungen: Der Midianschluss funktioniert nicht . . . Haben Sie die Treiber Ihrer Soundkarte installiert? Schauen Sie mal unter „Start Einstellungen Systemsteuerung Multimedia Midi ob ein Miditreiber Ihrer Soundkarte eingetragen ist, falls nicht hohlen Sie dieses nach. Dieser liegt Ihrer Soundkarte bei! Achtung: In vielen Programmen müssen Sie zuerst den Eingangs Port festlegen, bevor Sie Mididaten empfangen können!! (Prüfen)
Seite 37
Wird das Keyboard erkannt? Das ist wichtig, sonst kommt keine Kommunikation zustande! Wenn Sie den USB Stecker des Computers mit dem Keyboard verbinden sollte das Keyboard erkannt werden. Es meldet sich kurz mit „Miditech ...“ Schauen Sie mal unter „Start Einstellungen...
Seite 38
Sie bitte zuerst auf unserer Homepage nach, ob es vielleicht schon eine Lösung Ihres Problems gibt, falls nicht bitte eine Mail an: Info@Miditech.de Wir antworten normalerweise aufgrund vieler Mails zu den verschiedenen Produkten innerhalb von 10 Werktagen, falls Sie keine Antwort bekommen kann es sein, das unser...
Spezifikation Model: i² Control-37 Keyboard 37 anschlagsdynamische Pianotasten Polyphonie 10 Noten gleichzeitig Eingabetasten Midiselect MIDI Kanal Mode) Reset Velocity Reverb Chorus Pan Pos Volumen Oktave Transpose Program Wechsel CC-No.(genereller CC Zugriff) Set Controller Nummerntasten x10 Enter Cancel Regler Pitch Bend Rad Modulationsrad Data Entry Drehknopf 12 frei programmierbare Echtzeit Regler mit freier...
Préface Merci d’avoir choisi le i² Control-37, clavier-maître de contrôle MIDI. En utilisant votre i² Control-37 avec un ordinateur et un logiciel musical approprié, vous détenez déjà un home-studio complet, avec la possibilité de régler en temps réel les sons ainsi que les paramètres MIDI de vos instruments MIDI.
Table des Matieres Préface ........................44 Table des Matieres ....................45 Avis de sécurité ......................46 Votre instrument .......................47 Ce que vous devez savoir sur les fonctions MIDI .............48 Ce que vous devez savoir sur les fonctions USB .............48 Utilisation de la connection USB ................49 Utilisation des fonctions MIDI..................49 Réglages par défaut du i²...
Avis de sécurité Veuillez bien lire attentivement les conseils de sécurité suivants! 1. N'exposez jamais le clavier a l'eau ou a l'humidité. 2. Tâchez de ne pas utiliser ou déposer le clavier près de radiateurs ou autres sources de chaleur. N'exposez pas le clavier aux rayons de soleil. 3.
Votre instrument le i² Control-37 possède 37 touches dynamiques, mais n'offre pas de fonction Aftertouch. Le clavier i² Control-37 possède une molette Pitch Bend et une molette de Modulation. Il possède un écran d'affichage LED a 3 chiffres. Un potentiomètre Data Entry avec fonction de touche vous permet facilement de faire des modification des paramètres.
Ce que vous devez savoir sur les fonctions MIDI L’abréviation MIDI correspond à "Musical Instrument Digital Interface", ou Interface Numérique des Instruments de Musique, qui permet à tous les instruments de musique possédant cette interface d’échanger des données ou "de se parler". Pour expliquer, plus en détail, comment fonctionne MIDI sur votre instrument, les i²...
Utilisation de la connection USB Le clavier ne requiert pas de pilote USB spécial sous les logiciels Windows 2000, Windows XP et Mac OS-X 10.3.8. Raccordez simplement le clavier et l'ordinateur par le câble USB, puis le logiciel installeras automatiquement les pilotes nécessaires.
Réglages par défaut du Control-37 i² i² En allumant le Control-37, les paramètres du clavier serons les suivants: Canal de transmission MIDI n° 1. Octave par défaut de C2 (36) à C5 (72) After Touch par défaut d’une valeur de 0 Vélocité...
Set de commandes 1 = Molette de Modulation 2 = Molette Pitch Bend 3 = Touches Octave et sélection de banque 4 = Ècran d'affichage Boutons tournants de contrôle 5 = Potentiomètre et bouton Data Entry 7 = Touches de paramètres et touches numériques Molette de Modulation Elle sert a varier l’intensité...
Boutons Octave Down et Octave UP Utilisez ces boutons pour déplacer d’une octave la gamme de votre clavier i² Control-37. Pour par exemple baisser la gamme de deux octaves, appuyez simplement deux fois sur le bouton Octave Down. Potentiomètre Data Entry avec fonction de touche Il vous permet d’ajuster, directement a partir du clavier, les valeurs de paramètres tels que le volume, la vélocité...
Touche Reset (réinitialisation) Si vous appuyez sur le bouton Data Entry puis sur la touche RESET, un message est transmis, ordonnant à tous les instruments MIDI branchés de revenir à leurs réglages par défaut. Terminez en appuyant de nouveau sur le bouton Data Entry. Entrée des données via les touches numérotées Le clavier i²...
numéro de programme entre 1 et 128. Si vous souhaitez par exemple choisir le programme 67 (TenoSax), appuyez sur le bouton Data Entry puis sur les touches 6 et 7, et appuyez pour finir sur la touche Enter et enfin sur le bouton Data Entry. Les 12 boutons de contrôle en temps réel Ces 12 boutons programmables s’utilisent pour envoyer n’importe quel type de donnés de contrôleur MIDI sur n’importe quel canal MIDI.
Seite 55
configurations de base du clavier, que vous pouvez bien sur modifier selon vos besoins. Afin de sélectionner une des mémoires prédéfinis (Presets), appuyez sur le bouton Data Entry, puis un des boutons d'Octave (sélection de banque) pour choisir la banque désirée. Confirmez votre choix en appuyant sur la touche Enter, puis sur le bouton Data Entry.
Panneau arrière 1. Port USB i² Ce connecteur USB sert à relier le Control-37 et le port USB de l’ordinateur à l’aide d’un câble USB standard (fourni). 2. Prise pour pédale sustain Branchez ici une éventuelle pédale sustain (non fournie). 3.
5. Interrupteur d'alimentation Cet interrupteur a trois positions: 1. l’alimentation du clavier sur 9V/piles, 2. hors tension ou 3. sur alimentation via USB. 6. Prise d'alimentation Elle sert à connecter le clavier à un bloc d’alimentation 9 V à courant continu (500mA) dans le cas ou vous n'avez pas branché...
En cas de problèmes Si quelque chose ne marche pas. . . alors contrôlez les indications suivantes: L'interface MIDI ne fonctionne pas. . . Avez-vous installé les pilotes de votre carte numérique audio? Regardez sous "Démarrer Paramètres Panneau de configuration Sons et multimédia Audio...
Seite 59
plupart des cartes audio, il est possible de régler la latence. Celle-ci évite que le signal audio soit interrompu en utilisant des ordinateurs plus lents. Après avoir installé la carte audio, la latence est souvent réglée au maximum. Avec une latence trop haute, un retard du signal audio est déjà...
Seite 60
être que vous trouverez déjà une solution a votre problème. Sinon, vous pouvez bien sur nous contacter sous: Info@Miditech.de A cause du grand nombre de email, nous essayons de pouvoir vous répondre dans un délai d'environ 10 jours. Si toutefois vous ne recevez pas de réponse, il est...