Werbung
Quicklinks
Owner's manual
For household use only
Please read this document carefully before installing
and/or using your vacuum cleaning system.
Manuel d'instructions
Usage domestique seulement
Veuillez lire attentivement ce document avant de procéder à l'installation
et/ou l'utilisation de votre système d'aspiration centralisée.
Manual de instrucciones
Sólo para uso doméstico
Por favor, lea atentamente este documento antes de proceder
a la instalación y/o utilización de su sistema de aspiración central.
Benutzerhandbuch
Nur für den privaten häuslichen Gebrauch
Bitte lesen Sie dieses Dokument sorgfältig durch, ehe Sie mit dem Einbau und/
oder der Benutzung Ihrer Zentralstaubsaugeranlage beginnen.
Serial No / N
de série / No de serie / Seriennummer :
o
Head Office / Siège social
Oficina Central / Hauptsitz
Canada
3, rue Marcel-Ayotte, Blainville (Québec) J7C 5L7, CANADA
Tel.: (450) 434-2233
1 800 361-9553
Fax: (450) 434-6111
info@trovac.com
Distribution Center / Centre de distribution
Centro de distribución / Vertriebszentrum
USA
1164 SE Century Dr., Lee's Summit, Missouri USA 64081
info@trovac.com
EUROPE
16, rue du Stade, 44170 Treffieux France
info@trovac.eu
®
Made in USA
Fabriqué aux États-Unis
Fabricado en EEUU
Hergestellt in den USA
Werbung

Inhaltszusammenfassung für Deco VAC
- Seite 1 ® Owner’s manual For household use only Please read this document carefully before installing and/or using your vacuum cleaning system. Manuel d’instructions Usage domestique seulement Veuillez lire attentivement ce document avant de procéder à l’installation et/ou l’utilisation de votre système d’aspiration centralisée. Manual de instrucciones Sólo para uso doméstico Por favor, lea atentamente este documento antes de proceder...
- Seite 2 Important Safety Instructions | Importantes mesures de sécurité Medidas de seguridad importantes | Wichtige Sicherheitshinweise Polarization Instructions for models with 120volt cord only. These appliances have a polarized plug (one blade is wider than the other). This plug will fit in a polarized outlet only one way. If the plug does not fit fully in the outlet, reverse the plug. If it still does not fit, contact a qualified electrician to install the proper outlet.
- Seite 3 Deco Vac service center. Ne pas utiliser si le cordon ou la fiche est endommagé. Retourner l’appareil au centre de service Déco Vac s’il ne fonctionne pas bien, s’il est tombé, s’il a été endommagé, oublié à l’extérieur ou immergé.
- Seite 4 Important Safety Instructions | Importantes mesures de sécurité Medidas de seguridad importantes | Wichtige Sicherheitshinweise 10. Do not put any objects into openings. Do not use with any opening blocked; keep free of dust, lint, hair, and anything that may reduce air flow. N’insérer aucun objet dans les ouvertures.
-
Seite 5: Inhaltsverzeichnis
Table of Contents | Table des matières Índice | Inhaltsverzeichnis Schematic Schématique Esquema Aufbauschema Installation Installation Instalación Installation Operating Instructions Utilisation Funcionamiento Benutzung Troubleshooting Dépannage Reparación Störungsbehebung Warranty Information Garantie Garantia Garantie... -
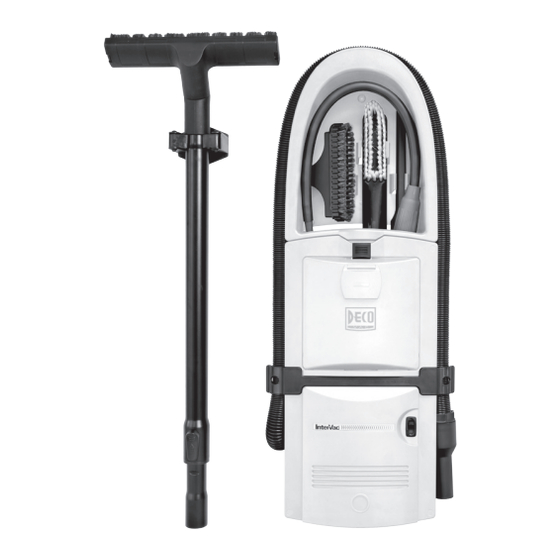
Seite 6: Schematic Schématique Esquema Aufbauschema
Schematic | Schématique Esquema | Aufbauschema 1. Tool caddy | Porte-accessoires Soporte para accesorios | Zubehörhalterung 2. Hose retainer | Dispositif de retenue du boyau Soporte para manguera | Schlauchhalter 3. Floor tool | Brosse à plancher Cepillo para suelos | Hartbodenbürste 4. -
Seite 7: Installation Installation Instalación Installation
Retirez le plan de papier à l’endos du manuel positionnez-le sur la surface à l’aide de ruban adhésif. L’appareil Déco Vac doit être installé à au moins 75 mm du sol afin de permettre l’évacuation d’air. Pour plus de stabilité, alignez le plan de façon à ce que deux des points centraux verticaux soient positionnés au centre d’un montant. - Seite 8 Unit Installation | Installation de l’appareil Instalación del aparato | Installation des Geräts 8. Attach all four screws through the marked keyholes. Keep the screw heads 1/8” from the wall surface. Vissez les 4 vis dans les trous. Assurez-vous de garder les têtes des vis à environ 3,2 mm de la surface du mur. Atornillar los 4 tornillos en los agujeros.
- Seite 9 Unit Installation | Installation de l’appareil Instalación del aparato | Installation des Geräts Slide tool caddy into dove-tail and push to lock over pin. Glisser les queues d’arronde dans les rainures et pousser pour verrouiller en place. Colocar los lados redondeados en las ranuras y apretar para bloquear.
-
Seite 10: Operating Instructions Utilisation Funcionamiento Benutzung
Operating Instructions | Utilisation Funcionamiento | Benutzung Note: The lower part of the vacuum cleaner will be quite warm when in use. Note : La partie inférieure de l’appareil deviendra chaude durant l’utilisation. Nota: La parte inferior del aparato se volverá caliente durante el uso. Hinweis: Der untere Teil des Geräts wird während des Betriebs recht warm. - Seite 11 Operating Instructions | Utilisation Funcionamiento | Benutzung TIP : If you break off the vacuum hose inlet cover, simply reattach it by lining up one of the small dimples located on the inside of the inlet cover and then press hard on the other side to click into position. ASTUCE : Si vous détacher la porte de la prise située sur le devant de l’aspirateur, vous pouvez simplement la replacer en alignant l’encoche située derrière de la porte de la prise et en appuyant fermement sur l’autre côté...
- Seite 12 Operating Instructions | Utilisation Funcionamiento | Benutzung Tuck-in the corners and all 4 sides carefully under the vertical ribs. Please watch that the front side (which you cannot see) is under the ribs. Insérer les coins et les 4 côtés sous les rebords verticaux avec soin. Veuillez vous assurer que le côté...
-
Seite 13: Troubleshooting Dépannage Reparación Störungsbehebung
Troubleshooting | Dépannage Reparación | Störungsbehebung Cleaning the stretch hose Nettoyage du boyau Limpieza de la manguera Reinigung des Schlauchs 1. Lift the hose up on both ends and dispense some liquid detergent into both ends. Soulever les deux extrémités du boyau et appliquer du savon liquide dans les deux ouvertures. Levantar las dos extremidades de la manguera y poner jabón líquido por los dos lados. -
Seite 14: Warranty Information Garantie Garantia Garantie
6 ans à compter de la date d’achat original. Le centre de service autorisé réparera ou remplacera (à la discrétion de Déco Vac) la ou les pièces défectueuses, et ce, sans frais de main d’oeuvre en atelier pour la période de la garantie. - Seite 15 Le garantizamos que su aspirador no tendrá defectos de material o fabricación. Esta garantia es válida para un periodo de 6 años a partir de la fecha de compra. El centro de servicio autorizado reparará o reemplazará (a discreción de Déco Vac) la o las piezas defectuosas, y eso sin gastos de mano de obra en taller durante el periodo de la garantia.
- Seite 16 5.125" (130.2 mm)