Vimar 7509 Technisches Handbuch
Inhaltsverzeichnis
Verfügbare Sprachen
Verfügbare Sprachen
Quicklinks
Manuale installatore - Installer guide
Manuel installateur - Technisches Handbuch
Instrucciones instalador - Manual do instalador
Εγχειρίδιο οδηγιών
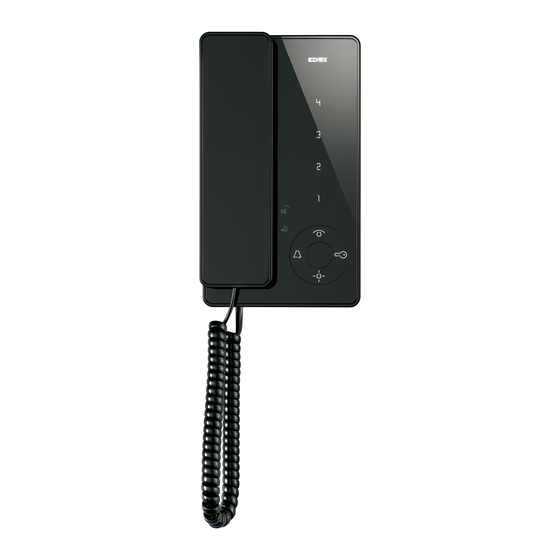
7509, 7509/D*
Citofono Tab con microtelefono
Tab interphone with handset
Portier Tab avec combiné
Haustelefon Tab mit Hörer
Port.autom. Tab con microteléfono
Telefone Tab com microtelefone
Θυροτηλέφωνο Tab με ακουστικό
*
Inhaltsverzeichnis

Verwandte Anleitungen für Vimar 7509


Inhaltszusammenfassung für Vimar 7509
- Seite 1 Manuale installatore - Installer guide Manuel installateur - Technisches Handbuch Instrucciones instalador - Manual do instalador Εγχειρίδιο οδηγιών 7509, 7509/D* Citofono Tab con microtelefono Tab interphone with handset Portier Tab avec combiné Haustelefon Tab mit Hörer Port.autom. Tab con microteléfono Telefone Tab com microtelefone Θυροτηλέφωνο...
-
Seite 20: Technische Merkmale
Zur Verwendung in Systemen Due Fili Plus. satzfunktion oder eines Internrufs. Der Artikel 7509/D verfügt über die Funktion für Träger von Hörgeräten. Taster 3: Auf die Aktivierung der Zusatzfunktion oder Internruf Vor der Programmierung die Anleitungen aufmerksam lesen, um sich programmierbarer Taster (aktiviert defaultmäßig die Funktion... -
Seite 21: Anschlussklemmleiste
Antwortzeit (für Ruf vom Klingeltableau): Defaultwert 30 s (Mindestwert 1 s, Höchstwert 255 s) Der Art. 7509/D ist mit einer internen Spule ausgestattet, dank der das Gerät Antwortzeit (für Internruf): 30 s (fester Wert) auch von Hörgeräteträgern benutzt werden kann. Für diese Funktionsweise Gesprächszeit (für Ruf vom Klingeltableau): Defaultwert 120 s... -
Seite 22: Einstellung Der Ruftonlautstärke
Mit der Taste E3 wird die Melodie für den ETAGENRUF gewählt (nur bei Verwendung des Taster-Schnittstellenmoduls Art. 6120 oder Etagenruftaster Vimar). Bei Etagenruf mit direkt an den Klemmen FP und M des Haustelefons angeschlossenem Taster kann der Rufton nicht geändert werden. -
Seite 23: Busabschluss Für Die Stabilisierung Des Videosignals
Abb.. 6 Abb.. 7 Abb.. 5 Busabschluss für die Stabilisierung des Videosignals No interior do telefone estão presentes os Dip-switch de terminação do BUS para a estabilização do sinal de vídeo. Consoante a configuração de ligação (telefones/monitores ligados em série ou derivados de um distribuidor) defina os dip-swich na posição adequada (posição A, B ou C), seguindo as indicações descritas na nota “Terminação 50Ω... -
Seite 24: Manuelle Programmierungen
Manuelle Programmierungen Der sekundäre Kenncode ID wird wie folgt programmiert: 1) Den Hörer abnehmen. Folgende Basisprogrammierungen sind am Haustelefon/Monitor möglich: 2) Gleichzeitig die Tasten B und A drücken und die zwei Tasten gedrückt - Programmierung des Kenncodes ID, vorzunehmen entweder an dem halten, bis die LED F (Ruftonabschaltung) zu blinken beginnt. -
Seite 25: Programmierung Mit Software Saveprog
„Selbsteinschaltung eines bestimmten Klingeltableaus“, „Rücksetzen auf Tons die Taste A loslassen und kurz die Taste C drücken. Defaultwerte der vom Installationstechniker programmierten Taster“, „Wie- Damit wurden alle Programmierungen des Haustelefons gelöscht. Um zu derherstellen der Standarddaten“ zugeordnet werden. kontrollieren, ob die Programmierungen korrekt gelöscht wurden, den Taster C drücken: Das Haustelefon muss einen Signalton im Hörer abgeben. - Seite 44 Art. 8879 Art. 8879 A6 - Citofono serie Tab A6 - Haustelefon Serie Tab A6 - Tab series interphone Art. 7509, 7509/D Art. 7509, 7509/D Art. 7509, 7509/D C - Targa esterna audio a pulsanti C - Externes Audio-Klingeltableau mit Tasten...
- Seite 45 Impianto citofonico mono o plurifamiliare con una Montante - Cable riser targa esterna (RIF. SI649). Colonne montante - Steigleitung Single and multiple residence audio door entry MONTANTE - Coluna montante Κεντρικη γραμμη system with one external entrance panel (REF. SI649). Installation de poste d’appartement mono ou multi- usagers avec plaque de rue (RÉF.
- Seite 46 Varianti di collegamento per suoneria supplementare (RIF. SI649) Wiring versions for additional chimes (REF. SI649) Variantes de raccordement pour sonnerie supplémentaire (RÉF. SI649). Sonderschaltungen für zusätzlichen Gong (REF. SI649) Variantes de conexión para timbre adicional (REF. SI649) Variantes de ligação para campainha suplementar (REF. SI649) Παραλλαγές...
- Seite 47 Varianti di collegamento per chiamata fuoriporta (RIF. SI649) Wiring versions for door calls (REF. SI649) Variantes de raccordement pour appel palier (RÉF. SI649) Sonderschaltungen für Etagenruf (REF. SI649) Variantes de conexión para llamada desde fuera de la puerta (REF. SI649) Variantes de ligação para chamada de patamar (REF.
- Seite 48 BUSTERMINIERUNG TERMINAISON BUS BUS TERMINATION TERMINAZIONE BUS Dieser Hinweis gilt für alle Geräte der Techno- Cette remarque concerne tous les dispositifs This note applies to all devices with Due Fili Questa nota si applica a tutti i dispositivi della logie Due Fili Plus mit “Steckverbinder oder de la technologie Due Fili Plus dotés du «...
- Seite 49 REGOLE DI INSTALLAZIONE. INSTALLATION RULES. RÈGLES D’INSTALLATION. INSTALLATIONSVORSCHRIFTEN. Die Installation hat gemäß den im jewei- L’installazione deve essere effettuata Installation should be carried out ob- L’installation doit être effectuée dans ligen Verwendungsland der Produkte con l’osservanza delle disposizioni re- serving current installation regulations le respect des dispositions régulant geltenden Vorschriften zur Installation golanti l’installazione del materiale elet-...
- Seite 50 Note:...
- Seite 51 Note:...