Grundig DSB 950 Bedienungsanleitung
Inhaltsverzeichnis
Verfügbare Sprachen
Verfügbare Sprachen
Inhaltsverzeichnis

Verwandte Anleitungen für Grundig DSB 950


Inhaltszusammenfassung für Grundig DSB 950
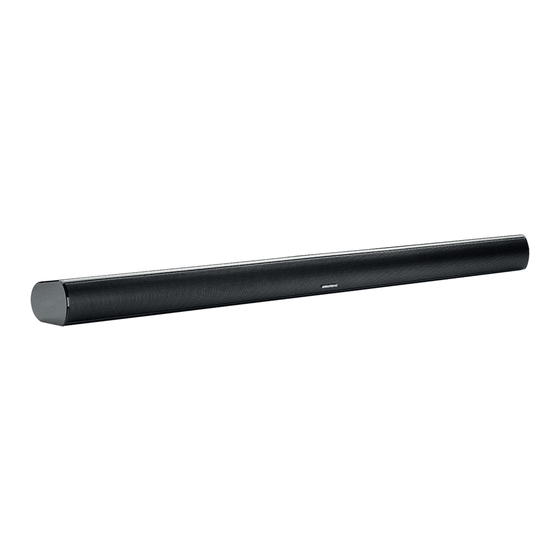
- Seite 1 SOUNDBAR DSB 950...
- Seite 3 -----------------------------------------------------------------------------------------------------------------------------------------------------------------------------...
- Seite 4 ----------------------------------------------------------------------------------------------------------------------------------------------------------------------------- DEUTSCH 05-13 ENGLISH 14-22...
-
Seite 5: Aufstellung Und Sicherheit
AUFSTELLUNG UND SICHERHEIT - ------------------------------------------------ Bitte machen Sie sich vor dem Aufstellen mit den Reinigen Sie die Soundbar nicht mit Reinigungs- folgenden Hinweisen vertraut: mitteln; andernfalls kann das Gehäuse beschä- digt werden. Reinigen Sie das Gerät mit einem Die Soundbar ist zur Audiowiedergabe vorge- sauberen, trockenen Tuch. -
Seite 6: Wichtige Hinweise Zu Hochfre- Quenzaussendungen
AUFSTELLUNG UND SICHERHEIT - ------------------------------------------------ Hinweise: Schließen Sie niemals Geräte an, wenn die Soundbar eingeschaltet ist. Am besten den Netzstecker ziehen! Schalten Sie auch andere Geräte zuerst aus, bevor Sie diese anschließen! Stecken Sie den Netzstecker erst dann in die Steckdose, wenn sämtliche externen Geräte komplett angeschlossen wurden! Sorgen Sie dafür, dass der Netzstecker stets frei zugänglich bleibt! -
Seite 7: Auf Einen Blick
AUF EINEN BLICK --------------------------------------------------------------------------------------------------------- Siehe Abbildung auf Seite 3. STUMM Schaltet die Soundbar-Lautspre- cher stumm und wieder ein. Front QUELLE Schaltet zwischen den Quellen Display „Bluetooth“, „USB“ und „LINE IN“ um. Fernbedienungssensor S pringt zum nächsten Titel. Rückwand WIEDERHOLEN W iederholt den zuletzt gespielten Titel. -
Seite 8: Externe Geräte Anschließen
VORBEREITUNGEN/ANSCHLUSS ----------------------------------------------- Vorbereitungen Externe Geräte anschließen Externe Geräte wie MP3-Player verbinden Sie mit Fernbedienungsbatterie aktivieren dem »AUX IN«-Eingang. Entfernen Sie die Schutzfolie aus dem Batterie- Schließen Sie ein handelsübliches Audiokabel fach. an den »AUX IN«-Eingang der Soundbar an. – Die Fernbedienung ist nun einsatzbereit. Verbinden Sie das Adapterkabel mit dem ex- Fernbedienungsbatterie wechseln ternen Gerät. - Seite 9 WANDMONTAGE - -------------------------------------------------------------------------------------------------------- Damit es nicht zu Verletzungen kommt, muss die Soundbar-Halterung felsenfest an der Wand an- gebracht werden. Halten Sie sich dabei unbe- dingt an die folgenden Hinweise. Achtung: Der Untergrund muss stabil sein und das Ge- wicht des Gerätes spielend tragen können. Benutzen Sie ausschließlich auf das Gewicht des Gerätes abgestimmtes Befestigungsma- Achten Sie darauf, dass die Schraubenköpfe...
- Seite 10 WANDMONTAGE - -------------------------------------------------------------------------------------------------------- Hängen Sie die Halterungen mitsamt Sound- bar in die Schrauben an der Wand ein. DEUTSCH...
-
Seite 11: Bedienung
Die Soundbar sucht jetzt nach Bluetooth-Signa- len. Suchen Sie am z. B. Smartphone nach dem Bluetooth-Signal der Soundbar. Wählen Sie „Grundig Connected Soundbar“ aus der Liste mit gefundenen Geräten. Sobald die Bluetooth-Verbindung zwischen ex- ternem Gerät und Soundbar hergestellt wurde, leuchtet das Bluetooth-Symbol im Display dau- erhaft. -
Seite 12: Batterie Einlegen
BEDIENUNG - ---------------------------------------------------------------------------------------------------------------------------- Hinweis: Bluetooth-Signale reichen etwa 10 m weit. Das externe Gerät merkt sich die Verbindung mit der „Grundig Connected Soundbar“. Im Bluetooth-Modus können » II«, » «, » – «, » «, » « etc. ebenfalls genutzt wer- den. -
Seite 13: Entsorgung Von Altgeräten
Dieses Gerät wurde aus hochwertigen Materialien hergestellt, die wiederver- Den genauen Wortlaut der Konformitätserklä- wendet und recycelt werden können. rung (DOC) finden Sie auf der GRUNDIG Home- Entsorgen Sie das Gerät am Ende sei- page www.grundig.com/downloads/doc. ner Einsatzzeit nicht mit dem regulären Das Typenschild finden Sie an der Rückwand des... - Seite 22 Grundig Intermedia GmbH Thomas-Edison-Platz 3 D-63263 Neu-Isenburg www.grundig.com 17/31...