Herunterladen Inhalt Inhalt Diese Seite drucken
Dru LANZA Installationsvorschrift Und Bedienungsanleitung

Dru LANZA Installationsvorschrift Und Bedienungsanleitung

Elektrischer heizkamin
Inhaltsverzeichnis

Werbung

Verfügbare Sprachen

Verfügbare Sprachen

INSTALLATION INSTRUCTION AND USER MANUAL GB/IE
INSTALLATIONSVORSCHRIFT UND BEDIENUNGSANLEITUNG DE/AT/BE/LU/CH
CONSIGNES D'INSTALLATION ET MODE D'EMPLOI FR/BE/LU/CH
ELECTRIC ATMOSPHERIC HEARTH
ELEKTRISCHER HEIZKAMIN
FOYER D'AMBIANCE ÉLECTRIQUE
MODEL LANZA
Store this document in a safe place
Dieses Dokument sorgfältig aufbewahren
Conservez soigneusement ce document
Carefully read the complete manual
Die Bedienungsanleitung von vorn bis hinten sorgfältig durchlesen
Veuillez lire attentivement tout le manuel
DRU VERWARMING B.V.
HOLLAND
957.613.01

Werbung

Inhaltsverzeichnis
loading

Inhaltszusammenfassung für Dru LANZA

  • Seite 1 INSTALLATIONSVORSCHRIFT UND BEDIENUNGSANLEITUNG DE/AT/BE/LU/CH CONSIGNES D’INSTALLATION ET MODE D’EMPLOI FR/BE/LU/CH ELECTRIC ATMOSPHERIC HEARTH ELEKTRISCHER HEIZKAMIN FOYER D’AMBIANCE ÉLECTRIQUE MODEL LANZA Store this document in a safe place Dieses Dokument sorgfältig aufbewahren Conservez soigneusement ce document Carefully read the complete manual Die Bedienungsanleitung von vorn bis hinten sorgfältig durchlesen...
  • Seite 2 Figure A...
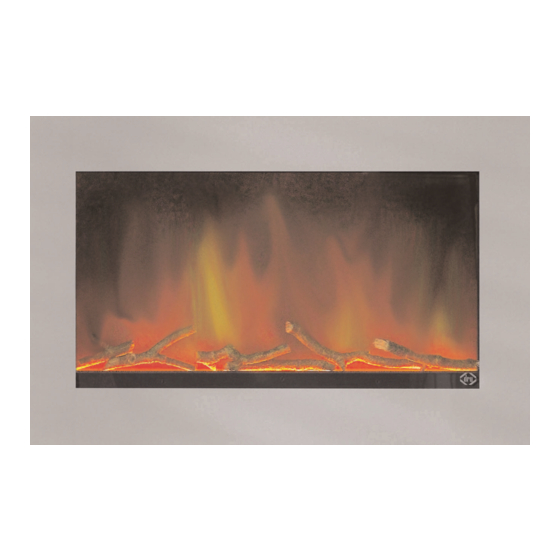
  • Seite 3 Picture 1 Picture 2 Lanza...
  • Seite 5: Inhaltsverzeichnis

    Technical data .......10 Wireless control ......6 Lanza...
  • Seite 6: Ce Declaration

    EC directives. Any changes in the appliance without prior consultation with us, shall make this declaration invalid. Product: electric atmospheric hearth Type: Lanza Applicable EEC directives 2006/95/EC 89/336/EC...
  • Seite 7: Important Safety Instructions

    • Do NOT use the appliance when the atmospheric humidity is higher than 80%. • Do NOT use the appliance at a height above 2,000 metres. • Caution:The appliance weighs about 26 kg, we recommend that you do not move the appliance without any help. Lanza...
  • Seite 8: Warnings

    ot air (outlet) Cool air (inlet) Figure B Figure C Warnings Caution! Special data or do’s and don’ts concerning the prevention of damage Caution! Read the manual Caution! Make sure that the air inlet and outlet are not blocked 1.The symbol at the underside near the hot air outlet (see figure B) indicates that the appliance is very hot at this location and that by covering this outlet the appliance and/or the surrounding space can become overheated.
  • Seite 9: Preface

    Dear customer, Dear customer, The appliance has a power consumption of about 1500 Thank you for purchasing this DRU product. Our products watts (with both heating elements activated). For that have been developed and produced in accordance with the reason the atmospheric hearth is provided with two 8 highest quality, performance and safety requirements.
  • Seite 10: Hanging The Appliance From The Wall

    By pressing I, heating element I will be activated (750 fixing methods. watts). If you press the same button again, element I will Dru cannot be held responsible for incorrectly fixed be switched off.The same procedure applies to II. appliances.
  • Seite 11: Placing And Replacing The Batteries Of The Remote Control

    (0 or 1) the appliance can be switched on or off (see figure G). Caution: if you switch off the appliance here, it will no longer use any power. When switching off the appliance (at night for example) we always recommend using this switch. Lanza...
  • Seite 12: Removing The Front Pane

    INSTALLATION INSTRUCTION Placing the pebbles before placing the front Removing the front pane glass plate • Remove the plug from the wall socket For placing the pebbles, you should first remove the front • Unscrew the 2 fixing screws at both sides of the appli- pane (see removing pane).
  • Seite 13: Extra Protection

    In case of malfunctions, you should always appliance, if necessary you can use a pocket torch contact him.You supplier will contact DRU if he feels this is (see figure B). necessary.The factory warranty for your appliance is valid for 2 years after date of purchase.
  • Seite 14: General Remarks

    INSTALLATION INSTRUCTION GENERAL REMARKS Technical data Possible malfunctions: electrical connection The appliance does have a flame effect and the ventilator is also working, but there is no more hot air coming from the • Nominal voltage (50 Hz) 230-240 Volt AC appliance.
  • Seite 15: Technical Data

    TECHNICAL DATA Lanza...
  • Seite 16 Abbildung A...
  • Seite 17 Foto 1 Foto 2 Lanza...
  • Seite 19 Technische Daten ......24 Drahtlose Bedienung ......20 Lanza...
  • Seite 20: Ce-Erklärung

    EG-Richtlinien enthaltenen grundlegenden Anforderungen im Hinblick auf die Sicherheit und Gesundheit erfüllt. Falls ohne Rücksprache mit uns irgendwelche Veränderungen am Gerät vorgenommen werden, verliert diese Erklärung ihre Gültigkeit. Produkt: Elektrischer Heizkamin Typ: Lanza Gültige EG-Richtlinien 2006/95/EC 89/336/EC Harmonisierte Normen: IEC 60335-1...
  • Seite 21: Sicherheitsanweisungen

    • Das Gerät niemals bei einer Luftfeuchtigkeit von über 80 % verwenden. • Das Gerät keinesfalls in einer Höhenlage über 2000 Meter verwenden. • Achtung: Das Gerät wiegt etwa 26 kg. Daher ist es empfehlenswert, das Gerät nicht ohne Hilfe zu versetzen. Lanza...
  • Seite 22: Gefahrenwarnungen

    Heiße luft ablass Kuhle luft einlass Abbildung B Abbildung C Gefahrenwarnungen Achtung! Besondere Daten beziehungsweise Gebote und Verbote im Zusammenhang mit der Schadensprävention Achtung! Die Bedienungsanleitung durchlesen Achtung! Achten Sie darauf, dass die Lufteinlass- und Ablassöffnungen nicht blockiert werden 1. Das Symbol an der Unterseite in der Nähe des Heißluftablasses (siehe Abbildung B) weist darauf hin, dass das Gerät an dieser Stelle besonders heiß...
  • Seite 23: Vorwort

    Bei beschädigter Verpackung den Artikel keinesfalls verwenden! Sehr geehrter Kunde, Installation Wir danken Ihnen für den Ankauf dieses DRU-Produkts. Das Gerät von einem offiziellen Fachhändler gemäß den Unsere Produkte sind gemäß den strengsten dafür gültigen Vorschriften einbauen lassen. Anforderungen an die Qualität, Leistung und Sicherheit...
  • Seite 24: Aufhängen Des Geräts An Der Wand

    Watt) eingeschaltet.Wenn man nun nochmals I drückt, andere Befestigungsmethoden verwendet werden. wird dadurch das Element 1 wieder ausgeschaltet; das Dru übernimmt keinerlei Verantwortung bei inkorrekter Gleiche gilt für II. Befestigung des Geräts. Wenn man erst I und dann II drückt, werden dadurch beide Hinten am Gerät befinden sich zwei Schlitze.
  • Seite 25: Fernbedienung

    (0 oder 1) kann das Gerät aus- oder eingeschaltet werden (siehe Abbildung G). Achtung: Wenn man das Gerät mit diesem Schalter ausschaltet, verbraucht das Gerät keinen Strom mehr. Wenn das Gerät (nachts beispielsweise) ausgeschaltet wird, ist es immer empfehlenswert, dazu diesen Schalter zu verwenden. Lanza...
  • Seite 26: Ausbau Der Frontscheibe

    INSTALLATIONSVORSCHRIFT Die Kieselsteine werden noch vor dem Ausbau der Frontscheibe Einsetzen der vorderen Glasplatte eingelegt. • Den Stecker aus der Steckdose herausziehen Vor dem Einlegen der Kieselsteine wird die Frontscheibe • Die beiden seitlich am Gerät befindlichen ausgebaut (siehe Ausbau der Scheibe). Befestigungsschrauben lösen (siehe Abbildung K) und Die Kieselsteine gemäß...
  • Seite 27: Zusätzlicher Schutz

    Bei Störungen wenden Sie sich bitte auf jeden werden. Achten Sie darauf, dass das Gerät vor Beginn der Fall an ihn. Ihr Lieferant schaltet DRU ein, wenn er das für Reinigungsarbeiten spannungslos ist. Berühren Sie den notwendig hält. Die fabriksseitige Garantie auf Ihr Gerät Ventilator keinesfalls mit harten Teilen, da hierdurch eine beträgt zwei Jahre ab dem Kaufdatum.
  • Seite 28: Störungen

    INSTALLATIONSVORSCHRIFT ALLGEMEINE ANMERKUNGEN Störungen Technische Daten Es ist sehr unwahrscheinlich, dass Störungen auftreten. Sollte trotzdem eine Störung vorkommen, wenden Sie sich Stromanschluss bitte an Ihren Lieferanten. • Nennspannung (50 Hz) 230-240 Volt AC Mögliche Störungen: • Wattverbrauch ohne Heizung ungefähr 14 Watt •...
  • Seite 29: Technische Daten

    TECHNISCHE DATEN Lanza...
  • Seite 30 figure A...
  • Seite 31 1 photo 2 Lanza...
  • Seite 32 INSTRUCTIONS...
  • Seite 33 Données techniques ......38 Commande sans fil ......34 Lanza...
  • Seite 34: Déclaration Ce

    Cette déclaration devient caduque lorsque des modifications sont apportées à l’appareil sans avoir con- certé nos services. Produit : Foyer d’ambiance électrique Type : Lanza Directives CE d'application 2006/95/CE 89/336/CE Normes harmonisées appliquées :...
  • Seite 35: Instructions De Sécurité

    • N’utilisez PAS l’appareil lorsque le taux d’humidité de l’air est supérieur à 80%. • N’utilisez PAS l’appareil à plus de 2000 m d’altitude. • Attention : L’appareil pèse environ 26 kg, il est préférable de ne pas déplacer l’appareil sans aide. Lanza...
  • Seite 36: Avertissements

    Air chaud (évacuation) Air froid (alimentation) figure B figure C Avertissements Attention ! Données particulières, respectivement, obligations et interdictions, relatives à la prévention des dommages Attention ! Lire le manuel Attention ! Assurez-vous que l’arrivée et l’évacuation d’air ne soient pas obstruées 1.
  • Seite 37: Avant-Propos

    Faites installer l’appareil par un professionnel agréé, con- formément aux prescriptions en vigueur. Cher client, Nous vous remercions pour l’achat de ce produit DRU. Raccordement Nos produits sont conçus et fabriqués suivant les exigen- L’appareil doit être branché sur une prise de courant mise ces les plus hautes en matière de qualité, performances et...
  • Seite 38: Suspension De L'appareil Au Mur

    être utilisés. ment I s'éteint. Le même principe s'applique à l'élément II. Dru ne peut en rien être tenue pour responsable en cas Si vous appuyez d’abord sur I puis sur II, les deux éléments de mauvaise fixation de l'appareil.
  • Seite 39: Mise En Place Et Remplacement Des Piles Dans La Commande À Distance

    (voir la figure G). Attention : lorsque vous éteignez l’appareil à l’aide de cet interrupteur, l'appareil est entièrement hors tension. Par conséquent, il est recommandé d'utiliser cet interrupteur à chaque fois que vous souhaitez éteindre complètement l'appareil (pour la nuit par exemple). Lanza...
  • Seite 40: Démontage De La Vitre Avant

    INSTRUCTIONS D’INSTALLATION Mise en place des cailloux avant de mettre en Démontage de la vitre avant place la vitre avant • Débranchez la fiche de la prise de courant Pour mettre en place les cailloux, vous devez enlever la • Dévissez les 2 vis de fixation sur la face latérale de vitre avant (voir démontage de la vitre).
  • Seite 41: Protection Supplémentaire

    Sur la face intérieure de la vitre avant, de la poussière peut s’être accumulée au fil du temps.Vous pouvez évacuer cette poussière à l’aide d’un nettoyant pour vitre ou un chiffon humide (voir le démontage de la vitre). Lanza...
  • Seite 42: Garantie

    INSTRUCTIONS D’INSTALLATION REMARQUES GÉNÉRALES Garantie Données techniques La garantie sur votre appareil DRU est accordée via votre fournisseur. En cas de pannes, veuillez toujours prendre Raccordement électrique contact avec ce dernier.Votre fournisseur contactera DRU • s’il l’estime nécessaire. La garantie d’usine sur votre appar- Tension nominale (50 Hz) 230-240 volts CA eil s’étend sur 2 ans à...
  • Seite 43: Données Techniques

    DONNÉES TECHNIQUES Lanza...

Inhaltsverzeichnis