Herunterladen Inhalt Inhalt Diese Seite drucken
Inhaltsverzeichnis

Werbung

Verfügbare Sprachen

Verfügbare Sprachen

MICROLITE
W E A R A B L E M I C R O P H O N E S
LOW–PROFILE, ULTRA-MINIATURE MICROPHONES
FOR THEATER, BROADCAST AND CONFERENCES
3
BEDIENUNGSANLEITUNG
Vor Inbetriebnahme des Gerätes lesen!
53
USER INSTRUCTIONS
Read the manual before using the equipment!
102
MODE D'EMPLOI
Lire cette notice avant d'utiliser le système!
154
MODO DE EMPLEO
¡Consulte el manual antes de utilizar el equipo!

Werbung

Inhaltsverzeichnis
loading

Inhaltszusammenfassung für AKG MICROLITE EC81 MD

  • Seite 1 MICROLITE W E A R A B L E M I C R O P H O N E S LOW–PROFILE, ULTRA-MINIATURE MICROPHONES FOR THEATER, BROADCAST AND CONFERENCES BEDIENUNGSANLEITUNG Vor Inbetriebnahme des Gerätes lesen! USER INSTRUCTIONS Read the manual before using the equipment! MODE D’EMPLOI Lire cette notice avant d’utiliser le système! MODO DE EMPLEO...
  • Seite 3: Inhaltsverzeichnis

    Varianten der MicroLite Serie LAVALIERMIKROFONE Lieferumfang Zubehör 4.2.1 Gitterkappe 4.2.2 Lavalierclips 4.2.3 Windschutz 4.2.4 Make‑Up Schutz 4.2.5 AKG Adapter‑Stecker 4.2.6 Etui mit Sichtfenster Lavaliermikrofon anbringen 4.3.1 Make‑Up Schutz anbringen Anwendung des Mikrofons Reinigung des Mikrofons OHRBÜGELMIKROFONE Lieferumfang Zubehör 5.2.1 Gitterkappe 5.2.2...
  • Seite 4 6.2.6 AKG Adapter‑Stecker 6.2.7 Etui mit Sichtfenster Kopfbügelmikrofon anbringen Anwendung des Mikrofons Reinigung des Mikrofons MIKROFON ANSCHLIESSEN Anschluss an AKG Funksysteme Anschluss an alternative Funksysteme Anschluss an herkömmliche Mischpulte via Kabel Optionales Zubehör 7.4.1 Adapter‑Stecker für alternative Systeme 7.4.2 Phantomspeiseadapter...
  • Seite 5 INHALT Ohrbügelmikrofon und Kopfbügelmikrofon 8.4.1 Sprach‑ und Gesangsübertragung 8.4.2 Abnahme von Musikinstrumenten REINIGUNG Mikrofon Ohrbügel Schutzkappe Windschutz Make‑Up Schutz TECHNISCHE DATEN 10.1 XX81 MD 10.1.1 Frequenzgang 10.1.2 Polardiagramm 10.1.3 Spezifikationen 10.2 XX82 MD 10.2.1 Frequenzgang 10.2.2 Polardiagramm 10.2.3 Spezifikationen FEHLERBEHEBUNG MICROLITE MANUAL...
  • Seite 6: Allgemeines

    ALLgEMEINES Allgemeines Zweck der Bedienungsanleitung Zweck der Bedienungs­ anleitung Die vorliegende Bedienungsanleitung soll Sie befähigen, das Gerät: • sicher zu bedienen • laut bestimmungsgemäßer Verwendung nutzen zu können. Aufbewahrung der Bedienungsanleitung Aufbe­ wahrung der Bedienungs­ Bewahren Sie die Bedienungsanleitung sorgfältig auf oder hinterle‑ anleitung gen Sie sie elektronisch an einem leicht zugänglichen Ort.
  • Seite 7: Bestimmungsgemäße Verwendung

    Übertragung von Schall und Sprache konzipiert. Haftung und Gewährleistung Haftung und Gewähr­ leistung AKG Acoustics GmbH übernimmt keine Haftung und keine Gewähr für Schäden, wenn: • die Mikrofone der Serie MicroLite für andere Zwecke einge‑ setzt werden, als unter Bestimmungsgemäße Verwendung beschrieben ist •...
  • Seite 8: Sicherheit Und Umwelt

    Setzen Sie das Gerät nicht extremen Kräften aus und ziehen Sie nicht am Kabel. • Verwenden Sie das Gerät nur für die in der Bedienungsanleitung beschriebenen Anwendungen. Für Schäden infolge unsachgemäßer Handhabung oder missbräuchlicher Verwendung kann AKG keine Haftung übernehmen. MICROLITE MANUAL...
  • Seite 9: Umwelt

    Entsorgungsvorschriften. • Die Verpackung ist wiederverwertbar. Entsorgen Sie die Verpackung in einem dafür vorgesehenen Sammelsystem. Konformitätserklärung Dieses Produkt entspricht den in der Konformitätserklärung angegebenen Normen. Sie können die Konformitätserklärung per E‑Mail von sales@akg.com anfordern oder unter www.akg.com downloaden. MICROLITE MANUAL...
  • Seite 10: Microlite: Beschreibung Allgemein

    MicroLite: Beschreibung allgemein Einleitung Einleitung Vielen Dank, dass Sie sich für ein Produkt von AKG entschie‑ den haben. Lesen Sie die Bedienungsanleitung aufmerksam durch, bevor Sie das Gerät benutzen und bewahren Sie die Bedienungsanleitung sorgfältig auf, damit Sie jederzeit darin nach‑...
  • Seite 11: Lavaliermikrofone

    LAvALIERMIKROfONE Lavaliermikrofone LC81 MD Die Lavaliermikrofone LC81 MD sind Mikrofone mit nierenförmiger Richtcharakteristik und sind in den Farben schwarz, weiß, beige und cocoa erhältlich. LC82 MD Die Lavaliermikrofone LC82 MD sind Mikrofone mit kugelförmiger Richtcharakteristik und sind in den Farben schwarz, weiß, beige und cocoa erhältlich.
  • Seite 12: Lieferumfang

    Kontrollieren Sie, ob die Verpackung alle unten angeführten Teile Lavalier­ enthält. mikrofon Alle, für die Anwendung mit AKG Funksystemen benötigten Zubehörteile sind bereits beigepackt. Adapterstecker für andere Funksysteme finden Sie auf Seite 36. Die Mikrofone der MicroLite Serie sind Kondensatormikrofone und benötigen daher eine Spannungsversorgung. Das entsprechende Netzteil mit Phantomspeisung ist als optionales Zubehör erhältlich.
  • Seite 13: Gitterkappe

    LAvALIERMIKROfONE LC81 MD LC81 MD LC82 MD LC82 MD schwarz/weiß beige/cocoa H1 Magnetclip H2 Krokoclip H3 Kabelclip Transportetui mit Sichtfenster 4.2.1 Gitterkappe Gitterkappe Abb. 2: WM81 Abb. 3: WM82 Gitterkappe für LC81 MD Gitterkappe für LC82 MD Die mitgelieferte Gitterkappe (WM81, WM82) besteht aus mehreren Schichten verschiedenen Materials.
  • Seite 14: Windschutz

    LAvALIERMIKROfONE Das Mikrofon wird am Gehäuse durch die Spange am Clip ange‑ bracht: Dadurch wird das Mikrofonkabel geschützt. Der Kabelclip dient zum Befestigen des Kabels an der Kleidung. Der Kabelclip dient der Zugentlastung des Mikrofonkabels. 4.2.3 Windschutz Windschutz Abb. 7: W81 Abb.
  • Seite 15: Akg Adapter-Stecker

    4.2.5 AKG Adapter­Stecker AKG Adapter­ Stecker Abb. 11: MDA1 AKG Adapter-Stecker Der mitgelieferte Adapter‑Stecker MDA1 AKG verbindet die Mikrofone der MicroLite Serie mit Taschensendern von AKG mit 3‑poligem Mini‑XLR Eingang. 4.2.6 Etui mit Sichtfenster Etui Abb. 12: Etui mit Sichtfenster Zum sicheren Verstauen des Lavaliermikrofons dient das mitgelie‑...
  • Seite 16: Lavaliermikrofon Anbringen

    LAvALIERMIKROfONE Lavaliermikrofon anbringen Lavalier­ mikrofon anbringen Entnehmen Sie das Mikrofon dem Etui und setzen Sie die Schutzkappe auf die Mikrofonkapsel. Achten Sie bei LC81 darauf, dass die Schutzkappe die Schalleintrittslöcher vollständig bedeckt! Setzen Sie bei Bedarf den Windschutz auf die Schutzkappe. Befestigen Sie das Mikrofon an der Ausnehmung unterhalb der Mikrofonkapsel in der Spange des...
  • Seite 17: Make-Up Schutz Anbringen

    LAvALIERMIKROfONE Zur Zugentlastung des Kabels verwenden Sie den Kabelclip H3 (im Lieferumfang von LCXX MD in beige und cocoa enthalten): Drücken Sie das Kabel in den Kabelclip ein und bringen Sie den Clip an der Kleidung an. Schließen Sie das Mikrofon an. Siehe dazu Seite 35 ff.
  • Seite 18: Ohrbügelmikrofone

    OHRBügELMIKROfONE Ohrbügelmikrofone EC81 MD Die Ohrbügelmikrofone EC81 MD sind Mikrofone mit nierenförmi‑ ger Richtcharakteristik und sind in den Farben beige und cocoa erhältlich. EC82 MD Die Ohrbügelmikrofone EC82 MD sind Mikrofone mit kugelförmi‑ ger Richtcharakteristik und sind in den Farben beige und cocoa erhältlich.
  • Seite 19: Lieferumfang

    Kontrollieren Sie, ob die Verpackung alle unten angeführten Teile Ohrbügel­ enthält. mikrofon Alle, für die Anwendung mit AKG Funksystemen benötigten Zubehörteile sind bereits beigepackt. Adapterstecker für andere Funksysteme finden Sie auf Seite 36. Die Mikrofone der MicroLite Serie sind Kondensatormikrofone und benötigen daher eine Spannungsversorgung. Das entsprechende Netzteil mit Phantomspeisung ist als optionales Zubehör erhältlich.
  • Seite 20: Gitterkappe

    OHRBügELMIKROfONE 5.2.1 Gitterkappe Gitterkappe Abb. 16: WM81 Abb. 17: WM82 Gitterkappe für EC81 MD Gitterkappe für EC82 MD Die mitgelieferte Gitterkappe (WM81, WM82) besteht aus mehreren Schichten verschiedenen Materials. Die Gitterkappe dient dem Schutz vor Staub und Make‑Up. Zudem schützt die Gitterkappe die Mikrofonmembran vor Wind‑ und Poppgeräuschen.
  • Seite 21: Windschutz

    OHRBügELMIKROfONE 5.2.3 Windschutz Windschutz Abb. 19: W81 Abb. 20: W82 Windschutz für EC81 MD Windschutz für EC82 MD Zum Abschirmen des Mikrofons vor Wind bei Aufnahmen im Außenbereich wird über die Gitterkappe der Windschutz (W81, W82) gestülpt, dadurch bleibt das Klangbild sauber und das Mikrofon ist optimal geschützt.
  • Seite 22: Schweißschutz

    Dies verhindert, dass das Mikrofon verstopft wird, was zu dumpfem Klang und geringerer Empfindlichkeit des Mikrofons führen würde. 5.2.6 AKG Adapter­Stecker AKG Adapter­ Stecker Abb. 24: MDA1 AKG Adapter-Stecker Der mitgelieferte Adapter‑Stecker MDA1 AKG verbindet die Mikrofone der MicroLite Serie mit Taschensendern von AKG mit 3‑poligem Mini‑XLR Eingang. MICROLITE MANUAL...
  • Seite 23: Etui Mit Sichtfenster

    OHRBügELMIKROfONE 5.2.7 Etui mit Sichtfenster Etui Abb. 25: Etui mit Sichtfenster Zum sicheren Verstauen des Lavaliermikrofons dient das mitgelie‑ ferte Etui. Das eingebaute Sichtfenster erlaubt jederzeit, die Farbe bzw. die Art des Mikrofons zu überprüfen, ohne das Etui öffnen zu müssen.
  • Seite 24: Ohrbügelmikrofon Anbringen

    OHRBügELMIKROfONE Ohrbügelmikrofon anbringen Ohrbügel­ mikrofon anbringen Entnehmen Sie das Mikrofon dem Etui und setzen Sie die Schutzkappe auf die Mikrofonkapsel. Achten Sie bei LC81 darauf, dass die Schutzkappe die Schalleintrittslöcher vollständig bedeckt! Setzen Sie bei Bedarf den Windschutz auf die Schutzkappe. Der Ohrbügel wird standardmä‑...
  • Seite 25 OHRBügELMIKROfONE Legen Sie den Ohrbügel über das Ohr, sodass die Verstärkung des Ohrbügels hinter dem Ohrläppchen eng anliegt. Falls das Mikrofon zu locker sitzt, nehmen Sie das Mikrofon nochmals ab und biegen Sie den Drahtbügel vorsichtig etwas nach innen. Positionieren Sie das Mikrofon so, dass die Mikrofonkapsel von ca.
  • Seite 26: Make-Up Schutz Anbringen

    OHRBügELMIKROfONE 5.3.1 Make­Up Schutz anbringen Make­Up Schutz anbringen Abb. 26: Make-Up Schutz Abb. 27: Mikrofon mit Make-Up Schutz anbringen während Schminkvorgang Wird das Mikrofon in die Maske mit eingebaut, setzen Sie den Make‑Up Schutz während des Schminkvorgangs direkt auf die Mikrofonkapsel! Setzen Sie nach Entfernen des Make‑Up Schutzes die Schutzkappe wieder auf! Bei Bedarf kann über die Schutzkappe...
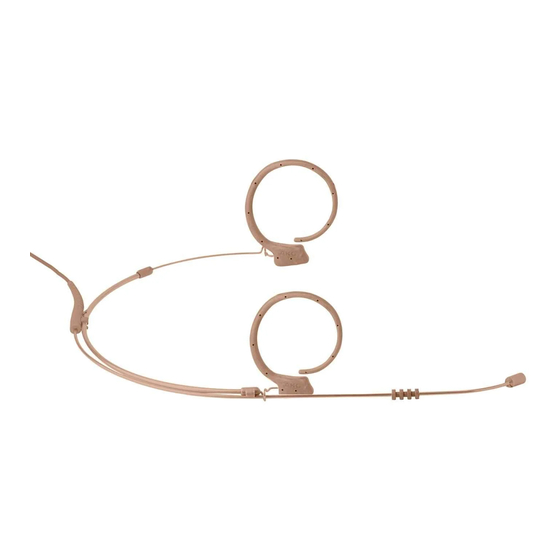
  • Seite 27: Kopfbügelmikrofone

    KOPfBügELMIKROfONE Kopfbügelmikrofone HC81 MD Die Kopfbügelmikrofone HC81 MD sind Mikrofone mit nierenför‑ miger Richtcharakteristik und sind in den Farben beige und cocoa erhältlich. HC82 MD Die Kopfbügelmikrofone HC82 MD sind Mikrofone mit kugelför‑ miger Richtcharakteristik und sind in den Farben beige und cocoa erhältlich.
  • Seite 28: Lieferumfang

    Kontrollieren Sie, ob die Verpackung alle unten angeführten Teile Kopfbügel­ enthält. mikrofon Alle, für die Anwendung mit AKG Funksystemen benötigten Zubehörteile sind bereits beigepackt. Adapterstecker für andere Funksysteme finden Sie auf Seite 36. Die Mikrofone der MicroLite Serie sind Kondensatormikrofone und benötigen daher eine Spannungsversorgung. Das entsprechende Netzteil mit Phantomspeisung ist als optionales Zubehör erhältlich.
  • Seite 29: Gitterkappe

    KOPfBügELMIKROfONE 6.2.1 Gitterkappe Gitterkappe Abb. 29: WM81 Abb. 30: WM82 Gitterkappe für EC81 MD Gitterkappe für EC82 MD Die mitgelieferte Gitterkappe (WM81, WM82) besteht aus mehreren Schichten verschiedenen Materials. Die Gitterkappe dient dem Schutz vor Staub und Make‑Up. Zudem schützt die Gitterkappe die Mikrofonmembran vor Wind‑ und Poppgeräuschen.
  • Seite 30: Make-Up Schutz

    KOPfBügELMIKROfONE W82) gestülpt, dadurch bleibt das Klangbild sauber und das Mikrofon ist optimal geschützt. 6.2.4 Make­Up Schutz Make­Up Schutz Abb. 34: MUP81 Abb. 35: MUP82 Make-Up Schutz für EC81 MD Make-Up Schutz für EC82 MD Zum Schutz vor Make‑up während des Schminkvorgangs wird der Make‑Up Schutz (MUP81, MUP82) auf das Mikrofon gesetzt.
  • Seite 31: Akg Adapter-Stecker

    6.2.6 AKG Adapter­Stecker AKG Adapter­ Stecker Abb. 37: MDA1 AKG Adapter-Stecker Der mitgelieferte Adapter‑Stecker MDA1 AKG verbindet die Mikrofone der MicroLite Serie mit Taschensendern von AKG mit 3‑poligem Mini‑XLR Eingang. 6.2.7 Etui mit Sichtfenster Etui Abb. 38: Etui mit Sichtfenster Zum sicheren Verstauen des Lavaliermikrofons dient das mitgelie‑...
  • Seite 32: Kopfbügelmikrofon Anbringen

    KOPfBügELMIKROfONE Kopfbügelmikrofon anbringen Kopfbügel­ mikrofon anbringen Entnehmen Sie das Mikrofon dem Etui und setzen Sie die Schutzkappe auf die Mikrofonkapsel. Achten Sie bei LC81 darauf, dass die Schutzkappe die Schalleintrittslöcher vollständig bedeckt! Setzen Sie bei Bedarf den Windschutz auf die Schutzkappe. Klappen Sie die Ohrbügel senkrecht nach oben, je...
  • Seite 33 KOPfBügELMIKROfONE Setzen Sie das Mikrofon wieder auf und justieren Sie den Kopfbügel, dazu den Bügel von hinten an den Nacken drücken, bis er eng anliegt. Positionieren Sie das Mikrofon so, dass die Mikrofonkapsel von ca. 1 cm Abstand auf den Mundwinkel zeigt (1).
  • Seite 34: Anwendung Des Mikrofons

    KOPfBügELMIKROfONE Anwendung des Mikrofons Details zur Anwendung siehe ab Seite 38 ff. Reinigung des Mikrofons Details zur Reinigung der einzelnen Teile siehe ab Seite 43 ff. MICROLITE MANUAL...
  • Seite 35: Mikrofon Anschliessen

    MDA1 AKG Adapter‑Stecker auf den Microdot‑Stecker auf. Anschluss an alternative Funksysteme Alternative Funk systeme AKG garantiert nicht die Kompatibilität mit Funksystemen von Fremdmarken und übernimmt diesbezüglich keine Haftung! Entnehmen Sie nähere Informationen den Bedienungsanleitungen der Funksysteme der jeweiligen Hersteller. Zum Anschluss an alternative Funksysteme tauschen Sie den AKG Adapter‑Stecker gegen den...
  • Seite 36: Anschluss An Herkömmliche Mischpulte Via Kabel

    MIKROfON ANSCHLIESSEN Anschluss an herkömmliche Mischpulte via Kabel Zum Anschluss an alternati‑ ve Mischpulte tauschen Sie den AKG Adapter‑Stecker gegen den entsprechenden Phantomspeiseadapter (MDPA) aus. Schließen Sie den Phantomspeiseadapter (MDPA) an (Siehe dazu auch auf Seite 36 ff). Die Mikrofone der MicroLite Serie sind Kondensatormikrofone und benötigen daher eine...
  • Seite 37: Phantomspeiseadapter

    MDA2 SEN1 MDA3 SEN2 MDA4 SHU MDA5 AT MDA6 BD MDA7 LEC Abb. 39: Microdot-Adapter AKG garantiert nicht die Kompatibilität mit Funksystemen von Fremdmarken und übernimmt diesbezüglich keine Haftung. 7.4.2 Phantomspeiseadapter Abb. 40: Phantomspeiseadapter (MDPA) Für volle Flexibilität mit dem MicroLite Mikrofon kann auf eine verkabelte Anwendung mit Hilfe des Phantomspeiseadapters umgeschaltet werden.
  • Seite 38: Anwendung

    ANWENduNg Anwendung Anwendung Allgemeines Der große Vorteil eines Mikrofons, das an der Kleidung, am Kopf oder in der Maske befestigt ist, besteht darin, dass der Abstand zwischen Mikrofon und dem Mund des Anwenders immer gleich bleibt. Damit sind keine Pegelschwankungen zu befürchten. Die Bewegungsfreiheit bleibt erhalten, die Hände bleiben frei.
  • Seite 39: Phase Drehen

    ANWENduNg 8.2.3 Phase drehen JPhase180 Jumper Abb. 41: Phantomspeiseadapter Die Phase des Signals kann über den Phantomspeiseadapter um 180° gedreht werden. Schrauben Sie die Kreuzschlitzschraube am Gehäuse Phantomspeiseadapters auf. Nehmen Sie das Gehäuse ab. Ziehen Sie den Jumper ab und stecken Sie ihn auf nur einen Pin auf.
  • Seite 40: Lavaliermikrofon Anwenden

    ANWENduNg Lavaliermikrofon anwenden 8.3.1 Sprachübertragung Sprachüber­ tragung min. 10 cm Abb. 42: Sprachübertragung Für eine optimale Sprachübertragung, befestigen Sie das Mikrofon mit dem Krokoclip an der Kleidung. Positionien Sie das Mikrofon so nahe wie möglich beim Mund des Redners. Je geringer der Abstand zwischen dem Mikrofon und der Schallquelle, umso geringer ist die Gefahr akustischer Rückkopplungen und umso geringer ist der Raumanteil im Aufnahmesignal.
  • Seite 41: Theater, Musical, Oper

    ANWENduNg Befestigen Sie das Mikrofon mit dem Krokoclip oder dem Magnetclip an einem geeigneten Dekorationsteil (z.B. Kulisse, Hintergrund, Vorhang o.ä.). 8.3.3 Theater, Musical, Oper Theater, Musical, Oper Abb. 44: Sprach- und Gesangsübertragung Befestigen Sie das Mikrofon in der Maske möglichst nahe beim Mund.
  • Seite 42: Ohrbügelmikrofon Und Kopfbügelmikrofon

    ANWENduNg Violine Violine Abb. 45: Mikrofon zur Abnahme der Violine Falls das Mikrofon nicht an der Violine selbst befestigt werden kann oder darf, können Sie das Mikrofon mit einem Klebeband an der Wange des Künstlers befestigen. Alternativ können Sie ein Ohrbügel‑ oder Kopfbügelmikrofon verwenden.
  • Seite 43: Abnahme Von Musikinstrumenten

    REINIguNg 8.4.2 Abnahme von Musikinstrumenten Abnahme von Musik­ instrumenten Befestigen Sie das Mikrofon wie in Abschnitt 5 und 6.3 beschrie‑ ben. Darauf achten, dass das Mikrofon von ca. 1 cm Entfernung auf den Mundwinkel zeigt. Bei Blasinstrumenten können Sie den mitgelieferten Windschutz verwenden, um zu starke Blasgeräusche zu dämpfen.
  • Seite 44: Ohrbügel

    REINIguNg Ohrbügel Ohrbügel Ziehen Sie beim Ohrbügelmikrofon den Ohrbügel vom Draht. Klappen Sie beim Kopfbügelmikrofon die Ohrbügel senkrecht nach innen. Ziehen Sie die Ohrbügel an der unteren Verstärkung vom Draht. Waschen Sie die Ohrbügel in 60 bis 70 °C heißem Seifenwasser. Lassen Sie die Ohrbügel vollständig trocknen.
  • Seite 45: Windschutz

    REINIguNg Waschen Sie die Schutzkappe in lauwarmem Seifenwasser. Lassen Sie die Schutzkappe vollständig trocknen, bevor Sie sie wieder verwenden. Windschutz Windschutz Ziehen Sie den Windschutz vom Mikrofon ab. Waschen Sie den Windschutz in lauwarmem Seifenwasser. Lassen Sie den Windschutz vollstän‑ dig trocknen, bevor Sie ihn wieder verwenden.
  • Seite 46: Technische Daten

    TECHNISCHE dATEN Technische Daten 10.1 XX81 MD XX81 MD 10.1.1 Frequenzgang Frequenz­ gang XX81 MD Abb. 46: Frequenzgang XX81 MD 10.1.2 Polardiagramm Polar­ diagramm XX81 MD Abb. 47: Polardiagramm XX81 MD MICROLITE MANUAL...
  • Seite 47: Spezifikationen

    1 000 Hz/120 dB Elektrische Impedanz bei 5 000 Ohm 1 000Hz Eigenrauschen 35,5 mV Erforderliche Spannung 5 V bei 4,5 kOhm, zweiadrige (typische AKG Spannungs‑ Spannungsversorgung versorgung) Abmessungen Mikrofon (Kapsel): ∅ 4,4 mm Länge: 8,5 mm Kabel: ∅ 1,4 mm Gewicht (inkl.
  • Seite 48: Xx82 Md

    TECHNISCHE dATEN 10.2 XX82 MD XX82 MD 10.2.1 Frequenzgang Frequenz­ gang XX82 MD Abb. 48: Frequenzgang XX82 MD 10.2.2 Polardiagramm Polar­ diagramm XX82 MD Abb. 49: Polardiagramm XX82 MD MICROLITE MANUAL...
  • Seite 49: Spezifikationen

    1 000 Hz/120 dB Elektrische Impedanz bei 5 000 Ohm 1 000 Hz Eigenrauschen 31,2 mV Erforderliche Spannung 5 V bei 4,5 kOhm, zweiadrige (typische AKG Spannungs‑ Spannungsversorgung versorgung) Abmessungen Mikrofon (Kapsel): ∅ 3,6 mm; Länge: 7,2 mm Kabel: ∅ 1,4 mm Gewicht (inkl.
  • Seite 50: Fehlerbehebung

    fEHLERBEHEBuNg Fehlerbehebung Fehler Mögliche Ursache Abhilfe Kein Ton Mischpult und/ Mischpult und/oder Verstärker oder Verstärkger einschalten ausgeschaltet Kanal‑Fader oder Kanal‑Fader oder Summenpegelregler Summenpegelregler am Mischpult oder am Mischpult oder Lautstärkeregler des Lautstärkeregler des Verstärkers Verstärkers auf gewünschten steht auf Null Pegel ein stellen Mikrofon nicht Mikrofon an Mischpult oder...
  • Seite 51 fEHLERBEHEBuNg Fehler Mögliche Ursache Abhilfe Verzerrungen Gain‑Regler am Gain‑Regler zurückdrehen Mischpult zu weit aufgedreht Mischpulteingang zu Vorabschwächung zwischen empfindlich Mikrofonkabel und Eingang stecken Auslöschung Phase verschoben Phase kann um 180° mancher verschoben werden Frequenzen Siehe dazu Seite 39 Lesen Sie zudem die Bedienungsanleitung des Senders und des Empfängers! MICROLITE MANUAL...
  • Seite 52 MICROLITE MANUAL...
  • Seite 53 4.2.1 Wire‑mesh grill 4.2.2 Lavalier clips 4.2.3 Wind screen 4.2.4 Make‑up cover 4.2.5 AKG adapter plug 4.2.6 Case with window Attaching the lavalier microphone 4.3.1 Attaching the make‑up cover Using the microphone Cleaning the microphone EAR HOOK MICROPHONE Package content Accessories 5.2.1...
  • Seite 54 Attaching the headworn microphone Using the Microphone Cleaning the microphone CONNECTING THE MICROPHONE Connecting the microphone to an AKG wireless system Connecting the microphone to an alternative wireless system 84 Connection to conventional mixing console using a cable Optional accessories 7.4.1...
  • Seite 55 CONTENTS 8.3.4 Recording musical instruments Ear hook microphone and headworn microphone 8.4.1 Transmitting voices or songs 8.4.2 Recording musical instruments CLEANING Microphone Ear clip Protective cap Wind screen Make‑up cover TECHNICAL DATA 10.1 XX81 MD 10.1.1 Frequency response 10.1.2 Polar pattern 10.1.3 Specifications 10.2...
  • Seite 56: General

    gENERAL General Purpose of this user instructions Purpose of this user instruc­ tions This user instructions is intended to enable you to: • Operate the equipment safely • Use the equipment correctly. Storing this user instructions Storing this user instruc­ tions Keep this user instructions in a safe place or store it electronically in an easily accessible location.
  • Seite 57: Correct Use

    Liability and warranty Liability and warranty AKG Acoustics GmbH accepts no liability or warranty for damage, • Microphones from the MicroLite series are used for purposes other than those described as intended use •...
  • Seite 58: Safety And Environment

    Do not expose the equipment to extreme forces and do not pull on the cable. • Only use the equipment for the applications described in this user instructions. AKG cannot accept any liability for damages resulting from improper handling or misuse. MICROLITE MANUAL...
  • Seite 59: Environment

    Declaration of Conformity This product conforms to the standards listed in the Declaration of Conformity. You can request the Declaration Of Conformity by E‑Mail from sales@akg.com or download it from www.akg.com. MICROLITE MANUAL...
  • Seite 60: Microlite: General Description

    Introduction Introduction Thank you for deciding to buy an AKG product. Read the user instructions carefully before using the equipment and keep the user instructions in a safe place so that you can refer to it at any time in the future.
  • Seite 61: Lavalier Microphones

    LAvALIER MICROPHONES Lavalier microphones LC81 MD The LC81 MD lavalier microphones are cardioid condenser micro‑ phones and are available in black, white, beige and cocoa. LC82 MD The LC82 MD lavalier microphones are omnidirectional condenser microphones and are available in black, white, beige and cocoa. The lavalier microphones in black and white are designed to be attached to clothing and have a 1 m cable.
  • Seite 62: Package Content

    All accessory parts necessary for use with AKG wireless systems are enclosed. Adapter plugs for other wireless systems can be found on page 85. The microphones in the MicroLite series are condenser micropho‑ nes. As a result, they require a power supply. The corresponding power adapter with phantom power is available as an optional accessory.
  • Seite 63: Accessories

    LC82 MD LC82 MD black/white black/white LC81 MD Microphone including cable LC82 MD accessories MDA1 Microdot Adapter AKG WM81/WM82 Wire‑mesh grill W81/W82 Foam wind screen MUP81/MUP82 Make‑up cover H1 Magnet clip H2 Crocodile clip H3 Cable clip Transport case with window 4.2.1 Wire­mesh grill...
  • Seite 64: Lavalier Clips

    LAvALIER MICROPHONES 4.2.2 Lavalier clips Lavalier clips The MicroLite series offers three different lavalier clips for attaching the microphone to clothing: Fig. 4: H1 Fig. 5: H2 Fig. 6: H3 Magnet clip Crocodile clip Cable clip The microphone is attached to the housing by the clasp on the clip: This helps ensure the microphone cable is protected.
  • Seite 65: Make-Up Cover

    AKG adapter plug Fig. 11: MDA1 AKG adapter plug The suppled MDA1 AKG adapter plug connects the MicroLite series microphone to the AKG bodypack transmitter with a 3‑pin Mini‑XLR input. 4.2.6 Case with window Case Fig. 12: Case with window The supplied case is used as a secure way of storing the lavalier microphone.
  • Seite 66: Attaching The Lavalier Microphone

    LAvALIER MICROPHONES Attaching the lavalier microphone Attaching the lavalier microphone Remove the microphone from the case and place the protective cap on the microphone capsule. When attaching the LC81, make sure the protective cap covers the sound entry holes completely! Place the wind screen on the protec‑...
  • Seite 67: Attaching The Make-Up Cover

    LAvALIER MICROPHONES To support the cable, use the H3 cable clip (provided in the LCXX MD package content, available in beige or cocoa): Press the cable into the cable clip and attach the clip to the article of clothing. Connect the microphone. For more information, see pages 84 ff.
  • Seite 68: Using The Microphone

    LAvALIER MICROPHONES Using the microphone For details on use, see from page 87 ff. Cleaning the microphone For details on cleaning the individual parts, see from page 93 ff. MICROLITE MANUAL...
  • Seite 69: Ear Hook Microphone

    EAR HOOK MICROPHONE Ear hook microphone EC81 MD The EC81 MD ear hook microphones are cardioid condenser microphones and are available in beige and cocoa. EC82 MD The EC82 MD ear hook microphones are omnidirectional conden‑ ser microphones and are available in beige and cocoa. Fig.
  • Seite 70: Package Content

    All accessory parts necessary for use with AKG wireless systems are enclosed. Adapter plugs for other wireless systems can be found on page 85. The microphones in the MicroLite series are condenser micropho‑ nes. As a result, they require a power supply. The corresponding power adapter with phantom power is available as an optional accessory.
  • Seite 71: Wire-Mesh Grill

    EAR HOOK MICROPHONE 5.2.1 Wire­mesh grill Wire­mesh grill Fig. 16: WM81 Fig. 17: WM82 Wire-mesh grill for EC81 MD Wire-mesh grill for EC82 MD The supplied wire‑mesh grill (WM81, WM82) consists of several layers of different materials. The wire‑mesh grill is used as protection against dirt and make‑up. Additionally, the wire‑mesh grill protects the microphone membra‑...
  • Seite 72: Make-Up Cover

    EAR HOOK MICROPHONE 5.2.4 Make­up cover Make­up cover Fig. 21: MUP81 Fig. 22: MUP82 Make-up cover for EC81 MD Make-up cover for EC82 MD The make‑up cover (MUP81, MUP82) is placed on the microphone to protect it during the make‑up application process. 5.2.5 Protection against sweat Protection against...
  • Seite 73: Akg Adapter Plug

    AKG adapter plug Fig. 24: MDA1 AKG adapter plug The suppled MDA1 AKG adapter plug connects the MicroLite series microphone to the AKG bodypack transmitter with a 3‑pin Mini‑XLR input. 5.2.7 Case with window Case Fig. 25: Case with window The supplied case is used as a secure way of storing the lavalier microphone.
  • Seite 74: Attaching The Ear Hook Microphone

    EAR HOOK MICROPHONE Attaching the ear hook microphone Attaching the ear hook microphone Remove the microphone from the case and place the protective cap on the microphone capsule. When attaching the LC81, make sure the protective cap covers the sound entry holes completely! Place the wind screen on the protecti‑...
  • Seite 75 EAR HOOK MICROPHONE Place the ear clip over your ear so that the ear clip's amplifier fits snugly behind your earlobe. If the microphone is too loose, remo‑ ve the microphone again and carefully bend the wire frame inwards. Position the microphone so that the microphone capsule is approximately 1 cm away from the corner of your mouth (1).
  • Seite 76: Attaching The Make-Up Cover

    EAR HOOK MICROPHONE 5.3.1 Attaching the make­up cover Attaching the make­up cover Fig. 26: Attaching Fig. 27: Microphone with make-up the make-up cover cover during make-up application If the microphone is built into the mask, place the make‑up cover directly on the microphone capsule during the make‑up application process! Place the protective cap back on after removing the make‑up cover! If necessary, the wind screen can be placed over the...
  • Seite 77: Headworn Microphones

    HEAdWORN MICROPHONES Headworn microphones HC81 MD The HC81 MD headworn microphones are cardioid condenser microphones and are available in beige and cocoa. HC82 MD The HC82 MD headworn microphones are omnidirectional conden‑ ser microphones and are available in beige and cocoa. Fig.
  • Seite 78: Package Content

    All accessory parts necessary for use with AKG wireless systems are enclosed. Adapter plugs for other wireless systems can be found on page 85. The microphones in the MicroLite series are condenser micropho‑ nes. As a result, they require a power supply. The corresponding power adapter with phantom power is available as an optional accessory.
  • Seite 79: Wire-Mesh Grill

    HEAdWORN MICROPHONES 6.2.1 Wire­mesh grill Wire­mesh grill Fig. 29: WM81 Fig. 30: WM82 Wire-mesh grill for EC81 MD Wire-mesh grill for EC82 MD The supplied wire‑mesh grill (WM81, WM82) consists of several layers of different materials. The wire‑mesh grill is used as protection against dirt and make‑up. Additionally, the wire‑mesh grill protects the microphone membra‑...
  • Seite 80: Make-Up Cover

    HEAdWORN MICROPHONES The wind screen (W81, W82) is placed over the wire‑mesh grill to shield the microphone from picking up wind outdoors. This ensures the sound is clean and the microphone is optimally protected. 6.2.4 Make­up cover Make­up cover Fig. 34: MUP81 Fig.
  • Seite 81: Akg Adapter Plug

    AKG adapter plug Fig. 37: MDA1 AKG adapter plug The suppled MDA1 AKG adapter plug connects the MicroLite series microphone to the AKG bodypack transmitter with a 3‑pin Mini‑XLR input. 6.2.7 Case with window Case Fig. 38: Case with window The supplied case is used as a secure way of storing the lavalier microphone.
  • Seite 82: Attaching The Headworn Microphone

    HEAdWORN MICROPHONES Attaching the headworn microphone Attaching the headworn microphone Remove the microphone from the case and place the protective cap on the microphone capsule. When attaching the LC81, make sure the protective cap covers the sound entry holes completely! Place the wind screen on the protec‑...
  • Seite 83 HEAdWORN MICROPHONES Place the microphone on your head again and adjust the headset by pushing the clip toward your neck from behind until it fits snugly. Position the microphone so that the microphone capsule is approxima‑ tely 1 cm away from the corner of your mouth (1). Make sure the piece intended to protect against sweat is positioned against the skin and not against the...
  • Seite 84: Using The Microphone

    Alternative wireless system systems AKG makes no guarantee of compatibility to third‑party wireless systems and assumes no liability in this respect! For more information, refer to the user instructions from the respec‑ tive wireless system manufacturer. Replace the AKG adapter plug with...
  • Seite 85: Connection To Conventional Mixing Console Using A Cable

    Optional accessories 7.4.1 Adapter plug for alternative systems All MicroLite microphones are equipped with a cable and a Microdot plug: This ensures the microphones can be used with a wide variety of wireless systems (AKG , Audio‑Technica ® ® Beyerdynamic, Lectrosonics...
  • Seite 86: Phantom Power Adapter

    CONNECTINg THE MICROPHONE In addition to a wide variety of optional accessories, the correspon‑ ding adapters can be found on our website www.akg.com. MDA2 SEN1 MDA3 SEN2 MDA4 SHU MDA5 AT MDA6 BD MDA7 LEC Fig. 39: Microdot Adapter AKG makes no guarantee of compatibility to third‑party wireless systems and assumes no liability in this respect.
  • Seite 87: Use

    General The major advantage of a microphone that is attached to an article of clothing, on the user's head or in their mask is that the distance between the microphone and the user's mouth is always the same. This ensures there is no need to worry about the microphone level fluctuating.
  • Seite 88: Rotating The Phase

    8.2.3 Rotating the phase JPhase180 Jumper Fig. 41: Phantom power adapter The signal phase can be rotated by 180° using the phantom power adapter. Screw the Phillips‑head screw into the phantom adapter's housing. Remove the housing. Remove the jumper and plug it into only one pin. Put the housing on.
  • Seite 89: Using A Lavalier Microphone

    Using a lavalier microphone 8.3.1 Voice transmission Voice transmission min. 10 cm Fig. 42: Voice transmission Fasten the microphone to a piece of clothing with the crocodile clip to ensure optimal voice transmission. Position the microphone as close as possible to the speaker's mouth. The smaller the distance between the microphone and the sound source, the lower the risk of acoustic feedback and the less room noise will be picked up in the audio signal.
  • Seite 90: Recording Microphone Or Spot Microphone

    8.3.2 Recording microphone or spot microphone Recording microphone and spot microphone Fig. 43: Microphone attached to a decorative piece Fasten the microphone to a suitable decorative piece using the crocodile clip or the magnet clip (e.g. a backdrop, background or curtain).
  • Seite 91: Recording Musical Instruments

    8.3.4 Recording musical instruments Recording musical instruments The microphone can be attached to a variety of different instru‑ ments (e.g. string instruments, guitars, wind instruments). You only need to rotate the gain controller on the mixing console slightly because the microphone is located very close to the sound source.
  • Seite 92: Ear Hook Microphone And Headworn Microphone

    This method offers the following advantages: • The sound of the violin is not influenced. • There is no risk of damaging the violin by using tape. • The violin does not require a cable connection. Ear hook microphone and headworn microphone 8.4.1 Transmitting voices or songs Voice transmission Attach the microphone as described in section 5 and 6.3.
  • Seite 93: Cleaning

    CLEANINg Cleaning Clean the following parts before you store the microphone in the case: • Microphone • Ear clip • Protective cap • Wind screen • Make‑up cover Stow the microphone in the case. Microphone Microphone Use a damp cloth to clean the microphone housing. Do not use any cleaning agents.
  • Seite 94: Protective Cap

    CLEANINg Pull the ear clip from the wire on the lower amplifier. Wash the ear clip in hot, soapy water (60 to 70 °C). Allow the ear clip to dry completely. Push the ear clip back on to the wire. Protective cap Protective Remove the protective cap from the microphone.
  • Seite 95: Wind Screen

    CLEANINg Wind screen Wind screen Remove the wind screen from the microphone. Wash the wind screen in warm, soapy water. Allow the wind screen to dry com‑ pletely before using it again. Make­up cover Make­up cover Remove the make‑up cover from the microphone.
  • Seite 96: Technical Data

    TECHNICAL dATA Technical data 10.1 XX81 MD XX81 MD 10.1.1 Frequency response XX81 MD frequency response Fig. 46: XX81 MD frequency response 10.1.2 Polar pattern XX81 MD polar pattern Fig. 47: XX81 MD polar pattern MICROLITE MANUAL...
  • Seite 97: Specifications

    1,000 Hz/120 dB Electric impedance at 5,000 ohms 1,000 Hz Equivalent noise level 35.5 mV Required voltage (typical 5 V at 4.5 kOhm, two‑wire power AKG power requirement) requirement Dimensions Microphone (capsule): ∅ 4.4 mm Length: 8.5 mm Cable: ∅ 1.4 mm Weight (including cable) 5.3 g...
  • Seite 98: Xx82 Md

    TECHNICAL dATA 10.2 XX82 MD XX82 MD 10.2.1 Frequency response XX82 MD frequency response Fig. 48: XX82 MD frequency response 10.2.2 Polar pattern XX82 MD polar pattern Fig. 49: XX82 MD polar pattern MICROLITE MANUAL...
  • Seite 99: Specifications

    1,000 Hz/120 dB Electric impedance at 5,000 ohms 1,000 Hz Equivalent noise level 31.2 mV Required voltage (typical 5 V at 4.5 kOhm, two‑wire power AKG power requirement) requirement Dimensions Microphone (capsule): ∅ 3.6 mm; Length: 7.2 mm Cable: ∅ 1.4 mm Weight (including cable) 5.3 g...
  • Seite 100: Troubleshooting

    TROuBLESHOOTINg Troubleshooting Problem Possible cause Remedy No sound Power to mixing Switch on power to mixing console console and/or or amplifier amplifier is off Channel fader or Set channel fader or master level master level controller controller on mixing console or on the mixing console volume control on amplifier to or volume control on desired level...
  • Seite 101 TROuBLESHOOTINg Problem Possible cause Remedy Distortions Gain controller on the Turn gain controller down mixing console set too high Mixing console input Insert a preattenuation pad between sensitivity too high the microphone cable and the input Canceling Shifting the phase The phase can be shifted by 180°...
  • Seite 102 Grille de microphone 4.2.2 Clips de cravate 4.2.3 Bonnette anti vent 4.2.4 Protection maquillage 4.2.5 Prise adaptatrice AKG 4.2.6 Boîtier de transport avec hublot Pose du microphone lavalier 4.3.1 Pose de la protection maquillage Utilisation du microphone Nettoyage du microphone...
  • Seite 103 Boîtier de transport avec hublot Pose du microphone serre‑tête Utilisation du microphone Nettoyage du microphone RACCORDEMENT DU MICROPHONE Raccordement aux systèmes radio AKG Raccordement à d'autres systèmes radio Raccordement par câble à une console de mixage Accessoires en option 7.4.1 Prise adaptatrice pour systèmes tiers...
  • Seite 104 CONTENu Microphone tour d'oreille et microphone serre‑tête 8.4.1 Transmission de la parole et du chant 8.4.2 Réception du son d'instruments de musique NETTOYAGE Microphone Crochet d'oreille Capuchon de protection Bonnette anti vent Protection maquillage SPÉCIFICATIONS TECHNIQUES 10.1 XX81 MD 10.1.1 Réponse en fréquence 10.1.2 Diagramme polaire...
  • Seite 105: Généralités

    géNéRALITéS Généralités Objectif de ce mode d'emploi Objectif de ce mode d'emploi Ce mode d'emploi est destinée à vous permettre : • de manipuler cet appareil en toute sécurité • d'utiliser ce système de façon conforme. Conservation de ce mode d'emploi Conservation de ce mode d'emploi...
  • Seite 106: Utilisation Conforme

    Responsabilité et garantie Responsabilité et garantie AKG Acoustics GmbH ne saurait être tenue responsable des dommages causés par : • une utilisation de l'appareil pour un objectif autre que celui décrit dans la section Utilisation conforme •...
  • Seite 107: Sécurité Et Environnement

    • N’exposez pas l’appareil à de fortes contraintes et ne tirez pas sur le câble. • N'utilisez l'appareil que pour les applications décrites dans le mode d'emploi. AKG ne saurait être tenu responsable des dommages induits par une utilisation non conforme ou une manipulation inappropriée. MODE D'EMPLOI MICROLITE...
  • Seite 108: Environnement

    à un système de collecte adapté. Déclaration de conformité Ce produit satisfait les normes listées dans la déclaration de con‑ formité. Vous pouvez la demander par e‑mail en écrivant à sales@ akg.com ou la télécharger du site www.akg.com. MODE D'EMPLOI MICROLITE...
  • Seite 109: Microlite : Généralités

    Leur forme compact garantie un confort optimal. Ils offrent de plus une excellente qualité de son pendant leur longue durée de vie. Les microphones de la série MicroLite d'AKG, compatibles avec les systèmes sans fil courants, peuvent aussi être branchés sur un câble XLR. Modèles de la série MicroLite Versions Tous cardioïdes et omnidirectionnels, les microphones de la série...
  • Seite 110: Microphones Lavalier

    MICROPHONES LAvALIER Microphones lavalier LC81 MD Les microphones lavalier LC81 MD sont des microphones à directi‑ vité cardioïde disponibles en noir, blanc, beige ou chocolat. LC82 MD Les microphones lavalier LC82 MD sont des microphones à direc‑ tivité polaire omnidirectionnelle disponibles en noir, blanc, beige ou chocolat.
  • Seite 111: Livraison

    Microphone lavalier Tous les accessoires nécessaires à l'utilisation de l'appareil avec les système radio AKG sont livrés avec ce dernier. Vous trouverez des adaptateurs pour les autres systèmes radio page 136. Les microphones de la série MicroLite sont des microphones électrostatiques et doivent donc être alimentés en tension.
  • Seite 112: Accessoires

    LC82 MD LC82 MD noir/blanc beige/chocolat Accessoires Microphone avec câble LC81 MD LC82 MD MDA1 Adaptateur Microdot AKG WM81/WM82 Grille de microphone W81/W82 Bonnette anti vent en mousse MUP81/MUP82 Protection ma‑ quillage H1 Clip magnétique H2 Clip croco H3 Clip de câble Boîtier de transport avec hublot...
  • Seite 113: Clips De Cravate

    MICROPHONES LAvALIER Elle protège le microphone de la poussière et du maquillage. De plus elle isole la membrane du microphone des plosives et des bruits dus au vent. 4.2.2 Clips de cravate Clips de cravate La série MicroLite propose trois sortes de clips de cravate pour fixer le microphone aux vêtements.
  • Seite 114: Protection Maquillage

    4.2.5 Prise adaptatrice AKG Prise adaptat­ rice AKG Fig. 11 : MDA1 Prise adaptatrice AKG La prise adaptatrice MDA1 AKG livrée relie les microphones de la série MicroLite aux émetteurs de poche AKG à entrée 3‑pôles Mini‑XLR. MODE D'EMPLOI MICROLITE...
  • Seite 115: Boîtier De Transport Avec Hublot

    MICROPHONES LAvALIER 4.2.6 Boîtier de transport avec hublot Boîtier Fig. 12 : Boîtier de transport avec hublot Ce boîtier de transport sert à ranger le microphone lavalier. Le hublot permet de connaître la couleur et le type du microphone sans avoir à ouvrir le boîtier. MODE D'EMPLOI MICROLITE...
  • Seite 116: Pose Du Microphone Lavalier

    MICROPHONES LAvALIER Pose du microphone lavalier Pose du microphone lavalier Retirez le microphone de son boîtier et placez le capuchon de protection sur la capsule microphonique. Faites attention à ce que le capuchon de protection du LC81 recouvre com‑ plètement les trous d'entrée du son. Au besoin, placez la bonnette anti vent sur le capuchon de protection.
  • Seite 117: Pose De La Protection Maquillage

    MICROPHONES LAvALIER Le clip de câble H3 (livré avec les LCXX MD beige/chocolat) sert de réducteur de tension au câble : Faites glisser le câble dans le clip de câble et fixez ce dernier sur les vêtements. Branchez le microphone. Voyez page 135 ff. 4.3.1 Pose de la protection maquillage Fig.
  • Seite 118: Microphones Tour D'oreille

    MICROPHONES TOuR d'OREILLE Microphones tour d'oreille EC81 MD Les microphones tour d'oreille EC81 MD sont des microphones à directivité cardioïdes disponibles en beige et chocolat. EC82 MD Les microphones tour d'oreille tour d'oreille EC82 MD sont des microphones à directivité polaire omnidirectionnelle disponibles en beige et chocolat.
  • Seite 119: Livraison

    Tous les accessoires nécessaires à l'utilisation de l'appareil avec les système radio AKG sont livrés avec ce dernier. Vous trouverez des adaptateurs pour les autres systèmes radio page 136. Les microphones de la série MicroLite sont des microphones électrostatiques et doivent donc être alimentés en tension.
  • Seite 120: Accessoires

    EC81 MD EC82 MD beige/chocolat beige/chocolat Accessoires Microphone avec câble EC81 MD EC82 MD MDA1 Adaptateur Microdot AKG WM81/WM82 Grille de microphone W81/W82 Bonnette anti vent en mousse MUP81/MUP82 Protection ma‑ quillage H3 Clip de câble Boîtier de transport avec hublot 5.2.1 Grille de microphone...
  • Seite 121: Clip De Câble

    MICROPHONES TOuR d'OREILLE 5.2.2 Clip de câble Clip de câble Le clip de câble sert à fixer le câble sur les vêtements et réduire les tensions qui lui sont appliquées. Fig. 18 : H3 Clip de câble Le microphone est monté sur boîtier avec la fibule du clip : Ceci protège le câble du microphone. 5.2.3 Bonnette anti vent Bonnette anti vent Fig. 19 : W81 Fig.
  • Seite 122: Protection Contre La Sueur

    5.2.6 Prise adaptatrice AKG Prise adaptat­ rice AKG Fig. 24 : MDA1 Prise adaptatrice AKG La prise adaptatrice MDA1 AKG livrée relie les microphones de la série MicroLite aux émetteurs de poche AKG à entrée 3‑pôles Mini‑XLR. MODE D'EMPLOI MICROLITE...
  • Seite 123: Boîtier De Transport Avec Hublot

    MICROPHONES TOuR d'OREILLE 5.2.7 Boîtier de transport avec hublot Boîtier Fig. 25 : Boîtier de transport avec hublot Ce boîtier de transport sert à ranger le microphone lavalier. Le hublot permet de connaître la couleur et le type du microphone sans avoir à...
  • Seite 124: Pose Du Microphone Tour D'oreille

    MICROPHONES TOuR d'OREILLE Pose du microphone tour d'oreille Pose du microphone tour d'oreille Retirez le microphone de son boîtier et placez le capuchon de protection sur la capsule microphonique. Faites attention à ce que le capuchon de protection du LC81 recouvre com‑ plètement les trous d'entrée du son.
  • Seite 125 MICROPHONES TOuR d'OREILLE Placez le crochet d'oreille sur votre oreille de manière à ce que son ren‑ forcement soit serré derrière le lobe. Si le microphone bouge, retirez‑le et pliez avec précaution l'armature vers l'intérieur. Placez le microphone pour que la capsule microphonique soit à...
  • Seite 126: Pose De La Protection Maquillage

    MICROPHONES TOuR d'OREILLE 5.3.1 Pose de la protection maquillage Pose de la protection ma­ quillage Fig. 26 : Pose de Fig. 27 : Microphone avec la protection maquillage protection maquillage pendant la séance de maquillage Si le microphone est monté pendant le maquillage, placez la pro‑ tection maquillage directement sur la capsule microphonique.
  • Seite 127: Microphones Serre-Tête

    MICROPHONES SERRE-TêTE Microphones serre­tête HC81 MD Les microphones serre‑tête HC81 MD sont des microphones à directivité cardioïdes disponibles en beige et chocolat. HC82 MD Les microphones serre‑tête HC82 MD sont des microphones à directivité polaire omnidirectionnelle disponibles en beige et chocolat.
  • Seite 128: Livraison

    Microphone serre­tête Tous les accessoires nécessaires à l'utilisation de l'appareil avec les système radio AKG sont livrés avec ce dernier. Vous trouverez des adaptateurs pour les autres systèmes radio page 136. Les microphones de la série MicroLite sont des microphones électrostatiques et doivent donc être alimentés en tension.
  • Seite 129: Grille De Microphone

    MICROPHONES SERRE-TêTE HC81 MD HC82 MD beige/chocolat beige/chocolat H3 Clip de câble Boîtier de transport avec hublot 6.2.1 Grille de microphone Grille de microphone Fig. 29 : WM81 Fig. 30 : WM82 Grille de microphone pour EC81 MD Grille de microphone pour EC82 MD La grille de microphone livrée (WM81, WM82) est composée de couches de différents matériaux.
  • Seite 130: Bonnette Anti Vent

    MICROPHONES SERRE-TêTE 6.2.3 Bonnette anti vent Bonnette anti vent Fig. 32 : W81 Fig. 33 : W82 Bonnette anti vent pour EC81 MD Bonnette anti vent pour EC82 MD La bonnette anti vent (W81, W82), enfilée sur la grille du micropho‑ ne pour le protéger du vent lors des enregistrements en extérieur, permet de garder une image sonore claire.
  • Seite 131: Prise Adaptatrice Akg

    Prise adaptat­ rice AKG Fig. 37 : MDA1 Prise adaptatrice AKG La prise adaptatrice MDA1 AKG livrée relie les microphones de la série MicroLite aux émetteurs de poche AKG à entrée 3‑pôles Mini‑XLR. 6.2.7 Boîtier de transport avec hublot Boîtier Fig.
  • Seite 132: Pose Du Microphone Serre-Tête

    MICROPHONES SERRE-TêTE Pose du microphone serre­tête Pose du microphone serre­tête Retirez le microphone de son boîtier et placez le capuchon de protection sur la capsule microphonique. Faites attention à ce que le capuchon de protection du LC81 recouvre complètement les trous d'entrée du son.
  • Seite 133 MICROPHONES SERRE-TêTE Remettez le microphone et ajustez l'arceau en appuyant ce dernier contre la nuque, jusqu'à ce qu'il soit bien placé. Placez le microphone pour que la capsule microphonique soit à en‑ viron 1 cm du coin de la bouche (1). Assurez‑vous que la protection contre la sueur est en contact avec la peau et non l'armature (2).
  • Seite 134: Utilisation Du Microphone

    MICROPHONES SERRE-TêTE Utilisation du microphone Les pages 138 ff détaillent l'utilisation du microphone. Nettoyage du microphone Les pages 144 ff détaillent le nettoyage de chaque composant du microphone. MODE D'EMPLOI MICROLITE...
  • Seite 135: Raccordement Du Microphone

    Raccordement à d'autres systèmes radio Systèmes radio tiers AKG ne peut garantir la compatibilité du produit avec les systèmes radio tiers et décline toute responsabilité à ce sujet. Vous trouverez des informations complémentaires dans les modes d'emploi des systèmes radio éditées par leur fabricant.
  • Seite 136: Raccordement Par Câble À Une Console De Mixage

    RACCORdEMENT du MICROPHONE Raccordement par câble à une console de mixage Pour raccorder le microphone à une console de mixage, remplacez la prise adaptatrice AKG par un adaptateur d'alimentation fantôme (MDPA) approprié. Branchez l'adaptateur d'alimenta‑ tion fantôme (MDPA) (Voyez page 136 ff).
  • Seite 137: Adaptateur D'alimentation Fantôme

    MDA6 BD MDA7 LEC Fig. 39 : Adaptateur Microdot AKG ne peut garantir la compatibilité du produit avec les systèmes radio tiers et décline toute responsabilité à ce sujet. 7.4.2 Adaptateur d'alimentation fantôme Fig. 40 : Adaptateur d'alimentation fantôme (MDPA) Pour assurer la flexibilité d'utilisation du microphone MicroLite,...
  • Seite 138: Utilisation

    uTILISATION Utilisation Application Généralités Pouvoir inclure un microphone au maquillage ou à l'accrocher à des vêtements et à la tête permet de garder constante la distance qui le sépare de la bouche de son utilisateur. Ceci évite les écarts de niveau sonore et libère les mouvements et les mains.
  • Seite 139: Inverser La Phase

    uTILISATION 8.2.3 Inverser la phase JPhase180 Jumper Fig. 41 : Adaptateur d'alimentation fantôme La phase du signal sonore peut être inversée à 180° avec l'adapta‑ teur d'alimentation fantôme. Dévissez la vis cruciforme du boîtier de l'adaptateur d'alimen‑ tation fantôme. Retirez le boîtier. Soulevez le jumper et remettez‑le sur une seule broche.
  • Seite 140: Utiliser Un Microphone Lavalier

    uTILISATION Utiliser un microphone lavalier 8.3.1 Transmission vocale Transmission vocale min. 10 cm Fig. 42 : Transmission vocale Vous obtiendrez la meilleure transmission vocale en fixant le micro‑ phone avec le clip croco sur les vêtements. Placez le microphone le plus près de la bouche de l'orateur. Le risque de contre‑réaction acoustique et la part du bruit de salle dans le signal d'enregistrement diminuent avec la distance entre le microphone et la source sonore.
  • Seite 141: Théâtre, Comédie Musicale, Opéra

    uTILISATION 8.3.3 Théâtre, comédie musicale, opéra Théâtre, comé­ die musicale, opéra Fig. 44 : Transmission de la parole et du chant Placez le microphone le plus près de la bouche dans le maquillage. 8.3.4 Réception du son d'instruments de musique Réception du son d'ins­...
  • Seite 142 uTILISATION Violons Violons Fig. 45 : Microphone de réception du son du violon Su vous ne pouvez fixer le microphone sur le violon, accrochez-le sur la joue de l'artiste. Vous pouvez aussi utiliser un crochet d'oreille ou un microphone serre‑tête. Cette méthode à plusieurs avantages : • Le son du violon n'est pas altéré. •...
  • Seite 143: Microphone Tour D'oreille Et Microphone Serre-Tête

    uTILISATION Microphone tour d'oreille et microphone serre­tête 8.4.1 Transmission de la parole et du chant Transmission vocale Fixez le microphone comme indiqué dans les sections 5 et 6.3. Faites attention à ce que le microphone soit à environ 1 cm du coin de la bouche.
  • Seite 144: Nettoyage

    NETTOyAgE Nettoyage Nettoyez les composants suivants avant de ranger le microphone dans son boîtier de transport : • Microphone • Crochet d'oreille • Capuchon de protection • Bonnette anti vent • Protection maquillage Rangez le microphone dans son boîtier. Microphone Microphone Nettoyez le boîtier du microphone avec un chiffon légèrement humide.
  • Seite 145: Crochet D'oreille

    NETTOyAgE Crochet d'oreille Crochet d'oreille Retirez le crochet d'oreille de l'armature. Faites pivoter les crochets d'oreille du microphone serre‑tête verticale‑ ment vers l'intérieur Retirez les crochets d'oreille au niveau du renforcement inférieur de l'armature. Nettoyez les crochets d'oreille à l'eau savonneuse à 60‑70°C. Laissez‑les sécher.
  • Seite 146: Capuchon De Protection

    NETTOyAgE Capuchon de protection Capuchon de protection Retirez le capuchon de protection du microphone. Nettoyez‑le à l'eau savonneuse tiède. Laissez‑le sécher avant de le réutiliser. MODE D'EMPLOI MICROLITE...
  • Seite 147: Bonnette Anti Vent

    NETTOyAgE Bonnette anti vent Bonnette anti vent Retirez la bonnette anti vent du microphone. Nettoyez‑la à l'eau savonneuse tiède. Laissez‑la sécher avant de la réutiliser. Protection maquillage Protection ma­ quillage Retirez la protection maquillage du microphone. Nettoyez‑la à l'eau savonneuse tiède.
  • Seite 148: Spécifications Techniques

    SPéCIfICATIONS TECHNIquES Spécifications techniques 10.1 XX81 MD XX81 MD 10.1.1 Réponse en fréquence Réponse en fréquence XX81 MD Fig. 46 : Réponse en fréquence XX81 MD 10.1.2 Diagramme polaire Diagramme polaire XX81 MD Fig. 47 : Diagramme polaire XX81 MD MODE D'EMPLOI MICROLITE...
  • Seite 149: Spécifications

    5 000 Ohm 1 000 Hz : Niveau de bruit équivalent 35,5 mV Tension requise (tension 5 V à 4,5 kOhm, alimentation en d'alimentation AKG typique) tension bifilaire Dimensions Microphone (capsule) : ∅ 4,4 mm Longueur : 8,5 mm Câble : ∅...
  • Seite 150: Xx82 Md

    SPéCIfICATIONS TECHNIquES 10.2 XX82 MD XX82 MD 10.2.1 Réponse en fréquence Réponse en fréquence XX82 MD Fig. 48 : Réponse en fréquence XX82 MD 10.2.2 Diagramme polaire Diagramme polaire XX82 MD Fig. 49 : Diagramme polaire XX82 MD MODE D'EMPLOI MICROLITE...
  • Seite 151: Spécifications

    5 000 Ohm 1 000 Hz : Niveau de bruit équivalent 31,2 mV Tension requise (tension 5 V à 4,5 kOhm, alimentation en d'alimentation AKG typique) tension bifilaire Dimensions Microphone (capsule) : ∅ 3,6 mm Longueur : 7,2 mm Câble : ∅...
  • Seite 152: Guide Des Pannes

    guIdE dES PANNES Guide des pannes Erreur Origine possible Dépannage Pas de son La console de mixage et/ Mettre la console de mixage ou l’amplificateur ne sont et/ou l’amplificateur sous pas sous tension tension Le fader du canal ou le Régler le fader du canal ou le réglage de niveau master réglage de niveau master de de la console de mixage...
  • Seite 153 guIdE dES PANNES Erreur Origine possible Dépannage Distorsions Le réglage de gain de la Baisser le réglage de gain console de mixage est trop haut L’entrée de la console de Insérer un pré‑atténuateur de mixage est trop sensible sensibilité entre le câble du micro et l’entrée Certaines La phase est inversée La phase peut être inversée...
  • Seite 154 Rejilla metálica 4.2.2 Clips lavalier 4.2.3 Pantalla antiviento 4.2.4 Protección contra maquillaje 4.2.5 Conector adaptador AKG 4.2.6 Estuche con ventana Colocación del micrófono lavalier 4.3.1 Colocación de la protección contra maquillaje Utilización del micrófono Limpieza del micrófono MICRÓFONOS DE OREJA...
  • Seite 155 Estuche con ventana Colocación del micrófono de diadema Utilización del micrófono Limpieza del micrófono CONEXIÓN DEL MICRÓFONO Conexión a sistemas inalámbricos de AKG Conexión a sistemas inalámbricos alternativos Conexión a mesas de mezclas convencionales mediante cable 188 Accesorios opcionales 7.4.1 Conector adaptador para sistemas alternativos 7.4.2...
  • Seite 156 ÍNdICE Micrófono de oreja y micrófono de diadema 8.4.1 Transmisión de palabra y canto 8.4.2 Toma de instrumentos musicales LIMPIEZA Micrófono Gancho para la oreja Rejilla de protección Pantalla antiviento Protección contra maquillaje DATOS TÉCNICOS 10.1 XX81 MD 10.1.1 Respuesta de frecuencia 10.1.2 Patrón polar 10.1.3...
  • Seite 157: Generalidades

    gENERALIdAdES Generalidades Objeto del manual de usuario Objeto del manual de usuario El presente manual de usuario tiene por objeto capacitarle para • manejar el equipo de modo seguro • y emplearlo conforme al uso previsto. Conservación del manual de usuario Conservación del manual de usuario...
  • Seite 158: Uso Previsto

    Los micrófonos de la serie MicroLite se han diseñado exclusiva‑ mente para la transmisión de sonido y voz. Responsabilidad y garantía Responsa­ bilidad y garantía AKG Acoustics GmbH declina toda responsabilidad y garantía en los siguientes casos: • empleo de los micrófonos de la serie MicroLite con una finalidad distinta a la descrita como uso previsto •...
  • Seite 159: Seguridad Y Entorno

    No someta el equipo a fuerzas extremas y no tire del cable. • Emplee el equipo únicamente para las aplicaciones descritas en el manual de usuario. AKG declina toda responsabilidad por daños causados por un manejo inadecuado o erróneo. MANUAL DE MICROLITE...
  • Seite 160: Entorno

    Declaración de conformidad Este producto cumple las normas indicadas en la declaración de conformidad. Puede solicitar la declaración de conformidad por correo electrónico a sales@akg.com o descargarla en www.akg. com. MANUAL DE MICROLITE...
  • Seite 161: Microlite: Descripción General

    MicroLite: Descripción general Introducción Introducción Gracias por haberse decidido por un producto de AKG. Lea atenta- mente el manual de usuario antes de utilizar el aparato y conserve con cuidado el manual de usuario para poder consultarlo siempre que sea necesario. ¡Esperamos que le satisfaga y lo disfrute! Breve descripción...
  • Seite 162: Micrófonos Lavalier

    MICRófONOS LAvALIER Micrófonos lavalier LC81 MD Los micrófonos lavalier LC81 MD son micrófonos con patrón polar cardiode, disponibles en los colores negro, blanco, beige y cacao. LC82 MD Los micrófonos lavalier LC82 MD son micrófonos con directividad omnidireccional, disponibles en los colores negro, blanco, beige y cacao.
  • Seite 163: Contenido Del Embalaje

    Micrófono lavalier El embalaje incluye todos los accesorios necesarios para el uso con sistemas inalámbricos de AKG. Puede encontrar los conec‑ tores adaptadores para otros sistemas inalámbricos en la página 188. Los micrófonos de la serie MicroLite son micrófonos de condensa‑...
  • Seite 164: Accesorios

    LC82 MD LC82 MD negro/blanco beige/cacao Accesorios Micrófono incl. cable LC81 MD LC82 MD Adaptador Microdot de AKG MDA1 Rejilla metálica WM81/WM82 Pantalla antiviento de goma espuma W81/W82 Protección contra maquillaje MUP81/MUP82 Clip magnético H1 Clip de cocodrilo H2 Clip para cable H3...
  • Seite 165: Rejilla Metálica

    MICRófONOS LAvALIER 4.2.1 Rejilla metálica Rejilla metálica Fig. 2: WM81 Fig. 3: WM82 Rejilla metálica para LC81 MD Rejilla metálica para LC82 MD La rejilla metálica suministrada (WM81, WM82) se compone de varias capas de diferentes materiales. La rejilla metálica sirve para proteger del polvo y el maquillaje. Además, la rejilla metálica protege la membrana del micrófono de los ruidos del viento y pop.
  • Seite 166: Pantalla Antiviento

    Conector ad­ aptador AKG Fig. 11: Conector adaptador MDA1 AKG El conector adaptador MDA1 AKG suministrado conecta los micró‑ fonos de la serie MicroLite con los transmisores de petaca de AKG con entrada Mini‑XLR de 3 polos. MANUAL DE MICROLITE...
  • Seite 167: Estuche Con Ventana

    MICRófONOS LAvALIER 4.2.6 Estuche con ventana Estuche Fig. 12: Estuche con ventana El estuche suministrado sirve para guardar de forma segura el micrófono lavalier. La ventana incorporada permite comprobar en todo momento el color y el tipo de micrófono sin necesidad de abrir el estuche.
  • Seite 168: Colocación Del Micrófono Lavalier

    MICRófONOS LAvALIER Colocación del micrófono lavalier Colocación del micrófono lavalier Saque el micrófono del estuche y coloque la rejilla protectora sobre la cápsula microfónica. Para el modelo LC81, compruebe que la rejilla de protección cubra completamente los orificios de entra‑ da del sonido. En caso necesario, coloque la pantalla antiviento sobre la rejilla de protección.
  • Seite 169 MICRófONOS LAvALIER Utilice el clip para cable H3 (incluido en el contenido del embalaje del LCXX MD en beige y cacao) como antiestrés de cable: Introduzca el cable a presión en el clip para cable y sujete el clip a la ropa.
  • Seite 170: Colocación De La Protección Contra Maquillaje

    MICRófONOS LAvALIER 4.3.1 Colocación de la protección contra maquillaje Fig. 13: Colocación de la protección Fig. 14: Micrófono lavalier con contra maquillaje protección contra maquillaje durante el proceso de maquillaje Si se instala el micrófono en la máscara, coloque la protección contra maquillaje directamente sobre la cápsula microfónica duran‑...
  • Seite 171: Micrófonos De Oreja

    MICRófONOS dE OREjA Micrófonos de oreja EC81 MD Los micrófonos de oreja EC81 MD son micrófonos con patrón polar cardiode, disponibles en los colores beige y cacao. EC82 MD Los micrófonos de oreja EC82 MD son micrófonos con directividad omnidireccional, disponibles en los colores beige y cacao. Fig.
  • Seite 172: Accesorios

    MICRófONOS dE OREjA El embalaje incluye todos los accesorios necesarios para el uso con sistemas inalámbricos de AKG. Puede encontrar los conec‑ tores adaptadores para otros sistemas inalámbricos en la página 188. Los micrófonos de la serie MicroLite son micrófonos de condensa‑...
  • Seite 173: Rejilla Metálica

    MICRófONOS dE OREjA 5.2.1 Rejilla metálica Rejilla metálica Fig. 16: WM81 Fig. 17: WM82 Rejilla metálica para EC81 MD Rejilla metálica para EC82 MD La rejilla metálica suministrada (WM81, WM82) se compone de varias capas de diferentes materiales. La rejilla metálica sirve para proteger del polvo y el maquillaje. Además, la rejilla metálica protege la membrana del micrófono de los ruidos del viento y pop.
  • Seite 174: Protección Contra Maquillaje

    MICRófONOS dE OREjA exterior, de esta forma, las características sonoras permanecen limpias y se protege el micrófono de forma óptima. 5.2.4 Protección contra maquillaje Protección contra ma­ quillaje Fig. 21: MUP81 Fig. 22: MUP82 Protección contra maquillaje para Protección contra maquillaje para EC81 MD EC82 MD Para proteger del maquillaje durante el proceso de maquillaje se coloca la protección contra maquillaje (MUP81, MUP82) sobre el micrófono.
  • Seite 175: Conector Adaptador Akg

    AKG Fig. 24: Conector adaptador MDA1 AKG El conector adaptador MDA1 AKG suministrado conecta los micró‑ fonos de la serie MicroLite con los transmisores de petaca de AKG con entrada Mini‑XLR de 3 polos. 5.2.7 Estuche con ventana Estuche Fig.
  • Seite 176: Colocación Del Micrófono De Oreja

    MICRófONOS dE OREjA Colocación del micrófono de oreja Colocación del micrófono de oreja Saque el micrófono del estuche y coloque la rejilla protectora sobre la cápsula microfónica. Para el modelo LC81, compruebe que la rejilla de protección cubra com‑ pletamente los orificios de entrada del sonido.
  • Seite 177 MICRófONOS dE OREjA Coloque el gancho para la oreja sobre la oreja, de tal forma que el re‑ fuerzo del gancho para la oreja quede ajustado detrás del lóbulo. Si el micrófono se encuentra demasi‑ ado suelto, vuelva a soltar el micrófo‑ no y doble el alambre de soporte con cuidado ligeramente hacia dentro.
  • Seite 178: Colocación De La Protección Contra Maquillaje

    MICRófONOS dE OREjA 5.3.1 Colocación de la protección contra maquillaje Colocación de la protec­ ción contra maquillaje Fig. 26: Colocación de la protección Fig. 27: Micrófono con protección contra maquillaje contra maquillaje durante el proceso de maquillaje Si se instala el micrófono en la máscara, coloque la protección contra maquillaje directamente sobre la cápsula microfónica duran‑...
  • Seite 179: Micrófonos De Diadema

    MICRófONOS dE dIAdEMA Micrófonos de diadema HC81 MD Los micrófonos de diadema HC81 MD son micrófonos con patrón polar cardiode, disponibles en los colores beige y cacao. HC82 MD Los micrófonos de diadema HC82 MD son micrófonos con directi‑ vidad omnidireccional, disponibles en los colores beige y cacao. Fig.
  • Seite 180: Contenido Del Embalaje

    Micrófono de diadema El embalaje incluye todos los accesorios necesarios para el uso con sistemas inalámbricos de AKG. Puede encontrar los conec‑ tores adaptadores para otros sistemas inalámbricos en la página 188. Los micrófonos de la serie MicroLite son micrófonos de condensa‑...
  • Seite 181: Rejilla Metálica

    MICRófONOS dE dIAdEMA HC81 MD HC82 MD beige/cacao beige/cacao Protección contra maquillaje MUP81/MUP82 Clip para cable H3 Estuche de transporte con ventana 6.2.1 Rejilla metálica Rejilla metálica Fig. 29: WM81 Fig. 30: WM82 Rejilla metálica para EC81 MD Rejilla metálica para EC82 MD La rejilla metálica suministrada (WM81, WM82) se compone de varias capas de diferentes materiales.
  • Seite 182: Pantalla Antiviento

    MICRófONOS dE dIAdEMA 6.2.3 Pantalla antiviento Pantalla antiviento Fig. 32: W81 Fig. 33: W82 Pantalla antiviento para EC81 MD Pantalla antiviento para EC82 MD La pantalla antiviento se coloca sobre la rejilla metálica (W81, W82) para proteger el micrófono del viento durante grabaciones en el exterior, de esta forma, las características sonoras permanecen limpias y se protege el micrófono de forma óptima.
  • Seite 183: Conector Adaptador Akg

    AKG Fig. 37: Conector adaptador MDA1 AKG El conector adaptador MDA1 AKG suministrado conecta los micró‑ fonos de la serie MicroLite con los transmisores de petaca de AKG con entrada Mini‑XLR de 3 polos. 6.2.7 Estuche con ventana Estuche Fig.
  • Seite 184: Colocación Del Micrófono De Diadema

    MICRófONOS dE dIAdEMA Colocación del micrófono de diadema Colocación del micrófono de diadema Saque el micrófono del estuche y coloque la rejilla protectora sobre la cápsula microfónica. Para el modelo LC81, compruebe que la rejilla de protección cubra completamente los orificios de entrada del sonido. En caso necesario, coloque la pantalla antiviento sobre la rejilla de protección.
  • Seite 185 MICRófONOS dE dIAdEMA Vuelva a colocar el micrófono y ajuste la diadema presionando , el arco contra la nuca hasta que quede ajustado. Posicione el micrófono de tal forma que la cápsula microfónica quede orientada hacia la boca a una distancia aprox.
  • Seite 186: Utilización Del Micrófono

    MICRófONOS dE dIAdEMA Utilización del micrófono Los detalles relativos a la utilización se incluyen a partir de la página 190y siguientes. Limpieza del micrófono Los detalles relativos a la limpieza de las piezas individuales se incluyen a partir de la página 196y siguientes. MANUAL DE MICROLITE...
  • Seite 187: Conexión Del Micrófono

    Conexión a sistemas inalámbricos alternativos Sistemas inalámbricos alternativos AKG no garantiza la compatibilidad con sistemas inalámbricos de otras marcas y declina toda responsabilidad a este respecto. Consulte la información más detallada en los manuales de usuario de los sistemas inalámbricos del fabricante en cuestión.
  • Seite 188: Conexión A Mesas De Mezclas Convencionales Mediante Cable

    Accesorios opcionales 7.4.1 Conector adaptador para sistemas alternativos Todos los micrófonos MicroLite están equipados con un cable con conector Microdot. De esta forma, los micrófonos pueden usarse con una gran variedad de sistemas inalámbricos (AKG ® Audio‑Technica , Beyerdynamic, Lectrosonics , Sennheiser ®...
  • Seite 189: Adaptador De Alimentación Fantasma

    MDA5 AT MDA6 BD MDA7 LEC Fig. 39: Adaptador Microdot AKG no garantiza la compatibilidad con sistemas inalámbricos de otras marcas y declina toda responsabilidad a este respecto. 7.4.2 Adaptador de alimentación fantasma Fig. 40: Adaptador de alimentación fantasma (MDPA) Para disponer de una flexibilidad completa con el micrófono...
  • Seite 190: Aplicación

    APLICACIóN Aplicación Aplicación Generalidades La gran ventaja de un micrófono que se sujeta a la ropa, a la cabe‑ za o a la máscara consiste en que la distancia entre el micrófono y la boca del usuario permanece siempre igual. Esto evita las fluctuaciones de nivel.
  • Seite 191: Inversión De Fase

    APLICACIóN 8.2.3 Inversión de fase JPhase180 Jumper Fig. 41: Adaptador de alimentación fantasma Es posible invertir en 180° la fase de la señal mediante el adaptador de alimentación fantasma. Desatornille el tornillo Phillips situado en la carcasa del adaptador de alimentación fantasma. Retire la carcasa.
  • Seite 192: Utilización Del Micrófono Lavalier

    APLICACIóN Utilización del micrófono lavalier 8.3.1 Transmisión de voz Transmisión de voz min. 10 cm Fig. 42: Transmisión de voz Para conseguir una transmisión de voz óptima, sujete el micrófono a la ropa con el clip de cocodrilo. Posicione el micrófono tan cerca de la boca del orador como sea posible.
  • Seite 193: Micrófono De Grabación O De Apoyo

    APLICACIóN 8.3.2 Micrófono de grabación o de apoyo Micrófono de grabación y de apoyo Fig. 43: Micrófono sujeto a un elemento de la decoración Sujete el micrófono con el clip de cocodrilo o el clip magnético a un elemento de la decoración adecuado (p. ej. bastidores, fondo, telón o similar).
  • Seite 194: Toma De Instrumentos Musicales

    APLICACIóN 8.3.4 Toma de instrumentos musicales Toma de instrumentos musicales Es posible sujetar el micrófono a diversos instrumentos (p. ej. instrumentos de arco, guitarra, instrumentos de viento). Debido a que el micrófono se encuentra muy cerca de la fuente de audio, solo necesita girar un poco el control de ganancia de la mesa de mezclas.
  • Seite 195: Micrófono De Oreja Y Micrófono De Diadema

    APLICACIóN Como alternativa, puede utilizar un micrófono de oreja o de diadema. Este método tiene las siguientes ventajas: • no se influye en el sonido del violín. • no existe riesgo de dañar el violín mediante la cinta adhesiva o similar. • el violín no requiere una conexión mediante cable. Micrófono de oreja y micrófono de diadema 8.4.1 Transmisión de palabra y canto Transmisión de voz Sujete el micrófono como se describe en la sección 5y 6.3.
  • Seite 196: Limpieza

    LIMPIEzA Limpieza Limpie las siguientes piezas antes de guardar el micrófono en el estuche: • Micrófono • Gancho para la oreja • Rejilla de protección • Pantalla antiviento • Protección contra maquillaje Guarde el micrófono en el estuche. Micrófono Micrófono Limpie la carcasa del micrófono con un paño húmedo.
  • Seite 197: Gancho Para La Oreja

    LIMPIEzA Gancho para la oreja Gancho para la oreja En el caso del micrófono de oreja, retire el gancho para la oreja del alambre. En el caso del micrófono de diade‑ ma, abata los ganchos para la oreja en vertical hacia dentro. Retire los ganchos para la oreja del alambre tirando del refuerzo inferior.
  • Seite 198: Rejilla De Protección

    LIMPIEzA Rejilla de protección Rejilla de protección Retire la rejilla de protección del micrófono. Lave la rejilla de protección con una mezcla de agua y jabón templada. Permita que la rejilla de protección se seque por completo antes de volver a usarla. Pantalla antiviento Pantalla antiviento...
  • Seite 199: Protección Contra Maquillaje

    LIMPIEzA Protección contra maquillaje Protección contra ma­ quillaje Retire la protección contra maquilla‑ je del micrófono. Lave la protección contra maquillaje con una mezcla de agua y jabón templada. Permita que la protección contra maquillaje se seque por completo antes de volver a usarla. MANUAL DE MICROLITE...
  • Seite 200: Datos Técnicos

    dATOS TéCNICOS Datos técnicos 10.1 XX81 MD XX81 MD 10.1.1 Respuesta de frecuencia Respuesta de frecuencia XX81 MD Fig. 46: Respuesta de frecuencia XX81 MD 10.1.2 Patrón polar Patrón polar XX81 MD Fig. 47: Patrón polar XX81 MD MANUAL DE MICROLITE...
  • Seite 201: Especificaciones

    Impedancia eléctrica a 5.000 ohmios 1.000 Hz Nivel de ruido equivalente 35,5 mV Tensión requerida (suminis‑ 5 V a 4,5 kOhmios, suministro tro de tensión típico de AKG) de tensión a través de dos conductores Dimensiones Micrófono (cápsula): ∅ 4,4 mm Longitud: 8,5 mm Cable: ∅...
  • Seite 202: Xx82 Md

    dATOS TéCNICOS 10.2 XX82 MD XX82 MD 10.2.1 Respuesta de frecuencia Respuesta de frecuencia XX82 MD Fig. 48: Respuesta de frecuencia XX82 MD 10.2.2 Patrón polar Patrón polar XX82 MD Fig. 49: Patrón polar XX82 MD MANUAL DE MICROLITE...
  • Seite 203: Especificaciones

    Impedancia eléctrica a 5.000 ohmios 1.000 Hz Nivel de ruido equivalente 31,2 mV Tensión requerida (suministro 5 V a 4,5 kOhmios, suministro de tensión típico de AKG) de tensión a través de dos conductores Dimensiones Micrófono (cápsula): ∅ 3,6 mm; Longitud: 7,2 mm Cable: ∅...
  • Seite 204: Problemas De Funcionamiento

    PROBLEMAS dE fuNCIONAMIENTO Problemas de funcionamiento Error Posible causa Solución Ausencia de Están desconectados la Encender la mesa de mezclas sonido mesa de mezclas y/o el y/o el amplificador amplificador El fader de canal o el Ajuste al nivel deseado el regulador del nivel de fader de canal o el regulador suma de la mesa de del nivel de suma en la mesa...
  • Seite 205 PROBLEMAS dE fuNCIONAMIENTO Error Posible causa Solución Distorsiones El control de ganancia Disminuir el nivel de ganancia de la mesa de mezclas con el control de ganancia está ajustado a un nivel excesivo La entrada de la mesa de Conectar un preatenuador mezclas es demasiado entre el cable del micrófono y sensible...
  • Seite 206 NOTES...
  • Seite 207 NOTES...
  • Seite 208: Legal Notice

    © 2016 AKG Acoustics GmbH All rights reserved. The information contained in this manual, including any drawi‑ ngs and photos provided, are the intellectual property of AKG Acoustics GmbH. In accordance with copyright law, it is not permitted for this documentation or parts thereof to be reproduced or transmitted for any purpose in any form using any means, whether electro‑...

Inhaltsverzeichnis