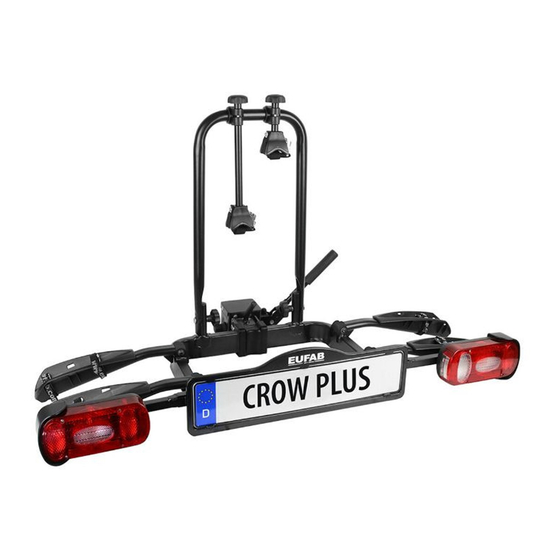
Eufab CROW + Bedienungsanleitung
Fahrradträger, erweiterbar
Vorschau ausblenden
Andere Handbücher für CROW +:
- Bedienungsanleitung (24 Seiten) ,
- Bedienungsanleitung (8 Seiten)
Inhaltsverzeichnis
Verfügbare Sprachen
Verfügbare Sprachen
3. Kennzeichen bestellen unter
https://www.eufab.com
D
Art.-Nr.: 11582
Fahrradträger CROW +, erweiterbar
Bedienungsanleitung .............................. 3
Art. no. 11582
Bicycle rack CROW +, can be expanded
Operating instructions ............................. 9
Réf. 11582
Porte-vélos CROW +, extensible
Manuel de l'opérateur ............................ 15
Teilweise vormontiert
Zusammenklappbar
Cod. art. 11582
Portabiciclette CROW +, espandibile
Istruzioni per l'uso ................................... 20
Č. výr. 11582
Nosič jízdních kol CROW +, výsuvný
Návod k obsluze ...................................... 25
© EAL GmbH, 11582, 09.2024
1
Kapitel
Inhaltsverzeichnis

Verwandte Anleitungen für Eufab CROW +


Inhaltszusammenfassung für Eufab CROW +
- Seite 1 Teilweise vormontiert Zusammenklappbar 3. Kennzeichen bestellen unter https://www.eufab.com © EAL GmbH, 11582, 09.2024 Art.-Nr.: 11582 Cod. art. 11582 Fahrradträger CROW +, erweiterbar Portabiciclette CROW +, espandibile Bedienungsanleitung ......3 Istruzioni per l‘uso ........20 Art. no. 11582 Č. výr. 11582 Bicycle rack CROW +, can be expanded Nosič...
-
Seite 3: Inhaltsverzeichnis
3. SPEZIFIKATIONEN Fahrradträger CROW +, erweiterbar Dimensionen (L x B x H): ca. 56 x 117 x 67 [cm] zusammengeklappt: ca. 75 x 71 x 19 [cm] INHALT Eigengewicht: ca. 14,5 kg Elektroanschluss: 13-polig BESTIMMUNGSGEMÄßER GEBRAUCH __________________ 3 Maximale Nutzlast: 50 kg D-Wert: 7,6 Kn... -
Seite 4: Bedienungsanleitung
5. BEDIENUNGSANLEITUNG verwendet werden, die von der EAL GmbH dafür zugelassen sind. 5.1 KOMPLETTIERUNG DES FAHRRADTRÄGERS Personen- oder Sachschaden durch nicht komplett montierten Der Fahrradträger muss noch komplettiert werden. Nehmen Sie alle Bautei- Fahrradträger le aus der Verpackung und legen diese übersichtlich hin. Jeder Arbeitsschritt •... -
Seite 5: Montage Des Kennzeichenhalters
5.1.2 MONTAGE DES KENNZEICHENHALTERS 5.2 MONTAGE DES FAHRRADTRÄGERS AUF DER ANHÄNGERKUPPLUNG Achten Sie auf eine unbeschädigte, saubere und fettfreie Anhängerkupplung. Entfernen Sie eventuell vorhandenen Lack von der Kupplungskugel. Bevor Sie den Fahrradträger auf die Anhängerkupplung setzen, machen Sie sich mit dem Schnellverschlusssystem vertraut. Bild 4: Kennzeichenhalter Drehen Sie die beiden Kreuzschlitzschrauben aus dem hinteren Querträger des Fahrradträgers heraus. -
Seite 6: Auseinanderklappen Des Fahrradträgers
Wenn der Träger sich nicht mehr auf der Anhängerkupplung verdrehen 5.4 MONTAGE DER KURZEN SPANNGURTE lässt, drehen Sie den Sicherungsbolzen des Schnellverschlusses, sodass er einrastet. Schließen Sie nun den Schnellverschluss mit dem mitgelie- ferten Vorhängeschloss ab und entfernen den Schlüssel aus dem Schloss. Bewahren Sie diese Schlüssel sorgfältig und an einem sicheren Ort auf. -
Seite 7: Abklappmechanismus
5.6 ABKLAPPMECHANISMUS 8. HINWEISE ZUM UMWELTSCHUTZ Das Symbol mit der durchgestrichenen Mülltonne bedeutet, Wenn Sie den Abklappmechanismus betätigen wollen, halten dass Elektro- und Elektronikgeräte nicht zusammen mit dem Sie unbedingt mit einer Hand den U–Bügel oder die Fahrrä- Hausmüll entsorgt werden dürfen. Verbraucher sind der fest, damit der Träger nicht schlagartig abklappen kann. -
Seite 8: Kontaktinformationen
7-polig 6/54 2/54G 2/54G 6/54 7/58L 7/58L 5/58R 3/31 3/31 5/58R Blinker links gelb 2/54G Nebelschlussleuchte blau 3/31 Masse weiß Blinker rechts grün 5/58R Schlussleuchte rechts braun 6/54 Bremsleuchten 7/58L Schlussleuchte links schwarz 13-polig Blinker links gelb Nebelschlussleuchte blau Masse weiß... -
Seite 9: Proper Use Of The Product
3. SPECIFICATIONS Bicycle rack CROW +, can be expanded Dimensions (L x W x H): approx. 56 x 117 x 67 [cm] Folded: approx. 75 x 71 x 19 [cm] CONTENT Weight: approx. 14,5 kg Electrical connection: 13-polig PROPER USE OF THE PRODUCT _____________________ 9 Payload: 50 kg D-value:... -
Seite 10: Operating Instructions
Personal injury or property damage possible due to an 5. OPERATING INSTRUCTIONS incompletely mounted bicycle rack. 5.1 COMPLETING THE BICYCLE RACK • Driving with the bicycle rack not fully assembled may result in accidents. The bicycle rack must be fi nished. Take all of the components out of the •... -
Seite 11: Mounting The License Plate Holder
5.2 MOUNTING THE BICYCLE RACK ON THE TRAILER TOW BAR 5.1.2 MOUNTING THE LICENSE PLATE HOLDER Ensure that the trailer tow bar is undamaged, clean and free of grease. Remove any paint from the coupling ball. Figure 4: License plate holder Before you put the bicycle rack on the trailer tow bar, familiarise yourself with the quick locking system. -
Seite 12: Dismantling The Bicycle Rack
5.4 MOUNTING THE SHORT TENSIONING STRAPS from the lock. Store the key carefully and in a safe place. The bicycle rack is now secured to prevent theft. Regularly check the fi rm seating of the rack on the trailer tow bar as well as the attachment of the bicycles to the rack. -
Seite 13: Folding Mechanism
5.6 FOLDING MECHANISM 7. NOTES REGARDING ENVIRONMENTAL PROTECTION Due to its lighting system, the bicycle carrier is an electrical If you wish to operate the folding mechanism, always hold device. the U-shaped bracket or the bicycles with one hand to ensure Do not dispose of electrical appliances in household waste! that the rack is not able to fold out suddenly. -
Seite 14: Contact Information
13 Pin Turn signal light, left yellow Rear fog light blue Earth white Turn signal light, right green Taillight , right brown Brake light Taillight , left black Reserving light grey Not assigned Not assigned Not assigned Earth Not assigned 9. -
Seite 15: Utilisation Conforme
Poids : env.14,5 kg Raccordement électrique : 13-polig Porte-vélos CROW +, extensible Charge utile : 50 kg Valeur D : 7,6 Kn Max. poids du vélo : 25 kg SOMMAIRE Vitesse maximale autorisée : 130 km/h UTILISATION CONFORME _________________________15 MATÉRIEL FOURNI _____________________________15 SPÉCIFICATIONS ______________________________15 3.1 CONDITIONS D’ATTELAGE 3.1 CONDITIONS D’ATTELAGE ________________________15... -
Seite 16: Notice D'utilisation
5.1.1 MONTAGE DE L‘ÉTRIER EN U Dommages matériels ou corporels en cas de porte-vélos partiellement monté. 1 Poignée écrou M8 3 Vis à tête bombée M8 x 60 • Conduire avec des porte-vélos partiellement montés peut provoquer des 2 Rondelle plate M8 4 Étrier en U avec support de cadre accidents. -
Seite 17: Montage Du Levier De Serrage
Les attaches de montage (5) pour la fi xation de la plaque Le cadenas est toujours nécessaire lors de l‘utilisation d‘immatriculation se trouvent dans le support de plaque du porte-vélos Le porte-vélos ne doit être utilisé que d‘immatriculation. Cassez deux des attaches. Glissez la plaque si le cadenas est correctement inséré... -
Seite 18: Montage Des Sangles De Serrage Courtes
Dépliez le porte-vélos comme indiqué sur les fi gures suivantes. Le porte-vélos ne doit pas être utilisé sans cette ceinture de sécurité. 1. Dépliage du feu arrière de droite Figure 15 : Sangles CROW+ de sécurité de la roue avant 2. -
Seite 19: Repliage Du Porte-Vélos
5.7 REPLIAGE DU PORTE VÉLOS 7 broches Repliez d‘abord les rails de roues sur le plateau porteur. Faites glisser le verrouillage du feu arrière (position 1, fi gure 18) vers l‘extérieur, puis rabattez le support d’ é clairage vers l‘arrière (position 2, fi gure 18). Mainte- nezle fermement contre le plateau porteur jusqu’à... - Seite 20 Portabiciclette CROW +, espandibile Carico utile: 50 kg Allacciamento elettrico: 13-polig Max. peso della bicicletta: 25 kg Valore D: 7,6 Kn INDICE Velocità max. consentita: 130 km/h USO CONFORME ______________________________20 VOLUME DI CONSEGNA __________________________20 3.1 REQUISITI DEL GANCIO DI TRAINO SPECIFICHE _________________________________20 •...
- Seite 21 Danni a persone o cose derivanti da portabiciclette non 5.1.1 MONTAGGIO DELLA STAFFA A U completamente montati 1 Dado zigrinato M8 3 Vite a testa tonda M8 x 60 • Viaggiare con portabiciclette non assemblati completamente può causare 2 Rondella M8 4 Staff...
-
Seite 22: Montaggio Del Portabiciclette Sul Gancio Di Traino
Il sistema di aggancio rapido è costituito da un elemento con leva di bloccaggio (8). Azionando la leva, l‘aggancio rapido si apre o si chiude. Con l‘ausilio del perno di fi ssaggio (9) e del lucchetto (10), l‘aggancio rapido si blocca e si chiude a chiave. - Seite 23 Aprire il portabiciclette come illustrato nelle seguenti fi gure. Il portabiciclette non si deve utilizzare senza questa cinghia di sicurezza. 1. Apertura del fanale posteriore di destra Figura 15: Cinghie CROW+ di ssaggio ruota anteriore 2. Apertura del fanale posteriore di sinistra CROW+ 3.
-
Seite 24: Manutenzione E Pulizia
5.7 CHIUSURA DEL PORTABICICLETTE 7 poli Innanzitutto ribaltare i binari indietro sul piano di supporto. Spingere il bloccaggio del fanale posteriore (posizione 1 in fi gura 18) verso l‘esterno, quindi richiudere il supporto lampade (posizione 2 in fi gura 18). Premerlo sul piano di supporto fi no a quando non scatta in posizione. -
Seite 25: Zamýšlené Použití
3. SPECIFIKACE Nosič jízdních kol CROW +, výsuvný Rozměry (L x B x H): přibližně. 56 x 117 x 67 [cm] složené: přibližně. 75 x 71 x 19 [cm] OBSAH Mrtvá váha: přibližně. 14,5 kg Elektrické připojení: 13-polig ZAMÝŠLENÉ POUŽITÍ ____________________________ 25 Maximální... -
Seite 26: Návod K Obsluze
5. NÁVOD K OBSLUZE Zranění osob nebo poškození majetku v důsledku neúplně n amontovaného nosiče jízdních kol 5.1KOMPLETACE NOSIČE JÍZDNÍCH KOL • Jízda s neúplně smontovanými nosiči kol může vést k nehodám. Ještě je třeba dokončit nosič jízdních kol. Vyjměte všechny součásti z obalu •... -
Seite 27: Montáž Držáku Registrační Značky
5.1.2 MONTÁŽ DRŽÁKU REGISTRAČNÍ ZNAČKY 5.2 MONTÁŽ NOSIČE JÍZDNÍCH KOL NA SPOJOVACÍ ZAŘÍZENÍ ___ PŘÍVĚSU Ujistěte se, že je spojovací zařízení přívěsu nepoškozené, čisté a zbavené mastnoty. Před nasazením nosiče jízdních kol na spojovací zařízení přívěsu se seznamte s rychloupínacím systémem. Obrázek 4: Držák registrační... -
Seite 28: Rozložení Nosiče Jízdních Kol
chráněn i proti krádeži. pravidelně kontrolujte pevné uchycení nosiče na 5.4 MONTÁŽ KRÁTKÝCH NAPÍNACÍCH POPRUHŮ spojovacím zařízení přívěsu i upevnění jízdních kol k nosiči. Pravidelně kon- trolujte také funkčnost systému osvětlení nosiče jízdních kol. 5.3 ROZLOŽENÍ NOSIČE JÍZDNÍCH KOL Obrázek 13: 6 x krátký napínací popruh Chcete-li nosič... -
Seite 29: Kládací Mechanismus
5.6 SKLÁDACÍ MECHANISMUS 7. POZNÁMKY K OCHRANĚ ŽIVOTNÍHO PROSTŘEDÍ Nosič jízdních kol je díky svému systému osvětlení Když chcete ovládat skládací mechanismus, nezapomeňte jednou rukou přidržet U-šroub nebo kola, aby se nosič nemohl elektrickým zařízením. prudce sklopit. (riziko zranění) Nevyhazujte elektrické spotřebiče do domovního odpadu! Odpadní... -
Seite 30: Kontaktní Informace
13 pólů Indikátor vlevo žlutá Zadní mlhové světlo modrá Hromadné bílá Ukazatel vpravo zelená Zadní světlo vpravo hnědá Brzdová světla červená Zadní světlo vlevo černá Couvací světlo šedá Není doloženo Není doloženo Není doloženo Hromadné Není doloženo 9. KONTAKTNÍ INFORMACE EAL GmbH Otto-Hausmann-Ring 107 D-42115 Wuppertal, Německo... - Seite 32 EAL GmbH Otto-Hausmann-Ring 107 +49 (0)202 42 92 83 0 info@eal-vertrieb.com 42115 Wuppertal +49 (0) 202 42 92 83 – 160 www.eal-vertrieb.com Deutschland REPRISE À DÉPOSER À DÉPOSER Cet appareil, À LA LIVRAISON EN MAGASIN EN DÉCHÈTERIE ses accessoires et cordons se recyclent Points de collecte sur www.quefairedemesdechets.fr Privilégiez la répara on ou le don de votre appareil !