ECX ROOST Gebrauchsanweisung
1:18 4wd desert buggy rtr
Verfügbare Sprachen
Verfügbare Sprachen
ROOST
®
ECX01005T1/T2 | 1:18 4WD DESERT BUGGY RTR
EN
NOTICE
All instructions, warranties and other collateral documents are subject to change at the
sole discretion of Horizon Hobby, LLC. For up-to-date product literature, visit
http://www.horizohobby.com and click on the Support tab for this product.
MEANING OF SPECIAL LANGUAGE
The following terms are used throughout the product literature to indicate various levels of
potential harm when operating this product:
NOTICE: Procedures, which if not properly followed, create a possibility of physical
property damage AND a little or no possibility of injury.
CAUTION: Procedures, which if not properly followed, create the probability of physical property
damage AND a possibility of serious injury.
WARNING: Procedures, which if not properly followed, create the probability of property
damage, collateral damage, and serious injury OR create a high probability of superficial injury.
WARNING: Read the ENTIRE instruction manual to become familiar with the features
of the product before operating. Failure to operate the product correctly can result in
damage to the product, personal property and cause serious injury.
This is a sophisticated hobby product and NOT a toy. It must be operated with caution and
common sense and requires some basic mechanical ability. Failure to operate this Product in a
safe and responsible manner could result in injury or damage to the product or other property.
This product is not intended for use by children without direct adult supervision. Do not use with
incompatible components or alter this product in any way outside of the instructions provided
by Horizon Hobby, LLC. This manual contains instructions for safety, operation and maintenance.
It is essential to read and follow all the instructions and warnings in the manual, prior to
assembly, setup or use, in order to operate correctly and avoid damage or serious injury.
Age Recommendation: Not for children under 14 years. This is not a toy.
SAFETY PRECAUTIONS AND GUIDELINES
Always keep a safe distance in all directions around your model to avoid collisions
»
or injury. This model is controlled by a radio signal subject to interference from many
sources outside your control. Interference can cause momentary loss of control.
Always operate your model in open spaces away from full-size vehicles, traffic and
»
people.
»
Always carefully follow the directions and warnings for this and any optional support
equipment (chargers, rechargeable battery packs, etc.).
»
Always keep all chemicals, small parts and anything electrical out of the reach of
children.
Always avoid water exposure to all equipment not specifically designed and
»
protected for this purpose. Moisture causes damage to electronics.
Never place any portion of the model in your mouth as it could cause serious injury
»
or even death.
»
Never operate your model with low transmitter batteries.
WATER-RESISTANT VEHICLE WITH WATERPROOF ELECTRONICS
Your new Horizon Hobby vehicle has been designed and built with a combination of
waterproof and water-resistant components to allow you to operate the product in many "wet
conditions," including puddles, creeks, wet grass, snow and even rain.
While the entire vehicle is highly water-resistant, it is not completely waterproof and your
vehicle should NOT be treated like a submarine. The various electronic components used in
the vehicle, such as the Electronic Speed Control (ESC), servo(s) and receiver are waterproof,
however, most of the mechanical components are water-resistant and should not be submerged.
Metal parts, including the bearings, hinge pins, screws and nuts, as well as the contacts
in the electrical cables, will be susceptible to corrosion if additional maintenance is not
performed after running in wet conditions. To maximize the long-term performance of your
vehicle and to keep the warranty intact, the procedures described in the "Wet Conditions
Maintenance" section below must be performed regularly if you choose to run in wet
conditions. If you are not willing to perform the additional care and maintenance required,
then you should not operate the vehicle in those conditions.
CAUTION: Failure to exercise caution while using this product and complying with the
following precautions could result in product malfunction and/or void the warranty.
GENERAL PRECAUTIONS
»
Read through the wet conditions maintenance procedures and make sure that you
have all the tools you will need to properly maintain your vehicle.
»
Not all batteries can be used in wet conditions. Consult the battery manufacturer
before use. Caution should be taken when using Li-Po batteries in wet conditions.
»
Most transmitters are not water-resistant. Consult your transmitter's manual or the
manufacturer before operation.
Never operate your transmitter or vehicle where lightning may be present.
»
Do not operate your vehicle where it could come in contact with salt water (ocean
»
water or water on salt-covered roads), contaminated or polluted water. Salt water is
very conductive and highly corrosive, so use caution.
»
Even minimal water contact can reduce the life of your motor if it has not been
certified as water-resistant or waterproof. If the motor becomes excessively wet,
apply very light throttle until the water is mostly removed from the motor. Running a
wet motor at high speeds may rapidly damage the motor.
Driving in wet conditions can reduce the life of the motor. The additional resistance of
»
operating in water causes excess strain. Alter the gear ratio by using a smaller pinion
or larger spur gear. This will increase torque (and motor life) when running in mud,
deeper puddles, or any wet conditions that will increase the load on the motor for an
extended period of time.
WET CONDITIONS MAINTENANCE
»
Drain any water that has collected in the tires by spinning them at high speed. With
the body removed, place the vehicle upside down and pull full throttle for a few
short bursts until the water has been removed.
CAUTION: Always keep hands, fingers, tools and any loose or hanging objects away
from rotating parts when performing the above drying technique.
»
Remove the battery pack(s) and dry the contacts. If you have an air compressor or a can of
compressed air, blow out any water that may be inside the recessed connector housing.
Remove the tires/wheels from the vehicle and gently rinse the mud and dirt off with a
»
garden hose. Avoid rinsing the bearings and transmission.
NOTICE: Never use a pressure washer to clean your vehicle.
Use an air compressor or a can of compressed air to dry the vehicle and help remove
»
any water that may have gotten into small crevices or corners.
»
Spray the bearings, drive train, fasteners and other metal parts with a water-displacing
light oil or lubricant. Do not spray the motor.
»
Let the vehicle air dry before you store it. Water (and oil) may continue to drip for a
few hours.
Increase the frequency of disassembly, inspection and lubrication of the following:
»
· Front and rear axle hub assembly bearings.
· All transmission cases, gears and differentials.
· Motor—clean with an aerosol motor cleaner and re-oil the bushings with
lightweight motor oil.
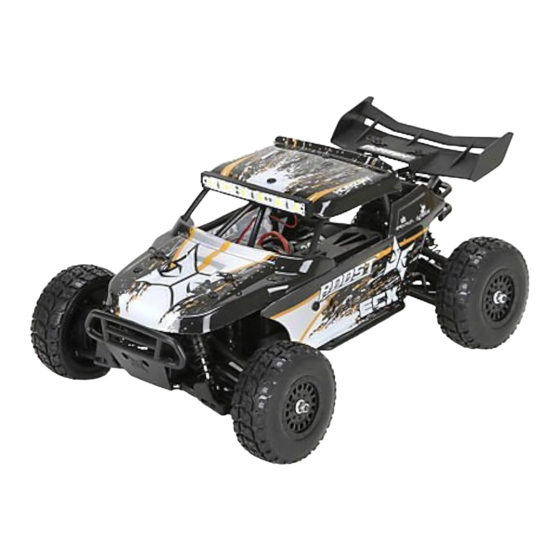
COMPONENTS
Body
Roost 1:18 4WD Desert Buggy RTR vehicle
Operating Weight
1.75 lbs (793g)
Transmitter
2.4GHz 2-Channel (AA Batteries)
Charger
100mA, 9V, EC3
Speedpack ™ 900mAh Ni-MH 6-Cell Flat, with EC3™
Battery
connector
Motor
Brushed 380
Receiver
2.4GHz 2-Channel
1
Charging Your Vehicle Battery
1. Connect the battery to the battery charger.
2. Connect the battery charger to an AC power outlet.
3. Allow the battery to charge for 9 hours.
™
Charging Warnings
»
NEVER LEAVE THE BATTERY AND CHARGER UNATTENDED DURING USE.
NEVER CHARGE BATTERIES OVERNIGHT.
»
Read all safety precautions and literature prior to use of this product.
»
»
Never allow children under 14 years of age to charge batteries.
»
Never attempt to charge dead or damaged batteries.
Never charge a battery if the cable has been pinched or shorted.
»
Never allow the batteries or charger to come into contact with moisture at any time.
»
»
Never charge batteries in extremely hot or cold places (recommended between 50–80°F [10–26°C]) or place in direct sunlight.
»
Always use only Ni-MH rechargeable batteries. This charger cannot charge batteries such as "heavy duty", "alkaline", "mercury" or "lithium"
batteries.
Always connect to the charger correctly.
»
»
Always disconnect the battery and charger after charging and let them cool between charges.
»
Always inspect the battery before charging.
Always terminate all processes and contact Horizon Hobby if the product malfunctions.
»
Always make sure you know the specifications of the battery to be charged or discharged to ensure it meets the requirements of this charger.
»
»
Always constantly monitor the temperature of the battery while charging.
»
Always end the charging process if the charger or battery becomes hot to the touch or starts to change form during the charge process.
WARNING: Failure to exercise caution while using this product and comply with the following warnings could result in product malfunction,
electrical issues, excessive heat, FIRE, and ultimately injury and property damage.
2
Turn over the
vehicle
3
Install the vehicle
battery
4
Installing Your Transmitter Battery
This transmitter requires 4 AA batteries.
1. Remove the battery cover from the transmitter.
2. Install the batteries as shown.
3. Install the battery cover.
CAUTION: If using rechargeable batteries, charge only rechargeable batteries. Charging non-rechargeable batteries may cause the batteries
to burst, resulting in injury to persons and/or damage to property.
CAUTION: Risk of explosion if battery is replaced by an incorrect type. Dispose of used batteries according to national regulations.
5
Transmitter Controls
Battery Level Indicator
Solid Red and Green:
Battery voltage is
good (above 4V).
Solid Red: Battery
voltage is critically low
(below 4V). Replace
transmitter batteries.
Throttle Dual Rate
Adjusts the maximum
amount throttle the
vehicle can be given
Steering Rate
Adjusts the amount the
front wheels move when
the steering wheel is
turned left or right
Throttle Trim
Adjusts the neutral
point of the electronic
speed control
Steering Trim
Adjust to make the
vehicle drive straight
with no input at the
steering wheel
6
Electronic Speed Control (ESC)
Connecting
1. Connect the RED (+) ESC wire to the RED (+) motor wire.
2. Connect the BLACK (–) ESC wire to the BLACK (–) motor wire.
Calibrating
Ensure proper ESC function by calibrating the ESC to your transmitter
inputs.
1. Power OFF the ESC.
2. Ensure your transmitter is powered ON, the throttle is not reversed,
the throttle trim is neutral and the throttle travel range is at 100%.
3. Keep the throttle at neutral and power ON the ESC.
4. The ESC automatically calibrates the throttle range after 3 seconds.
5. 3 beeps will sound when the ESC is ready to run.
OWNER'S MANUAL
B
Reverse Switch
Allows you to change the direction of
steering (ST) and throttle (TH) controls.
(The default setting for steering and
throttle is "NOR")
Power Switch
Power on or off the transmitter
Steering Wheel
Control steering. Right
and Left steering with
ST switch on NOR
(See Reverse Switch)
Throttle Trigger
Controls power
to the motor for
forward or reverse
(See TH reverse
switch)
Reverse
Stop
(when TH reverse
Forward
switch on NOR)
(when TH reverse
switch on NOR)
NOTICE: Always disconnect the battery from the ESC when you
have finished operating your vehicle. The ESC's switch only controls
power to the receiver and servos. The ESC will continue to draw
current when connected to the battery, resulting in possible damage to
the battery through over-discharge.
7
Binding
Binding is the process of programming the receiver to recognize the GUID
(Globally Unique Identifier) code of a single specific transmitter. The included
transmitter and receiver are bound at the factory. If you need to rebind, follow
the instructions below.
1.
Power off the transmitter and ESC.
2.
Connect a fully charged battery pack to the ESC.
3.
Press and hold the bind button while powering up the ESC. After 2 seconds the ESC will be in bind mode.
4.
Release the bind button and power on transmitter. Binding is complete.
You must rebind when binding the receiver to a different transmitter.
NOTICE: Do not attempt to bind the transmitter and receiver if there are other compatible transmitters in bind mode within 400
feet. Doing so may result in unexpected binding.
8
Remove the body
from the vehicle
9
Power on the
transmitter
10
Power on the
vehicle
11
Control Test Check
1.
Do a test of the transmitter's control of the vehicle with the
vehicle's wheels off the ground.
2.
Start driving slowly, and, if the vehicle does not go straight, adjust
the steering trim dial on the transmitter.
IMPORTANT: Seat the motor brushes by driving smoothly on a flat
surface during use of the first battery charge. Properly seating the
motor brushes will increase the life and performance of the motor.
When You Are Finished
12
Power off the
vehicle
13
Power off the
transmitter
14
Remove and recharge the
vehicle battery
Bind button
ON
B
Inhaltsverzeichnis

Verwandte Anleitungen für ECX ROOST


Inhaltszusammenfassung für ECX ROOST
-
Seite 2: Aufsetzen Der Karosserie
· Motor: reinigen Sie den Motor mit einen Aerosol Reiniger und ölen Sie dann die Lager mit leichtem Motoröl. Rückwärts Stop Vorwärts KOMPONENTEN Fahrzeug: Roost 1:18 4WD Desert Buggy RTR Gewicht: 1.75 lbs (793g) Sender: 2.4GHz 2-Kanal (AA Batterien) Entnehmen und Aufladen Ladegerät:... - Seite 5 49637 | Created: 10/2015 http://www.horizonhobby.com/content/support-render-compliance. kontaktieren. © 2015 Horizon Hobby LLC. © 2015 Horizon Hobby, LLC. ECX, the ECX logo, Roost, Speedpack, Tazer, EC3 and the Horizon Hobby logo are trademarks or registered trademarks of Horizon Hobby, LLC. Patents pending.