testo 635-2 Bedienungsanleitung
Feuchte/temperatur/drucktaupunkt-messgerät
Inhaltsverzeichnis
Verfügbare Sprachen
Verfügbare Sprachen
Quicklinks
Bedienungsanleitung
Instruction manual
Feuchte-/Temperatur- / Drucktaupunkt-Messgerät
Allgemeine Hinweise ............................................2
1.
Sicherheitshinweise ..............................................4
2.
Bestimmungsgemäße Verwendung ......................5
3.
Produktbeschreibung ..........................................6
3.1
Anzeige- und Bedienelemente ........................................6
3.2
Schnittstellen ..................................................................8
3.3
Spannungsversorgung ....................................................8
4.
Inbetriebnahme ....................................................9
5.
Bedienung..........................................................10
5.1
Fühler anschließen ........................................................10
5.2
Ein- / Ausschalten ........................................................10
5.3
Displaybeleuchtung ......................................................11
6.
Gerät einstellen ..................................................12
6.1
Konfigurationsmenü ......................................................12
6.1.1
Profil................................................................................12
6.1.2
Einheiten ........................................................................13
6.1.3
Gerät ..............................................................................13
6.1.4
Fühler ..............................................................................14
6.1.5
Language ........................................................................16
6.2
Hauptmenü ..................................................................17
6.2.1
Speicher (nur 635-2 ) ......................................................18
6.2.2
Messreihe (nur 635-2 )....................................................19
6.2.3
Mittelwert (nur 635-2) ....................................................20
6.2.4
Berechnung ....................................................................20
6.2.5
Material ..........................................................................22
6.2.6
Zyklisch Drucken (nur 635-1) ..........................................22
7.
Messen ..............................................................23
8.
Wartung und Pflege............................................26
9.
Fragen und Antworten........................................27
10. Technische Daten ..............................................28
11. Zubehör / Ersatzteile ..........................................29
testo 635
de
en
Inhalt
Kapitel
Inhaltsverzeichnis

Verwandte Anleitungen für testo 635-2


Inhaltszusammenfassung für testo 635-2
-
Seite 1: Inhaltsverzeichnis
6.1.2 Einheiten ................13 6.1.3 Gerät ................13 6.1.4 Fühler ................14 6.1.5 Language ................16 Hauptmenü ..............17 6.2.1 Speicher (nur 635-2 ) ............18 6.2.2 Messreihe (nur 635-2 )............19 6.2.3 Mittelwert (nur 635-2) ............20 6.2.4 Berechnung ..............20 6.2.5 Material ................22 6.2.6 Zyklisch Drucken (nur 635-1) ..........22 Messen ..............23... -
Seite 2: Allgemeine Hinweise
Allgemeine Hinweise Allgemeine Hinweise Dieses Kapitel gibt wichtige Hinweise zur Nutzung der vorliegenden Dokumentation. Diese Dokumentation enthält Informationen, die für einen sicheren und effizienten Einsatz des Produkts beachtet werden müssen. Lesen Sie diese Dokumentation aufmerksam durch und machen Sie sich mit der Bedienung des Produkts vertraut, bevor Sie es einsetzen. - Seite 3 Allgemeine Hinweise 3 Kurzschreibweise In diesem Dokument wird eine Kurzschreibweise verwendet, um Handlungs- schritte (z. B. den Aufruf einer Funktion) darzustellen. Beispiel: Funktion „Gerätedaten“ aufrufen Kurzschreibweise: Gerät Ger.-Dat. Erforderliche Handlungsschritte: die Funktion Gerät wählen. Auswahl bestätigen. die Funktion Ger.-Dat. wählen. Auswahl bestätigen.
-
Seite 4: Sicherheitshinweise
Dabei die vorgegebenen Handlungsschritte einhalten. Aus Sicherheitsgründen nur Original-Ersatzteile von Testo ver- wenden. Fachgerecht entsorgen Defekte Akkus / leere Batterien an den dafür vorgesehenen Sammelstellen abgeben. Produkt nach Ende der Nutzungszeit an Testo senden. Wir sorgen für eine umweltschonende Entsorgung. -
Seite 5: Bestimmungsgemäße Verwendung
Setzen Sie dass Produkt nur für die Bereiche ein, für die es konzipiert wurde. Im Zweifelsfall bitte bei Testo nachfragen. Das testo 635 ist ein kompaktes Messgerät zur Messung von Temperatur, Feuchte und Drucktaupunkt. Das Produkt wurde für folgende Aufgaben / Bereiche konzipiert: ·... -
Seite 6: Produktbeschreibung
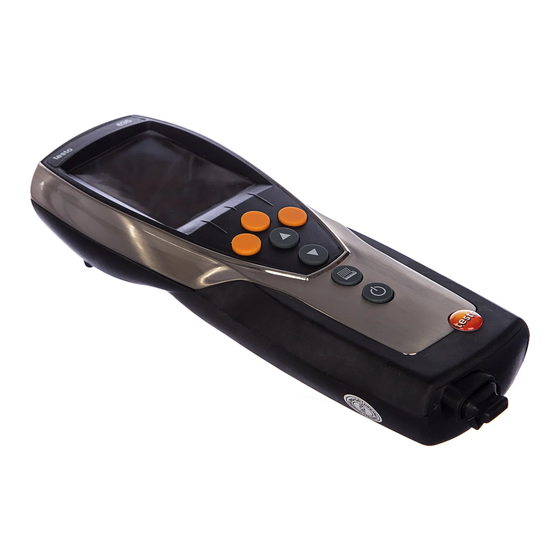
3. Produktbeschreibung Produktbeschreibung Dieses Kapitel gibt eine Übersicht über die Komponenten des Produkts und deren Funktionen. 3.1 Anzeige- und Bedienelemente Übersicht Infrarot-, USB-Schnittstelle Display (Beleuchtung zuschaltbar) Bedientasten Rückseite: Batterie- und Funkmodulfach, Haltemagnete Starke Magnete Beschädigung a a nderer G G eräte! Sicherheitsabstand zu Produkten einhalten, die durch Magnetismus beschädigt werden können (z. -
Seite 7: Funktionstasten (Belegung Abhängig Von Profil Und Einstellung)
Eingabe bestätigen Abbrechen Messwert halten/Aktuellen Messwert anzeigen Hold Max.-/Min-Werte auf aktuellen Messwert zurücksetzen Reset Menüpunkt „Zeitliche Mittelwertbildung“ öffnen Mittl Menüpunkt „Messreihe“ öffnen (nur 635-2) Messr Messreihe starten/beenden (nur 635-2) Start Ende Werte speichern (nur 635-2) Menüpunkt „Material“ öffnen Menüpunkt „Funk“ öffnen... -
Seite 8: Schnittstellen
3. Produktbeschreibung 3.2 Schnittstellen Infrarot-Schnittstelle Über die Infrarot-Schnittstelle an der Kopfseite des Geräts können Messdaten an einen Testo-Protokolldrucker gesendet werden. USB-Schnittstelle Über die USB-Schnittstelle an der Kopfseite des Geräts kann das Netzteil (Zubehör) zur Spannungsversorgung des Geräts angeschlossen werden. Geräte mit Speicher: Mess- / Gerätedaten können über die USB-Schnittstelle mit einem PC ausgetauscht werden. -
Seite 9: Inbetriebnahme
4. Inbetriebnahme 9 Inbetriebnahme Dieses Kapitel beschreibt die Handlungsschritte, die zur Inbetriebnahme des Produkts erforderlich sind. Display-S S chutzfolie e e ntfernen: Schutzfolie vorsichtig abziehen. Batterien / Akkus u u nd F F unkmodul ( ( Zubehör) e e inlegen: Die beiden Schrauben auf der Rückseite des Geräts lösen und Batteriefachdeckel abnehmen. -
Seite 10: Bedienung
5. Bedienung Bedienung Dieses Kapitel beschreibt die Handlungsschritte, die beim Einsatz des Produkts häufig ausgeführt werden. 5.1 Fühler anschließen Steckbare Fühler Steckbare Fühler müssen vor dem Einschalten des Messgeräts angeschlossen werden, damit diese vom Messgerät erkannt werden. Anschlussstecker des Fühlers in die Fühlerbuchse des Messgeräts stecken. -
Seite 11: Displaybeleuchtung
5. Bedienung 11 Gerät a a usschalten: gedrückt halten (ca. 2s), bis das Display erlischt. 5.3 Displaybeleuchtung Displaybeleuchtung e e in- / / ausschalten: Das Gerät ist eingeschaltet. drücken. -
Seite 12: Gerät Einstellen
6. Gerät einstellen Gerät einstellen Dieses Kapitel beschreibt die Handlungsschritte, die zur Anpassung des Mess- geräts an spezielle Messaufgaben erforderlich sind. 6.1 Konfigurationsmenü Im Konfigurationsmenü werden die Grundeinstellungen des Messgeräts vor- genommen. Konfigurationsmenü ö ö ffnen: Das Gerät befindet sich in der Messansicht. gedrückt halten (ca. -
Seite 13: Einheiten
6. Gerät einstellen 13 6.1.2 Einheiten Vordefinierte Systeme und individuelle Einstellmöglichkeiten: Messgröße System ISO System US Individuelle Einstellmöglichkeiten Temperatur °C °F °C, °F Druck inchH2O mbar, Pa, hPa, kPa, inchH2O Einheiten e e instellen: Das Konfigurationsmenü ist geöffnet, Konfig. wird angezeigt. Einheiten ISO/US (System-Einstellung) oder eine Messgröße (individu- elle Einstellung) wählen und mit... -
Seite 14: Batterietyp
6. Gerät einstellen Batterietyp Um eine korrekte Anzeige der Batteriekapazität zu gewährleisten, muss der ver- wendete Batterietyp eingestellt werden. Batterietyp e e instellen: Das Konfigurationsmenü ist geöffnet, Konfig. wird angezeigt. Gerät Bat-Typ Batterie oder Akku wählen und mit bestätigen. Auto OFF Ist Auto OFF eingeschaltet, schaltet sich das Gerät nach 10min ohne Tasten- betätigung automatisch aus. - Seite 15 6. Gerät einstellen 15 Jeder Funkfühler besitzt eine Fühler-ID (RF-ID). Diese besteht aus den letzten 3 Ziffern der Serien-Nr. und der Position des Schiebeschalters (H oder L) im Funkfühler. Funkfühler e e inrichten: Ein Funkmodul (Zubehör) ist in das Gerät eingelegt. Siehe Kapitel , S.
-
Seite 16: Language
6. Gerät einstellen Reset d d er A A bgleichwerte d d urchführen: Das Konfigurationsmenü ist geöffnet, Konfig. wird angezeigt. Fühler Abgleich Reset wählen und mit 2x bestätigen. - Die Abgleichwerte werden auf die Werkseinstellungen zurückgesetzt. Abgleich d d urchführen: Das Konfigurationsmenü... -
Seite 17: Hauptmenü
Der in diesem Kapitel beschriebene Weg zum Aufruf der Funktionen im Hauptmenü bezieht sind auf die Profil-Einstellung Standard. Ist ein anderes Profil eingestellt, so kann sich der Weg zum Aufruf einzelner Funktionen ändern bzw. die Funktion ist im eingestellten Profil nicht verfügbar. Menüübersicht testo 635-1 Profil Menüpunkte Funktion... -
Seite 18: Menüübersicht Testo
Sie jeweils eine Menüebene zurück. Zum Verlassen des Hauptmenüs mehrfach drücken, bis das Gerät zur Messansicht gewechselt hat. 6.2.1 Speicher (nur 635-2) Messort Der aktive Messort kann geändert werden. Es können max. 99 Messorte angelegt werden. Die nummerischen Messortbezeichnungen (01 - 99) können über die PC-Software in beliebige Texte (max. -
Seite 19: Messreihe (Nur 635-2)
Speicher l l öschen: Das Hauptmenü ist geöffnet, Menü wird angezeigt. Speicher Löschen den gesamten Speicher löschen. 6.2.2 Messreihe (nur 635-2) Eine Messreihe kann programmiert und de- / aktiviert werden: Bezeichnung Beschreibung Messreihe ausgeschaltet: Messwerte können manuell gespeichert werden AUTO Automatische Messreihe: Messtakt (mind. -
Seite 20: Mittelwert (Nur 635-2)
Anzahl der Messwerte einstellen und mit bestätigen. - Das Gerät wechselt zur Messansicht. 6.2.3 Mittelwert (nur 635-2) Zeitlich Die Mittelwertbildung erfolgt als gleitender Mittelwert. Zeitliche M M ittelwertbildung a a ktivieren: Das Hauptmenü ist geöffnet, Menü wird angezeigt. - Seite 21 6. Gerät einstellen 21 Zur Durchführung der Berechnung müssen bestimmte Messkanäle verfügbar sein. Folgende Größen können berechnet werden: · Wassergehalt · Taupunkt (unterhalb 0°Ctd / 32°Ftd werden Frost- / -Reif-Punkttemperaturen angezeigt.) · Psychometrische Temperatur Der zur Berechnung des U-Werts erforderliche Wärmeübergangskoeffizient (Alpha) kann eingestellt werden.
-
Seite 22: Material
Ausdruck kann programmiert werden. Dies ermöglicht die Aufnahme von Messwerten (max. 999) in einem vorgegebenen Messtakt (min. 1min). Die Messwerte werden an einen Testo-Protokolldrucker gesendet. Zyklisches D D rucken a a ktivieren / Messreihe p p rogrammieren: Das Hauptmenü ist geöffnet, Menü wird angezeigt. -
Seite 23: Messen
Fühler verwendet, ansonsten Funkfühler 1, 2 oder 3. Messung d d urchführen: Das Gerät befindet sich in der Messansicht. Die Messreihe AUTO ist nicht aktiviert (nur 635-2). Fühler positionieren und Messwerte ablesen. Anzeige O O bere M M esskanal-Z Z eile ä ä ndern: drücken. - Seite 24 - Unter dem aktiven Messort wird ein Messprotokoll mit den Messwerten aller verfügbaren Messkanäle angelegt. Zeitliche M M ittelwertbildung d d urchführen: Die Mittelwertbildung erfolgt als gleitender Mittelwert, Einzelwerte werden nicht angezeigt. 635-1: drücken, 635-2: Mittel Mittl zeitlich Mittelwertbildung starten. Start Mittelwertbildung stoppen.
- Seite 25 Das Gerät befindet sich in der Messansicht und Zyklisches Drucken ist aktiviert. Zyklisches Drucken mit starten. - Die Messreihe startet. Die Messwerte werden an den Testo-Protokoll- drucker übertragen. - Die Messung läuft, bis ein Abbruch mit erfolgt oder bis das End- Stopp kriterium eintritt (Anzahl Messwerte erreicht).
-
Seite 26: Wartung Und Pflege
8. Wartung und Pflege Wartung und Pflege Dieses Kapitel beschreibt die Handlungsschritte, die zur Erhaltung der Funktionsfähigkeit und zur Verlängerung der Lebensdauer des Produkts beitragen. Gehäuse r r einigen: Gehäuse bei Verschmutzung mit einem feuchten Tuch (Seifenlauge) reinigen. Keine scharfen Reinigungs- oder Lösungsmittel verwenden! Batterie / Akku w w echseln: Gerät ist ausgeschaltet. -
Seite 27: Fragen Und Antworten
· Stromversorgung war für längere Zeit · Geräteeinstellungen neu vornehmen. nicht mehr korrekt unterbrochen Falls wir Ihre Frage nicht beantworten konnten: Wenden Sie sich bitte an Ihren Händler oder den Testo-Kundendienst. Kontaktdaten finden Sie im Garantieheft oder im Internet unter www.testo.com . -
Seite 28: Technische Daten
Weitere Gerätedaten Eigenschaft Werte Fühleranschlüsse 1x Omega TE-Buchse, 1x Mini-DIN-Buchse, Funkmodul (Zubehör) Speicher Nur 635-2: max. 99 Messorte, bis zu 10000 Messwerte (abhängig von Anzahl Messorte, Protokolle, Kanäle) Batteriestandzeit 200h Spannungsversorgung 3x Mignon-Batterie (Lieferumfang)/-akku oder Netzteil (Zubehör) Gehäusematerial ABS/TPE/Metall... -
Seite 29: Zubehör/Ersatzteile
Stecker-Netzteil, 5VDC, 500mA mit Eurostecker 0554 0447 Externes Ladegerät inkl. 4 NiMH-Akkus, mit integriertem, internationalem Netzstecker 100-240V, 300mA, 50/60Hz, 12VA/Gerät 0554 0610 Eine vollständige Liste aller Zubehör- und Ersatzteile finden Sie in den Produkt- katalogen und -broschüren oder im Internet unter: www.testo.com... - Seite 30 Notizen...
- Seite 60 AG Postfach 11 40, 79849 Lenzkirch Testo-Straße 1, 79853 Lenzkirch Telefon: (07653) 681-0 Fax: (07653) 681-100 E-Mail: info@testo.de Internet: http://www.testo.com 0977.6350/01/T/dr/15.06.2005...